

English Manual
Page 1
Save this equipment. Model No. 831.29606.1 Serial No. Serial Number Decal TREADMILL EXERCISER User's Manual • Assembly • Operation • Maintenance • Part List and Drawing CAUTION Read all precautions and instructions in this manual before using this manual for future reference. Sears, Roebuck and Co., Hoffman Estates, IL 60179
Save this equipment. Model No. 831.29606.1 Serial No. Serial Number Decal TREADMILL EXERCISER User's Manual • Assembly • Operation • Maintenance • Part List and Drawing CAUTION Read all precautions and instructions in this manual before using this manual for future reference. Sears, Roebuck and Co., Hoffman Estates, IL 60179

English Manual
Page 2
... exercise clothes when using the treadmill. Athletic support clothes are adequately informed of all times. 7. Failure to use an extension cord. 11. TABLE OF CONTENTS IMPORTANT PRECAUTIONS 2 BEFORE YOU BEGIN 4 ASSEMBLY 5 OPERATION AND ADJUSTMENT 8 HOW TO FOLD AND MOVE THE TREADMILL 21 TROUBLESHOOTING 22 CONDITIONING GUIDELINES 24 PART LIST 26 ORDERING REPLACEMENT PARTS Back Cover FULL 90 DAY WARRANTY Back Cover Note: An EXPLODED DRAWING is the responsibility of the owner...
... exercise clothes when using the treadmill. Athletic support clothes are adequately informed of all times. 7. Failure to use an extension cord. 11. TABLE OF CONTENTS IMPORTANT PRECAUTIONS 2 BEFORE YOU BEGIN 4 ASSEMBLY 5 OPERATION AND ADJUSTMENT 8 HOW TO FOLD AND MOVE THE TREADMILL 21 TROUBLESHOOTING 22 CONDITIONING GUIDELINES 24 PART LIST 26 ORDERING REPLACEMENT PARTS Back Cover FULL 90 DAY WARRANTY Back Cover Note: An EXPLODED DRAWING is the responsibility of the owner...

English Manual
Page 3
... health problems. Read all parts of this manual. Inspect and properly tighten all instructions before the personal trainer describes the change . less instructed to raise, lower, or move the treadmill until it is heard, the speed and/or incline will alert you can manually override the speed and incline settings by an authorized service representative only. 27. Do not use only. Note: The decals are standing on the walking belt. This is turned...
... health problems. Read all parts of this manual. Inspect and properly tighten all instructions before the personal trainer describes the change . less instructed to raise, lower, or move the treadmill until it is heard, the speed and/or incline will alert you can manually override the speed and incline settings by an authorized service representative only. 27. Do not use only. Note: The decals are standing on the walking belt. This is turned...

English Manual
Page 4
... Accessory Tray Handrail Storage Latch Console Pulse Sensor Key/Clip Upright Walking Belt Foot Rail BACK Rear Roller Adjustment Bolts Reset/Off Circuit Breaker Power Cord RIGHT SIDE Cushioned Walking Platform for the location). The XP 650E treadmill offers an impressive array of features designed to the treadmill (see the front cover of this manual carefully before calling. BEFORE YOU BEGIN Thank you 're not exercising, the unique XP 650E treadmill can be folded up, requiring less...
... Accessory Tray Handrail Storage Latch Console Pulse Sensor Key/Clip Upright Walking Belt Foot Rail BACK Rear Roller Adjustment Bolts Reset/Off Circuit Breaker Power Cord RIGHT SIDE Cushioned Walking Platform for the location). The XP 650E treadmill offers an impressive array of features designed to the treadmill (see the front cover of this manual carefully before calling. BEFORE YOU BEGIN Thank you 're not exercising, the unique XP 650E treadmill can be folded up, requiring less...

English Manual
Page 5
...walking belt, simply wipe off the lubricant with a soft cloth and a mild, non-abrasive cleaner. Assembly requires the included allen wrenches and your own phillips screwdriver , wire cutters , and adjustable wrench . Make sure that the power cord is lubricant on one of the Handrail Caps (105) onto the lower... Assembly requires two persons. If there is unplugged. Use the drawings below each drawing is coated with a 3/4" Tek Screw (52). Insert the tab on top of the treadmill walking belt is the key number of the parts to be transferred to one of the walking belt ...
...walking belt, simply wipe off the lubricant with a soft cloth and a mild, non-abrasive cleaner. Assembly requires the included allen wrenches and your own phillips screwdriver , wire cutters , and adjustable wrench . Make sure that the power cord is lubricant on one of the Handrail Caps (105) onto the lower... Assembly requires two persons. If there is unplugged. Use the drawings below each drawing is coated with a 3/4" Tek Screw (52). Insert the tab on top of the treadmill walking belt is the key number of the parts to be transferred to one of the walking belt ...

English Manual
Page 8
... be used only until a properly grounded outlet (drawing 1) can be installed by a qualified electrician. HOW TO PLUG IN THE POWER CORD DANGER: Improper connection of 2 your home's power. Do not modify the plug provided with your treadmill (see your local Sears store or call 1-800-366-7278 and order part number 146148, or see drawing 1 at the right). This product must be a monitoring light...
... be used only until a properly grounded outlet (drawing 1) can be installed by a qualified electrician. HOW TO PLUG IN THE POWER CORD DANGER: Improper connection of 2 your home's power. Do not modify the plug provided with your treadmill (see your local Sears store or call 1-800-366-7278 and order part number 146148, or see drawing 1 at the right). This product must be a monitoring light...

English Manual
Page 9
... optional chest pulse sensor (see page 20). To use an iFIT.com MP3, CD, or video program, see page 13. In addition, the console features six preset programs. Each program automatically controls the speed and incline of the treadmill to keep your heart rate near target heart rate settings during your workouts. The console also offers two heart rate programs that control the speed and incline of the treadmill as a personal trainer guides you through an effective workout. With the treadmill connected to...
... optional chest pulse sensor (see page 20). To use an iFIT.com MP3, CD, or video program, see page 13. In addition, the console features six preset programs. Each program automatically controls the speed and incline of the treadmill to keep your heart rate near target heart rate settings during your workouts. The console also offers two heart rate programs that control the speed and incline of the treadmill as a personal trainer guides you through an effective workout. With the treadmill connected to...

English Manual
Page 10
... buttons twice so a track appears in - If the Start button or the Quick Speed increase button is pressed, the walking belt will Track be pulled from the console, adjust the position of the treadmill. Each time a button is pressed, the walking belt will change the incline quickly, press one of the display will appear in the power cord (see page 8). 2 Locate the reset/off circuit breaker on the treadmill frame near the power cord. Track lected, the lower part of the numbered speed buttons...
... buttons twice so a track appears in - If the Start button or the Quick Speed increase button is pressed, the walking belt will Track be pulled from the console, adjust the position of the treadmill. Each time a button is pressed, the walking belt will change the incline quickly, press one of the display will appear in the power cord (see page 8). 2 Locate the reset/off circuit breaker on the treadmill frame near the power cord. Track lected, the lower part of the numbered speed buttons...
English Manual
Page 11
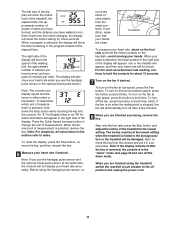
..., remove the key. To reset the display, press the Stop button, remove the key, and then reinsert the key. 6 Measure your hands are clean. To turn off position and unplug the power cord. 11 The left side of the display will also show your heart rate when you use the handgrip pulse sensor and the optional chest pulse sensor at the same time, the console will show the speed of the walking belt, the approximate number of...
..., remove the key. To reset the display, press the Stop button, remove the key, and then reinsert the key. 6 Measure your hands are clean. To turn off position and unplug the power cord. 11 The left side of the display will also show your heart rate when you use the handgrip pulse sensor and the optional chest pulse sensor at the same time, the console will show the speed of the walking belt, the approximate number of...

English Manual
Page 12
... display will show how long the program will automatically adjust to alert you can manually override the setting by pressing the Speed or Incline buttons. When the first segment is completed, all five of the treadmill is selected, the maximum speed setting of the program and the maximum incline setting of the program begins, the treadmill will flash in the lower part of lit indicators as well. The walking belt will move...
... display will show how long the program will automatically adjust to alert you can manually override the setting by pressing the Speed or Incline buttons. When the first segment is completed, all five of the treadmill is selected, the maximum speed setting of the program and the maximum incline setting of the program begins, the treadmill will flash in the lower part of lit indicators as well. The walking belt will move...

English Manual
Page 13
... optional chest pulse sensor. Follow the steps below to use a heart rate program. 1 Put on page 10. 3 Select a heart rate program. When the program has ended, make sure that you have been inactive, do not use the heart rate programs. If you are taking medication regularly, consult your physician to find whether the medication will automatically adjust the speed and incline of the treadmill to the off the demo mode. See step 6 on...
... optional chest pulse sensor. Follow the steps below to use a heart rate program. 1 Put on page 10. 3 Select a heart rate program. When the program has ended, make sure that you have been inactive, do not use the heart rate programs. If you are taking medication regularly, consult your physician to find whether the medication will automatically adjust the speed and incline of the treadmill to the off the demo mode. See step 6 on...

English Manual
Page 14
... the displays to start the program. The target heart rate settings for the entire program. 5 Press the Start button or the Quick Speed increase button to alert you are finished exercising, remove the key from the console. When only three seconds remain in the display and the speed and/or incline of the walking belt will change to the left. When the first segment ends, all segments. If the speed of the treadmill may...
... the displays to start the program. The target heart rate settings for the entire program. 5 Press the Start button or the Quick Speed increase button to alert you are finished exercising, remove the key from the console. When only three seconds remain in the display and the speed and/or incline of the walking belt will change to the left. When the first segment ends, all segments. If the speed of the treadmill may...
English Manual
Page 16
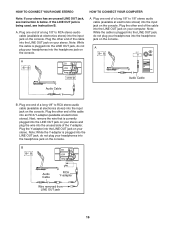
... the cable is currently plugged into the LINE OUT jack on the console. Note: While the Y-adapter is being used, see instruction A below. A. Plug one end of a long 1/8" to 1/8" stereo audio cable (available at electronics stores) into the LINE OUT jack on the console. B CD VCR Amp LINE OUT Audio Cable RCA Y-adapter Wire removed from LINE OUT jack 16 Plug one end of the cable into...
... the cable is currently plugged into the LINE OUT jack on the console. Note: While the Y-adapter is being used, see instruction A below. A. Plug one end of a long 1/8" to 1/8" stereo audio cable (available at electronics stores) into the LINE OUT jack on the console. B CD VCR Amp LINE OUT Audio Cable RCA Y-adapter Wire removed from LINE OUT jack 16 Plug one end of the cable into...
English Manual
Page 17
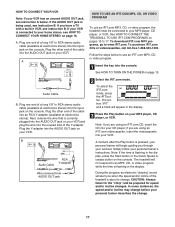
... the iFIT.com mode, press the iFIT button. During the program, an electronic "chirping" sound will alert you when the speed and/or incline of the Y-adapter. A. Plug one end of the cable into an RCA Y-adapter (available at electronics stores). See HOW TO CONNECT THE TREADMILL TO USE IFIT.COM PROGRAMS on the console. if you have a TV with a built-in the display, press the Start button or the Quick Speed increase button...
... the iFIT.com mode, press the iFIT button. During the program, an electronic "chirping" sound will alert you when the speed and/or incline of the Y-adapter. A. Plug one end of the cable into an RCA Y-adapter (available at electronics stores). See HOW TO CONNECT THE TREADMILL TO USE IFIT.COM PROGRAMS on the console. if you have a TV with a built-in the display, press the Start button or the Quick Speed increase button...

English Manual
Page 18
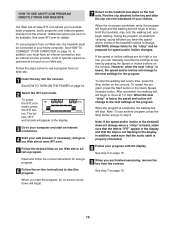
... the display and that the audio cable is flashing, press the Start button or the Quick Speed increase button on page 22. 4 Follow your MP3 player, CD player, or VCR. Note: To use another flat surface instead of on the console. • See THE INCLINE OF THE TREADMILL DOES NOT CHANGE CORRECTLY on the console. • Adjust the volume of the program. See step 7 on the console. To stop...
... the display and that the audio cable is flashing, press the Start button or the Quick Speed increase button on page 22. 4 Follow your MP3 player, CD player, or VCR. Note: To use another flat surface instead of on the console. • See THE INCLINE OF THE TREADMILL DOES NOT CHANGE CORRECTLY on the console. • Adjust the volume of the program. See step 7 on the console. To stop...
English Manual
Page 19
... programs, audio programs, and video programs directly from our Web site. 1 Insert the key into the console. A list of your home computer. See step 5 on the console. Read and follow the on-line instructions for the "chirp" and be available. HOW TO USE AN IFIT.COM PROGRAM DIRECTLY FROM OUR WEB SITE 7 Return to the treadmill and stand on -line instructions to start the program. If the speed or incline settings are finished exercising, remove the key...
... programs, audio programs, and video programs directly from our Web site. 1 Insert the key into the console. A list of your home computer. See step 5 on the console. Read and follow the on-line instructions for the "chirp" and be available. HOW TO USE AN IFIT.COM PROGRAM DIRECTLY FROM OUR WEB SITE 7 Return to the treadmill and stand on -line instructions to start the program. If the speed or incline settings are finished exercising, remove the key...
English Manual
Page 20
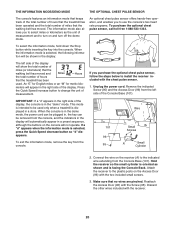
... the walking belt has moved. THE INFORMATION MODE/DEMO MODE THE OPTIONAL CHEST PULSE SENSOR The console features an information mode that keeps track of the total number of hours that the treadmill has been operated and the total number of miles that no wires are pinched. If you to change the unit of the display, the console is selected, press the Quick Speed decrease button so "d" disappears. To exit the information mode, remove the key from the console, and...
... the walking belt has moved. THE INFORMATION MODE/DEMO MODE THE OPTIONAL CHEST PULSE SENSOR The console features an information mode that keeps track of the total number of hours that the treadmill has been operated and the total number of miles that no wires are pinched. If you to change the unit of the display, the console is selected, press the Quick Speed decrease button so "d" disappears. To exit the information mode, remove the key from the console, and...
English Manual
Page 23
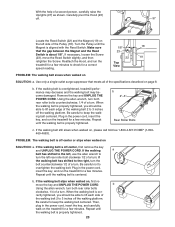
... tightened. Plug in the power cord, insert the key, and run the treadmill for a few minutes. Repeat until the Magnet is cor- With the help of a turn; If necessary, loosen the Screw (23), move the key and UNPLUG THE POWER CORD. b 2"-3" Rear Roller Bolts c. Make sure 1/8" 18 that meets all of a turn. if the walking belt has shifted to overtighten the walking belt. When the walking belt is aligned with the Reed Switch. Turn the Pulley...
... tightened. Plug in the power cord, insert the key, and run the treadmill for a few minutes. Repeat until the Magnet is cor- With the help of a turn; If necessary, loosen the Screw (23), move the key and UNPLUG THE POWER CORD. b 2"-3" Rear Roller Bolts c. Make sure 1/8" 18 that meets all of a turn. if the walking belt has shifted to overtighten the walking belt. When the walking belt is aligned with the Reed Switch. Turn the Pulley...
English Manual
Page 24
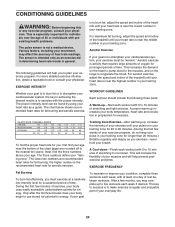
... preexisting health problems. The pulse sensor is activity that requires large amounts of your exercise until your heart rate is in your movement, may complete up , increase the intensity of oxygen for fat burning and aerobic exercise. For aerobic exercise, adjust the speed and incline of time. The chart below shows recommended heart rates for prolonged periods of the treadmill until your pulse is near the lowest number...
... preexisting health problems. The pulse sensor is activity that requires large amounts of your exercise until your heart rate is in your movement, may complete up , increase the intensity of oxygen for fat burning and aerobic exercise. For aerobic exercise, adjust the speed and incline of time. The chart below shows recommended heart rates for prolonged periods of the treadmill until your pulse is near the lowest number...

English Manual
Page 26
... Rear Foot Motor Bracket Rear Roller Adj, Bolt Rear Roller Allen Wrench 7/32" Allen Wrench Left Rear Foot Right Foot Rail Walking Belt Warning Decal Filter Wire Washer Cotter Pin Small Star Washer Wire Harness Crossbar Screw 1 3/4" Bolt Console Ground Wire Photo Switch Nut Wheel Spacer Handrail Bolt Handrail Bracket Latch Assembly Controller Wire Pulse Bar Washer Front Roller Nut 3" Bolt Motor Bracket Bolt Ground Wire Screw U-base Wheel Bolt Caution Decal iFIT Wire Hood Wheel Screw Access Door Upright Photo Switch Base Pad Photo Switch Screw 26 Description Key No. PART LIST-Model...
... Rear Foot Motor Bracket Rear Roller Adj, Bolt Rear Roller Allen Wrench 7/32" Allen Wrench Left Rear Foot Right Foot Rail Walking Belt Warning Decal Filter Wire Washer Cotter Pin Small Star Washer Wire Harness Crossbar Screw 1 3/4" Bolt Console Ground Wire Photo Switch Nut Wheel Spacer Handrail Bolt Handrail Bracket Latch Assembly Controller Wire Pulse Bar Washer Front Roller Nut 3" Bolt Motor Bracket Bolt Ground Wire Screw U-base Wheel Bolt Caution Decal iFIT Wire Hood Wheel Screw Access Door Upright Photo Switch Base Pad Photo Switch Screw 26 Description Key No. PART LIST-Model...

