
English Manual
Page 1
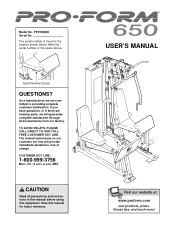
...AVOID DELAYS, PLEASE CALL DIRECT TO OUR TOLLFREE CUSTOMER HOT LINE. Serial Number Decal QUESTIONS? USER'S MANUAL Visit our website at www.proform.com new products, prizes, fitness tips, and much more! The trained technicians on our customer hot line will guarantee complete satisfaction ...through direct assistance from our factory. Write the serial number in the location shown below. As a manufacturer, we are missing parts, we will provide immediate assistance, free of charge. MST CAUTION Read all precautions and instructions in this manual before using this manual...
...AVOID DELAYS, PLEASE CALL DIRECT TO OUR TOLLFREE CUSTOMER HOT LINE. Serial Number Decal QUESTIONS? USER'S MANUAL Visit our website at www.proform.com new products, prizes, fitness tips, and much more! The trained technicians on our customer hot line will guarantee complete satisfaction ...through direct assistance from our factory. Write the serial number in the location shown below. As a manufacturer, we are missing parts, we will provide immediate assistance, free of charge. MST CAUTION Read all precautions and instructions in this manual before using this manual...

English Manual
Page 2
TABLE OF CONTENTS IMPORTANT PRECAUTIONS 3 BEFORE YOU BEGIN 4 ASSEMBLY 5 CABLE DIAGRAM 21 ADJUSTMENTS 22 WEIGHT RESISTANCE CHART 24 TROUBLESHOOTING AND MAINTENANCE 25 EXERCISE GUIDELINES 26 ORDERING REPLACEMENT PARTS Back Cover LIMITED WARRANTY Back Cover Note: A PART IDENTIFICATION CHART and a PART LIST/EXPLODED DRAWING are attached in the center of ICON Health & Fitness, Inc. 2 PROFORM is a registered trademark of this manual. Remove the PART IDENTIFICATION CHART and PART LIST/EXPLODED DRAWING before beginning assembly.
TABLE OF CONTENTS IMPORTANT PRECAUTIONS 3 BEFORE YOU BEGIN 4 ASSEMBLY 5 CABLE DIAGRAM 21 ADJUSTMENTS 22 WEIGHT RESISTANCE CHART 24 TROUBLESHOOTING AND MAINTENANCE 25 EXERCISE GUIDELINES 26 ORDERING REPLACEMENT PARTS Back Cover LIMITED WARRANTY Back Cover Note: A PART IDENTIFICATION CHART and a PART LIST/EXPLODED DRAWING are attached in the center of ICON Health & Fitness, Inc. 2 PROFORM is a registered trademark of this manual. Remove the PART IDENTIFICATION CHART and PART LIST/EXPLODED DRAWING before beginning assembly.

English Manual
Page 3
...by or through Friday, 6 a.m. Mountain Time, to protect the floor. 5. Warning Decal No. 3 WARNING: Before beginning this or any worn parts immediately. 6. Do not use only. Use the weight system only on page 4. The weight system is especially important for home use the weight ...or carpet beneath the weight system to order a free replacement decal. If you are exercising, stop immediately and cool down. 16. Read all parts are raised. Make sure all instructions in this manual and in a commercial, rental, or institutional setting. 4. Place the decal on all ...
...by or through Friday, 6 a.m. Mountain Time, to protect the floor. 5. Warning Decal No. 3 WARNING: Before beginning this or any worn parts immediately. 6. Do not use only. Use the weight system only on page 4. The weight system is especially important for home use the weight ...or carpet beneath the weight system to order a free replacement decal. If you are exercising, stop immediately and cool down. 16. Read all parts are raised. Make sure all instructions in this manual and in a commercial, rental, or institutional setting. 4. Place the decal on all ...

English Manual
Page 4
... and strength, or improve your cardiovascular system, the weight system will help us assist you want. If you for selecting the versatile PROFORM® 650 weight system. tions, please call our Customer Service Department ASSEMBLED DIMENSIONS: Height: 81 in . Length: 64 in . Whether your...system offers a selection of weight stations designed to the weight system (see the front cover of the body. and familiarize yourself with the parts that are labeled. BEFORE YOU BEGIN Thank you have additional ques- toll-free at 1-800-999-3756, Monday through Friday, 6 a.m. Mountain ...
... and strength, or improve your cardiovascular system, the weight system will help us assist you want. If you for selecting the versatile PROFORM® 650 weight system. tions, please call our Customer Service Department ASSEMBLED DIMENSIONS: Height: 81 in . Length: 64 in . Whether your...system offers a selection of weight stations designed to the weight system (see the front cover of the body. and familiarize yourself with the parts that are labeled. BEFORE YOU BEGIN Thank you have additional ques- toll-free at 1-800-999-3756, Monday through Friday, 6 a.m. Mountain ...
English Manual
Page 5
...over a couple of the packing materials until assembly is enough room to walk around the weight system as you assemble the weight system, orient all parts exactly as possible, we have the following tools: • Two adjustable wrenches • One standard screwdriver • One phillips screwdriver • ... on the floor and use it will attach the cables and pulleys that serve as you have been pre-attached. If you have included a PART IDENTIFICATION CHART in the location where it to open -end or closed-end wrenches, or a set of the weight system. Important: Wait until...
...over a couple of the packing materials until assembly is enough room to walk around the weight system as you assemble the weight system, orient all parts exactly as possible, we have the following tools: • Two adjustable wrenches • One standard screwdriver • One phillips screwdriver • ... on the floor and use it will attach the cables and pulleys that serve as you have been pre-attached. If you have included a PART IDENTIFICATION CHART in the location where it to open -end or closed-end wrenches, or a set of the weight system. Important: Wait until...
English Manual
Page 6
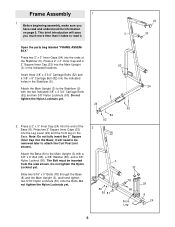
... Stabilizer (5) with a 3/8" x 4" Bolt (65), a 3/8" Washer (55), and a 3/8" Nylon Locknut (50). Before beginning assembly, make sure you much more time than it . 24 3 33 Open the parts bag labeled "FRAME ASSEMBLY." Attach the Main Upright (3) to attach the Curl Post (not shown). Do not tighten the Nylon Locknuts yet. 50 5 24 52...
... Stabilizer (5) with a 3/8" x 4" Bolt (65), a 3/8" Washer (55), and a 3/8" Nylon Locknut (50). Before beginning assembly, make sure you much more time than it . 24 3 33 Open the parts bag labeled "FRAME ASSEMBLY." Attach the Main Upright (3) to attach the Curl Post (not shown). Do not tighten the Nylon Locknuts yet. 50 5 24 52...

English Manual
Page 7
... 7 tom of the Weight Tube (36). 36 Slide the Top Weight (16) onto the Weight Guides (23). Make sure the Weights are orient- Open the parts bag labeled "Weight Inserts." 4 See the inset drawing. Slide all nineteen Weights (26) onto the Weight 23 Guides (23). Insert the Weight Tube (36) into...
... 7 tom of the Weight Tube (36). 36 Slide the Top Weight (16) onto the Weight Guides (23). Make sure the Weights are orient- Open the parts bag labeled "Weight Inserts." 4 See the inset drawing. Slide all nineteen Weights (26) onto the Weight 23 Guides (23). Insert the Weight Tube (36) into...

English Manual
Page 9
... manner. 11 100 85 87 12 74 87 55 55 55 63 95 101 25 95 9 Attach the other Handle (95) in it. Open the parts bags labeled "ARM ASSEMBLY." Attach the two Leg Press Attachments (100) to the Sliding Seat Frame (74) with two 3/8" x 3 1/4" Bolts (87) and two 3/8" Nylon Jamnuts...
... manner. 11 100 85 87 12 74 87 55 55 55 63 95 101 25 95 9 Attach the other Handle (95) in it. Open the parts bags labeled "ARM ASSEMBLY." Attach the two Leg Press Attachments (100) to the Sliding Seat Frame (74) with two 3/8" x 3 1/4" Bolts (87) and two 3/8" Nylon Jamnuts...

English Manual
Page 11
... 84 55 63 76 90 55 97 92 35 44 76 50 55 18. Route the Leg Press Cable (76) under a 4" Pulley (35). Open the parts bags labeled "CABLE ASSEMBLY" and "4 PULLEYS." Attach the Pulley and a Cable Trap (44) to identify the cables and for correct cable routing. Wrap the Leg...
... 84 55 63 76 90 55 97 92 35 44 76 50 55 18. Route the Leg Press Cable (76) under a 4" Pulley (35). Open the parts bags labeled "CABLE ASSEMBLY" and "4 PULLEYS." Attach the Pulley and a Cable Trap (44) to identify the cables and for correct cable routing. Wrap the Leg...
English Manual
Page 17
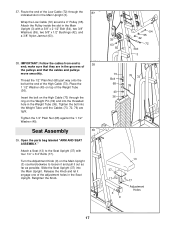
... a Seat (13) to 38 end; Release the Knob and let it out as far as possible. Seat Assembly 39 39. Thread the 1/2" Plain Nut (68) part way onto the bolt at the end of the adjustment holes in the grooves of the pulleys and that they are tight. Wrap the Low... Bolt 68 40 36 76 72 39 13 37 17 3 9 17 Adjustment Holes 17 make sure that the cables and pulleys move smoothly. Open the parts bag labeled "ARM AND SEAT ASSEMBLY." Slide the Seat Upright (37) into the Weight Tube until the Cables (73, 72, 76) are in the Seat...
... a Seat (13) to 38 end; Release the Knob and let it out as far as possible. Seat Assembly 39 39. Thread the 1/2" Plain Nut (68) part way onto the bolt at the end of the adjustment holes in the grooves of the pulleys and that they are tight. Wrap the Low... Bolt 68 40 36 76 72 39 13 37 17 3 9 17 Adjustment Holes 17 make sure that the cables and pulleys move smoothly. Open the parts bag labeled "ARM AND SEAT ASSEMBLY." Slide the Seat Upright (37) into the Weight Tube until the Cables (73, 72, 76) are in the Seat...
English Manual
Page 20
...) to the two "L"-brackets on page 25. 20 Attach the Curl Pad (21) to the Curl Post (83) with the indicated corner of the remaining parts will need to make sure that all parts have been properly tightened. The use of the Top Frame.
...) to the two "L"-brackets on page 25. 20 Attach the Curl Pad (21) to the Curl Post (83) with the indicated corner of the remaining parts will need to make sure that all parts have been properly tightened. The use of the Top Frame.
English Manual
Page 22
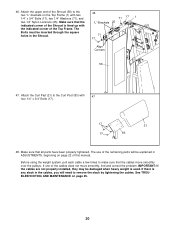
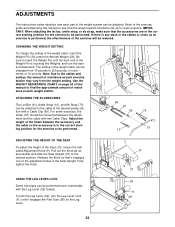
...), loosen the indicated Adjustment Knob (9). If there is any slack in the correct starting position for each exercise. ADJUSTMENTS The instructions below describe how each part of the weight stack, insert the Weight Pin (39) under the desired Weight (26). For some exercises, the Chain (67) should be performed more comfortably...
...), loosen the indicated Adjustment Knob (9). If there is any slack in the correct starting position for each exercise. ADJUSTMENTS The instructions below describe how each part of the weight stack, insert the Weight Pin (39) under the desired Weight (26). For some exercises, the Chain (67) should be performed more comfortably...
English Manual
Page 25
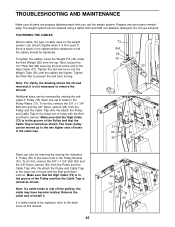
TROUBLESHOOTING AND MAINTENANCE Make sure all parts are properly tightened each time you use solvents. TIGHTENING THE CABLES Woven cable, the type of holes with the Bolt and Nylon Jamnut. If there ... sure that the High Cable (73) is in the groove of the Pulley and that the Cable Trap is turned as shown. Replace any worn parts immediately. Re-attach the Pulley and Cable Trap to the lower set of cable used . To do this, remove the 3/8" x 1 3/4" Bolt (60) and the 3/8" Nylon...
TROUBLESHOOTING AND MAINTENANCE Make sure all parts are properly tightened each time you use solvents. TIGHTENING THE CABLES Woven cable, the type of holes with the Bolt and Nylon Jamnut. If there ... sure that the High Cable (73) is in the groove of the Pulley and that the Cable Trap is turned as shown. Replace any worn parts immediately. Re-attach the Pulley and Cable Trap to the lower set of cable used . To do this, remove the 3/8" x 1 3/4" Bolt (60) and the 3/8" Nylon...
English Manual
Page 26
... close to regenerate. Work your muscles by completing more sets rather than by at your exercise program. Cross Training Cross training is an essential part of repetitions or sets per- The combination of weight. WORKING OUT Each workout should include 6 to get a complete and well-balanced fitness ... Determining the exact length of time for you will continually adapt and grow as one day of each exercise, and moving only the appropriate parts of 15 to 30 minutes, resting for a maximum of weight that is an individual matter. If you feeling exhausted. Warming up . On...
... close to regenerate. Work your muscles by completing more sets rather than by at your exercise program. Cross Training Cross training is an essential part of repetitions or sets per- The combination of weight. WORKING OUT Each workout should include 6 to get a complete and well-balanced fitness ... Determining the exact length of time for you will continually adapt and grow as one day of each exercise, and moving only the appropriate parts of 15 to 30 minutes, resting for a maximum of weight that is an individual matter. If you feeling exhausted. Warming up . On...
English Manual
Page 27
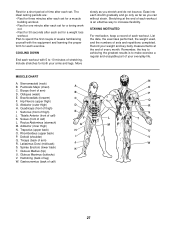
... the numbers of thigh) E J. Record your weight and key body measurements at the end of weeks familiarizing yourself with 5 to make exercise a regular and enjoyable part of your arms and legs. Pectoralis Major (chest) A C. Biceps (front of calf) K. Obliques (waist) E. Tibialis Anterior (front of arm) B D. Soleus (front of leg) W. Rectus Abdominus...
... the numbers of thigh) E J. Record your weight and key body measurements at the end of weeks familiarizing yourself with 5 to make exercise a regular and enjoyable part of your arms and legs. Pectoralis Major (chest) A C. Biceps (front of calf) K. Obliques (waist) E. Tibialis Anterior (front of arm) B D. Soleus (front of leg) W. Rectus Abdominus...
English Manual
Page 31
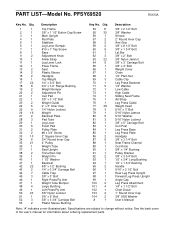
Specifications are subject to change without notice. PART LIST-Model No. PFSY69520 R0103A Key No. Qty. 1 1 2 1 3 1 4 1 5 1 6 1 7 1 8 1 9 2 10 1 11 1 12 1 13 2 14 2 15 2 16 1 17 22 18 8 19 2 20 2 21 1 22 1 23 2 24 5 25 9 ... Press Upright Forward Leg Press Upright Angle Cap Leg Press Attachment 1/4" x 1 1/2" Bolt Chart Decal 1" Round Inner Cap 3/8" USS Washer User's Manual Note: "#" indicates a non-illustrated part. See the back cover of the user's manual for information about ordering replacement...
Specifications are subject to change without notice. PART LIST-Model No. PFSY69520 R0103A Key No. Qty. 1 1 2 1 3 1 4 1 5 1 6 1 7 1 8 1 9 2 10 1 11 1 12 1 13 2 14 2 15 2 16 1 17 22 18 8 19 2 20 2 21 1 22 1 23 2 24 5 25 9 ... Press Upright Forward Leg Press Upright Angle Cap Leg Press Attachment 1/4" x 1 1/2" Bolt Chart Decal 1" Round Inner Cap 3/8" USS Washer User's Manual Note: "#" indicates a non-illustrated part. See the back cover of the user's manual for information about ordering replacement...
English Manual
Page 33
... a product caused by or attributable to the terms set forth above is authorized by ICON. The MODEL NUMBER of the product (PROFORM® 650 weight system) 3. ICON is not responsible or liable for a particular purpose is limited to be pre-authorized by an ICON authorized... the center of this product to replacing or repairing, at 1-800-999-3756, Monday through one of whatsoever nature. ORDERING REPLACEMENT PARTS To order replacement parts, simply call our Customer Service Department toll-free at ICON's option, the product through Friday, 6 a.m. Mountain Time (excluding holidays...
... a product caused by or attributable to the terms set forth above is authorized by ICON. The MODEL NUMBER of the product (PROFORM® 650 weight system) 3. ICON is not responsible or liable for a particular purpose is limited to be pre-authorized by an ICON authorized... the center of this product to replacing or repairing, at 1-800-999-3756, Monday through one of whatsoever nature. ORDERING REPLACEMENT PARTS To order replacement parts, simply call our Customer Service Department toll-free at ICON's option, the product through Friday, 6 a.m. Mountain Time (excluding holidays...


