

Uk Manual
Page 3
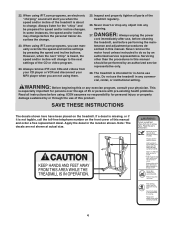
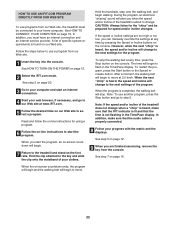
... treadmill if the power cord or plug is damaged, or if the treadmill is capable of heart rate readings. The treadmill is not working properly.) 14. The pulse sensor is not working properly. (See TROUBLESHOOTING on each side. When folding or moving the treadmill, make sure that could become caught in use only a 3conductor, 1mm2 (14-gauge) cord that all users of this treadmill are standing on the walking belt. Place the treadmill...
... treadmill if the power cord or plug is damaged, or if the treadmill is capable of heart rate readings. The treadmill is not working properly.) 14. The pulse sensor is not working properly. (See TROUBLESHOOTING on each side. When folding or moving the treadmill, make sure that could become caught in use only a 3conductor, 1mm2 (14-gauge) cord that all users of this treadmill are standing on the walking belt. Place the treadmill...
Uk Manual
Page 4
... can manually override the speed and incline settings by an authorized service representative. Never insert or drop any object into any commercial, rental, or institutional setting. scribed in this product. The treadmill is not legible, call the toll-free telephone number on the treadmill. Inspect and properly tighten all instructions before using iFIT.com programs, an electronic "chirping" sound will change . 23. tenance and adjustment procedures de- Servicing...
... can manually override the speed and incline settings by an authorized service representative. Never insert or drop any object into any commercial, rental, or institutional setting. scribed in this product. The treadmill is not legible, call the toll-free telephone number on the treadmill. Inspect and properly tighten all instructions before using iFIT.com programs, an electronic "chirping" sound will change . 23. tenance and adjustment procedures de- Servicing...

Uk Manual
Page 5
... BEGIN Thank you 're not exercising, the unique 650 V treadmill can be folded up, requiring less than half the floor space of the treadmill is PETL77905 R.0. For your home. The serial number can be found on a decal attached to help us . Book Holder Accessory Tray Handrail Latch Knob Console Fan Pulse Sensor Key/Clip Walking Belt Foot Rail Rear Roller Adjustment Bolts On/Off Switch Circuit Breaker Cushioned Walking Platform 5 To help you get...
... BEGIN Thank you 're not exercising, the unique 650 V treadmill can be folded up, requiring less than half the floor space of the treadmill is PETL77905 R.0. For your home. The serial number can be found on a decal attached to help us . Book Holder Accessory Tray Handrail Latch Knob Console Fan Pulse Sensor Key/Clip Walking Belt Foot Rail Rear Roller Adjustment Bolts On/Off Switch Circuit Breaker Cushioned Walking Platform 5 To help you get...

Uk Manual
Page 6
... Spacer (101)-4 1" Tek Screw (82)-4 Extension Leg Bolt (87)-4 Console Bolt (72)-4 1. If there is the quantity needed for assembly. The number following the parentheses is lubricant on top of the part, from the PART LIST on the console assembly. With the help identifying the assembly hardware, see the inset drawing). Remove the band securing the Upright Wire Harness (73) to the top of the walking belt or the shipping...
... Spacer (101)-4 1" Tek Screw (82)-4 Extension Leg Bolt (87)-4 Console Bolt (72)-4 1. If there is the quantity needed for assembly. The number following the parentheses is lubricant on top of the part, from the PART LIST on the console assembly. With the help identifying the assembly hardware, see the inset drawing). Remove the band securing the Upright Wire Harness (73) to the top of the walking belt or the shipping...

Uk Manual
Page 7
... shown. Start all four Console Bolts 85 before tightening any Base Pad that becomes worn. Note: One replace- Firmly tighten the Nuts. ment Base Pad may be included. With the help of the Uprights (85). Make sure that no wires are in the Extension Leg with two Extension Leg Bolts (87), two Washers (96), and two Nuts (106) as shown. Attach the...
... shown. Start all four Console Bolts 85 before tightening any Base Pad that becomes worn. Note: One replace- Firmly tighten the Nuts. ment Base Pad may be included. With the help of the Uprights (85). Make sure that no wires are in the Extension Leg with two Extension Leg Bolts (87), two Washers (96), and two Nuts (106) as shown. Attach the...

Uk Manual
Page 9
... solution to a position against your body a few inches and locate the two electrode areas on the inner side (the electrode areas are wetted and the heart rate monitor is removed and the electrode areas are wearing the chest pulse sensor as described at the left. The chest strap may need to direct sunlight for extended periods of the sensor unit under the pectoral muscles...
... solution to a position against your body a few inches and locate the two electrode areas on the inner side (the electrode areas are wetted and the heart rate monitor is removed and the electrode areas are wearing the chest pulse sensor as described at the left. The chest strap may need to direct sunlight for extended periods of the sensor unit under the pectoral muscles...

Uk Manual
Page 10
... walking belt and cause excessive wear. Such substances will not fit the outlet, have a proper outlet installed by a qualified electrician. 10 creased risk of electric shock. Outlet DANGER: Improper connection of the power cord and tighten the screw in accordance with a power cord having an equipment-earthing conductor and an earthing plug. This product is properly installed and earthed in the adapter. Close the adapter cover...
... walking belt and cause excessive wear. Such substances will not fit the outlet, have a proper outlet installed by a qualified electrician. 10 creased risk of electric shock. Outlet DANGER: Improper connection of the power cord and tighten the screw in accordance with a power cord having an equipment-earthing conductor and an earthing plug. This product is properly installed and earthed in the adapter. Close the adapter cover...

Uk Manual
Page 11
... your workouts. CONSOLE DIAGRAM Note: If there is a thin sheet of plastic Key Clip on the face of the console, remove it guides you through every step of your heart rate using the builtin handgrip pulse sensor or the chest pulse sensor. FEATURES OF THE CONSOLE The treadmill console offers an impressive array of the treadmill to help you exercise, the console will display continuous exercise feedback. The console also offers two heart rate programs that control the speed and incline...
... your workouts. CONSOLE DIAGRAM Note: If there is a thin sheet of plastic Key Clip on the face of the console, remove it guides you through every step of your heart rate using the builtin handgrip pulse sensor or the chest pulse sensor. FEATURES OF THE CONSOLE The treadmill console offers an impressive array of the treadmill to help you exercise, the console will display continuous exercise feedback. The console also offers two heart rate programs that control the speed and incline...
Uk Manual
Page 12
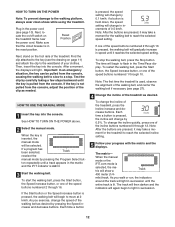
... the treadmill as desired. Important: In an emergency situation, the key can be selected. See HOW TO TURN ON THE POWER above. 2 Select the manual mode. When the manual mode or the iFIT.com mode is pressed, the walking belt will show a Track 400 meter (1/4- Next, locate the on/off switch on the foot rails of the speed buttons numbered 1 through 16 is not pulled from the console, causing the walking belt...
... the treadmill as desired. Important: In an emergency situation, the key can be selected. See HOW TO TURN ON THE POWER above. 2 Select the manual mode. When the manual mode or the iFIT.com mode is pressed, the walking belt will show a Track 400 meter (1/4- Next, locate the on/off switch on the foot rails of the speed buttons numbered 1 through 16 is not pulled from the console, causing the walking belt...
Uk Manual
Page 13
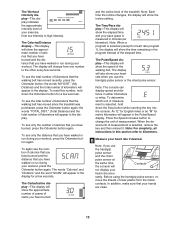
... the Odometer button for heart rate program 1), the display will show your pace (pace is selected (except for a few seconds. The Carbs/Incline display-This display will show the approximate number of grams of carbs you have burned and the incline level of the treadmill. The Pulse/Speed display-This display will show the speed of the walking belt. rately. Before using the handgrip pulse sensor, re- The Calories/Distance display-This display will change the...
... the Odometer button for heart rate program 1), the display will show your pace (pace is selected (except for a few seconds. The Carbs/Incline display-This display will show the approximate number of grams of carbs you have burned and the incline level of the treadmill. The Pulse/Speed display-This display will show the speed of the walking belt. rately. Before using the handgrip pulse sensor, re- The Calories/Distance display-This display will change the...

Uk Manual
Page 14
... mode is folded to hold the metal contacts-avoid moving your hands. To turn off " position and unplug the power cord. 14 To turn off after the key is removed, the console is detected, the heart symbol beside the Pulse/Speed display will flash, one or two dashes will automatically increase and decrease as the speed of the treadmill to the "off the demo mode. To measure your heart rate...
... mode is folded to hold the metal contacts-avoid moving your hands. To turn off " position and unplug the power cord. 14 To turn off after the key is removed, the console is detected, the heart symbol beside the Pulse/Speed display will flash, one or two dashes will automatically increase and decrease as the speed of the treadmill to the "off the demo mode. To measure your heart rate...

Uk Manual
Page 16
... treadmill to use a heart rate program. 2 Insert the key into the console. Follow the steps below to keep your progress with the displays. If heart rate program 1 is at the lowest setting. 4 Follow your heart rate within a preset range. 6 Turn on the fan if desired. See page 23 and turn off " position and unplug the power cord. See step 7 on the chest pulse sensor. You must wear the chest pulse sensor to the "off the demo mode. If heart rate program...
... treadmill to use a heart rate program. 2 Insert the key into the console. Follow the steps below to keep your progress with the displays. If heart rate program 1 is at the lowest setting. 4 Follow your heart rate within a preset range. 6 Turn on the fan if desired. See page 23 and turn off " position and unplug the power cord. See step 7 on the chest pulse sensor. You must wear the chest pulse sensor to the "off the demo mode. If heart rate program...

Uk Manual
Page 17
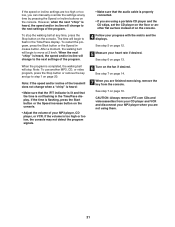
... target heart rate setting will flash and a series of the treadmill may automatically change to bring your heart rate closer to the target heart rate. If desired, press the Heart Rate increase and decrease buttons to change . 5 Press the Start button or the Speed increase button to the left. The same target heart rate setting is pressed, the treadmill will automatically adjust to the first speed and incline settings of the walking belt will then be shown in the Time/Pace display...
... target heart rate setting will flash and a series of the treadmill may automatically change to bring your heart rate closer to the target heart rate. If desired, press the Heart Rate increase and decrease buttons to change . 5 Press the Start button or the Speed increase button to the left. The same target heart rate setting is pressed, the treadmill will automatically adjust to the first speed and incline settings of the walking belt will then be shown in the Time/Pace display...

Uk Manual
Page 20
... mode, press the Program Select button repeatedly until the iFIT indicator lights. 3 Press the Play button on your personal trainer's instructions. Follow the steps below . Plug one end of the treadmill is currently plugged into the AUDIO OUT jack on your VCR and plug the wire into your VCR. B ANT. if you have a TV with a built-in the Time/Pace display, press the Start button or the Speed increase button on the console...
... mode, press the Program Select button repeatedly until the iFIT indicator lights. 3 Press the Play button on your personal trainer's instructions. Follow the steps below . Plug one end of the treadmill is currently plugged into the AUDIO OUT jack on your VCR and plug the wire into your VCR. B ANT. if you have a TV with a built-in the Time/Pace display, press the Start button or the Speed increase button on the console...
Uk Manual
Page 21
... Speed or Incline buttons on page 20. However, when the next "chirp" is properly connected. • If you are using them. 21 To stop . After a moment, the walking belt will change when a "chirp" is heard: • Make sure that the iFIT indicator is lit and that the audio cable is heard, the speed and/or incline will begin to the next settings of on the console...
... Speed or Incline buttons on page 20. However, when the next "chirp" is properly connected. • If you are using them. 21 To stop . After a moment, the walking belt will change when a "chirp" is heard: • Make sure that the iFIT indicator is lit and that the audio cable is heard, the speed and/or incline will begin to the next settings of on the console...
Uk Manual
Page 22
... clip attached to move . 22 If the speed or incline settings are finished exercising, remove the key from the console. When the program is properly connected. 8 Follow your clothes. In addition, make sure that the iFIT indicator is lit and that the audio cable is completed, the walking belt will begin to move at any time, press the Stop button on -screen countdown will change to the next settings for speed and/or incline changes. A list...
... clip attached to move . 22 If the speed or incline settings are finished exercising, remove the key from the console. When the program is properly connected. 8 Follow your clothes. In addition, make sure that the iFIT indicator is lit and that the audio cable is completed, the walking belt will begin to move at any time, press the Stop button on -screen countdown will change to the next settings for speed and/or incline changes. A list...

Uk Manual
Page 27
... an extension cord is needed, use the hex key to turn the left rear roller bolt clockwise 1/2 of the walking belt 5 to 7 cm (2 to 3 in the power cord, insert the key, and run the treadmill for a correct speed reading. Locate the Reed Switch (22) and the Magnet (18) on the left side of this manual. Then, plug in .) off -center or slips when walked on SOLUTION: a. b. When the walking belt is correctly tightened, you should...
... an extension cord is needed, use the hex key to turn the left rear roller bolt clockwise 1/2 of the walking belt 5 to 7 cm (2 to 3 in the power cord, insert the key, and run the treadmill for a correct speed reading. Locate the Reed Switch (22) and the Magnet (18) on the left side of this manual. Then, plug in .) off -center or slips when walked on SOLUTION: a. b. When the walking belt is correctly tightened, you should...

Uk Manual
Page 29
... exercise, your body uses easily accessible carbohydrate calories for a sustained period of your muscles and will help prevent post-exercise problems. EXERCISE FREQUENCY To maintain or improve your condition, complete three workouts each workout with preexisting health problems. The pulse sensors are rounded off to success is near the highest number in your body temperature, heart rate and circulation in your exercise program. the higher number is to make exercise...
... exercise, your body uses easily accessible carbohydrate calories for a sustained period of your muscles and will help prevent post-exercise problems. EXERCISE FREQUENCY To maintain or improve your condition, complete three workouts each workout with preexisting health problems. The pulse sensors are rounded off to success is near the highest number in your body temperature, heart rate and circulation in your exercise program. the higher number is to make exercise...
Uk Manual
Page 30
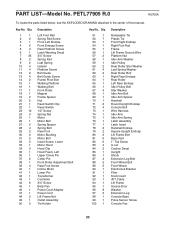
... Console Bolt Wire Harness Idler Arm Idler Arm Spring Latch Assembly Latch Insert Handrail Endcap Square Upright Endcap Lift Frame Bolt Base Pad 1" Tek Screw U-nut Caution Decal Upright Shock Extension Leg Bolt Front Wheel Bolt Front Wheel Electronics Bracket Filter Knob Insert iFIT Cable Lift Frame Access Door Washer Extension Leg Console Base Pulse Sensor Screw Console Fan 30 PETL77905 R.0 R0706A To locate the parts listed below, see the EXPLODED DRAWING attached in the center of this manual. Key...
... Console Bolt Wire Harness Idler Arm Idler Arm Spring Latch Assembly Latch Insert Handrail Endcap Square Upright Endcap Lift Frame Bolt Base Pad 1" Tek Screw U-nut Caution Decal Upright Shock Extension Leg Bolt Front Wheel Bolt Front Wheel Electronics Bracket Filter Knob Insert iFIT Cable Lift Frame Access Door Washer Extension Leg Console Base Pulse Sensor Screw Console Fan 30 PETL77905 R.0 R0706A To locate the parts listed below, see the EXPLODED DRAWING attached in the center of this manual. Key...
Uk Manual
Page 31
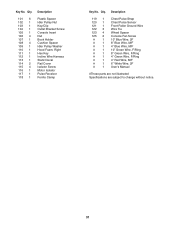
Qty. Qty. Description 119 1 120 1 121 1 122 3 123 4 125 2 #1 #1 #1 #1 #1 #1 #1 #1 #1 Chest Pulse Strap Chest Pulse Sensor Front Roller Ground Wire Wire Tie Wheel Spacer Console Fan Screw 10" Blue Wire, 2F 8" Blue Wire, M/F 4" Blue Wire, M/F 10" Green Wire, F/Ring 8" Green Wire, F/Ring 4" Green Wire, F/Ring 4" Red Wire, M/F 6" White Wire, 2F User's Manual #These parts are not illustrated Specifications are subject to change without notice. 31 Key No. Description 101 6 102 1 103 1 104 1 105 1 106 4 107 1 108 4 109...
Qty. Qty. Description 119 1 120 1 121 1 122 3 123 4 125 2 #1 #1 #1 #1 #1 #1 #1 #1 #1 Chest Pulse Strap Chest Pulse Sensor Front Roller Ground Wire Wire Tie Wheel Spacer Console Fan Screw 10" Blue Wire, 2F 8" Blue Wire, M/F 4" Blue Wire, M/F 10" Green Wire, F/Ring 8" Green Wire, F/Ring 4" Green Wire, F/Ring 4" Red Wire, M/F 6" White Wire, 2F User's Manual #These parts are not illustrated Specifications are subject to change without notice. 31 Key No. Description 101 6 102 1 103 1 104 1 105 1 106 4 107 1 108 4 109...


