
User Manual
Page 3
...in a fall and serious injury. 13. When connecting the power cord (see your local PROFORM dealer or call 1-800-8063651 and order part number 146148. 20. Do not attempt to raise, lower, or move the treadmill until it is not working properly. (See BEFORE YOU BEGIN on page 5 for both... 14. If the control system is turned off switch to use the treadmill with at all of high speeds. Never move the walking belt while the power is damaged, the walking belt may change the incline of the treadmill. The treadmill should be used or where oxygen is properly assembled. (See ASSEMBLY on...
...in a fall and serious injury. 13. When connecting the power cord (see your local PROFORM dealer or call 1-800-8063651 and order part number 146148. 20. Do not attempt to raise, lower, or move the treadmill until it is not working properly. (See BEFORE YOU BEGIN on page 5 for both... 14. If the control system is turned off switch to use the treadmill with at all of high speeds. Never move the walking belt while the power is damaged, the walking belt may change the incline of the treadmill. The treadmill should be used or where oxygen is properly assembled. (See ASSEMBLY on...
User Manual
Page 5
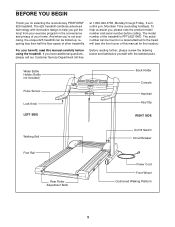
... the drawing below and familiarize yourself with innovative design to the treadmill (see the front cover of other treadmills. The model number of your benefit, read this manual for selecting the revolutionary PROFORM® 625 treadmill. For your home. And when you , please note the ... using the treadmill. The 625 treadmill combines advanced technology with the labeled parts. at 1-800-999-3756, Monday through Friday, 6 a.m. Water Bottle Holder (Bottle not included) Pulse Sensor Lock Knob LEFT SIDE Book Holder Console Handrail Key/Clip RIGHT SIDE Walking Belt On/Off...
... the drawing below and familiarize yourself with innovative design to the treadmill (see the front cover of other treadmills. The model number of your benefit, read this manual for selecting the revolutionary PROFORM® 625 treadmill. For your home. And when you , please note the ... using the treadmill. The 625 treadmill combines advanced technology with the labeled parts. at 1-800-999-3756, Monday through Friday, 6 a.m. Water Bottle Holder (Bottle not included) Pulse Sensor Lock Knob LEFT SIDE Book Holder Console Handrail Key/Clip RIGHT SIDE Walking Belt On/Off...
User Manual
Page 6
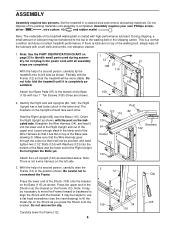
...of the walking belt or the shipping carton. Do not dispose of a second person, carefully raise the Frame (12) to lift the metal clip on the Base (115) as shown. With the help of the packing materials until assembly is completely assembled. Do not fully fold the treadmill until all ... wipe off the lubricant with Washers (123) into the lower end of the Right Upright and out of the treadmill walking belt is a normal condition and does not affect treadmill performance. Do not remove the clip. Note: The underside of the upper end. Attach four Base Pads (97) to use a flat ...
...of the walking belt or the shipping carton. Do not dispose of a second person, carefully raise the Frame (12) to lift the metal clip on the Base (115) as shown. With the help of the packing materials until assembly is completely assembled. Do not fully fold the treadmill until all ... wipe off the lubricant with Washers (123) into the lower end of the Right Upright and out of the treadmill walking belt is a normal condition and does not affect treadmill performance. Do not remove the clip. Note: The underside of the upper end. Attach four Base Pads (97) to use a flat ...
User Manual
Page 8
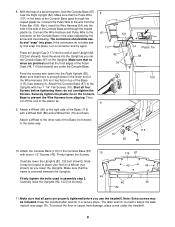
... the wires into place. Attach the Console Back (116) to the Uprights with seven 1/2" Screws (46). Note: It may be helpful to adjust the walking belt (see drawing 3). Carefully raise the Uprights (82, 122 [not shown]). 116 87 46 46 46 46 82 11. Keep the included allen wrench in the... 109 115 86 10. Connect the Pulse Wire to prevent the Wire Harness from slipping. Make sure that all four Screws before you use the treadmill. Make sure that there is centered between the Uprights. 46 Firmly tighten the bolts used to place your foot on a Wheel (not shown) as you...
... the wires into place. Attach the Console Back (116) to the Uprights with seven 1/2" Screws (46). Note: It may be helpful to adjust the walking belt (see drawing 3). Carefully raise the Uprights (82, 122 [not shown]). 116 87 46 46 46 46 82 11. Keep the included allen wrench in the... 109 115 86 10. Connect the Pulse Wire to prevent the Wire Harness from slipping. Make sure that all four Screws before you use the treadmill. Make sure that there is centered between the Uprights. 46 Firmly tighten the bolts used to place your foot on a Wheel (not shown) as you...
User Manual
Page 9
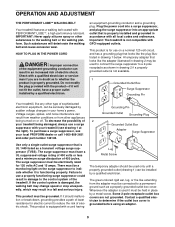
...are in damage to whether the product is damaged, the walking belt may change speed or stop unexpectedly, which may be connected to the walking belt or the walking platform. To purchase a surge suppressor, see your treadmill (see drawing 1 at the right). To decrease the possibility ...home's power. If the control system is properly grounded. Contact a qualified electrician to indicate whether it is equipped with your local PROFORM dealer or call 1-800-806-3651 and order part number 146148. Grounding Pin Grounded Outlet Grounding Plug Grounded Outlet Box Adapter Surge ...
...are in damage to whether the product is damaged, the walking belt may change speed or stop unexpectedly, which may be connected to the walking belt or the walking platform. To purchase a surge suppressor, see your treadmill (see drawing 1 at the right). To decrease the possibility ...home's power. If the control system is properly grounded. Contact a qualified electrician to indicate whether it is equipped with your local PROFORM dealer or call 1-800-806-3651 and order part number 146148. Grounding Pin Grounded Outlet Grounding Plug Grounded Outlet Box Adapter Surge ...
User Manual
Page 10
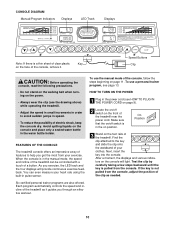
...: Before operating the console, read the following precautions. • Do not stand on the walking belt when turning on the power. • Always wear the clip (see the drawing above) while operating the treadmill. • Adjust the speed in small increments in order to avoid sudden jumps in the power...As you exercise, the LED track and the four displays will light. Next, insert the key into the console. FEATURES OF THE CONSOLE The treadmill console offers an impressive array of features to the key and slide the clip onto the waistband of your exercise. To use a personal trainer ...
...: Before operating the console, read the following precautions. • Do not stand on the walking belt when turning on the power. • Always wear the clip (see the drawing above) while operating the treadmill. • Adjust the speed in small increments in order to avoid sudden jumps in the power...As you exercise, the LED track and the four displays will light. Next, insert the key into the console. FEATURES OF THE CONSOLE The treadmill console offers an impressive array of features to the key and slide the clip onto the waistband of your exercise. To use a personal trainer ...
User Manual
Page 11
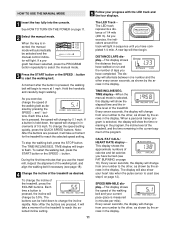
...buttons. Every seven seconds, the display will show the time remaining in the program, the incline level of the treadmill, and the time remaining in the current segment of the walking belt as shown by pressing the SPEED v and w buttons. When the key is inserted, the manual mode will...are pressed, it will begin walking. DISTANCE/LAPS display-This display shows Arrow the distance that you use the treadmill, inspect the alignment of the walking belt, and align the walking belt if necessary (see page 18). 4 Change the incline of calories and fat calories you have walked or run...
...buttons. Every seven seconds, the display will show the time remaining in the program, the incline level of the treadmill, and the time remaining in the current segment of the walking belt as shown by pressing the SPEED v and w buttons. When the key is inserted, the manual mode will...are pressed, it will begin walking. DISTANCE/LAPS display-This display shows Arrow the distance that you use the treadmill, inspect the alignment of the walking belt, and align the walking belt if necessary (see page 18). 4 Change the incline of calories and fat calories you have walked or run...

User Manual
Page 13
.../INCLINE/SEG. Hold the handrails and begin to zero. See step 5 on the console. When the program is completed, make sure that the treadmill will reach a maximum speed of 4 mph and a maximum incline of 8% during the first program. The program will automatically adjust to the off... When only three seconds remain in the "demo" mode. The walking belt will begin walking. The TIME/INCLINE/SEG. Note: If the displays and indicators on page 12. 6 When the program is pressed, the treadmill will automatically adjust to the first speed and incline settings for the current...
.../INCLINE/SEG. Hold the handrails and begin to zero. See step 5 on the console. When the program is completed, make sure that the treadmill will reach a maximum speed of 4 mph and a maximum incline of 8% during the first program. The program will automatically adjust to the off... When only three seconds remain in the "demo" mode. The walking belt will begin walking. The TIME/INCLINE/SEG. Note: If the displays and indicators on page 12. 6 When the program is pressed, the treadmill will automatically adjust to the first speed and incline settings for the current...
User Manual
Page 14
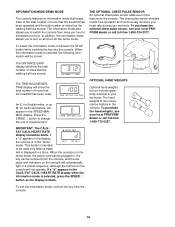
...800-772-0257. The TIME/INCLINE/SEG. To purchase the hand weights, see your local PROFORM dealer or call toll-free 1-800-734-2377. This mode is in the demo mode...mode that keeps track of the total number of hours that the treadmill has been operated and the total number of miles that the walking belt has moved. The information mode also allows you to switch the ... will not operate. Press the SPEED v button to change the unit of hours that the treadmill has been used only when a treadmill is selected, the following information will be removed from the console. 14 IMPORTANT: The CALS./ ...
...800-772-0257. The TIME/INCLINE/SEG. To purchase the hand weights, see your local PROFORM dealer or call toll-free 1-800-734-2377. This mode is in the demo mode...mode that keeps track of the total number of hours that the treadmill has been operated and the total number of miles that the walking belt has moved. The information mode also allows you to switch the ... will not operate. Press the SPEED v button to change the unit of hours that the treadmill has been used only when a treadmill is selected, the following information will be removed from the console. 14 IMPORTANT: The CALS./ ...
User Manual
Page 18
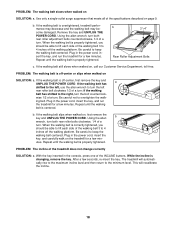
... off the walking platform. While the incline is properly tightened. The treadmill will recalibrate the incline. 18 b 3"-4" Rear Roller Adjustment Bolts c. If the walking belt is overtightened, treadmill performance may decrease and the walking belt may become damaged. wise 1/2 of the INCLINE buttons. After a ... key inserted in the power cord, insert the key, and run the treadmill for a few minutes. If the walking belt slips when walked on page 9. Be careful not to keep the walking belt centered. Be careful to overtighten the walk- Use only a single-outlet ...
... off the walking platform. While the incline is properly tightened. The treadmill will recalibrate the incline. 18 b 3"-4" Rear Roller Adjustment Bolts c. If the walking belt is overtightened, treadmill performance may decrease and the walking belt may become damaged. wise 1/2 of the INCLINE buttons. After a ... key inserted in the power cord, insert the key, and run the treadmill for a few minutes. If the walking belt slips when walked on page 9. Be careful not to keep the walking belt centered. Be careful to overtighten the walk- Use only a single-outlet ...
User Manual
Page 22
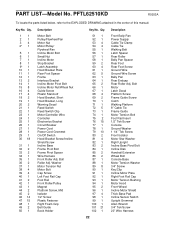
... 101 21 102 1 22 Description Front Belly Pan Power Supply Cable Tie Clamp Cable Tie Walking Belt Latch Spacer Rear Roller Belly Pan Spacer Rear Foot Rear Foot Screw Ground Wire Ground Wire Screw Belly...Foot Rail Front Roller/Pulley Magnet Platform Screw, Mid Isolator 1/2" Screw Plastic Fastener Right Foam Grip Belt Guide Book Holder Key No. PART LIST-Model No. Bolt Roller Adj. Qty. 11 21 34...2 42 1 43 1 44 2 45 2 46 14 47 15 48 1 49 2 50 1 Description Motor Belt Pulley/Flywheel/Fan Motor Nut Motor/Pulley/ Flywheel/Fan Incline Motor Bolt Small Nut Incline Motor Stop Bracket Latch Assembly Hood...
... 101 21 102 1 22 Description Front Belly Pan Power Supply Cable Tie Clamp Cable Tie Walking Belt Latch Spacer Rear Roller Belly Pan Spacer Rear Foot Rear Foot Screw Ground Wire Ground Wire Screw Belly...Foot Rail Front Roller/Pulley Magnet Platform Screw, Mid Isolator 1/2" Screw Plastic Fastener Right Foam Grip Belt Guide Book Holder Key No. PART LIST-Model No. Bolt Roller Adj. Qty. 11 21 34...2 42 1 43 1 44 2 45 2 46 14 47 15 48 1 49 2 50 1 Description Motor Belt Pulley/Flywheel/Fan Motor Nut Motor/Pulley/ Flywheel/Fan Incline Motor Bolt Small Nut Incline Motor Stop Bracket Latch Assembly Hood...


