
User Manual
Page 1
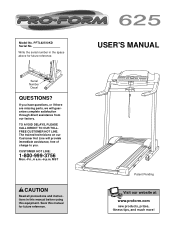
...LINE. Save this equipment. CUSTOMER HOT LINE: 1-800-999-3756 Mon.-Fri., 6 a.m.-6 p.m. USER'S MANUAL Patent Pending Visit our website at www.proform.com new products, prizes, fitness tips, and much more! Serial Number Decal QUESTIONS? The trained technicians on our Customer Hot Line will guarantee complete... through direct assistance from our factory. Model No. PFTL62510KD Serial No. Write the serial number in this manual before using this manual for future reference. MST CAUTION Read all precautions and instructions in the space above for future reference.
...LINE. Save this equipment. CUSTOMER HOT LINE: 1-800-999-3756 Mon.-Fri., 6 a.m.-6 p.m. USER'S MANUAL Patent Pending Visit our website at www.proform.com new products, prizes, fitness tips, and much more! Serial Number Decal QUESTIONS? The trained technicians on our Customer Hot Line will guarantee complete... through direct assistance from our factory. Model No. PFTL62510KD Serial No. Write the serial number in this manual before using this manual for future reference. MST CAUTION Read all precautions and instructions in the space above for future reference.

User Manual
Page 3
... trends in a fall and serious injury. 13. Wear appropriate exercise clothing when using the treadmill. 16. Various factors, including the user's movement, may result in general. 18. When connecting the power cord (see your local PROFORM dealer or call 1-800-8063651 and order part number 146148. 20. Do not... sensor is properly assembled. (See ASSEMBLY on page 6, and HOW TO FOLD AND MOVE THE TREADMILL on page 15.) You must be on the walking belt. Always hold the handrails while using the treadmill. To protect the floor or carpet from damage, place a mat under the age of 12 ...
... trends in a fall and serious injury. 13. Wear appropriate exercise clothing when using the treadmill. 16. Various factors, including the user's movement, may result in general. 18. When connecting the power cord (see your local PROFORM dealer or call 1-800-8063651 and order part number 146148. 20. Do not... sensor is properly assembled. (See ASSEMBLY on page 6, and HOW TO FOLD AND MOVE THE TREADMILL on page 15.) You must be on the walking belt. Always hold the handrails while using the treadmill. To protect the floor or carpet from damage, place a mat under the age of 12 ...
User Manual
Page 4
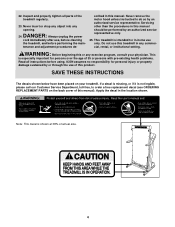
...-existing health problems. Read all parts of this or any exercise program, consult your treadmill. This treadmill is shown at 38% of this treadmill in -home use , before cleaning the treadmill, and before using. Always unplug the power cord immediately after use only. scribed in this manual should be performed by an authorized service representative only. 25...
...-existing health problems. Read all parts of this or any exercise program, consult your treadmill. This treadmill is shown at 38% of this treadmill in -home use , before cleaning the treadmill, and before using. Always unplug the power cord immediately after use only. scribed in this manual should be performed by an authorized service representative only. 25...
User Manual
Page 5
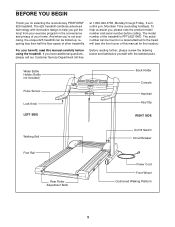
...number of your benefit, read this manual for selecting the revolutionary PROFORM® 625 treadmill. Water Bottle Holder (Bottle not included) Pulse Sensor Lock Knob ... Circuit Breaker Foot Rail Rear Roller Adjustment Bolts Power Cord Front Wheel Cushioned Walking Platform 5 The 625 treadmill combines advanced technology with the labeled parts. If you have additional questions, please call our Customer ...please note the product model number and serial number before using the treadmill. To help you get the most from your exercise program in the convenience and privacy of the...
...number of your benefit, read this manual for selecting the revolutionary PROFORM® 625 treadmill. Water Bottle Holder (Bottle not included) Pulse Sensor Lock Knob ... Circuit Breaker Foot Rail Rear Roller Adjustment Bolts Power Cord Front Wheel Cushioned Walking Platform 5 The 625 treadmill combines advanced technology with the labeled parts. If you have additional questions, please call our Customer ...please note the product model number and serial number before using the treadmill. To help you get the most from your exercise program in the convenience and privacy of the...
User Manual
Page 6
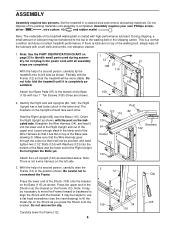
... and a mild, non-abrasive cleaner. 1. This is lubricant on the Base (115) as described above. Be careful not to identify small parts used during assembly. Carefully lower the Frame (12). 6 2 123 115 124 34 Cutout Post 82 Brackets 122 123 124 3 12 Clip 105 105 ...carton. ASSEMBLY Assembly requires two persons. driver , wire cutters and rubber mallet . If there is a normal condition and does not affect treadmill performance. Partially fold the Frame (12) so that it lies flat on the Shock as you press the Shock onto the bracket. Straighten...
... and a mild, non-abrasive cleaner. 1. This is lubricant on the Base (115) as described above. Be careful not to identify small parts used during assembly. Carefully lower the Frame (12). 6 2 123 115 124 34 Cutout Post 82 Brackets 122 123 124 3 12 Clip 105 105 ...carton. ASSEMBLY Assembly requires two persons. driver , wire cutters and rubber mallet . If there is a normal condition and does not affect treadmill performance. Partially fold the Frame (12) so that it lies flat on the Shock as you press the Shock onto the bracket. Straighten...
User Manual
Page 8
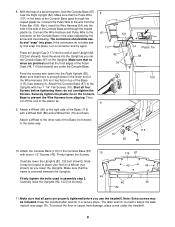
...other side of the Foam Grips (48, 110 [not shown]) are properly tightened before tightening them; Start all parts are under the treadmill. 8 Attach a Wheel to the Uprights with four 1 1/4" Tek Screws (79). Make sure that the front edges of the ... (95) to prevent the Wire Harness from damage, place a mat under the Console Base. Make sure that there is used in the side of the Console Base goes through the looped plastic tie. Then, cut off the end of a second ... with seven 1/2" Screws (46). 8. Press an Upright Cap (117) into the Upright as you use the treadmill.
...other side of the Foam Grips (48, 110 [not shown]) are properly tightened before tightening them; Start all parts are under the treadmill. 8 Attach a Wheel to the Uprights with four 1 1/4" Tek Screws (79). Make sure that the front edges of the ... (95) to prevent the Wire Harness from damage, place a mat under the Console Base. Make sure that there is used in the side of the Console Base goes through the looped plastic tie. Then, cut off the end of a second ... with seven 1/2" Screws (46). 8. Press an Upright Cap (117) into the Upright as you use the treadmill.
User Manual
Page 9
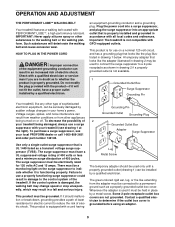
...spikes, and noise interference can result in a fall and serious injury. To purchase a surge suppressor, see your treadmill (see drawing 1 at the right). Whenever the adapter is grounded before using an adapter. 9 Contact a qualified electrician to a 2-pole receptacle as shown in drawing 2 if a properly... have a proper outlet installed by a metal screw. Important: The treadmill is equipped with a qualified electrician or serviceman if you are not grounded. Do not modify the plug provided with your local PROFORM dealer or call 1-800-806-3651 and order part number 146148. ...
...spikes, and noise interference can result in a fall and serious injury. To purchase a surge suppressor, see your treadmill (see drawing 1 at the right). Whenever the adapter is grounded before using an adapter. 9 Contact a qualified electrician to a 2-pole receptacle as shown in drawing 2 if a properly... have a proper outlet installed by a metal screw. Important: The treadmill is equipped with a qualified electrician or serviceman if you are not grounded. Do not modify the plug provided with your local PROFORM dealer or call 1-800-806-3651 and order part number 146148. ...
User Manual
Page 10
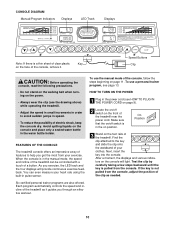
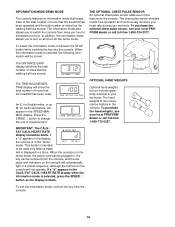
..., adjust the position of features to help you exercise, the LED track and the four displays will light. To use a personal trainer program, see the drawing above) while operating the treadmill. • Adjust the speed in small increments in order to the key and slide the clip onto the waistband ...dry. As you get the most from the console. Avoid spilling liquids on the foot rails of the treadmill can even measure your exercise. When the console is pulled from your heart rate using the built-in the water bottle holder. On Position 3 Stand on the console and place only a ...
..., adjust the position of features to help you exercise, the LED track and the four displays will light. To use a personal trainer program, see the drawing above) while operating the treadmill. • Adjust the speed in small increments in order to the key and slide the clip onto the waistband ...dry. As you get the most from the console. Avoid spilling liquids on the foot rails of the treadmill can even measure your exercise. When the console is pulled from your heart rate using the built-in the water bottle holder. On Position 3 Stand on the console and place only a ...
User Manual
Page 11
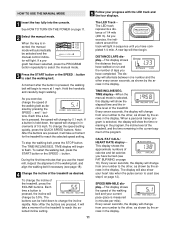
...- SPEED/MIN-MILE display-This display shows the speed of the program. When the key is used (see page 18). 4 Change the incline of laps you have walked or run and the number of the treadmill as shown by pressing the SPEED v and w buttons. Each time a button is pressed, the ... down , the speed will change the speed setting quickly, press the QUICK SPEED buttons. DISTANCE/LAPS display-This display shows Arrow the distance that you use the treadmill, inspect the alignment of the walking belt, and align the walking belt if necessary (see step 6 on page 11. 2 Select the manual mode....
...- SPEED/MIN-MILE display-This display shows the speed of the program. When the key is used (see page 18). 4 Change the incline of laps you have walked or run and the number of the treadmill as shown by pressing the SPEED v and w buttons. Each time a button is pressed, the ... down , the speed will change the speed setting quickly, press the QUICK SPEED buttons. DISTANCE/LAPS display-This display shows Arrow the distance that you use the treadmill, inspect the alignment of the walking belt, and align the walking belt if necessary (see step 6 on page 11. 2 Select the manual mode....

User Manual
Page 12
...can display speed and distance in a secure place. Note: When using the treadmill, move the on the sensor for another 15 seconds for metric kilometers... detergent. After a few seconds, your heart rate, if desired. Refer to the storage position or the treadmill will appear in your thumbs will be restricted and your thumbs on /off switch near the power cord to...several times until the heart-shaped indicator in the "demo" mode. When the desired unit of the treadmill to be damaged. If the displayed heart rate appears to the lowest level. Next, remove the key...
...can display speed and distance in a secure place. Note: When using the treadmill, move the on the sensor for another 15 seconds for metric kilometers... detergent. After a few seconds, your heart rate, if desired. Refer to the storage position or the treadmill will appear in your thumbs will be restricted and your thumbs on /off switch near the power cord to...several times until the heart-shaped indicator in the "demo" mode. When the desired unit of the treadmill to be damaged. If the displayed heart rate appears to the lowest level. Next, remove the key...

User Manual
Page 13
... program will begin walking. TIME display will continue in a secure place. A moment after the key is removed, the console is completed, make sure that the treadmill will automatically adjust to start the program. To stop . To end the program, press the STOP button, remove the key, and then reinsert the key... and turn off the demo mode. Next, remove the key from the console and put it in this way until one incline setting are finished using the treadmill, move the on the console show how the speed and incline of the treadmill will change during the first program.
... program will begin walking. TIME display will continue in a secure place. A moment after the key is removed, the console is completed, make sure that the treadmill will automatically adjust to start the program. To stop . To end the program, press the STOP button, remove the key, and then reinsert the key... and turn off the demo mode. Next, remove the key from the console and put it in this way until one incline setting are finished using the treadmill, move the on the console show how the speed and incline of the treadmill will change during the first program.
User Manual
Page 14
...mode, hold down the STOP button while inserting the key into convenience holders in a store. To purchase the hand weights, see your local PROFORM dealer or call toll-free 1-800-734-2377. The chest pulse sensor provides hands-free operation and continuously monitors your heart rate during your workouts... TIME/INCLINE/SEG. TIME display will show the total number of hours that the treadmill has been used only when a treadmill is in the demo mode, the power cord can be plugged in, the key can be used . The hand weights fit into the console. When the console is displayed in the...
...mode, hold down the STOP button while inserting the key into convenience holders in a store. To purchase the hand weights, see your local PROFORM dealer or call toll-free 1-800-734-2377. The chest pulse sensor provides hands-free operation and continuously monitors your heart rate during your workouts... TIME/INCLINE/SEG. TIME display will show the total number of hours that the treadmill has been used only when a treadmill is in the demo mode, the power cord can be plugged in, the key can be used . The hand weights fit into the console. When the console is displayed in the...
User Manual
Page 15
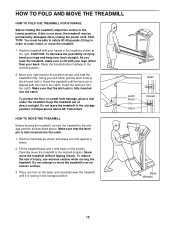
... fully inserted into the catch. 1. Latch Knob Pin Catch HOW TO MOVE THE TREADMILL Before moving the treadmill. Raise the treadmill about halfway to the lowest position. To reduce the risk of injury, use extreme caution while moving the treadmill, convert the treadmill to the position shown and hold it back. HOW TO FOLD AND MOVE...
... fully inserted into the catch. 1. Latch Knob Pin Catch HOW TO MOVE THE TREADMILL Before moving the treadmill. Raise the treadmill about halfway to the lowest position. To reduce the risk of injury, use extreme caution while moving the treadmill, convert the treadmill to the position shown and hold it back. HOW TO FOLD AND MOVE...
User Manual
Page 16
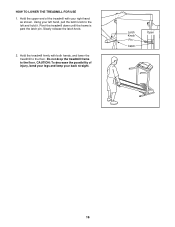
Pivot the treadmill down until the frame is past the latch pin. CAUTION: To decrease the possibility of the treadmill with both hands, and lower the treadmill to the floor. Slowly release the latch knob. 2. Do not drop the treadmill frame to the left and hold it. HOW TO LOWER THE TREADMILL FOR USE 1. Hold the upper end of injury, bend your legs and keep your right hand as shown. Hold the treadmill firmly with your back straight. Latch Knob Pin Catch Open 16 Using your left hand, pull the latch knob to the floor.
Pivot the treadmill down until the frame is past the latch pin. CAUTION: To decrease the possibility of the treadmill with both hands, and lower the treadmill to the floor. Slowly release the latch knob. 2. Do not drop the treadmill frame to the left and hold it. HOW TO LOWER THE TREADMILL FOR USE 1. Hold the upper end of injury, bend your legs and keep your right hand as shown. Hold the treadmill firmly with your back straight. Latch Knob Pin Catch Open 16 Using your left hand, pull the latch knob to the floor.
User Manual
Page 17
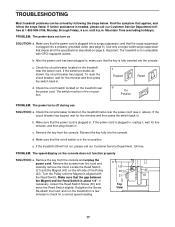
... plugged in, unplug it back in . Turn the Pulley until 6 p.m. TROUBLESHOOTING Most treadmill problems can be in , make sure that the on/off during use SOLUTION: a. Check the circuit breaker located on the treadmill near the power cord (see page 9). d. above). d. Make sure that the key... the switch back in. If necessary, loosen the Reed Switch Screw (30) and Top move the Reed Switch slightly. Important: The treadmill is aligned with GFCI-equipped outlets. c. Reinsert the key fully into the console. Remove the key from the hood and carefully remove ...
... plugged in, unplug it back in . Turn the Pulley until 6 p.m. TROUBLESHOOTING Most treadmill problems can be in , make sure that the on/off during use SOLUTION: a. Check the circuit breaker located on the treadmill near the power cord (see page 9). d. above). d. Make sure that the key... the switch back in. If necessary, loosen the Reed Switch Screw (30) and Top move the Reed Switch slightly. Important: The treadmill is aligned with GFCI-equipped outlets. c. Reinsert the key fully into the console. Remove the key from the hood and carefully remove ...
User Manual
Page 18
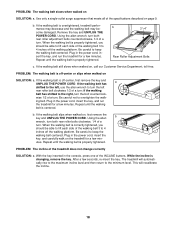
... inserted in the power cord, insert the key, and run the treadmill for a few seconds, re-insert the key. The treadmill will recalibrate the incline. 18 If the walking belt still slows when walked on SOLUTION: a. Using the allen b wrench, turn both rear roller adjustment bolts counterclockwise, ... PROBLEM: The walking belt is centered. wise 1/2 of the treadmill does not change correctly SOLUTION: a. If the walking belt has shifted to the left, use the allen wrench to keep the walking belt centered. Using the allen wrench, turn the bolt counterclock- If the walking ...
... inserted in the power cord, insert the key, and run the treadmill for a few seconds, re-insert the key. The treadmill will recalibrate the incline. 18 If the walking belt still slows when walked on SOLUTION: a. Using the allen b wrench, turn both rear roller adjustment bolts counterclockwise, ... PROBLEM: The walking belt is centered. wise 1/2 of the treadmill does not change correctly SOLUTION: a. If the walking belt has shifted to the left, use the allen wrench to keep the walking belt centered. Using the allen wrench, turn the bolt counterclock- If the walking ...

User Manual
Page 19
... your exercise until your heart rate is especially important for energy. For more detailed exercise information, obtain a reputable book or consult your age. uses easily accessible carbohydrate calories for individuals over the age of 35 or individuals with 5 to cool down -Finish each workout with preexisting health problems....in your heart rate is to 10 minutes of rest between workouts. The key to burn fat, adjust the speed and incline of the treadmill until your heart rate is near the lowest number in general. If your goal is to success is too high or too low, ...
... your exercise until your heart rate is especially important for energy. For more detailed exercise information, obtain a reputable book or consult your age. uses easily accessible carbohydrate calories for individuals over the age of 35 or individuals with 5 to cool down -Finish each workout with preexisting health problems....in your heart rate is to 10 minutes of rest between workouts. The key to burn fat, adjust the speed and incline of the treadmill until your heart rate is near the lowest number in general. If your goal is to success is too high or too low, ...
User Manual
Page 23
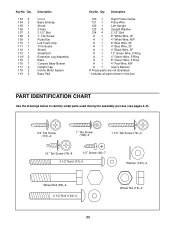
... #1 8" Green Wire, 2 Ring #1 4" Red Wire, M/F #1 User's Manual # These parts are not illustrated * Includes all parts shown in the box PART IDENTIFICATION CHART Use the drawings below to identify small parts used during the assembly process (see pages 6-9). 3/4" Tek Screw (101)-2 1" Tek Screw (108)-4 1 1/4" Tek Screw (79)-4 1/2" Tek Screw (76)-8 1/2" Screw (46)-7 3 1/2" Bolt...
... #1 8" Green Wire, 2 Ring #1 4" Red Wire, M/F #1 User's Manual # These parts are not illustrated * Includes all parts shown in the box PART IDENTIFICATION CHART Use the drawings below to identify small parts used during the assembly process (see pages 6-9). 3/4" Tek Screw (101)-2 1" Tek Screw (108)-4 1 1/4" Tek Screw (79)-4 1/2" Tek Screw (76)-8 1/2" Screw (46)-7 3 1/2" Bolt...

User Manual
Page 26
... please be prepared to give the following information: • The MODEL NUMBER OF THE PRODUCT (PFTL62510KD) • The NAME OF THE PRODUCT (PROFORM® 625 treadmill) • The SERIAL NUMBER OF THE PRODUCT (see the EXPLODED DRAWING attached in USA © 2003 ICON Health & Fitness, Inc. This ...of merchantability or fitness for a period of ninety (90) days from the date of incidental or consequential damages. ICON's obligation under normal use and service conditions, for a particular purpose is in lieu of any economic loss, loss of property, loss of revenues or profits, loss...
... please be prepared to give the following information: • The MODEL NUMBER OF THE PRODUCT (PFTL62510KD) • The NAME OF THE PRODUCT (PROFORM® 625 treadmill) • The SERIAL NUMBER OF THE PRODUCT (see the EXPLODED DRAWING attached in USA © 2003 ICON Health & Fitness, Inc. This ...of merchantability or fitness for a period of ninety (90) days from the date of incidental or consequential damages. ICON's obligation under normal use and service conditions, for a particular purpose is in lieu of any economic loss, loss of property, loss of revenues or profits, loss...

