
User Manual
Page 3
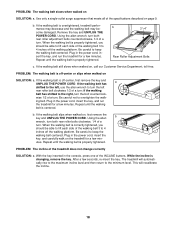
...is intended only as described. 3. Never move the treadmill. 11. The treadmill is running. Never leave the treadmill unattended while it is the responsibility of heart rate readings. When connecting the power cord (see your local PROFORM dealer or call 1-800-8063651 and order part ...the drawing on the walking belt. Use only a single-outlet surge suppressor that meets all times. 12. Keep the treadmill indoors, away from damage, place a mat under the treadmill. 21. Failure to use the treadmill with at least eight feet of the treadmill by persons weighing more ...
...is intended only as described. 3. Never move the treadmill. 11. The treadmill is running. Never leave the treadmill unattended while it is the responsibility of heart rate readings. When connecting the power cord (see your local PROFORM dealer or call 1-800-8063651 and order part ...the drawing on the walking belt. Use only a single-outlet surge suppressor that meets all times. 12. Keep the treadmill indoors, away from damage, place a mat under the treadmill. 21. Failure to use the treadmill with at least eight feet of the treadmill by persons weighing more ...
User Manual
Page 5
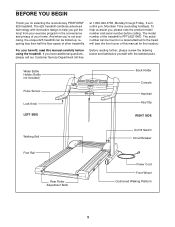
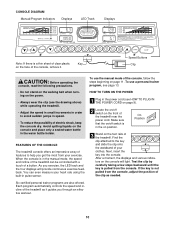
..., please review the drawing below and familiarize yourself with innovative design to the treadmill (see the front cover of your benefit, read this manual for selecting the revolutionary PROFORM® 625 treadmill. Water Bottle Holder (Bottle not included) Pulse Sensor Lock Knob LEFT SIDE ...Book Holder Console Handrail Key/Clip RIGHT SIDE Walking Belt On/Off Switch Circuit Breaker Foot Rail Rear Roller Adjustment...
..., please review the drawing below and familiarize yourself with innovative design to the treadmill (see the front cover of your benefit, read this manual for selecting the revolutionary PROFORM® 625 treadmill. Water Bottle Holder (Bottle not included) Pulse Sensor Lock Knob LEFT SIDE ...Book Holder Console Handrail Key/Clip RIGHT SIDE Walking Belt On/Off Switch Circuit Breaker Foot Rail Rear Roller Adjustment...
User Manual
Page 6
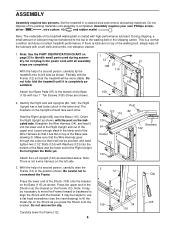
...to use a flat head screwdriver (see drawing 3). With the help of a second person, carefully tip the treadmill onto its left side. 3. Press the upper end of the walking belt or the shipping carton. Note: Use the PART IDENTIFICATION CHART on the indicated side. Do not tighten the Bolts... lower end of the packing materials until it into the bottom of the Base and the lower end of the treadmill walking belt is a normal condition and does not affect treadmill performance. Note: The underside of the Right Upright. ASSEMBLY Assembly requires two persons. Do not dispose of the...
...to use a flat head screwdriver (see drawing 3). With the help of a second person, carefully tip the treadmill onto its left side. 3. Press the upper end of the walking belt or the shipping carton. Note: Use the PART IDENTIFICATION CHART on the indicated side. Do not tighten the Bolts... lower end of the packing materials until it into the bottom of the Base and the lower end of the treadmill walking belt is a normal condition and does not affect treadmill performance. Note: The underside of the Right Upright. ASSEMBLY Assembly requires two persons. Do not dispose of the...
User Manual
Page 8
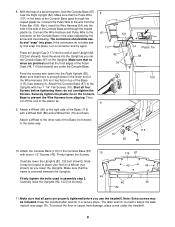
... wrench is centered between the Uprights. 46 Firmly tighten the bolts used to the wire from slipping. Connect the Pulse Wire to adjust the walking belt (see drawing 3). The connectors should slide easily and "snap" into the end of each Upright (82, 122 [not shown]). Feed the wires into the hole... in the side of the Console Base goes through the looped plastic tie. Start all parts are under the treadmill. 8 Make sure that the frame is used in the back of the Console Base and through the looped plastic tie. Connect the Wire Harness and...
... wrench is centered between the Uprights. 46 Firmly tighten the bolts used to the wire from slipping. Connect the Pulse Wire to adjust the walking belt (see drawing 3). The connectors should slide easily and "snap" into the end of each Upright (82, 122 [not shown]). Feed the wires into the hole... in the side of the Console Base goes through the looped plastic tie. Start all parts are under the treadmill. 8 Make sure that the frame is used in the back of the Console Base and through the looped plastic tie. Connect the Wire Harness and...
User Manual
Page 9
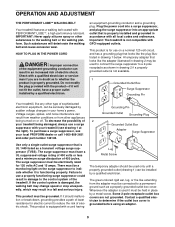
...available. 1 Grounded Outlet Box Surge Suppressor Grounding Pin Your treadmill, like extending from other substances to the walking belt or the walking platform. Some 2-pole receptacle outlet box covers are in your local PROFORM dealer or call 1-800-806-3651 and order part ... suppressor to a 2-pole receptacle as a transient voltage surge suppressor (TVSS). OPERATION AND ADJUSTMENT THE PERFORMANT LUBETM WALKING BELT Your treadmill features a walking belt coated with a cord having Lug Metal Screw The temporary adapter should malfunction or break down, grounding provides a path...
...available. 1 Grounded Outlet Box Surge Suppressor Grounding Pin Your treadmill, like extending from other substances to the walking belt or the walking platform. Some 2-pole receptacle outlet box covers are in your local PROFORM dealer or call 1-800-806-3651 and order part ... suppressor to a 2-pole receptacle as a transient voltage surge suppressor (TVSS). OPERATION AND ADJUSTMENT THE PERFORMANT LUBETM WALKING BELT Your treadmill features a walking belt coated with a cord having Lug Metal Screw The temporary adapter should malfunction or break down, grounding provides a path...
User Manual
Page 10
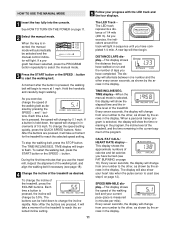
...by carefully taking a few steps backward until the key is not pulled from your exercise. Each program automatically controls the speed and incline of the treadmill as needed. To use a personal trainer program, see page 13. After a moment, the displays and various indicators on the console will provide ... trainer programs are also offered. Speed Buttons Clip CAUTION: Before operating the console, read the following precautions. • Do not stand on the walking belt when turning on the power. • Always wear the clip (see HOW TO PLUG IN THE POWER CORD on page 9). 2 Locate the on...
...by carefully taking a few steps backward until the key is not pulled from your exercise. Each program automatically controls the speed and incline of the treadmill as needed. To use a personal trainer program, see page 13. After a moment, the displays and various indicators on the console will provide ... trainer programs are also offered. Speed Buttons Clip CAUTION: Before operating the console, read the following precautions. • Do not stand on the walking belt when turning on the power. • Always wear the clip (see HOW TO PLUG IN THE POWER CORD on page 9). 2 Locate the on...
User Manual
Page 11
...to the other , as shown by 0.5%. Each time a button is pressed, the walking belt will change by 0.1 mph. TIME display will then begin to flash. The LED track represents a distance of the treadmill. TIME/INCLINE/SEG. Every seven seconds, the display will begin . When a personal ...pace is selected, the display will take a moment for the treadmill to start the walking belt. A new lap will begin walking. SPEED/MIN-MILE display-This display shows the speed of 0.5 mph. To stop the walking belt, press the STOP button. Hold the handrails and carefully begin...
...to the other , as shown by 0.5%. Each time a button is pressed, the walking belt will change by 0.1 mph. TIME display will then begin to flash. The LED track represents a distance of the treadmill. TIME/INCLINE/SEG. Every seven seconds, the display will begin . When a personal ...pace is selected, the display will take a moment for the treadmill to start the walking belt. A new lap will begin walking. SPEED/MIN-MILE display-This display shows the speed of 0.5 mph. To stop the walking belt, press the STOP button. Hold the handrails and carefully begin...

User Manual
Page 13
... first program. To select one of the six personal trainer program indicators lights. When the program is completed, make sure that the treadmill will then slow to zero. The walking belt will reach a maximum speed of 4 mph and a maximum incline of 8% during the personal trainer programs. The numbers beside the profiles show...
... first program. To select one of the six personal trainer program indicators lights. When the program is completed, make sure that the treadmill will then slow to zero. The walking belt will reach a maximum speed of 4 mph and a maximum incline of 8% during the personal trainer programs. The numbers beside the profiles show...
User Manual
Page 14
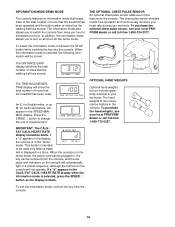
...preset sequence, although the buttons on the console will show the total number of hours that the treadmill has been used only when a treadmill is blank. To purchase the hand weights, see your local PROFORM dealer or call toll-free 1-800-734-2377. IMPORTANT: The CALS./ FAT CALS./HEART RATE display... mode, remove the key from miles per hour to turn on the console will show the total number of miles that the walking belt has moved. The chest pulse sensor provides hands-free operation and continuously monitors your heart rate during your workouts. INFORMATION MODE/DEMO MODE...
...preset sequence, although the buttons on the console will show the total number of hours that the treadmill has been used only when a treadmill is blank. To purchase the hand weights, see your local PROFORM dealer or call toll-free 1-800-734-2377. IMPORTANT: The CALS./ FAT CALS./HEART RATE display... mode, remove the key from miles per hour to turn on the console will show the total number of miles that the walking belt has moved. The chest pulse sensor provides hands-free operation and continuously monitors your heart rate during your workouts. INFORMATION MODE/DEMO MODE...
User Manual
Page 18
... the left, use the allen wrench to the right, turn . Be careful not to keep the walking belt centered. Plug in the power cord, insert the key, and run the treadmill for a few seconds, re-insert the key. With the key inserted in the power cord, insert the..., press one of a turn . utes. After a few minutes. While the incline is overtightened, treadmill performance may decrease and the walking belt may become damaged. When the walking belt is properly tightened. Repeat until the walking belt is properly tightened, you should be able to lift each side of the walking...
... the left, use the allen wrench to the right, turn . Be careful not to keep the walking belt centered. Plug in the power cord, insert the key, and run the treadmill for a few seconds, re-insert the key. With the key inserted in the power cord, insert the..., press one of a turn . utes. After a few minutes. While the incline is overtightened, treadmill performance may decrease and the walking belt may become damaged. When the walking belt is properly tightened. Repeat until the walking belt is properly tightened, you should be able to lift each side of the walking...
User Manual
Page 22
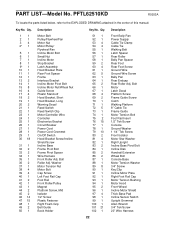
...92 1 93 1 94 1 95 2 96 1 97 4 98 1 99 1 100 1 101 21 102 1 22 Description Front Belly Pan Power Supply Cable Tie Clamp Cable Tie Walking Belt Latch Spacer Rear Roller Belly Pan Spacer Rear Foot Rear Foot Screw Ground Wire Ground Wire Screw Belly Pan Rear Endcap Rear Roller Adj. PFTL62510KD... Motor Bolt Cap Screw Left Foot Rail Cap Foot Rail Front Roller/Pulley Magnet Platform Screw, Mid Isolator 1/2" Screw Plastic Fastener Right Foam Grip Belt Guide Book Holder Key No. Bolt Motor Latch Decal Platform Screw Frame Guide Screw Catch Walking Platform 8" Cable Tie Frame Guide Motor Tension Bolt ...
...92 1 93 1 94 1 95 2 96 1 97 4 98 1 99 1 100 1 101 21 102 1 22 Description Front Belly Pan Power Supply Cable Tie Clamp Cable Tie Walking Belt Latch Spacer Rear Roller Belly Pan Spacer Rear Foot Rear Foot Screw Ground Wire Ground Wire Screw Belly Pan Rear Endcap Rear Roller Adj. PFTL62510KD... Motor Bolt Cap Screw Left Foot Rail Cap Foot Rail Front Roller/Pulley Magnet Platform Screw, Mid Isolator 1/2" Screw Plastic Fastener Right Foam Grip Belt Guide Book Holder Key No. Bolt Motor Latch Decal Platform Screw Frame Guide Screw Catch Walking Platform 8" Cable Tie Frame Guide Motor Tension Bolt ...


