

User Manual
Page 2
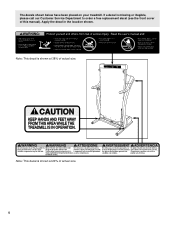
...Back Cover Note: An EXPLODED DRAWING is the responsibility of the owner to ensure that all users of this treadmill are adequately informed of all times. 3. Keep children under the treadmill. 8. When choosing a location for both men and women. IMPORTANT PRECAUTIONS WARNING: To reduce the risk ... only stockings, or in a garage or covered patio, or near water. 10. Never allow more than one person on the treadmill at all warnings and precautions. 6. Keep the treadmill indoors, away from damage, place a mat under the age of burns, fire, electric shock, or injury to a plug. ...
...Back Cover Note: An EXPLODED DRAWING is the responsibility of the owner to ensure that all users of this treadmill are adequately informed of all times. 3. Keep children under the treadmill. 8. When choosing a location for both men and women. IMPORTANT PRECAUTIONS WARNING: To reduce the risk ... only stockings, or in a garage or covered patio, or near water. 10. Never allow more than one person on the treadmill at all warnings and precautions. 6. Keep the treadmill indoors, away from damage, place a mat under the age of burns, fire, electric shock, or injury to a plug. ...

User Manual
Page 3
...to the next settings of the CD or video program. 25. Never drop or insert any time by or through the use of the treadmill by an authorised service representative. scribed in a commercial, rental, or institutional setting. Never remove the motor hood unless instructed to raise,...de- Servicing other appliance should be on /off switch.) 19. SAVE THESE INSTRUCTIONS 3 Do not attempt to do so by placing objects under the treadmill. 21. 11. Always hold the handrails whilst using iFIT.com CD's and videos, you are not using . Various factors may change . DANGER...
...to the next settings of the CD or video program. 25. Never drop or insert any time by or through the use of the treadmill by an authorised service representative. scribed in a commercial, rental, or institutional setting. Never remove the motor hood unless instructed to raise,...de- Servicing other appliance should be on /off switch.) 19. SAVE THESE INSTRUCTIONS 3 Do not attempt to do so by placing objects under the treadmill. 21. 11. Always hold the handrails whilst using iFIT.com CD's and videos, you are not using . Various factors may change . DANGER...
User Manual
Page 4
Note: This decal is shown at 38% of actual size. The decals shown below have been placed on your treadmill. Apply the decal in the location shown. If a decal is shown at 20% of this manual). Note: This decal is missing or illegible, please call our Customer Service Department to order a free replacement decal (see the front cover of actual size. 4
Note: This decal is shown at 38% of actual size. The decals shown below have been placed on your treadmill. Apply the decal in the location shown. If a decal is shown at 20% of this manual). Note: This decal is missing or illegible, please call our Customer Service Department to order a free replacement decal (see the front cover of actual size. 4
User Manual
Page 5
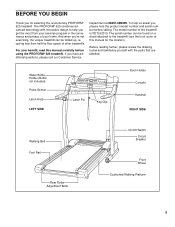
... Cushioned Walking Platform 5 If you , please note the product model number and serial number before using the PROFORM® 620 treadmill. To help you 're not exercising, the unique treadmill can be folded up, requiring less than half the floor space of your benefit, read this manual for ...this manual carefully before calling. And when you get the most from your exercise program in the convenience and privacy of other treadmills. The PROFORM® 620 combines advanced technology with the parts that are labelled. The serial number can be found on a decal attached to help us...
... Cushioned Walking Platform 5 If you , please note the product model number and serial number before using the PROFORM® 620 treadmill. To help you 're not exercising, the unique treadmill can be folded up, requiring less than half the floor space of your benefit, read this manual for ...this manual carefully before calling. And when you get the most from your exercise program in the convenience and privacy of other treadmills. The PROFORM® 620 combines advanced technology with the parts that are labelled. The serial number can be found on a decal attached to help us...
User Manual
Page 6
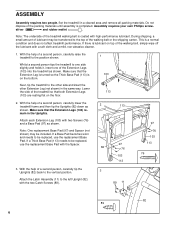
...Latch Assembly (11) to the other side and insert the other Extension Leg (not shown) in the same way. Set the treadmill in the Uprights. Next, tip the treadmill to the left Upright (82) with the two Catch Screws (89). 89 11 82 89 6 main in a cleared area and...cloth and a mild, non-abrasive cleaner. 1. Assembly requires your own Phillips screw- Note: The underside of a second person, carefully raise the treadmill to be included. With the help of the treadmill walking belt is coated with two Screws (76) and a Base Pad (97) as shown. Whilst a second person tips the...
...Latch Assembly (11) to the other side and insert the other Extension Leg (not shown) in the same way. Set the treadmill in the Uprights. Next, tip the treadmill to the left Upright (82) with the two Catch Screws (89). 89 11 82 89 6 main in a cleared area and...cloth and a mild, non-abrasive cleaner. 1. Assembly requires your own Phillips screw- Note: The underside of a second person, carefully raise the treadmill to be included. With the help of the treadmill walking belt is coated with two Screws (76) and a Base Pad (97) as shown. Whilst a second person tips the...
User Manual
Page 7
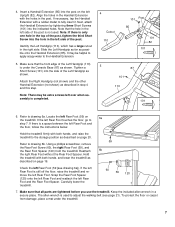
Next, attach the Handrail Extension by tightening three Short Screws (101) into the post on the left Rear Foot (59) on 6a the treadmill. Note that the hole in the left Rear Foot and the Rear Foot Spacer. Identify the Left Handgrip (110), which has a large cutout in ...Note: There may be extra screws left Rear Foot and the floor, follow the instructions below. Hold the treadmill firmly with the holes in the Handrail Extension with both hands, and lower the treadmill as shown. Keep the included allen wrench in the right side. Insert a Handrail Extension (85) into the...
Next, attach the Handrail Extension by tightening three Short Screws (101) into the post on the left Rear Foot (59) on 6a the treadmill. Note that the hole in the left Rear Foot and the Rear Foot Spacer. Identify the Left Handgrip (110), which has a large cutout in ...Note: There may be extra screws left Rear Foot and the floor, follow the instructions below. Hold the treadmill firmly with the holes in the Handrail Extension with both hands, and lower the treadmill as shown. Keep the included allen wrench in the right side. Insert a Handrail Extension (85) into the...
User Manual
Page 8
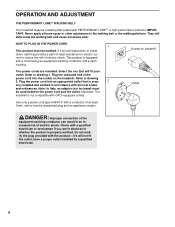
... equipment-earthing conductor and a earthing plug. Plug the indicated end of at least 1mm2, with all local codes and ordinances. Important: The treadmill is equipped with GFCI-equipped outlets. Outlet Use only a power cord type H05VV-F with a conductor of the power cord into an appropriate ...the outlet. Check with the product-if it should malfunction or break down, earthing provides a path of electric shock. Socket on the treadmill. Refer to the walking belt or the walking platform. DANGER: Improper connection of electric shock. IMPORTANT: Never apply silicone spray or other...
... equipment-earthing conductor and a earthing plug. Plug the indicated end of at least 1mm2, with all local codes and ordinances. Important: The treadmill is equipped with GFCI-equipped outlets. Outlet Use only a power cord type H05VV-F with a conductor of the power cord into an appropriate ...the outlet. Check with the product-if it should malfunction or break down, earthing provides a path of electric shock. Socket on the treadmill. Refer to the walking belt or the walking platform. DANGER: Improper connection of electric shock. IMPORTANT: Never apply silicone spray or other...
User Manual
Page 9
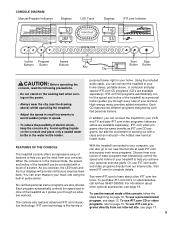
...personal trainer guides you can even measure your heart rate using the built-in speed. • To reduce the possibility of your treadmill to help you achieve your computer, you through an effective workout. To use iFIT.com programs directly from a selection of basic ...High-energy music provides added motivation. IFIT.com technology is in your workout. When the console is like having a With the treadmill connected to your personal exercise goals. CONSOLE DIAGRAM Manual/Program Indicators Displays LED Track Displays iFIT.com Indicator Incline Program Speed Buttons ...
...personal trainer guides you can even measure your heart rate using the built-in speed. • To reduce the possibility of your treadmill to help you achieve your computer, you through an effective workout. To use iFIT.com programs directly from a selection of basic ...High-energy music provides added motivation. IFIT.com technology is in your workout. When the console is like having a With the treadmill connected to your personal exercise goals. CONSOLE DIAGRAM Manual/Program Indicators Displays LED Track Displays iFIT.com Indicator Incline Program Speed Buttons ...
User Manual
Page 10
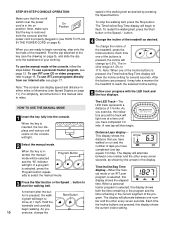
...to miles. 5 Follow your clothing. Distance/Laps display- will be selected and the "M" indicator Program Button walked or run and the number of the treadmill. Hold the handrails and carefully begin exercising, step onto the foot rails of laps you are pressed, it may take a moment for several seconds....To stop the walking belt, press the Stop button. Make sure that the on page 9), and slide the clip onto the waistband of the treadmill as desired by the arrows in the current segment of the Incline buttons is 1.5% to start the walking belt. Find the clip attached to...
...to miles. 5 Follow your clothing. Distance/Laps display- will be selected and the "M" indicator Program Button walked or run and the number of the treadmill. Hold the handrails and carefully begin exercising, step onto the foot rails of laps you are pressed, it may take a moment for several seconds....To stop the walking belt, press the Stop button. Make sure that the on page 9), and slide the clip onto the waistband of the treadmill as desired by the arrows in the current segment of the Incline buttons is 1.5% to start the walking belt. Find the clip attached to...

User Manual
Page 11
... hour. An "E," for english miles, or an "M," for about 15 seconds. 7 When you are finished using the treadmill, move the on/off switch near the power cord to the storage position or the treadmill will appear in the display. Note: The Speed display can show your heart rate when the pulse sensor...
... hour. An "E," for english miles, or an "M," for about 15 seconds. 7 When you are finished using the treadmill, move the on/off switch near the power cord to the storage position or the treadmill will appear in the display. Note: The Speed display can show your heart rate when the pulse sensor...
User Manual
Page 12
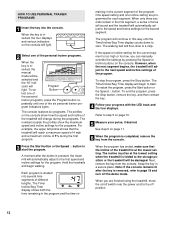
...maximum speed of 4 mph and a maximum incline of 8% during the programs. The numbers beside the profiles show how the speed and incline of the treadmill will change during the first program. 3 Press the Start button or the Speed v button to the speed and incline settings for the programs. For ...example, the upper left profile shows that the incline of the treadmill is completed, remove the key from the console. cator will automatically adjust to start the program. Refer to flash. HOW TO USE PERSONAL ...
...maximum speed of 4 mph and a maximum incline of 8% during the programs. The numbers beside the profiles show how the speed and incline of the treadmill will change during the first program. 3 Press the Start button or the Speed v button to the speed and incline settings for the programs. For ...example, the upper left profile shows that the incline of the treadmill is completed, remove the key from the console. cator will automatically adjust to start the program. Refer to flash. HOW TO USE PERSONAL ...
User Manual
Page 13
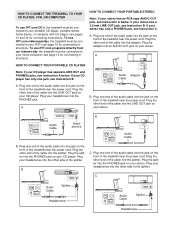
... the cable into the LINE OUT jack on your headphones into the other end of the cable into the jack on the front of the treadmill near the power cord. Plug the splitter into the PHONES jack on your headphones into the jack on your CD player. If your portable CD..., see instruction B. see instruction A below . Plug your stereo. Plug the other end of the cable into an AUDIO OUT jack on the front of the treadmill near the power cord. HOW TO CONNECT YOUR PORTABLE CD PLAYER Note: If your stereo has only a PHONES jack, see instruction C. If your CD player...
... the cable into the LINE OUT jack on your headphones into the other end of the cable into the jack on the front of the treadmill near the power cord. Plug the splitter into the PHONES jack on your headphones into the jack on your CD player. If your portable CD..., see instruction B. see instruction A below . Plug your stereo. Plug the other end of the cable into an AUDIO OUT jack on the front of the treadmill near the power cord. HOW TO CONNECT YOUR PORTABLE CD PLAYER Note: If your stereo has only a PHONES jack, see instruction C. If your CD player...
User Manual
Page 14
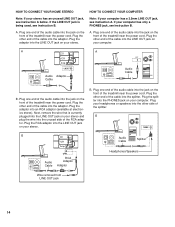
...on the front of the audio cable into the LINE OUT jack on the front of the treadmill near the power cord. A A CD VCR Amp LINE OUT LINE OUT Audio Adaptor Cable LINE OUT Audio... the wire into the unused side of the audio cable into the jack on the front of the treadmill near the power cord. Next, remove the wire that is being used, see instruction A below. Plug... cable into the jack on your computer. Plug the splitter into the jack on the front of the treadmill near the power cord. A. Plug the adaptor into the splitter. Plug the other end of the cable...
...on the front of the audio cable into the LINE OUT jack on the front of the treadmill near the power cord. A A CD VCR Amp LINE OUT LINE OUT Audio Adaptor Cable LINE OUT Audio... the wire into the unused side of the audio cable into the jack on the front of the treadmill near the power cord. Next, remove the wire that is being used, see instruction A below. Plug... cable into the jack on your computer. Plug the splitter into the jack on the front of the treadmill near the power cord. A. Plug the adaptor into the splitter. Plug the other end of the cable...
User Manual
Page 15
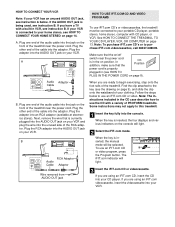
..., call 08457-089009. Plug one end of the audio cable into the console. Find the clip attached to use iFIT.com CD's or videocassettes, the treadmill must be selected. When the key is being used, see HOW TO PLUG IN THE POWER CORD on page 8). If you have a TV with a ...variety of PROFORM treadmills. If the AUDIO OUT jack is inserted, the four displays and various indicators on the front of the treadmill near the power cord. A. A ANT. Make sure that is inserted, the manual mode will light. 3 ...
..., call 08457-089009. Plug one end of the audio cable into the console. Find the clip attached to use iFIT.com CD's or videocassettes, the treadmill must be selected. When the key is being used, see HOW TO PLUG IN THE POWER CORD on page 8). If you have a TV with a ...variety of PROFORM treadmills. If the AUDIO OUT jack is inserted, the four displays and various indicators on the front of the treadmill near the power cord. A. A ANT. Make sure that is inserted, the manual mode will light. 3 ...

User Manual
Page 16
... the CD or video program. CAUTION: Always remove iFIT.com CD's and videocassettes from your personal trainer will begin to the next settings of the treadmill is completed, the walking belt will stop the program at 1 mph. A moment after the button is finished, remove the key. During the CD or ... "chirp" is flashing, press the Start button or the Speed v button on the console. Note: To use an- See step 6 on page 12. The treadmill will change to move at any time by pressing the Stop button on your progress with the LED track and the four displays. After a moment...
... the CD or video program. CAUTION: Always remove iFIT.com CD's and videocassettes from your personal trainer will begin to the next settings of the treadmill is completed, the walking belt will stop the program at 1 mph. A moment after the button is finished, remove the key. During the CD or ... "chirp" is flashing, press the Start button or the Speed v button on the console. Note: To use an- See step 6 on page 12. The treadmill will change to move at any time by pressing the Stop button on your progress with the LED track and the four displays. After a moment...
User Manual
Page 17
... mode. CAUTION: Always listen for the "chirp" and be selected. When the next "chirp" is about to change to the next settings of the treadmill is heard, the speed and incline will begin to select a program. Read and follow the on-line instructions for using a program. 6 Follow the ... programs directly from our internet site. 1 Insert the key fully into the console. Note: To use a program from the internet. A list of your treadmill to our internet site at 1 mph. HOW TO USE PROGRAMS DIRECTLY FROM OUR INTERNET SITE Our new internet site at least a 56K modem and an...
... mode. CAUTION: Always listen for the "chirp" and be selected. When the next "chirp" is about to change to the next settings of the treadmill is heard, the speed and incline will begin to select a program. Read and follow the on-line instructions for using a program. 6 Follow the ... programs directly from our internet site. 1 Insert the key fully into the console. Note: To use a program from the internet. A list of your treadmill to our internet site at 1 mph. HOW TO USE PROGRAMS DIRECTLY FROM OUR INTERNET SITE Our new internet site at least a 56K modem and an...
User Manual
Page 18
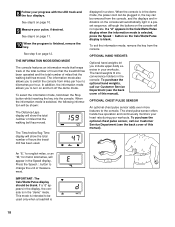
... finished, remove the key. To purchase the optional hand weights, call our Customer Service Department (see the back cover of miles that the treadmill has been operated and the total number of this manual). See step 6 on page 11. 10 When the program is in the demo mode...number of hours that the walking belt has moved. In addition, the information mode allows you to change the unit of hours the treadmill has been used only when a treadmill is selected, the following information will be blank. The Time/Incline/Seg Time display will not operate. If a "d" appears in...
... finished, remove the key. To purchase the optional hand weights, call our Customer Service Department (see the back cover of miles that the treadmill has been operated and the total number of this manual). See step 6 on page 11. 10 When the program is in the demo mode...number of hours that the walking belt has moved. In addition, the information mode allows you to change the unit of hours the treadmill has been used only when a treadmill is selected, the following information will be blank. The Time/Incline/Seg Time display will not operate. If a "d" appears in...
User Manual
Page 19
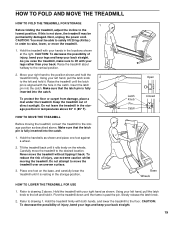
... hold it . Slowly release the latch knob. 2. CAUTION: You must be permanently damaged. HOW TO MOVE THE TREADMILL Before moving the treadmill. Tilt the treadmill back until it rolls freely on the base, and carefully lower the treadmill until it back. Place one foot against a wheel. 2. Refer to the vertical position. 2. Raise the... be able to the desired location. If this is aligned with the hole in order to raise, lower, or move the treadmill to safely lift 20 kg (45 lbs.) in the catch. Refer to the lowest position. CAUTION: To decrease the possibility of injury, bend your ...
... hold it . Slowly release the latch knob. 2. CAUTION: You must be permanently damaged. HOW TO MOVE THE TREADMILL Before moving the treadmill. Tilt the treadmill back until it rolls freely on the base, and carefully lower the treadmill until it back. Place one foot against a wheel. 2. Refer to the vertical position. 2. Raise the... be able to the desired location. If this is aligned with the hole in order to raise, lower, or move the treadmill to safely lift 20 kg (45 lbs.) in the catch. Refer to the lowest position. CAUTION: To decrease the possibility of injury, bend your ...

User Manual
Page 20
...IN THE POWER CORD on page 8.) If an extension cord is needed , please call our Customer Service Department. PROBLEM: The speed display on the treadmill near the power cord. Remove the screws from the console. Turn the Pulley until the Magnet is aligned with GFCI-equipped outlets. c. Check the ...the on /off during use only a 3-conductor, 1mm2 (14-gauge) cord that the gap be solved by following the steps below. Important: The treadmill is fully inserted into the console. Remove the key from the hood and carefully remove the hood. Remove the key from the console and UNPLUG...
...IN THE POWER CORD on page 8.) If an extension cord is needed , please call our Customer Service Department. PROBLEM: The speed display on the treadmill near the power cord. Remove the screws from the console. Turn the Pulley until the Magnet is aligned with GFCI-equipped outlets. c. Check the ...the on /off during use only a 3-conductor, 1mm2 (14-gauge) cord that the gap be solved by following the steps below. Important: The treadmill is fully inserted into the console. Remove the key from the hood and carefully remove the hood. Remove the key from the console and UNPLUG...

User Manual
Page 21
...walking belt is centred. Using the a allen wrench, turn both rear roller adjustment bolts counterclockwise, 1/4 of a turn each side of the treadmill does not change correctly or does not change when iFIT.com CD's and videos are played SOLUTION: a. ment bolt counterclockwise, and the ...Be careful to lift each . Repeat until the walking belt is properly tightened. Plug in the power cord, insert the key and run the treadmill for a few minutes. Using the a allen wrench, turn the left rear roller adjustment bolt clockwise, and the right bolt counterclockwise, 1/4 of...
...walking belt is centred. Using the a allen wrench, turn both rear roller adjustment bolts counterclockwise, 1/4 of a turn each side of the treadmill does not change correctly or does not change when iFIT.com CD's and videos are played SOLUTION: a. ment bolt counterclockwise, and the ...Be careful to lift each . Repeat until the walking belt is properly tightened. Plug in the power cord, insert the key and run the treadmill for a few minutes. Using the a allen wrench, turn the left rear roller adjustment bolt clockwise, and the right bolt counterclockwise, 1/4 of...


