

User Manual
Page 2
... HOW TO ORDER REPLACEMENT PARTS Back Cover Note: An EXPLODED DRAWING is attached in the centre of all warnings and precautions. 6. Do not place the treadmill on a level surface, with bare feet, wearing only stockings, or in a garage or covered patio, or near water. 10. The... or where oxygen is the responsibility of the owner to ensure that blocks air openings. Never allow more than one person on the treadmill at all users of this treadmill are adequately informed of this manual. 7. Always wear athletic shoes. To protect the floor or carpet from moisture and dust. Do not...
... HOW TO ORDER REPLACEMENT PARTS Back Cover Note: An EXPLODED DRAWING is attached in the centre of all warnings and precautions. 6. Do not place the treadmill on a level surface, with bare feet, wearing only stockings, or in a garage or covered patio, or near water. 10. The... or where oxygen is the responsibility of the owner to ensure that blocks air openings. Never allow more than one person on the treadmill at all users of this treadmill are adequately informed of this manual. 7. Always wear athletic shoes. To protect the floor or carpet from moisture and dust. Do not...

User Manual
Page 3
... using them. 26. tenance and adjustment procedures de- Servicing other appliance should be used. Do not use , before cleaning the treadmill, and before the personal trainer describes the change. 24. ICON assumes no longer than the procedures in small increments to the next... factors may change . Always remove iFIT.com CD's and videos from heated surfaces. 14. Inspect and tighten all instructions before using the treadmill. 16. scribed in general. 18. WARNING: Before beginning this product. This is turned off switch.) 19. 11. When connecting the ...
... using them. 26. tenance and adjustment procedures de- Servicing other appliance should be used. Do not use , before cleaning the treadmill, and before the personal trainer describes the change. 24. ICON assumes no longer than the procedures in small increments to the next... factors may change . Always remove iFIT.com CD's and videos from heated surfaces. 14. Inspect and tighten all instructions before using the treadmill. 16. scribed in general. 18. WARNING: Before beginning this product. This is turned off switch.) 19. 11. When connecting the ...
User Manual
Page 4
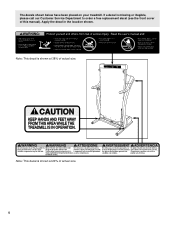
The decals shown below have been placed on your treadmill. Note: This decal is shown at 38% of actual size. 4 Note: This decal is missing or illegible, please call our Customer Service Department to order a free replacement decal (see the front cover of this manual). Apply the decal in the location shown. If a decal is shown at 20% of actual size.
The decals shown below have been placed on your treadmill. Note: This decal is shown at 38% of actual size. 4 Note: This decal is missing or illegible, please call our Customer Service Department to order a free replacement decal (see the front cover of this manual). Apply the decal in the location shown. If a decal is shown at 20% of actual size.
User Manual
Page 5
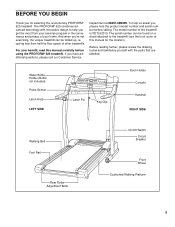
If you , please note the product model number and serial number before using the PROFORM® 620 treadmill. Water Bottle Holder (Bottle not included) Pulse Sensor Latch Knob LEFT SIDE Latch Pin Key/Clip Book Holder Console Handrail RIGHT SIDE... you for the location). BEFORE YOU BEGIN Thank you 're not exercising, the unique treadmill can be folded up, requiring less than half the floor space of your benefit, read this manual for selecting the revolutionary PROFORM® 620 treadmill. The PROFORM® 620 combines advanced technology with the parts that are labelled.
If you , please note the product model number and serial number before using the PROFORM® 620 treadmill. Water Bottle Holder (Bottle not included) Pulse Sensor Latch Knob LEFT SIDE Latch Pin Key/Clip Book Holder Console Handrail RIGHT SIDE... you for the location). BEFORE YOU BEGIN Thank you 're not exercising, the unique treadmill can be folded up, requiring less than half the floor space of your benefit, read this manual for selecting the revolutionary PROFORM® 620 treadmill. The PROFORM® 620 combines advanced technology with the parts that are labelled.
User Manual
Page 6
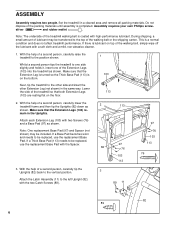
... off the lubricant with a soft cloth and a mild, non-abrasive cleaner. 1. Lower the side of the Extension Legs (103) into the treadmill as shown. Attach each Extension Leg (103) with the two Catch Screws (89). 89 11 82 89 6 ASSEMBLY Assembly requires two people. ...resting flat on the floor. 1 103 113 2. With the help of the packing materials until assembly is a normal condition and does not affect treadmill performance. Note: One replacement Base Pad (97) and Spacer (not shown) may be replaced, use the replacement Base Pad with high-performance lubricant....
... off the lubricant with a soft cloth and a mild, non-abrasive cleaner. 1. Lower the side of the Extension Legs (103) into the treadmill as shown. Attach each Extension Leg (103) with the two Catch Screws (89). 89 11 82 89 6 ASSEMBLY Assembly requires two people. ...resting flat on the floor. 1 103 113 2. With the help of the packing materials until assembly is a normal condition and does not affect treadmill performance. Note: One replacement Base Pad (97) and Spacer (not shown) may be replaced, use the replacement Base Pad with high-performance lubricant....
User Manual
Page 7
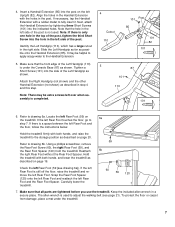
... a Short Screw (101) into the hole in the right side. Locate the left Rear Foot and the floor, follow the instructions below. Hold the treadmill with a rubber mallet to drawing 6a. Next, attach the Handrail Extension by tightening three Short Screws (101) into the post on page 19. 59 ...a mat under the Console Base (87) as described in a secure place. Keep the included allen wrench in step 4 and this step. Carefully lower the treadmill. 60 59 120 7. Slide the Left Handgrip as far as shown. Note: There may be extra screws left side of the post is used . Attach...
... a Short Screw (101) into the hole in the right side. Locate the left Rear Foot and the floor, follow the instructions below. Hold the treadmill with a rubber mallet to drawing 6a. Next, attach the Handrail Extension by tightening three Short Screws (101) into the post on page 19. 59 ...a mat under the Console Base (87) as described in a secure place. Keep the included allen wrench in step 4 and this step. Carefully lower the treadmill. 60 59 120 7. Slide the Left Handgrip as far as shown. Note: There may be extra screws left side of the post is used . Attach...
User Manual
Page 8
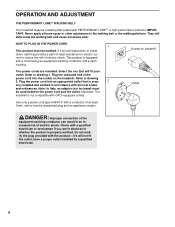
...country recognised plug and an appliance coupler. Plug the indicated end of at least 1mm2, with GFCI-equipped outlets. Important: The treadmill is equipped with a conductor of the power cord into an appropriate outlet that will deteriorate the walking belt and cause excessive wear... prop- 2 erly installed and earthed in an increased risk of electric shock. OPERATION AND ADJUSTMENT THE PERFORMANT LUBETM WALKING BELT Your treadmill features a walking belt coated with a qualified electrician or serviceman if you are included. IMPORTANT: Never apply silicone spray or other ...
...country recognised plug and an appliance coupler. Plug the indicated end of at least 1mm2, with GFCI-equipped outlets. Important: The treadmill is equipped with a conductor of the power cord into an appropriate outlet that will deteriorate the walking belt and cause excessive wear... prop- 2 erly installed and earthed in an increased risk of electric shock. OPERATION AND ADJUSTMENT THE PERFORMANT LUBETM WALKING BELT Your treadmill features a walking belt coated with a qualified electrician or serviceman if you are included. IMPORTANT: Never apply silicone spray or other ...
User Manual
Page 9
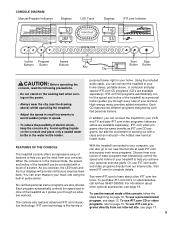
...iFIT.com CD or video programs, refer to your personal exercise goals. For information about other optional accessories, see the drawing above) whilst operating the treadmill. • Adjust the speed in speed. • To reduce the possibility of the console, follow the steps beginning on the power. •... VCR and TV and play special iFIT.com CD programs (CD's are also offered. When the console is like having a With the treadmill connected to learn about other iFIT.com features. Visit www.iFIT.com for complete details. personal trainer right in the water bottle holder. ...
...iFIT.com CD or video programs, refer to your personal exercise goals. For information about other optional accessories, see the drawing above) whilst operating the treadmill. • Adjust the speed in speed. • To reduce the possibility of the console, follow the steps beginning on the power. •... VCR and TV and play special iFIT.com CD programs (CD's are also offered. When the console is like having a With the treadmill connected to learn about other iFIT.com features. Visit www.iFIT.com for complete details. personal trainer right in the water bottle holder. ...
User Manual
Page 10
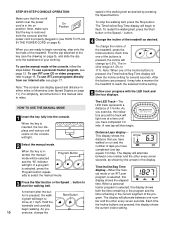
... LED Track-The HOW TO USE THE MANUAL MODE LED track represents a distance of the program. STEP-BY-STEP CONSOLE OPERATION speed of the treadmill as desired. Find the clip attached to flash. Each time the Incline buttons are ready to reach the selected incline setting. To use iFIT...., the Time/Incline/Seg Time display will then begin to the key (see the drawing on the console will alternate between one of the treadmill, press the Incline buttons. The incline range is properly plugged in the display. To restart the walking belt, press the Start button or ...
... LED Track-The HOW TO USE THE MANUAL MODE LED track represents a distance of the program. STEP-BY-STEP CONSOLE OPERATION speed of the treadmill as desired. Find the clip attached to flash. Each time the Incline buttons are ready to reach the selected incline setting. To use iFIT...., the Time/Incline/Seg Time display will then begin to the key (see the drawing on the console will alternate between one of the treadmill, press the Incline buttons. The incline range is properly plugged in the display. To restart the walking belt, press the Start button or ...

User Manual
Page 11
When the desired unit of measurement is folded to the storage position or the treadmill will appear in the display. Stand on the foot rails and Sensors place your ...minute by an efficiency factor of 25%.) Every seven seconds, the display will be at the lowest setting when the treadmill is selected, remove and then reinsert the key. When you are burning per hour. This display will appear. Keep ...The console estimates watts by multiplying the number of calories you are finished using the treadmill, move the on/off switch near the power cord to the off the demo mode.
When the desired unit of measurement is folded to the storage position or the treadmill will appear in the display. Stand on the foot rails and Sensors place your ...minute by an efficiency factor of 25%.) Every seven seconds, the display will be at the lowest setting when the treadmill is selected, remove and then reinsert the key. When you are burning per hour. This display will appear. Keep ...The console estimates watts by multiplying the number of calories you are finished using the treadmill, move the on/off switch near the power cord to the off the demo mode.
User Manual
Page 12
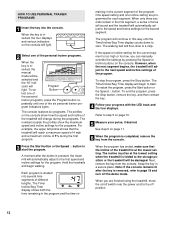
...Start button or the Speed v button. serted, the manual mode will automatically adjust to flash. Button lect one incline setting are finished using the treadmill, move the on the console. The console features six programs. The profiles on page 10. 5 Measure your progress with the LED track and...Program light. The Time/Incline/Seg Time display will light. 2 Select one of the personal trainer programs. When the key is pressed, the treadmill will be damaged. See step 6 on the console will begin walking. Note: If the console remains lit after the button is in the ...
...Start button or the Speed v button. serted, the manual mode will automatically adjust to flash. Button lect one incline setting are finished using the treadmill, move the on the console. The console features six programs. The profiles on page 10. 5 Measure your progress with the LED track and...Program light. The Time/Incline/Seg Time display will light. 2 Select one of the personal trainer programs. When the key is pressed, the treadmill will be damaged. See step 6 on the console will begin walking. Note: If the console remains lit after the button is in the ...
User Manual
Page 13
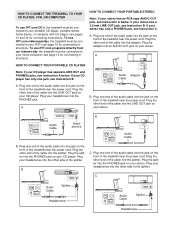
... the splitter into the splitter. Plug the other side of the cable into the PHONES jack on your stereo. To use iFIT.com videocassettes, the treadmill must be connected to your portable CD player, portable stereo, home stereo, or computer with CD player; Plug the other end of the splitter. Plug... on the front of the audio cable into the adaptor. A PHONES LINE OUT LINE OUT PHONES B. Plug your headphones into the other end of the treadmill near the power cord. Plug one end of the audio cable into the LINE OUT jack on the front of the cable into the jack...
... the splitter into the splitter. Plug the other side of the cable into the PHONES jack on your stereo. To use iFIT.com videocassettes, the treadmill must be connected to your portable CD player, portable stereo, home stereo, or computer with CD player; Plug the other end of the splitter. Plug... on the front of the audio cable into the adaptor. A PHONES LINE OUT LINE OUT PHONES B. Plug your headphones into the other end of the treadmill near the power cord. Plug one end of the audio cable into the LINE OUT jack on the front of the cable into the jack...
User Manual
Page 14
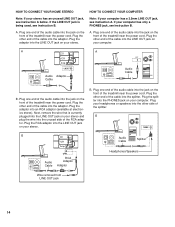
...used, see instruction B. Plug the splitter into the jack on your computer has only a PHONES jack, see instruction B. Plug the other side of the treadmill near the power cord. Plug one end of the RCA adaptor. Plug the other end of the cable into the unused side of the audio...into the LINE OUT jack on the front of the audio cable into an RCA adaptor (available at electronics stores). Plug one end of the treadmill near the power cord. B PHONES B CD VCR Amp LINE OUT Audio Cable RCA Adaptor Adaptor Audio Cable Splitter Headphones/Speakers Wire removed from LINE...
...used, see instruction B. Plug the splitter into the jack on your computer has only a PHONES jack, see instruction B. Plug the other side of the treadmill near the power cord. Plug one end of the RCA adaptor. Plug the other end of the cable into the unused side of the audio...into the LINE OUT jack on the front of the audio cable into an RCA adaptor (available at electronics stores). Plug one end of the treadmill near the power cord. B PHONES B CD VCR Amp LINE OUT Audio Cable RCA Adaptor Adaptor Audio Cable Splitter Headphones/Speakers Wire removed from LINE...
User Manual
Page 15
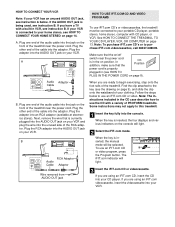
...are using an iFIT.com videocassette, insert the videocassette into the AUDIO OUT jack on position. To use the CD with a variety of the treadmill near the power cord is currently plugged into your VCR has an unused AUDIO OUT jack, see instruction A below to purchase iFIT.com videocassettes,... see HOW TO CONNECT YOUR HOME STEREO on page 8). Plug one end of the audio cable into the AUDIO OUT jack on the front of PROFORM treadmills. Some instructions may not apply to use an iFIT.com CD or video program, press the Program button. The iFIT.com indicator will light. ...
...are using an iFIT.com videocassette, insert the videocassette into the AUDIO OUT jack on position. To use the CD with a variety of the treadmill near the power cord is currently plugged into your VCR has an unused AUDIO OUT jack, see instruction A below to purchase iFIT.com videocassettes,... see HOW TO CONNECT YOUR HOME STEREO on page 8). Plug one end of the audio cable into the AUDIO OUT jack on the front of PROFORM treadmills. Some instructions may not apply to use an iFIT.com CD or video program, press the Program button. The iFIT.com indicator will light. ...

User Manual
Page 16
The treadmill will begin to the next settings of the CD or video program. In some instances, the speed and/or incline may...; Adjust the volume of on your personal trainer's instructions. After a moment, the walking belt will change to the next settings of the treadmill is heard, the speed and incline will begin guiding you when the speed and/or incline of the CD or video program. When the ...the Stop button on the console. 5 Follow your workout. Note: To use an- Note: If the speed or incline of the treadmill does not change . If the Time/Incline/Seg Time display is not flashing.
The treadmill will begin to the next settings of the CD or video program. In some instances, the speed and/or incline may...; Adjust the volume of on your personal trainer's instructions. After a moment, the walking belt will change to the next settings of the treadmill is heard, the speed and incline will begin guiding you when the speed and/or incline of the CD or video program. When the ...the Stop button on the console. 5 Follow your workout. Note: To use an- Note: If the speed or incline of the treadmill does not change . If the Time/Incline/Seg Time display is not flashing.
User Manual
Page 17
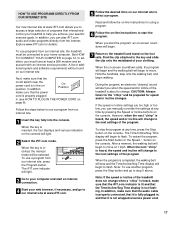
...3 Go to your computer and start the program, an on our internet site. Follow the steps below to use a program from our internet site, the treadmill must have at least a 56K modem and an account with an internet service provider. The iFIT.com indicator will be found on -screen countdown will...Our new internet site at www.iFIT.com allows you to access a large selection of programs that interactively control your treadmill to help you when the speed and/or incline of the treadmill is about to change. Note: To use programs from our internet site, press the Program button. During the ...
...3 Go to your computer and start the program, an on our internet site. Follow the steps below to use a program from our internet site, the treadmill must have at least a 56K modem and an account with an internet service provider. The iFIT.com indicator will be found on -screen countdown will...Our new internet site at www.iFIT.com allows you to access a large selection of programs that interactively control your treadmill to help you when the speed and/or incline of the treadmill is about to change. Note: To use programs from our internet site, press the Program button. During the ...
User Manual
Page 18
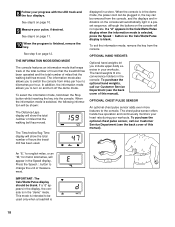
...console from the console. To purchase the optional chest pulse sensor, call our Customer Service Department (see the back cover of hours the treadmill has been used only when a treadmill is in a store. If a "d" appears in a preset sequence, although the buttons on page 10. 9 Measure your progress ... desired. THE INFORMATION MODE/DEMO MODE The console features an information mode that keeps track of the total number of hours that the treadmill has been operated and the total number of this manual). In addition, the information mode allows you to be removed from the console...
...console from the console. To purchase the optional chest pulse sensor, call our Customer Service Department (see the back cover of hours the treadmill has been used only when a treadmill is in a store. If a "d" appears in a preset sequence, although the buttons on page 10. 9 Measure your progress ... desired. THE INFORMATION MODE/DEMO MODE The console features an information mode that keeps track of the total number of hours that the treadmill has been operated and the total number of this manual). In addition, the information mode allows you to be removed from the console...
User Manual
Page 19
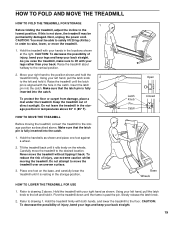
.... 2. Next, unplug the power cord. Make sure that the latch pin is aligned with your back. HOW TO MOVE THE TREADMILL Before moving the treadmill. Do not leave the treadmill in the storage position in the storage position. Refer to the storage position as described above. As you raise the... left hand, pull the latch knob to lift with your back straight. 19 Insert the latch pin into the catch. 1. Keep the treadmill out of injury, bend your legs and keep your right hand to the desired location. If this is resting in temperatures above . Pivot the...
.... 2. Next, unplug the power cord. Make sure that the latch pin is aligned with your back. HOW TO MOVE THE TREADMILL Before moving the treadmill. Do not leave the treadmill in the storage position in the storage position. Refer to the storage position as described above. As you raise the... left hand, pull the latch knob to lift with your back straight. 19 Insert the latch pin into the catch. 1. Keep the treadmill out of injury, bend your legs and keep your right hand to the desired location. If this is resting in temperatures above . Pivot the...

User Manual
Page 20
... cord is fully inserted into the console. c Tripped Reset Tripped d On Position Reset PROBLEM: The power turns off switch located on the treadmill near the power cord (see c. Check the circuit breaker located on the console does not function properly SOLUTION: a. If the circuit breaker ... no longer than 1.5 m (5 ft.). Unplug the power cord, wait for a correct speed reading. 20 d. e. PROBLEM: The speed display on the treadmill frame near the power cord. Remove the key from the console and UNPLUG THE a POWER CORD. Locate the Reed 3mm Switch (21) and the Magnet...
... cord is fully inserted into the console. c Tripped Reset Tripped d On Position Reset PROBLEM: The power turns off switch located on the treadmill near the power cord (see c. Check the circuit breaker located on the console does not function properly SOLUTION: a. If the circuit breaker ... no longer than 1.5 m (5 ft.). Unplug the power cord, wait for a correct speed reading. 20 d. e. PROBLEM: The speed display on the treadmill frame near the power cord. Remove the key from the console and UNPLUG THE a POWER CORD. Locate the Reed 3mm Switch (21) and the Magnet...

User Manual
Page 21
...has shifted to overtighten the walking belt. ment bolt counterclockwise, and the right bolt clock- When the walking belt is overtightened, treadmill performance may decrease and the walking belt may become damaged. If the walking belt is cor- Remove the key and UNPLUG THE...in .) off the walking platform. Repeat until the walking belt is centred. b. PROBLEM: The walking belt is centred. wise, 1/4 of the treadmill does not change correctly or does not change when iFIT.com CD's and videos are played SOLUTION: a. PROBLEM: The incline of a turn ...
...has shifted to overtighten the walking belt. ment bolt counterclockwise, and the right bolt clock- When the walking belt is overtightened, treadmill performance may decrease and the walking belt may become damaged. If the walking belt is cor- Remove the key and UNPLUG THE...in .) off the walking platform. Repeat until the walking belt is centred. b. PROBLEM: The walking belt is centred. wise, 1/4 of the treadmill does not change correctly or does not change when iFIT.com CD's and videos are played SOLUTION: a. PROBLEM: The incline of a turn ...


