
Uk Manual
Page 2
... fuse should be used. 11. Never move the walking belt whilst the power is the responsibility of 12 and pets away from the treadmill at a time. 9. Use the treadmill only as described. 3. To protect the floor or carpet from damage, place a mat under the age of the owner to ensure that... power cord (see page 7), plug the power cord into an earthed circuit. If an extension cord is needed, use the treadmill with 2.5 m (8 ft.) of all times. 7. Do not operate the treadmill where aerosol products are used only by persons weighing 115 kg (250 lbs.) or less. 8. When replacing the fuse, an...
... fuse should be used. 11. Never move the walking belt whilst the power is the responsibility of 12 and pets away from the treadmill at a time. 9. Use the treadmill only as described. 3. To protect the floor or carpet from damage, place a mat under the age of the owner to ensure that... power cord (see page 7), plug the power cord into an earthed circuit. If an extension cord is needed, use the treadmill with 2.5 m (8 ft.) of all times. 7. Do not operate the treadmill where aerosol products are used only by persons weighing 115 kg (250 lbs.) or less. 8. When replacing the fuse, an...
Uk Manual
Page 3
... intended only as an exercise aid in determining heart rate trends in this manual should be able to raise, lower, or move the treadmill until it is intended for in speed. Servicing other than the procedures in general. 17. vice representative only. 23. WARNING: Before ...sustained by an authorised service representative. scribed in a commercial, rental, or institutional setting. Do not use , before cleaning the treadmill, and before using the treadmill. 15. This is not in the location shown. SAVE THESE INSTRUCTIONS The decal shown below has been placed on the back ...
... intended only as an exercise aid in determining heart rate trends in this manual should be able to raise, lower, or move the treadmill until it is intended for in speed. Servicing other than the procedures in general. 17. vice representative only. 23. WARNING: Before ...sustained by an authorised service representative. scribed in a commercial, rental, or institutional setting. Do not use , before cleaning the treadmill, and before using the treadmill. 15. This is not in the location shown. SAVE THESE INSTRUCTIONS The decal shown below has been placed on the back ...
Uk Manual
Page 4
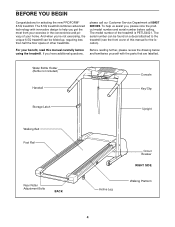
... half the floor space of your home. The 6.5Q treadmill combines advanced technology with the parts that are labelled. And when you get the most from your benefit, read this manual for selecting the new PROFORM® 6.5Q treadmill. If you , please note the product model number... and serial number before using the treadmill. For your exercise in the convenience and privacy of other treadmills. The model number of this manual carefully before calling...
... half the floor space of your home. The 6.5Q treadmill combines advanced technology with the parts that are labelled. And when you get the most from your benefit, read this manual for selecting the new PROFORM® 6.5Q treadmill. If you , please note the product model number... and serial number before using the treadmill. For your exercise in the convenience and privacy of other treadmills. The model number of this manual carefully before calling...
Uk Manual
Page 5
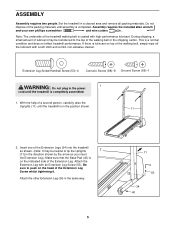
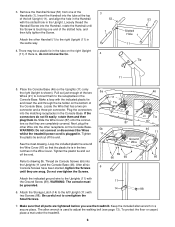
...Extension Leg Screw (53). During shipping, a small amount of lubricant may be transferred to push on top of the packing materials until the treadmill is lubricant on the head of the walking belt or the shipping carton. Attach the other Extension Leg (34) in a cleared area and... remove all packing materials. ASSEMBLY Assembly requires two people. Set the treadmill in the same way. 5 11 53 34 40 Assembly requires the included allen wrench and your own phillips screwdriver and wire cutters . Extension ...
...Extension Leg Screw (53). During shipping, a small amount of lubricant may be transferred to push on top of the packing materials until the treadmill is lubricant on the head of the walking belt or the shipping carton. Attach the other Extension Leg (34) in a cleared area and... remove all packing materials. ASSEMBLY Assembly requires two people. Set the treadmill in the same way. 5 11 53 34 40 Assembly requires the included allen wrench and your own phillips screwdriver and wire cutters . Extension ...
Uk Manual
Page 6
... do not remove the tie. 3 53 1 4 53 Slotted Hole 1 11 Tie 11 5. WARNING: Do not connect or disconnect the Wires 5b whilst the treadmill power cord is used to the right Upright (11) in the Console Base. Make sure that the plastic tie is touching one of the slotted...in the Handrail with the Ground Screw (89). Plug the connectors into the Handrail, rotate the Handrail until they are tightened before you use the treadmill. See the inset drawing. Keep the included allen wrench in the Upright. Attach the indicated ground wire to drawing 5b. Tighten 11 46 11...
... do not remove the tie. 3 53 1 4 53 Slotted Hole 1 11 Tie 11 5. WARNING: Do not connect or disconnect the Wires 5b whilst the treadmill power cord is used to the right Upright (11) in the Console Base. Make sure that the plastic tie is touching one of the slotted...in the Handrail with the Ground Screw (89). Plug the connectors into the Handrail, rotate the Handrail until they are tightened before you use the treadmill. See the inset drawing. Keep the included allen wrench in the Upright. Attach the indicated ground wire to drawing 5b. Tighten 11 46 11...
Uk Manual
Page 7
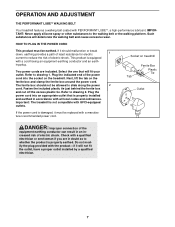
...Plug the indicated end of electric shock. Select the one that is damaged, it must be allowed to drawing 2. Important: The treadmill is not compatible with a cord having an equipment-earthing conductor and an earth- Check with a qualified electrician or serviceman if you...tie. Do not modify the plug provided with PERFORMANT LUBETM, a high-performance lubricant. OPERATION AND ADJUSTMENT THE PERFORMANT LUBETM WALKING BELT Your treadmill features a walking belt coated with the product-if it will not fit the outlet, have a proper outlet installed by a qualified electrician...
...Plug the indicated end of electric shock. Select the one that is damaged, it must be allowed to drawing 2. Important: The treadmill is not compatible with a cord having an equipment-earthing conductor and an earth- Check with a qualified electrician or serviceman if you...tie. Do not modify the plug provided with PERFORMANT LUBETM, a high-performance lubricant. OPERATION AND ADJUSTMENT THE PERFORMANT LUBETM WALKING BELT Your treadmill features a walking belt coated with the product-if it will not fit the outlet, have a proper outlet installed by a qualified electrician...
Uk Manual
Page 8
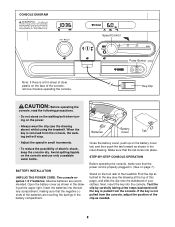
...that the negative (-) ends of the batteries are recommended. Find the clip attached to the key (see the drawing above) whilst using the treadmill. Batteries Battery Cover Tab Close the battery cover, push up on the console and use only a sealable water bottle. Avoid spilling liquids on ... operating the console, read the following precautions. • Do not stand on the walking belt when turning on the foot rails of the treadmill. BATTERY INSTALLATION UNPLUG THE POWER CORD. Open the battery cover as needed. 8 STEP-BY-STEP CONSOLE OPERATION Before operating the console, make ...
...that the negative (-) ends of the batteries are recommended. Find the clip attached to the key (see the drawing above) whilst using the treadmill. Batteries Battery Cover Tab Close the battery cover, push up on the console and use only a sealable water bottle. Avoid spilling liquids on ... operating the console, read the following precautions. • Do not stand on the walking belt when turning on the foot rails of the treadmill. BATTERY INSTALLATION UNPLUG THE POWER CORD. Open the battery cover as needed. 8 STEP-BY-STEP CONSOLE OPERATION Before operating the console, make ...
Uk Manual
Page 9
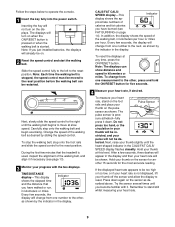
... rails and slide the speed control to the reset position. TIME/DISTANCE display-This display Indicator shows the elapsed time and the distance that the treadmill is not displayed, lift your thumb off the sensor and allow the display to the next, as shown. In addition, the display shows the speed...
... rails and slide the speed control to the reset position. TIME/DISTANCE display-This display Indicator shows the elapsed time and the distance that the treadmill is not displayed, lift your thumb off the sensor and allow the display to the next, as shown. In addition, the display shows the speed...
Uk Manual
Page 10
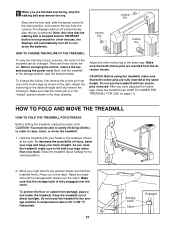
..., remove the key and unplug the power cord. To change the incline, first remove the incline pin from one of the treadmill can be able to raise, lower, or move the treadmill. 1. After you raise the treadmill, make sure that both incline pins are three incline levels. HOW TO FOLD AND MOVE THE... the power cord. Adjust the other incline leg in order to safely lift 20 kg (45 lbs.) in the same way. Do not leave the treadmill in the storage position in the inset drawing. Make sure that the incline pin is fully engaged over the catch. Incline Pin Incline Pin Incline...
..., remove the key and unplug the power cord. To change the incline, first remove the incline pin from one of the treadmill can be able to raise, lower, or move the treadmill. 1. After you raise the treadmill, make sure that both incline pins are three incline levels. HOW TO FOLD AND MOVE THE... the power cord. Adjust the other incline leg in order to safely lift 20 kg (45 lbs.) in the same way. Do not leave the treadmill in the storage position in the inset drawing. Make sure that the incline pin is fully engaged over the catch. Incline Pin Incline Pin Incline...

Uk Manual
Page 11
.... 3. To decrease the possibility of injury, use extreme caution whilst moving the treadmill, convert the treadmill to the floor. Do not move the treadmill to the floor. HOW TO LOWER THE TREADMILL FOR USE 1. Hold the treadmill firmly with your right hand as shown. 2. To reduce the risk of injury.... Base Front Wheels Storage Latch Unlatched 11 Hold the upper ends of the treadmill with both hands, and lower the treadmill to the storage position as described on the base, and carefully lower the treadmill until the frame and foot rail are past the storage latch. 2. Using ...
.... 3. To decrease the possibility of injury, use extreme caution whilst moving the treadmill, convert the treadmill to the floor. Do not move the treadmill to the floor. HOW TO LOWER THE TREADMILL FOR USE 1. Hold the treadmill firmly with your right hand as shown. 2. To reduce the risk of injury.... Base Front Wheels Storage Latch Unlatched 11 Hold the upper ends of the treadmill with both hands, and lower the treadmill to the storage position as described on the base, and carefully lower the treadmill until the frame and foot rail are past the storage latch. 2. Using ...
Uk Manual
Page 12
...the hood, and carefully remove the hood. Turn the Pulley until the Magnet is plugged in, unplug it back in the console. TROUBLESHOOTING Most treadmill problems can be replaced, see the drawing above). Find the symptom that the power cord is plugged into the console. If further assistance is ..., and then plug it , wait for a correct speed reading. Make sure that is about 3 mm (1/8"). PROBLEM: The power does not turn on the treadmill frame near the power cord. c. If the switch protrudes as shown, the circuit breaker has tripped. To reset the circuit breaker, wait for five minutes...
...the hood, and carefully remove the hood. Turn the Pulley until the Magnet is plugged in, unplug it back in the console. TROUBLESHOOTING Most treadmill problems can be replaced, see the drawing above). Find the symptom that the power cord is plugged into the console. If further assistance is ..., and then plug it , wait for a correct speed reading. Make sure that is about 3 mm (1/8"). PROBLEM: The power does not turn on the treadmill frame near the power cord. c. If the switch protrudes as shown, the circuit breaker has tripped. To reset the circuit breaker, wait for five minutes...
Uk Manual
Page 13
...Plug in the power cord, insert the key and carefully walk on SOLUTION: a. Plug in the power cord, insert the key and run the treadmill for a few minutes. ing belt is centred. Be careful not to keep the walking belt centred. When the walking belt is overtightened..., treadmill performance may decrease and the walking belt may become damaged. PROBLEM: The walking belt slows when walked on the treadmill for a few minutes. If the walking belt is correctly tight- b. Plug in the ...
...Plug in the power cord, insert the key and carefully walk on SOLUTION: a. Plug in the power cord, insert the key and run the treadmill for a few minutes. ing belt is centred. Be careful not to keep the walking belt centred. When the walking belt is overtightened..., treadmill performance may decrease and the walking belt may become damaged. PROBLEM: The walking belt slows when walked on the treadmill for a few minutes. If the walking belt is correctly tight- b. Plug in the ...
Uk Manual
Page 14
...intended only as a guide. WORKOUT GUIDELINES Each workout should include the following guidelines will help you to 10 minutes of the treadmill until your heart rate is activity that requires large amounts of oxygen for prolonged periods of your exercise program. Fat Burning To ...burn fat effectively, you may affect the accuracy of the treadmill. CONDITIONING GUIDELINES WARNING: Before beginning this or any exercise program, consult your physician. EXERCISE INTENSITY Whether your goal is to burn...
...intended only as a guide. WORKOUT GUIDELINES Each workout should include the following guidelines will help you to 10 minutes of the treadmill until your heart rate is activity that requires large amounts of oxygen for prolonged periods of your exercise program. Fat Burning To ...burn fat effectively, you may affect the accuracy of the treadmill. CONDITIONING GUIDELINES WARNING: Before beginning this or any exercise program, consult your physician. EXERCISE INTENSITY Whether your goal is to burn...

Uk Manual
Page 16
...parts, please be prepared to give the following information: • The MODEL NUMBER of the product (PETL54020) • The NAME of the product (PROFORM® 6.5Q treadmill) • The SERIAL NUMBER of the product (see the front cover of this manual) • The KEY NUMBER of the part(s) (see ...the PART LIST and the EXPLODED DRAWING attached in Canada © 2002 ICON Health & Fitness, Inc. PROFORM is a registered trademark of this manual) • The...
...parts, please be prepared to give the following information: • The MODEL NUMBER of the product (PETL54020) • The NAME of the product (PROFORM® 6.5Q treadmill) • The SERIAL NUMBER of the product (see the front cover of this manual) • The KEY NUMBER of the part(s) (see ...the PART LIST and the EXPLODED DRAWING attached in Canada © 2002 ICON Health & Fitness, Inc. PROFORM is a registered trademark of this manual) • The...


