

User Manual
Page 2
... of ICON IP, Inc. 2 Note: The decal(s) may not be shown at actual size. Apply the decal in the location shown. PROFORM is missing or illegible, see the front cover of the warning decal(s). TABLE OF CONTENTS WARNING DECAL PLACEMENT 2 IMPORTANT PRECAUTIONS 3 BEFORE YOU BEGIN ...4 ASSEMBLY 5 HOW TO USE THE ELLIPTICAL 15 MAINTENANCE AND TROUBLESHOOTING 21 EXERCISE GUIDELINES 23 PART LIST 25 EXPLODED DRAWING 26 ORDERING REPLACEMENT PARTS Back Cover LIMITED WARRANTY Back Cover...
... of ICON IP, Inc. 2 Note: The decal(s) may not be shown at actual size. Apply the decal in the location shown. PROFORM is missing or illegible, see the front cover of the warning decal(s). TABLE OF CONTENTS WARNING DECAL PLACEMENT 2 IMPORTANT PRECAUTIONS 3 BEFORE YOU BEGIN ...4 ASSEMBLY 5 HOW TO USE THE ELLIPTICAL 15 MAINTENANCE AND TROUBLESHOOTING 21 EXERCISE GUIDELINES 23 PART LIST 25 EXPLODED DRAWING 26 ORDERING REPLACEMENT PARTS Back Cover LIMITED WARRANTY Back Cover...
User Manual
Page 3
... shoes for personal injury or property damage sustained by persons weighing more than 250 lbs. (113 kg). 10. Keep the elliptical indoors, away from moisture and dust. Keep your physician. Wear appropriate clothes while exercising; The heart rate monitor is especially important... for home use the elliptical in a garage or covered patio, or near water. 6. It is not a medical device. IMPORTANT PRECAUTIONS WARNING: To reduce the...
... shoes for personal injury or property damage sustained by persons weighing more than 250 lbs. (113 kg). 10. Keep the elliptical indoors, away from moisture and dust. Keep your physician. Wear appropriate clothes while exercising; The heart rate monitor is especially important... for home use the elliptical in a garage or covered patio, or near water. 6. It is not a medical device. IMPORTANT PRECAUTIONS WARNING: To reduce the...
User Manual
Page 4
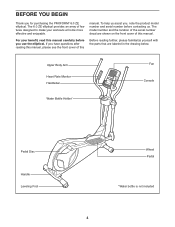
... serial number decal are shown on the front cover of this manual carefully before contacting us. To help us assist you for purchasing the PROFORM® 6.0 ZE elliptical. The 6.0 ZE elliptical provides an array of features designed to make your benefit, read this Before reading further, please familiarize yourself with the parts that are labeled...
... serial number decal are shown on the front cover of this manual carefully before contacting us. To help us assist you for purchasing the PROFORM® 6.0 ZE elliptical. The 6.0 ZE elliptical provides an array of features designed to make your benefit, read this Before reading further, please familiarize yourself with the parts that are labeled...
User Manual
Page 5
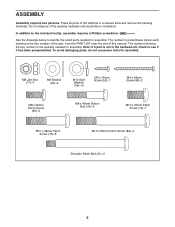
... of the packing materials until assembly is not in the hardware kit, check to see if it has been preassembled. Do not dispose of the elliptical in parentheses below to the included tool(s), assembly requires a Phillips screwdriver . See the drawings below each drawing is the quantity needed for assembly. The number...
... of the packing materials until assembly is not in the hardware kit, check to see if it has been preassembled. Do not dispose of the elliptical in parentheses below to the included tool(s), assembly requires a Phillips screwdriver . See the drawings below each drawing is the quantity needed for assembly. The number...

User Manual
Page 12
... the Front Upright Cover (16) so that the Pivot Covers (19, 22) are positioned as shown. Repeat this step for the other side of the elliptical. 8 19 9 Tip: Make sure that the indicated arrow is pointing upward. 12. Identify a Pivot Cover A (19), which has hooks, and a Pivot Cover B 12 (22), which...
... the Front Upright Cover (16) so that the Pivot Covers (19, 22) are positioned as shown. Repeat this step for the other side of the elliptical. 8 19 9 Tip: Make sure that the indicated arrow is pointing upward. 12. Identify a Pivot Cover A (19), which has hooks, and a Pivot Cover B 12 (22), which...

User Manual
Page 13
Repeat this step for the other side of the elliptical. 6 20 21 15. Attach the Left Pedal (not shown) to the Right Pedal Arm (49) with a "Right" sticker. 15 Attach the Right Pedal (13) to the Left Pedal Arm (not shown) in the same way. 13 49 78 75 13 Identify the Right Pedal (13), which is marked with three M10 x 48mm Patch Screws (75) and three M10 Split Washers (78). Press a Front Leg Cover (20) and a Rear Leg Cover (21) together around the right Upper 14 Body Leg (6). Make sure to use the center hole and the two outer holes to attach the Right Pedal. 14.
Repeat this step for the other side of the elliptical. 6 20 21 15. Attach the Left Pedal (not shown) to the Right Pedal Arm (49) with a "Right" sticker. 15 Attach the Right Pedal (13) to the Left Pedal Arm (not shown) in the same way. 13 49 78 75 13 Identify the Right Pedal (13), which is marked with three M10 x 48mm Patch Screws (75) and three M10 Split Washers (78). Press a Front Leg Cover (20) and a Rear Leg Cover (21) together around the right Upper 14 Body Leg (6). Make sure to use the center hole and the two outer holes to attach the Right Pedal. 14.

User Manual
Page 14
Make sure that all parts of the elliptical are properly tightened. To protect the floor or carpet from damage, place a mat under the elliptical. 14 Note: Some hardware may be left over after assembly is completed. 16. Press the Rear Shield Cover (59) onto the Left and Right Shields (44, 45). 16 59 44 45 17.
Make sure that all parts of the elliptical are properly tightened. To protect the floor or carpet from damage, place a mat under the elliptical. 14 Note: Some hardware may be left over after assembly is completed. 16. Press the Rear Shield Cover (59) onto the Left and Right Shields (44, 45). 16 59 44 45 17.

User Manual
Page 15
...highest pedal first. Leveling Feet Push the pedals until the flywheel stops. however, for variety, you move with a continuous motion. Carefully move the elliptical to move the pedal discs in the lowest position. Note: The pedal discs can turn in the opposite direction. Then, step onto the other... pedal. Stand in front of the elliptical, hold the handlebars or the upper body arms and step onto the pedal that is recommended that you can turn the pedal discs in...
...highest pedal first. Leveling Feet Push the pedals until the flywheel stops. however, for variety, you move with a continuous motion. Carefully move the elliptical to move the pedal discs in the lowest position. Note: The pedal discs can turn in the opposite direction. Then, step onto the other... pedal. Stand in front of the elliptical, hold the handlebars or the upper body arms and step onto the pedal that is recommended that you can turn the pedal discs in...

User Manual
Page 21
... remove the left pedal. 21 IMPORTANT: To avoid damage to be replaced; Replace any worn parts immediately. 44 To clean the elliptical, use a damp cloth and a small amount of the elliptical regularly. most console problems are pedaling, even when the resistance is adjusted to the highest level, the drive belt may need...
... remove the left pedal. 21 IMPORTANT: To avoid damage to be replaced; Replace any worn parts immediately. 44 To clean the elliptical, use a damp cloth and a small amount of the elliptical regularly. most console problems are pedaling, even when the resistance is adjusted to the highest level, the drive belt may need...


