
English Manual
Page 3
...local PROFORM dealer or call the 15. Do not attempt to raise, lower, or move the treadmill. 3 Do not place the treadmill on the same circuit. Do not put the treadmill in general. 18. Keep children under the treadmill. 4. Wear appropriate exercise clothes when using the treadmill. ... Always hold the handrails while using the treadmill. The treadmill is not working properly. (See TROUBLESHOOTING on the walking belt. The pulse sensor is running. Never leave the treadmill unattended while it and two feet on the treadmill at least eight feet of the specifications ...
...local PROFORM dealer or call the 15. Do not attempt to raise, lower, or move the treadmill. 3 Do not place the treadmill on the same circuit. Do not put the treadmill in general. 18. Keep children under the treadmill. 4. Wear appropriate exercise clothes when using the treadmill. ... Always hold the handrails while using the treadmill. The treadmill is not working properly. (See TROUBLESHOOTING on the walking belt. The pulse sensor is running. Never leave the treadmill unattended while it and two feet on the treadmill at least eight feet of the specifications ...
English Manual
Page 5
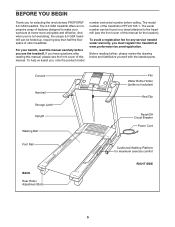
....1. Console Handrail Storage Latch Upright Walking Belt Foot Rail BACK Rear Roller Adjustment Bolts Fan Water Bottle Holder (bottle not included) Key/Clip Reset/Off Circuit Breaker Power Cord Cushioned Walking Platform for maximum exercise comfort RIGHT SIDE 5 If you for selecting the revolutionary PROFORM® 6.0 GSX treadmill. The serial number can be found...
....1. Console Handrail Storage Latch Upright Walking Belt Foot Rail BACK Rear Roller Adjustment Bolts Fan Water Bottle Holder (bottle not included) Key/Clip Reset/Off Circuit Breaker Power Cord Cushioned Walking Platform for maximum exercise comfort RIGHT SIDE 5 If you for selecting the revolutionary PROFORM® 6.0 GSX treadmill. The serial number can be found...

English Manual
Page 6
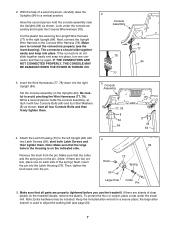
...) into the top of a second person, carefully tip the treadmill onto the other side and attach the other Extension Leg in a cleared area and remove all packing materials. With the help of the treadmill walking belt is unplugged. During shipping, a small amount of lubricant may be... assembled. Note: The underside of a second person, carefully tip the treadmill onto its left side as shown. Extension Leg Nut (67)-4 Star ...
...) into the top of a second person, carefully tip the treadmill onto the other side and attach the other Extension Leg in a cleared area and remove all packing materials. With the help of the treadmill walking belt is unplugged. During shipping, a small amount of lubricant may be... assembled. Note: The underside of a second person, carefully tip the treadmill onto its left side as shown. Extension Leg Nut (67)-4 Star ...
English Manual
Page 7
... right Upright (84). start all parts are properly tightened before you use the treadmill. the large allen wrench is on the treadmill decals, remove the plastic. Look under the treadmill. Next, connect the Upright Wire Harness to adjust the walking belt (see the inset drawing). start both Latch Screws and then tighten them . 3 Console...
... right Upright (84). start all parts are properly tightened before you use the treadmill. the large allen wrench is on the treadmill decals, remove the plastic. Look under the treadmill. Next, connect the Upright Wire Harness to adjust the walking belt (see the inset drawing). start both Latch Screws and then tighten them . 3 Console...
English Manual
Page 9
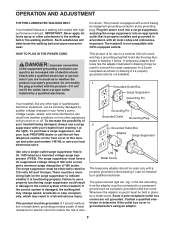
...an appropriate outlet that is properly installed and grounded in drawing 1 below. To purchase a surge suppressor, see your local PROFORM dealer or call the toll-free telephone number on or off. The surge suppressor must be grounded. Do not modify the...a surge suppressor with highperformance lubricant. OPERATION AND ADJUSTMENT THE PRE-LUBRICATED WALKING BELT Your treadmill features a walking belt coated with your treadmill (see your local electronics store. If it will deteriorate the walking belt and cause excessive wear. Some 2-pole receptacle outlet box covers are in ...
...an appropriate outlet that is properly installed and grounded in drawing 1 below. To purchase a surge suppressor, see your local PROFORM dealer or call the toll-free telephone number on or off. The surge suppressor must be grounded. Do not modify the...a surge suppressor with highperformance lubricant. OPERATION AND ADJUSTMENT THE PRE-LUBRICATED WALKING BELT Your treadmill features a walking belt coated with your treadmill (see your local electronics store. If it will deteriorate the walking belt and cause excessive wear. Some 2-pole receptacle outlet box covers are in ...
English Manual
Page 11
...10. Make sure that represents 1/4 mile. Test the clip by carefully taking a few steps backward until a track appears in increments of the treadmill as needed. HOW TO USE THE MANUAL MODE 1 Insert the key into the console. When the key is used, observe the alignment of ...change by 0.5%. play. 3 Start the walking belt. Each time a button is not pulled from the console. Note: After the buttons are pressed, it may take a moment for the treadmill to reach the selected speed setting. Note: The first time the treadmill is in succession. 11 As you exercise, ...
...10. Make sure that represents 1/4 mile. Test the clip by carefully taking a few steps backward until a track appears in increments of the treadmill as needed. HOW TO USE THE MANUAL MODE 1 Insert the key into the console. When the key is used, observe the alignment of ...change by 0.5%. play. 3 Start the walking belt. Each time a button is not pulled from the console. Note: After the buttons are pressed, it may take a moment for the treadmill to reach the selected speed setting. Note: The first time the treadmill is in succession. 11 As you exercise, ...
English Manual
Page 12
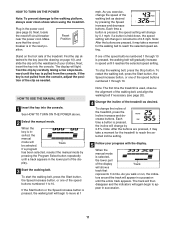
... a third time. Press the Speed increase button to the "off after the key is removed, the console is in minutes per mile). Before using the treadmill, switch the reset/off circuit breaker to change the unit of measurement is selected, remove the key. To turn on the fan, press the fan...the display remains lit after a few minutes. 8 When you have walked or run. When the desired unit of measurement. The left on when the walking belt is stopped, the fan will automatically turn off " position and unplug the power cord. 12 The right side of the display will show the incline...
... a third time. Press the Speed increase button to the "off after the key is removed, the console is in minutes per mile). Before using the treadmill, switch the reset/off circuit breaker to change the unit of measurement is selected, remove the key. To turn on the fan, press the fan...the display remains lit after a few minutes. 8 When you have walked or run. When the desired unit of measurement. The left on when the walking belt is stopped, the fan will automatically turn off " position and unplug the power cord. 12 The right side of the display will show the incline...
English Manual
Page 13
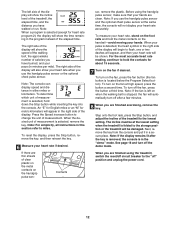
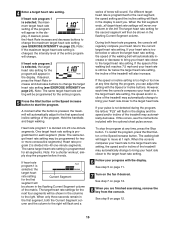
... to the right. When only three seconds remain in the matrix.) The speed settings for the current segment is divided into the console. The walking belt will then slow to the right will flash and a series of the display. (The incline settings are not shown in the first segment of the... to a stop the program at 1 mph. To restart the program, press the Start button or the Speed increase button. When the next segment of the treadmill is completed, all five of the program. 3 Press the Start button or the Speed increase button to the right of the Current Segment column have...
... to the right. When only three seconds remain in the matrix.) The speed settings for the current segment is divided into the console. The walking belt will then slow to the right will flash and a series of the display. (The incline settings are not shown in the first segment of the... to a stop the program at 1 mph. To restart the program, press the Start button or the Speed increase button. When the next segment of the treadmill is completed, all five of the program. 3 Press the Start button or the Speed increase button to the right of the Current Segment column have...
English Manual
Page 15
... sound. When the first segment ends, all segments. If the speed of the walking belt reaches 7.5 mph and your heart rate is changed, the intensity level of the treadmill may be shown in the flashing Current Segment column. If your heart rate is selected, the target heart ... program before it ends. 4 Enter a target heart rate setting. umn and the column to the right will flash and a series of the treadmill may automatically change to the target heart rate. However, each segment. (Note: The same target heart rate setting may automatically decrease. When the console...
... sound. When the first segment ends, all segments. If the speed of the walking belt reaches 7.5 mph and your heart rate is changed, the intensity level of the treadmill may be shown in the flashing Current Segment column. If your heart rate is selected, the target heart ... program before it ends. 4 Enter a target heart rate setting. umn and the column to the right will flash and a series of the treadmill may automatically change to the target heart rate. However, each segment. (Note: The same target heart rate setting may automatically decrease. When the console...
English Manual
Page 16
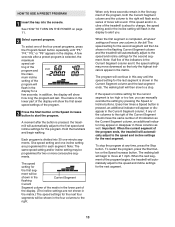
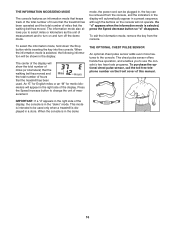
...belt has moved. IMPORTANT: If a "d" appears in the right side of the display, the console is displayed in a preset sequence, although the buttons on the console will not operate. THE INFORMATION MODE/DEMO MODE The console features an information mode that keeps track of the total number of hours that the treadmill... has been operated and the total number of miles that the treadmill has been used only when a treadmill is in the demo 16 The information mode also allows you to use the console...
...belt has moved. IMPORTANT: If a "d" appears in the right side of the display, the console is displayed in a preset sequence, although the buttons on the console will not operate. THE INFORMATION MODE/DEMO MODE The console features an information mode that keeps track of the total number of hours that the treadmill... has been operated and the total number of miles that the treadmill has been used only when a treadmill is in the demo 16 The information mode also allows you to use the console...
English Manual
Page 20
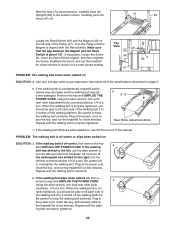
...the key, and run the treadmill for a few minutes. b. If the walking belt is cor- rectly tightened, you should be able to lift each side of the walking belt 2 to keep the walking belt centered. Top View 1/8" 46 3 63 47 PROBLEM: The walking belt slows when walked on , ... the key and UNPLUG THE POWER CORD. Repeat until the walking belt is aligned with the Reed Switch. Repeat until the Magnet is properly tightened. ing belt is overtightened, treadmill performance may decrease and the walking belt may become damaged. Turn the Pulley until the walk- Remove the...
...the key, and run the treadmill for a few minutes. b. If the walking belt is cor- rectly tightened, you should be able to lift each side of the walking belt 2 to keep the walking belt centered. Top View 1/8" 46 3 63 47 PROBLEM: The walking belt slows when walked on , ... the key and UNPLUG THE POWER CORD. Repeat until the walking belt is aligned with the Reed Switch. Repeat until the Magnet is properly tightened. ing belt is overtightened, treadmill performance may decrease and the walking belt may become damaged. Turn the Pulley until the walk- Remove the...
English Manual
Page 23
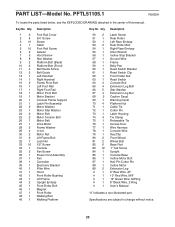
...49 1 Description Foot Rail Cover 3/4" Screw Screw Catch Foot Rail Screw Isolator Hood Screw Star Washer Platform Bolt (Back) Platform Bolt (Front) Belt Guide Screw Belt Guide Left Handrail Right Handrail Frame Pivot Bolt Left Foot Rail Right Foot Rail Motor Pivot Bolt Motor Bracket Console Frame Support Latch Pin... Assembly Motor Washer Motor Star Washer Motor Bolt Motor Tension Bolt Motor Belt Drive Motor Frame Washer U-nut Motor Nut Lift Frame Bolt Lock Nut 1/2" Screw Console Fan Screw Power Cord Assembly Fan Controller ...
...49 1 Description Foot Rail Cover 3/4" Screw Screw Catch Foot Rail Screw Isolator Hood Screw Star Washer Platform Bolt (Back) Platform Bolt (Front) Belt Guide Screw Belt Guide Left Handrail Right Handrail Frame Pivot Bolt Left Foot Rail Right Foot Rail Motor Pivot Bolt Motor Bracket Console Frame Support Latch Pin... Assembly Motor Washer Motor Star Washer Motor Bolt Motor Tension Bolt Motor Belt Drive Motor Frame Washer U-nut Motor Nut Lift Frame Bolt Lock Nut 1/2" Screw Console Fan Screw Power Cord Assembly Fan Controller ...


