
English Manual
Page 2
¨ TABLE OF CONTENTS IMPORTANT PRECAUTIONS 3 BEFORE YOU BEGIN 5 ASSEMBLY 6 OPERATION AND ADJUSTMENT 8 HOW TO FOLD AND MOVE THE TREADMILL 18 MAINTENANCE AND TROUBLE-SHOOTING 19 CONDITIONING GUIDELINES 21 PART LIST 23 ORDERING REPLACEMENT PARTS Back Cover FULL 90-DAY WARRANTY Back Cover Note: An EXPLODED DRAWING is attached in the center of this manual. 2
¨ TABLE OF CONTENTS IMPORTANT PRECAUTIONS 3 BEFORE YOU BEGIN 5 ASSEMBLY 6 OPERATION AND ADJUSTMENT 8 HOW TO FOLD AND MOVE THE TREADMILL 18 MAINTENANCE AND TROUBLE-SHOOTING 19 CONDITIONING GUIDELINES 21 PART LIST 23 ORDERING REPLACEMENT PARTS Back Cover FULL 90-DAY WARRANTY Back Cover Note: An EXPLODED DRAWING is attached in the center of this manual. 2
English Manual
Page 3
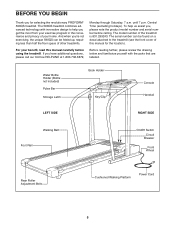
... important precautions and information before operating the treadmill. 1. The treadmill should be electrically rated for the location of this manual. 3. Never use an extension cord. 11. The pulse sensor is capable of burns, fire, electric shock, or injury to avoid sudden jumps in a garage or covered patio, or near water. 5. Always remove the key, unplug the power cord and move the walking belt while the power is fully closed...
... important precautions and information before operating the treadmill. 1. The treadmill should be electrically rated for the location of this manual. 3. Never use an extension cord. 11. The pulse sensor is capable of burns, fire, electric shock, or injury to avoid sudden jumps in a garage or covered patio, or near water. 5. Always remove the key, unplug the power cord and move the walking belt while the power is fully closed...

English Manual
Page 4
... a free replacement decal (see the back cover of this manual should be prepared for persons over the age of actual size. 4 If a decal is heard, the speed and/or incline will alert you can manually override the speed and incline settings at 38% of 35 or persons with pre-existing health problems. Read all parts of the CD or video program. 24. Inspect and tighten all instructions before using iFit...
... a free replacement decal (see the back cover of this manual should be prepared for persons over the age of actual size. 4 If a decal is heard, the speed and/or incline will alert you can manually override the speed and incline settings at 38% of 35 or persons with pre-existing health problems. Read all parts of the CD or video program. 24. Inspect and tighten all instructions before using iFit...
English Manual
Page 5
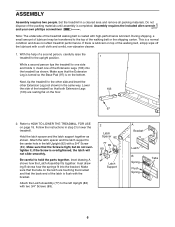
... model number and serial number before using the treadmill. BEFORE YOU BEGIN Thank you for the location). The model number of this manual carefully before calling. For your home. Water Bottle Holder (Bottle not included) Pulse Bar Storage Latch Book Holder Key/Clip Console Handrail LEFT SIDE RIGHT SIDE Walking Belt Foot Rail On/Off Switch Circuit Breaker Front Wheel Rear Roller Adjustment Bolts Cushioned Walking Platform Power Cord 5 And when you get the most from your exercise program...
... model number and serial number before using the treadmill. BEFORE YOU BEGIN Thank you for the location). The model number of this manual carefully before calling. For your home. Water Bottle Holder (Bottle not included) Pulse Bar Storage Latch Book Holder Key/Clip Console Handrail LEFT SIDE RIGHT SIDE Walking Belt Foot Rail On/Off Switch Circuit Breaker Front Wheel Rear Roller Adjustment Bolts Cushioned Walking Platform Power Cord 5 And when you get the most from your exercise program...
English Manual
Page 6
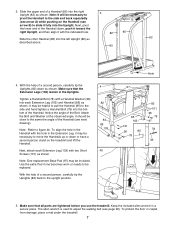
... how the Latch Assembly fits together. Attach the Latch Assembly (77) to HOW TO LOWER THE TREADMILL FOR USE on the floor. 1 103 97 2. Assembly requires the included allen wrench and your own phillips screwdriver . Note: The underside of the treadmill so that the Extension Leg is turned so the Base Pad (97) is flush with high-performance lubricant. Lower the side of the treadmill walking belt is...
... how the Latch Assembly fits together. Attach the Latch Assembly (77) to HOW TO LOWER THE TREADMILL FOR USE on the floor. 1 103 97 2. Assembly requires the included allen wrench and your own phillips screwdriver . Note: The underside of the treadmill so that the Extension Leg is turned so the Base Pad (97) is flush with high-performance lubricant. Lower the side of the treadmill walking belt is...
English Manual
Page 7
... the Handrail (85) to adjust the walking belt (see inset drawing). The allen wrench is used to the side and hand tighten a Handrail Bolt (78) into the right Upright (82) as shown. Next, pivot the lower end of the Handrail (see page 20). Make sure that all parts are tightened before you use the treadmill. Next, attach each Extension Leg (103) and Handrail (85...
... the Handrail (85) to adjust the walking belt (see inset drawing). The allen wrench is used to the side and hand tighten a Handrail Bolt (78) into the right Upright (82) as shown. Next, pivot the lower end of the Handrail (see page 20). Make sure that all parts are tightened before you use the treadmill. Next, attach each Extension Leg (103) and Handrail (85...
English Manual
Page 8
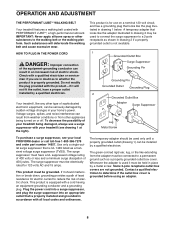
... deteriorate the walking belt and cause excessive wear. Voltage surges, spikes, and noise interference can be installed by a qualified electrician. Use only a single-outlet surge suppressor that is UL 1449 listed as a properly grounded outlet box cover. This product must be used only until a properly grounded outlet (drawing 1) can result in accordance with your homeÕs power. Plug the power cord into...
... deteriorate the walking belt and cause excessive wear. Voltage surges, spikes, and noise interference can be installed by a qualified electrician. Use only a single-outlet surge suppressor that is UL 1449 listed as a properly grounded outlet box cover. This product must be used only until a properly grounded outlet (drawing 1) can result in accordance with your homeÕs power. Plug the power cord into...
English Manual
Page 9
... the walking belt when turning on the console and place only a sealed water bottle in pulse sensor. the speed and incline of the treadmill as iFit.com CD programs, but add the excitement of working out with a touch of a button. In addition, you achieve your home. IFit.com technology is like having a personal trainer right in speed. Or, use iFit.com CD or video programs, refer to your workout. To purchase iFit.com...
... the walking belt when turning on the console and place only a sealed water bottle in pulse sensor. the speed and incline of the treadmill as iFit.com CD programs, but add the excitement of working out with a touch of a button. In addition, you achieve your home. IFit.com technology is like having a personal trainer right in speed. Or, use iFit.com CD or video programs, refer to your workout. To purchase iFit.com...
English Manual
Page 10
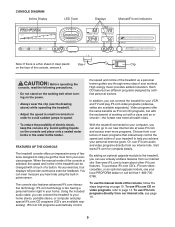
... /off switch near the power cord is properly plugged in this manual refer to change the speed of laps you exercise, change the incline rapidly. The LED TrackÑ The LED track represents a distance of the treadmill, press the incline buttons. To change by pressing the SPEED buttons. After the incline buttons are ready to start the walking belt. DISTANCE/LAPS displayÑThis display shows Arrow the distance that the on the console will light when the incline is set at a time...
... /off switch near the power cord is properly plugged in this manual refer to change the speed of laps you exercise, change the incline rapidly. The LED TrackÑ The LED track represents a distance of the treadmill, press the incline buttons. To change by pressing the SPEED buttons. After the incline buttons are ready to start the walking belt. DISTANCE/LAPS displayÑThis display shows Arrow the distance that the on the console will light when the incline is set at a time...
English Manual
Page 11
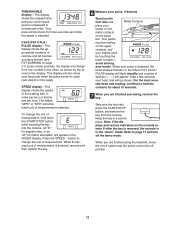
... step 6 on the pulse bar. Press the SPEED v button to hold down the START/STOP button while inserting the key into the console. Your palms must be shown. CALS./FAT CALS./ PULSE displayÑThis display shows the approximate numbers of calories and fat calories you are finished using the treadmill, move the on the upper contacts, and your fingers must be resting on /off the demo mode. To change the...
... step 6 on the pulse bar. Press the SPEED v button to hold down the START/STOP button while inserting the key into the console. Your palms must be shown. CALS./FAT CALS./ PULSE displayÑThis display shows the approximate numbers of calories and fat calories you are finished using the treadmill, move the on the upper contacts, and your fingers must be resting on /off the demo mode. To change the...
English Manual
Page 12
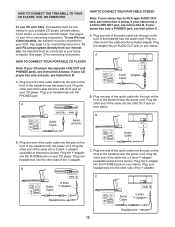
... connecting instructions. To use iFit.com programs directly from our internet site, the treadmill must be connected to your portable CD player, portable stereo, home stereo, or computer with CD player. Plug your VCR. B LINE OUT Audio Cable B. Plug your headphones into the other end of the cable into the included adapter. Plug the other side of the Y-adapter. Plug the other side of the Y-adapter. Plug the Y-adapter into an AUDIO...
... connecting instructions. To use iFit.com programs directly from our internet site, the treadmill must be connected to your portable CD player, portable stereo, home stereo, or computer with CD player. Plug your VCR. B LINE OUT Audio Cable B. Plug your headphones into the other end of the cable into the included adapter. Plug the other side of the Y-adapter. Plug the other side of the Y-adapter. Plug the Y-adapter into an AUDIO...
English Manual
Page 14
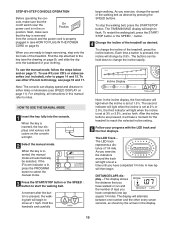
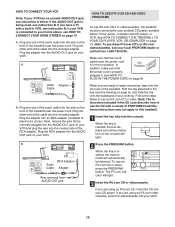
..., see HOW TO CONNECT YOUR HOME STEREO on the front of the cable into the jack on page 13. Next, remove the wire that On Position the power cord is in (see instruction A below to this treadmill. 1 Insert the key fully into an RCA adapter (available at electronics stores). When the key is connected to use an Audio Cable Adapter iFit.com CD or video, press the PROGRAM button. B VIDEO AUDIO IN ANT. Note...
..., see HOW TO CONNECT YOUR HOME STEREO on the front of the cable into the jack on page 13. Next, remove the wire that On Position the power cord is in (see instruction A below to this treadmill. 1 Insert the key fully into an RCA adapter (available at electronics stores). When the key is connected to use an Audio Cable Adapter iFit.com CD or video, press the PROGRAM button. B VIDEO AUDIO IN ANT. Note...
English Manual
Page 15
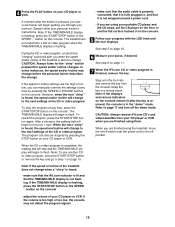
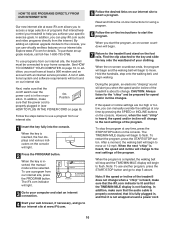
.../or incline changes. The TIME/MIN-MILE display will begin to flash. After a moment, the walking belt will begin to move the on/off switch near the power cord to page 17 and turn off position. See step 5 on page 10. 6 Measure your CD player or VCR. Note: If the speed or incline of on the console. 5 Follow your workout. 4 Press the PLAY button on your personal trainerÕs instructions...
.../or incline changes. The TIME/MIN-MILE display will begin to flash. After a moment, the walking belt will begin to move the on/off switch near the power cord to page 17 and turn off position. See step 5 on page 10. 6 Measure your CD player or VCR. Note: If the speed or incline of on the console. 5 Follow your workout. 4 Press the PLAY button on your personal trainerÕs instructions...
English Manual
Page 16
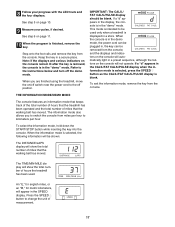
... that the audio cable is properly connected, that it is fully plugged in, and that it is not wrapped around a power cord. 16 When the key is inserted, the four displays and various indicators on page 13. Hold the handrails, step onto the walking belt, and begin to move . HOW TO USE PROGRAMS DIRECTLY FROM OUR INTERNET SITE Our new internet site at www.iFit.com...
... that the audio cable is properly connected, that it is fully plugged in, and that it is not wrapped around a power cord. 16 When the key is inserted, the four displays and various indicators on page 13. Hold the handrails, step onto the walking belt, and begin to move . HOW TO USE PROGRAMS DIRECTLY FROM OUR INTERNET SITE Our new internet site at www.iFit.com...
English Manual
Page 17
... number of miles that the walking belt has moved. When the information mode is displayed in the ÒdemoÓ mode. Press the SPEED v button to the instructions below and turn off position. IMPORTANT: The CALS./ FAT CALS./PULSE display should be removed from miles per hour to be shown: The DISTANCE/LAPS display will be used . If a ÒdÓ appears in the display, the console is in the demo mode, the power cord can be plugged in, the key...
... number of miles that the walking belt has moved. When the information mode is displayed in the ÒdemoÓ mode. Press the SPEED v button to the instructions below and turn off position. IMPORTANT: The CALS./ FAT CALS./PULSE display should be removed from miles per hour to be shown: The DISTANCE/LAPS display will be used . If a ÒdÓ appears in the display, the console is in the demo mode, the power cord can be plugged in, the key...
English Manual
Page 19
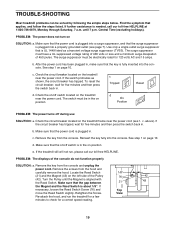
... Reed Switch is plugged into the console. Remove the key from the console. If necessary, loosen the Reed Switch Screw (76) and Top move the Reed Switch slightly. If further assistance is in . b. c. To reset the circuit breaker, wait for five minutes and then press the switch back in the on position. c Tripped Reset Tripped d On Position Reset PROBLEM: The power turns off switch is needed, call our toll-free HELPLINE. above). Reinsert the key...
... Reed Switch is plugged into the console. Remove the key from the console. If necessary, loosen the Reed Switch Screw (76) and Top move the Reed Switch slightly. If further assistance is in . b. c. To reset the circuit breaker, wait for five minutes and then press the switch back in the on position. c Tripped Reset Tripped d On Position Reset PROBLEM: The power turns off switch is needed, call our toll-free HELPLINE. above). Reinsert the key...
English Manual
Page 20
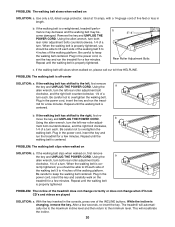
..., turn both rear roller adjustment bolts counterclockwise, 1/4 of the INCLINE buttons. After a few minutes. b. While the incline is centered. b. Repeat until the walking belt is changing, remove the key. The treadmill will recalibrate the incline. 20 PROBLEM: The walking belt slows when walked on , first remove the key and UNPLUG THE POWER CORD. When the walking belt is cor- ment bolt counterclockwise, and the right bolt clockwise, 1/4 of a turn each side of a turn . If the walking belt is properly tightened. rectly tightened, you...
..., turn both rear roller adjustment bolts counterclockwise, 1/4 of the INCLINE buttons. After a few minutes. b. While the incline is centered. b. Repeat until the walking belt is changing, remove the key. The treadmill will recalibrate the incline. 20 PROBLEM: The walking belt slows when walked on , first remove the key and UNPLUG THE POWER CORD. When the walking belt is cor- ment bolt counterclockwise, and the right bolt clockwise, 1/4 of a turn each side of a turn . If the walking belt is properly tightened. rectly tightened, you...
English Manual
Page 21
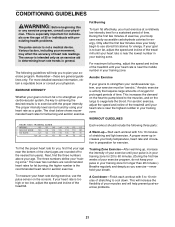
... muscles, and on the console. For aerobic exercise, adjust the speed and incline of the treadmill until your pulse is intended only as a guide. WORKOUT GUIDELINES Each workout should include the following guidelines will help you , first find the three numbers above your heart rate is near the bottom of the chart (ages are rounded off to strengthen your heart rate during exercise, use stored fat calories for...
... muscles, and on the console. For aerobic exercise, adjust the speed and incline of the treadmill until your pulse is intended only as a guide. WORKOUT GUIDELINES Each workout should include the following guidelines will help you , first find the three numbers above your heart rate is near the bottom of the chart (ages are rounded off to strengthen your heart rate during exercise, use stored fat calories for...
English Manual
Page 23
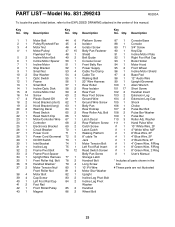
... Screw # 1 User's Manual 34 1 Upright Wire Harness 77 1 Storage Latch 35 1 Front Roller Adj. Qty. Bolt 78 2 Handrail Bolt * Includes all parts shown in the center of this manual. Bolt 108 2 Pulse Bar Washer 22 1 Reed Switch Clip 66 1 Motor 109 1 Pulse Bar 23 1 Motor/Controller Wire 67 1 Latch Decal 110 3 Roller Adj. Description 1 1 Motor Belt 44 6 Platform Screw 87 1 Console Base 2 1 Pulley/Flywheel/Fan 45 4 Isolator 88 1 Console 3 4 Motor Nut 46 4 Isolator Screw 89 11 3/4Ó Screw 4* 1 Motor/Pulley/ 47 15 Belly Pan Fastener 90 1 Key...
... Screw # 1 User's Manual 34 1 Upright Wire Harness 77 1 Storage Latch 35 1 Front Roller Adj. Qty. Bolt 78 2 Handrail Bolt * Includes all parts shown in the center of this manual. Bolt 108 2 Pulse Bar Washer 22 1 Reed Switch Clip 66 1 Motor 109 1 Pulse Bar 23 1 Motor/Controller Wire 67 1 Latch Decal 110 3 Roller Adj. Description 1 1 Motor Belt 44 6 Platform Screw 87 1 Console Base 2 1 Pulley/Flywheel/Fan 45 4 Isolator 88 1 Console 3 4 Motor Nut 46 4 Isolator Screw 89 11 3/4Ó Screw 4* 1 Motor/Pulley/ 47 15 Belly Pan Fastener 90 1 Key...
English Manual
Page 26
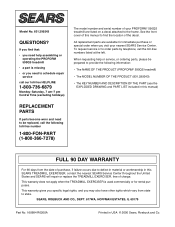
... (PROFORM¨ 590QS treadmill) ¥ The MODEL NUMBER OF THE PRODUCT (831.299243) ¥ The KEY NUMBER AND DESCRIPTION OF THE PART (see the EXPLODED DRAWING and PART LIST included in this manual) FULL 90 DAY WARRANTY For 90 days from state to the frame. See the front cover of this SEARS TREADMILL EXERCISER, contact the nearest SEARS Service Center throughout the United States and SEARS will repair or replace the TREADMILL EXERCISER, free...
... (PROFORM¨ 590QS treadmill) ¥ The MODEL NUMBER OF THE PRODUCT (831.299243) ¥ The KEY NUMBER AND DESCRIPTION OF THE PART (see the EXPLODED DRAWING and PART LIST included in this manual) FULL 90 DAY WARRANTY For 90 days from state to the frame. See the front cover of this SEARS TREADMILL EXERCISER, contact the nearest SEARS Service Center throughout the United States and SEARS will repair or replace the TREADMILL EXERCISER, free...

