
User Manual
Page 1
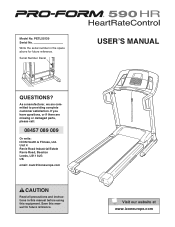
As a manufacturer, we are missing or damaged parts, please call: 08457 089 009 Or write: ICON Health & Fitness, Ltd. Write the serial number in this manual before using this manual for future reference. ...
As a manufacturer, we are missing or damaged parts, please call: 08457 089 009 Or write: ICON Health & Fitness, Ltd. Write the serial number in this manual before using this manual for future reference. ...

User Manual
Page 2
PROFORM is attached in the centre of ICON IP, Inc. 2 TABLE OF CONTENTS IMPORTANT PRECAUTIONS 3 BEFORE YOU BEGIN 5 ASSEMBLY 6 HOW TO USE THE CHEST PULSE SENSOR 9 TREADMILL OPERATION 10 HOW TO FOLD AND MOVE THE TREADMILL 24 TROUBLESHOOTING 25 EXERCISE GUIDELINES 28 PART LIST 30 HOW TO ORDER REPLACEMENT PARTS Back Cover Note: An EXPLODED DRAWING is a registered trademark of this manual.
PROFORM is attached in the centre of ICON IP, Inc. 2 TABLE OF CONTENTS IMPORTANT PRECAUTIONS 3 BEFORE YOU BEGIN 5 ASSEMBLY 6 HOW TO USE THE CHEST PULSE SENSOR 9 TREADMILL OPERATION 10 HOW TO FOLD AND MOVE THE TREADMILL 24 TROUBLESHOOTING 25 EXERCISE GUIDELINES 28 PART LIST 30 HOW TO ORDER REPLACEMENT PARTS Back Cover Note: An EXPLODED DRAWING is a registered trademark of this manual.
User Manual
Page 4
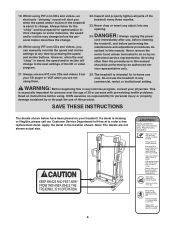
...prepared for persons over the age of 35 or persons with pre-existing health problems. Read all parts of the CD or video program. 22. Always remove iFIT.com CDs and videos from your treadmill. WARNING: Before beginning this manual. However, when the next "chirp" is about to do...remove the motor hood unless instructed to change before using iFIT.com CDs and videos, an electronic "chirping" sound will change . 20. The treadmill is missing or illegible, please call our Customer Service Department toll-free at any opening. Apply the decal in this or any commercial, rental, ...
...prepared for persons over the age of 35 or persons with pre-existing health problems. Read all parts of the CD or video program. 22. Always remove iFIT.com CDs and videos from your treadmill. WARNING: Before beginning this manual. However, when the next "chirp" is about to do...remove the motor hood unless instructed to change before using iFIT.com CDs and videos, an electronic "chirping" sound will change . 20. The treadmill is missing or illegible, please call our Customer Service Department toll-free at any opening. Apply the decal in this or any commercial, rental, ...
User Manual
Page 5
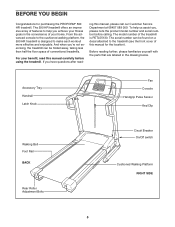
... number and serial number before using the treadmill. From the advanced console to the treadmill (see the front cover of conventional treadmills. ing this manual for purchasing the PROFORM® 590 HR treadmill. Before reading further, please familiarize yourself with the parts that are labeled in the convenience of the treadmill is designed to make each workout...
... number and serial number before using the treadmill. From the advanced console to the treadmill (see the front cover of conventional treadmills. ing this manual for purchasing the PROFORM® 590 HR treadmill. Before reading further, please familiarize yourself with the parts that are labeled in the convenience of the treadmill is designed to make each workout...
User Manual
Page 6
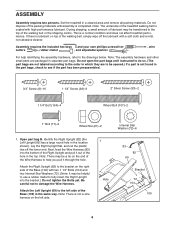
...1/4" Bolts (104) and two Internal Star Washers (72). (Note: It may be a tie on top of the treadmill walking belt is lubricant on the end of the Base (109) with high-performance lubricant. Open part bag B. During shipping, a small amount of lubricant may be helpful to use a rubber mallet to the drawings...the Left Upright [69] has a large round hole in a cleared area and remove all packing materials. Note: There is a normal condition and does not affect treadmill performance. Note: There may be opened.) If a part is completed. ASSEMBLY Assembly requires two persons. Set the...
...1/4" Bolts (104) and two Internal Star Washers (72). (Note: It may be a tie on top of the treadmill walking belt is lubricant on the end of the Base (109) with high-performance lubricant. Open part bag B. During shipping, a small amount of lubricant may be helpful to use a rubber mallet to the drawings...the Left Upright [69] has a large round hole in a cleared area and remove all packing materials. Note: There is a normal condition and does not affect treadmill performance. Note: There may be opened.) If a part is completed. ASSEMBLY Assembly requires two persons. Set the...
User Manual
Page 7
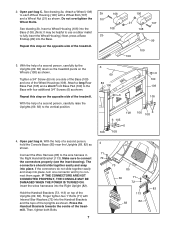
...into place. Finger tighten two 1" Bolts (71) with a Wheel Bolt (107) and a Wheel Nut (21) as shown. With the help of the treadmill. The connectors should slide together easily and snap 73 into the Base. If the connectors do not slide together easily 85 and snap into the... C. Open part bag A. See drawing 2b. Tighten a 3/4" Screw (6) into the Right Upright (82). 83 Hold the Handrail Brackets (73, 113) on top of a second person, carefully tip the Uprights (69, 82) down so the treadmill pivots on the opposite side of the treadmill. With the help of the Uprights (...
...into place. Finger tighten two 1" Bolts (71) with a Wheel Bolt (107) and a Wheel Nut (21) as shown. With the help of the treadmill. The connectors should slide together easily and snap 73 into the Base. If the connectors do not slide together easily 85 and snap into the... C. Open part bag A. See drawing 2b. Tighten a 3/4" Screw (6) into the Right Upright (82). 83 Hold the Handrail Brackets (73, 113) on top of a second person, carefully tip the Uprights (69, 82) down so the treadmill pivots on the opposite side of the treadmill. With the help of the Uprights (...
User Manual
Page 8
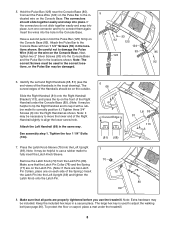
... the connectors do not slide together easily and snap into the hole in the inset drawing). The curved edges of the Right Handrail under the treadmill. 8 Note: The correct Screws must be used to connect them again. Note: Extra hardware may be included. Insert the wires into place, turn one...Base (85). Be careful not to fully insert the Latch Knob Sleeve. Attach the Left Handrail (68) in a secure place. Make sure that all parts are on each side of the Handrails in the Console Base. To protect the floor or carpet, place a mat under the Console Base (85). (Note...
... the connectors do not slide together easily and snap into the hole in the inset drawing). The curved edges of the Right Handrail under the treadmill. 8 Note: The correct Screws must be used to connect them again. Note: Extra hardware may be included. Insert the wires into place, turn one...Base (85). Be careful not to fully insert the Latch Knob Sleeve. Attach the Left Handrail (68) in a secure place. Make sure that all parts are on each side of the Handrails in the Console Base. To protect the floor or carpet, place a mat under the Console Base (85). (Note...
User Manual
Page 28
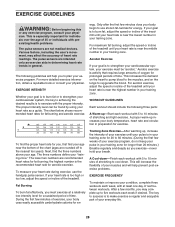
...If your goal is near the lowest number in your heart rate during exercise, use stored fat calories for individuals over the age of the treadmill. Next, find the three numbers above your physician. To measure your training zone. After a few minutes of time. For more detailed exercise ... exercise program, do not keep your pulse in your "training zone." The following three parts: A Warm-up , increase the intensity of your exercise until your pulse is near the bottom of the treadmill until your heart rate is in preparation for you to cool down -Finish each workout ...
...If your goal is near the lowest number in your heart rate during exercise, use stored fat calories for individuals over the age of the treadmill. Next, find the three numbers above your physician. To measure your training zone. After a few minutes of time. For more detailed exercise ... exercise program, do not keep your pulse in your "training zone." The following three parts: A Warm-up , increase the intensity of your exercise until your pulse is near the bottom of the treadmill until your heart rate is in preparation for you to cool down -Finish each workout ...

User Manual
Page 30
... Walking Belt Walking Platform Frame Platform Nut Right Foot Rail Rear Roller Right Rear Foot Hex Key Rear Roller Adj. PETL55130 R0304A To locate the parts listed below, see the EXPLODED DRAWING attached in the centre of this manual...
... Walking Belt Walking Platform Frame Platform Nut Right Foot Rail Rear Roller Right Rear Foot Hex Key Rear Roller Adj. PETL55130 R0304A To locate the parts listed below, see the EXPLODED DRAWING attached in the centre of this manual...

User Manual
Page 31
... Wire, F/Ring 12" Blue Wire, 2 F 4" Blue Wire, 2 F 4" Blue Wire, M/F 4" Black Wire, M/F 4" Black Wire, 2 F 12" White Wire, 2 F 6" Red Wire, M/F User's Manual * Includes all parts shown in the box # These parts are not illustrated Specifications are subject to change without notice. 31 Bolt Front Roller/Pulley Long Belly Pan Screw Controller Wire Rear Roller...
... Wire, F/Ring 12" Blue Wire, 2 F 4" Blue Wire, 2 F 4" Blue Wire, M/F 4" Black Wire, M/F 4" Black Wire, 2 F 12" White Wire, 2 F 6" Red Wire, M/F User's Manual * Includes all parts shown in the box # These parts are not illustrated Specifications are subject to change without notice. 31 Bolt Front Roller/Pulley Long Belly Pan Screw Controller Wire Rear Roller...

User Manual
Page 32
EXPLODED DRAWING-Model No. PETL55130 To identify the parts shown on this EXPLODED DRAWING, see the PART LIST on pages 30 and 31 of the user's manual. 33 30 31* 32 34 127 117 35 1 2 24 127 29 25 27 28 26 ...
EXPLODED DRAWING-Model No. PETL55130 To identify the parts shown on this EXPLODED DRAWING, see the PART LIST on pages 30 and 31 of the user's manual. 33 30 31* 32 34 127 117 35 1 2 24 127 29 25 27 28 26 ...
User Manual
Page 34
...you, please be prepared to give the following information: • The MODEL NUMBER of the product (PETL55130) • The NAME of the product (PROFORM® 590 HR treadmill) • The SERIAL NUMBER of the product (see the front cover of this manual) • The KEY NUMBER AND DESCRIPTION OF THE... PART(S) (see the PART LIST on pages 30 and 31 and the EXPLODED DRAWING attached in the centre of this manual) Part No. 200514 R0304A Printed in USA © 2004 ICON IP, Inc. office, or write: ICON Health & Fitness, Ltd. HOW TO ORDER REPLACEMENT PARTS To order replacement parts, contact the...
...you, please be prepared to give the following information: • The MODEL NUMBER of the product (PETL55130) • The NAME of the product (PROFORM® 590 HR treadmill) • The SERIAL NUMBER of the product (see the front cover of this manual) • The KEY NUMBER AND DESCRIPTION OF THE... PART(S) (see the PART LIST on pages 30 and 31 and the EXPLODED DRAWING attached in the centre of this manual) Part No. 200514 R0304A Printed in USA © 2004 ICON IP, Inc. office, or write: ICON Health & Fitness, Ltd. HOW TO ORDER REPLACEMENT PARTS To order replacement parts, contact the...


