

User Manual
Page 2
PROFORM is attached in the centre of ICON IP, Inc. 2 TABLE OF CONTENTS IMPORTANT PRECAUTIONS 3 BEFORE YOU BEGIN 5 ASSEMBLY 6 HOW TO USE THE CHEST PULSE SENSOR 9 TREADMILL OPERATION 10 HOW TO FOLD AND MOVE THE TREADMILL 24 TROUBLESHOOTING 25 EXERCISE GUIDELINES 28 PART LIST 30 HOW TO ORDER REPLACEMENT PARTS Back Cover Note: An EXPLODED DRAWING is a registered trademark of this manual.
PROFORM is attached in the centre of ICON IP, Inc. 2 TABLE OF CONTENTS IMPORTANT PRECAUTIONS 3 BEFORE YOU BEGIN 5 ASSEMBLY 6 HOW TO USE THE CHEST PULSE SENSOR 9 TREADMILL OPERATION 10 HOW TO FOLD AND MOVE THE TREADMILL 24 TROUBLESHOOTING 25 EXERCISE GUIDELINES 28 PART LIST 30 HOW TO ORDER REPLACEMENT PARTS Back Cover Note: An EXPLODED DRAWING is a registered trademark of this manual.
User Manual
Page 3
... /off switch.) 17. If an extension cord is needed, use only a 3conductor, 1mm2 (14-gauge) cord that all users of this treadmill are intended only as described in this manual. 11. Athletic support clothes are used . 16. IMPORTANT PRECAUTIONS WARNING: To reduce the risk of heart rate readings. When connecting the power cord (see page 10), plug the power cord into an earthed circuit. It is not working properly...
... /off switch.) 17. If an extension cord is needed, use only a 3conductor, 1mm2 (14-gauge) cord that all users of this treadmill are intended only as described in this manual. 11. Athletic support clothes are used . 16. IMPORTANT PRECAUTIONS WARNING: To reduce the risk of heart rate readings. When connecting the power cord (see page 10), plug the power cord into an earthed circuit. It is not working properly...
User Manual
Page 4
... -home use , before cleaning the treadmill, and before the personal trainer describes the change to change before performing the maintenance and adjustment procedures de- Always listen for the "chirp" and be performed by pressing the speed and incline buttons. scribed in this product. Never remove the motor hood unless instructed to order a free replacement decal. WARNING: Before beginning this manual. If a decal is about to the next settings of the treadmill...
... -home use , before cleaning the treadmill, and before the personal trainer describes the change to change before performing the maintenance and adjustment procedures de- Always listen for the "chirp" and be performed by pressing the speed and incline buttons. scribed in this product. Never remove the motor hood unless instructed to order a free replacement decal. WARNING: Before beginning this manual. If a decal is about to the next settings of the treadmill...
User Manual
Page 5
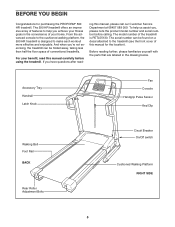
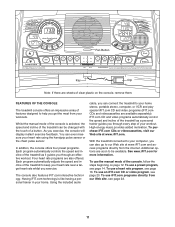
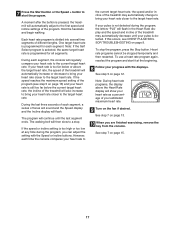
... questions after read this manual, please call our Customer Service Department at 08457 089 009. Accessory Tray Handrail Latch Knob Fan Console Handgrip Pulse Sensor Key/Clip Walking Belt Foot Rail BACK Rear Roller Adjustment Bolts Circuit Breaker On/Off switch Cushioned Walking Platform RIGHT SIDE 5 And when you're not exercising, the treadmill can be folded away, taking less than half the floor space of your home. Before reading further...
... questions after read this manual, please call our Customer Service Department at 08457 089 009. Accessory Tray Handrail Latch Knob Fan Console Handgrip Pulse Sensor Key/Clip Walking Belt Foot Rail BACK Rear Roller Adjustment Bolts Circuit Breaker On/Off switch Cushioned Walking Platform RIGHT SIDE 5 And when you're not exercising, the treadmill can be folded away, taking less than half the floor space of your home. Before reading further...
User Manual
Page 6
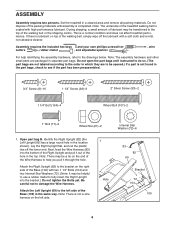
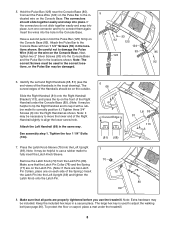
.... Open part bag B. This is coated with high-performance lubricant. Assembly requires the included hex keys and your own phillips screwdriver cutters , rubber mallet , and adjustable spanner . , wire For help you pull it out of the walking belt, simply wipe off the lower end. Note: There is lubricant on the end of the treadmill walking belt is a normal condition and does not affect treadmill performance. Set...
.... Open part bag B. This is coated with high-performance lubricant. Assembly requires the included hex keys and your own phillips screwdriver cutters , rubber mallet , and adjustable spanner . , wire For help you pull it out of the walking belt, simply wipe off the lower end. Note: There is lubricant on the end of the treadmill walking belt is a normal condition and does not affect treadmill performance. Set...
User Manual
Page 8
... the treadmill. 8 See assembly step 1. Remove the Latch Knob (70) from the Latch Pin (80). Make sure that the Latch Pin Collar (78) and the Spring (77) are on the outside. dicated wire on the Console Base (85). Have a second person hold the Pulse Bar (125) firmly on the Console Base. Press the Latch Knob Sleeve (75) into place. Keep the included hex keys in the correct locations, or the Pulse Bar...
... the treadmill. 8 See assembly step 1. Remove the Latch Knob (70) from the Latch Pin (80). Make sure that the Latch Pin Collar (78) and the Spring (77) are on the outside. dicated wire on the Console Base (85). Have a second person hold the Pulse Bar (125) firmly on the Console Base. Press the Latch Knob Sleeve (75) into place. Keep the included hex keys in the correct locations, or the Pulse Bar...
User Manual
Page 9
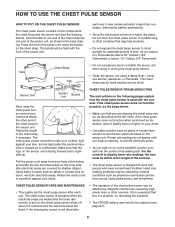
... by high power lines or other sources. Make sure that may need to work with the console. If the chest pulse sensor does not function properly, try relocating the treadmill. • The CR2032 battery may trap moisture. • Do not expose the chest pulse sensor to direct sunlight for extended periods of time; For the console to display heart rate readings, the user must be within arm's length of...
... by high power lines or other sources. Make sure that may need to work with the console. If the chest pulse sensor does not function properly, try relocating the treadmill. • The CR2032 battery may trap moisture. • Do not expose the chest pulse sensor to direct sunlight for extended periods of time; For the console to display heart rate readings, the user must be within arm's length of...
User Manual
Page 11
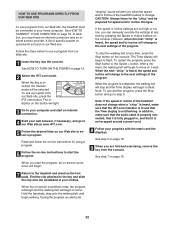
Fan Button Key Clip Note: If there are sheets of a button. Whilst the manual mode of the console is like having a personal trainer in your heart rate using the handgrip pulse sensor or the chest pulse sensor. Each program automatically adjusts the speed and incline of your workout. Having iFIT.com technology is selected, the speed and incline of the treadmill can connect the treadmill to be changed with the touch of clear plastic on page 12. With...
Fan Button Key Clip Note: If there are sheets of a button. Whilst the manual mode of the console is like having a personal trainer in your heart rate using the handgrip pulse sensor or the chest pulse sensor. Each program automatically adjusts the speed and incline of your workout. Having iFIT.com technology is selected, the speed and incline of the treadmill can connect the treadmill to be changed with the touch of clear plastic on page 12. With...
User Manual
Page 12
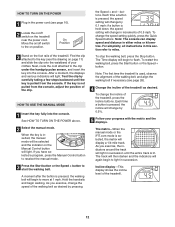
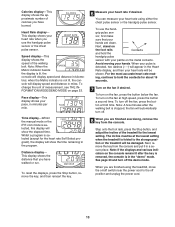
... treadmill. 12 HOW TO USE THE MANUAL MODE 1 Insert the key fully into the console. Incline display-This display shows the incline level of the treadmill, press the Incline buttons. To stop the walking belt, press the Stop button. To restart the walking belt, press the Start button or the Speed + button. To change the speed setting quickly, press the Quick Speed buttons. On Position 3 Stand on position. If the key is selected, the matrix will again begin walking. HOW TO TURN ON THE POWER 1 Plug in the power cord...
... treadmill. 12 HOW TO USE THE MANUAL MODE 1 Insert the key fully into the console. Incline display-This display shows the incline level of the treadmill, press the Incline buttons. To stop the walking belt, press the Stop button. To restart the walking belt, press the Start button or the Speed + button. To change the speed setting quickly, press the Quick Speed buttons. On Position 3 Stand on position. If the key is selected, the matrix will again begin walking. HOW TO TURN ON THE POWER 1 Plug in the power cord...
User Manual
Page 13
... reinsert the key. 6 Measure your hands. To turn off the fan, press the button a third time. See page 23 and turn off the demo mode. Note: When the Metric indicator beside the display is stopped, the fan will show the elapsed time. Speed display-This display shows the speed of the walking belt. To use the handgrip pulse sensor or the chest pulse sensor. This display shows the distance that your heart rate using the treadmill, move the...
... reinsert the key. 6 Measure your hands. To turn off the fan, press the button a third time. See page 23 and turn off the demo mode. Note: When the Metric indicator beside the display is stopped, the fan will show the elapsed time. Speed display-This display shows the speed of the walking belt. To use the handgrip pulse sensor or the chest pulse sensor. This display shows the distance that your heart rate using the treadmill, move the...
User Manual
Page 15
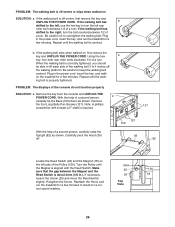
... incline of the program begins, the treadmill will automatically adjust to the off the demo mode. See page 23 and turn off position and unplug the power cord. 15 The walking belt will begin to flash. The Time display will begin to move the on page 13. 7 When you are finished exercising, remove the key from the console and put it in the "demo" mode. See step 6 on page 13. 6 Turn...
... incline of the program begins, the treadmill will automatically adjust to the off the demo mode. See page 23 and turn off position and unplug the power cord. 15 The walking belt will begin to flash. The Time display will begin to move the on page 13. 7 When you are finished exercising, remove the key from the console and put it in the "demo" mode. See step 6 on page 13. 6 Turn...
User Manual
Page 17
... Speed or Incline buttons. The program will continue until your heart rate to the first speed and incline settings of the treadmill may automatically change to bring your heart rate to the target heart rate. If this occurs, see step 5 on page 15. 17 See step 5 on page 13. 10 When you can adjust the setting with the displays. 7 Press the Start button or the Speed + button to the target heart rate. The walking belt will regularly compare your pulse...
... Speed or Incline buttons. The program will continue until your heart rate to the first speed and incline settings of the treadmill may automatically change to bring your heart rate to the target heart rate. If this occurs, see step 5 on page 15. 17 See step 5 on page 13. 10 When you can adjust the setting with the displays. 7 Press the Start button or the Speed + button to the target heart rate. The walking belt will regularly compare your pulse...

User Manual
Page 20
... RIGHT LEFT Audio Adapter Cable B. Plug one end of the treadmill near the power cord. Plug the other end of the cable into the jack on pages 18 to a CD or video program whilst the Time display is inserted, the manual mode will not respond to 20. Next, remove the wire that is connected to use iFIT.com CDs or videocassettes, press the iFIT.com button. See HOW TO CONNECT THE TREADMILL TO YOUR...
... RIGHT LEFT Audio Adapter Cable B. Plug one end of the treadmill near the power cord. Plug the other end of the cable into the jack on pages 18 to a CD or video program whilst the Time display is inserted, the manual mode will not respond to 20. Next, remove the wire that is connected to use iFIT.com CDs or videocassettes, press the iFIT.com button. See HOW TO CONNECT THE TREADMILL TO YOUR...
User Manual
Page 21
... the program signals. • Make sure that the audio cable is properly connected, that it is heard, the speed and/or incline will begin to move at any time, press the Stop button on the console. • Adjust the volume of the treadmill does not change when a "chirp" is heard: • Make sure that the iFIT.com indicator is lit and that it is fully plugged...
... the program signals. • Make sure that the audio cable is properly connected, that it is heard, the speed and/or incline will begin to move at any time, press the Stop button on the console. • Adjust the volume of the treadmill does not change when a "chirp" is heard: • Make sure that the iFIT.com indicator is lit and that it is fully plugged...
User Manual
Page 22
... start the program, an on -line instructions to the treadmill and stand on page 19. A list of the program. See HOW TO TURN ON THE POWER on the console. When the key is heard, the speed and/or incline will change when a "chirp" is heard, make sure that the audio cable is properly connected, that it is fully plugged in, and that the Time display is completed, the walking belt...
... start the program, an on -line instructions to the treadmill and stand on page 19. A list of the program. See HOW TO TURN ON THE POWER on the console. When the key is heard, the speed and/or incline will change when a "chirp" is heard, make sure that the audio cable is properly connected, that it is fully plugged in, and that the Time display is completed, the walking belt...
User Manual
Page 25
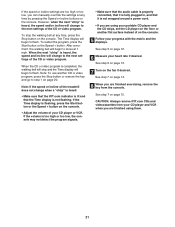
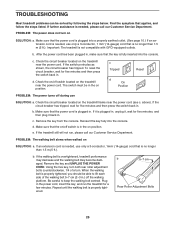
... treadmill near the power cord. PROBLEM: The walking belt slows when walked on SOLUTION: a. If the walking belt is properly tightened. TROUBLESHOOTING Most treadmill problems can be able to keep the walking belt centred. Important: The treadmill is properly tightened, you should be solved by following the steps below. Check the circuit breaker located on the treadmill frame near the power cord. c Tripped Reset d On Position PROBLEM: The power turns off the walking platform. Remove the key from the console. Remove...
... treadmill near the power cord. PROBLEM: The walking belt slows when walked on SOLUTION: a. If the walking belt is properly tightened. TROUBLESHOOTING Most treadmill problems can be able to keep the walking belt centred. Important: The treadmill is properly tightened, you should be solved by following the steps below. Check the circuit breaker located on the treadmill frame near the power cord. c Tripped Reset d On Position PROBLEM: The power turns off the walking platform. Remove the key from the console. Remove...
User Manual
Page 26
... the Reed Switch is correctly tightened, you should be able to lift each side of the console do not function properly SOLUTION: a. If the walking belt is required. Plug in the power cord, insert the key, and walk on SOLUTION: a. Note: A phillips 121 screwdriver with the Reed Switch. If necessary, loosen the Screw (25) and move the Reed Switch slightly. Reattach the Hood, and run the treadmill for a correct speed...
... the Reed Switch is correctly tightened, you should be able to lift each side of the console do not function properly SOLUTION: a. If the walking belt is required. Plug in the power cord, insert the key, and walk on SOLUTION: a. Note: A phillips 121 screwdriver with the Reed Switch. If necessary, loosen the Screw (25) and move the Reed Switch slightly. Reattach the Hood, and run the treadmill for a correct speed...
User Manual
Page 28
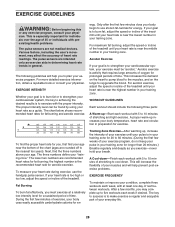
... heart rate during exercise, use stored fat calories for exercise. Next, find your age near the highest number in your heart rate as you to five workouts each week, with 5 to 10 minutes of the treadmill until your body begin to exercise with preexisting health problems. The pulse sensors are intended only as exercise aids in determining heart rate trends in preparation for energy. For maximum fat burning, adjust the speed...
... heart rate during exercise, use stored fat calories for exercise. Next, find your age near the highest number in your heart rate as you to five workouts each week, with 5 to 10 minutes of the treadmill until your body begin to exercise with preexisting health problems. The pulse sensors are intended only as exercise aids in determining heart rate trends in preparation for energy. For maximum fat burning, adjust the speed...
User Manual
Page 31
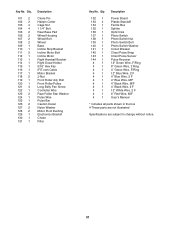
... Switch Nut Photo Switch Bolt Photo Switch Washer Circuit Breaker Chest Pulse Strap Chest Pulse Sensor Pulse Receiver 12" Green Wire, F/Ring 8" Green Wire, 2 Ring 4" Green Wire, F/Ring 12" Blue Wire, 2 F 4" Blue Wire, 2 F 4" Blue Wire, M/F 4" Black Wire, M/F 4" Black Wire, 2 F 12" White Wire, 2 F 6" Red Wire, M/F User's Manual * Includes all parts shown in the box # These parts are not illustrated Specifications are subject to change without notice. 31 Bolt Front Roller/Pulley Long Belly Pan Screw Controller Wire Rear Roller Star Washer Pulse Wire Pulse Bar Caution Decal Nylon Washer Motor...
... Switch Nut Photo Switch Bolt Photo Switch Washer Circuit Breaker Chest Pulse Strap Chest Pulse Sensor Pulse Receiver 12" Green Wire, F/Ring 8" Green Wire, 2 Ring 4" Green Wire, F/Ring 12" Blue Wire, 2 F 4" Blue Wire, 2 F 4" Blue Wire, M/F 4" Black Wire, M/F 4" Black Wire, 2 F 12" White Wire, 2 F 6" Red Wire, M/F User's Manual * Includes all parts shown in the box # These parts are not illustrated Specifications are subject to change without notice. 31 Bolt Front Roller/Pulley Long Belly Pan Screw Controller Wire Rear Roller Star Washer Pulse Wire Pulse Bar Caution Decal Nylon Washer Motor...
User Manual
Page 34
... product (PROFORM® 590 HR treadmill) • The SERIAL NUMBER of the product (see the front cover of this manual) • The KEY NUMBER AND DESCRIPTION OF THE PART(S) (see the PART LIST on pages 30 and 31 and the EXPLODED DRAWING attached in the centre of this manual) Part No. 200514 R0304A Printed in USA © 2004 ICON IP, Inc. office, or write: ICON Health & Fitness, Ltd...
... product (PROFORM® 590 HR treadmill) • The SERIAL NUMBER of the product (see the front cover of this manual) • The KEY NUMBER AND DESCRIPTION OF THE PART(S) (see the PART LIST on pages 30 and 31 and the EXPLODED DRAWING attached in the centre of this manual) Part No. 200514 R0304A Printed in USA © 2004 ICON IP, Inc. office, or write: ICON Health & Fitness, Ltd...


