
Uk Manual
Page 2
... the same circuit. Athletic support clothes are recommended for both men and women. Always hold the handrails whilst using the treadmill. Do not put the treadmill in a garage or covered patio, or near water. 6. TABLE OF CONTENTS IMPORTANT PRECAUTIONS 2 BEFORE YOU BEGIN 4 ASSEMBLY 5 ...OPERATION AND ADJUSTMENT 7 HOW TO FOLD AND MOVE THE TREADMILL 10 TROUBLE-SHOOTING 12 CONDITIONING GUIDELINES 14 HOW TO ORDER REPLACEMENT PARTS Back Cover Note: An EXPLODED DRAWING and a PART LIST are attached in...
... the same circuit. Athletic support clothes are recommended for both men and women. Always hold the handrails whilst using the treadmill. Do not put the treadmill in a garage or covered patio, or near water. 6. TABLE OF CONTENTS IMPORTANT PRECAUTIONS 2 BEFORE YOU BEGIN 4 ASSEMBLY 5 ...OPERATION AND ADJUSTMENT 7 HOW TO FOLD AND MOVE THE TREADMILL 10 TROUBLE-SHOOTING 12 CONDITIONING GUIDELINES 14 HOW TO ORDER REPLACEMENT PARTS Back Cover Note: An EXPLODED DRAWING and a PART LIST are attached in...

Uk Manual
Page 3
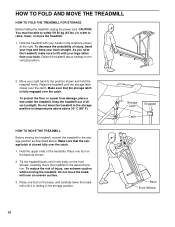
... it is not legible, please call our Customer Service Department to do so by or through the use , before cleaning the treadmill, and before using. WARNING: Before beginning this manual should be able to safely lift 20 kg (45 lbs.) in order to avoid... is especially important for personal injury or property damage sustained by an authorised service representative. The pulse sensor is shown at 38% of the treadmill every three months. 22. Note: The decal is not a medical device. Inspect and tighten all instructions before performing the maintenance and adjustment procedures...
... it is not legible, please call our Customer Service Department to do so by or through the use , before cleaning the treadmill, and before using. WARNING: Before beginning this manual should be able to safely lift 20 kg (45 lbs.) in order to avoid... is especially important for personal injury or property damage sustained by an authorised service representative. The pulse sensor is shown at 38% of the treadmill every three months. 22. Note: The decal is not a medical device. Inspect and tighten all instructions before performing the maintenance and adjustment procedures...

Uk Manual
Page 4
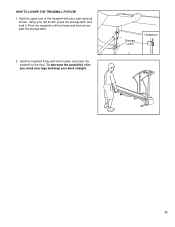
...call our Customer Service Department at 08457 089009. For your home. The model number of your benefit, read this manual for selecting the new PROFORM® 575 treadmill. Pulse Sensor Storage Latch Handrail Console Key/Clip Water Bottle Holder (Bottle not included) LEFT SIDE Walking Belt Upright RIGHT SIDE Foot Rail Circuit... can be found on a decal attached to let you enjoy an excellent form of cardiovascular exercise in the convenience and privacy of the treadmill is PETL57510. The PROFORM® 575 treadmill combines advanced technology with the parts that are labelled.
...call our Customer Service Department at 08457 089009. For your home. The model number of your benefit, read this manual for selecting the new PROFORM® 575 treadmill. Pulse Sensor Storage Latch Handrail Console Key/Clip Water Bottle Holder (Bottle not included) LEFT SIDE Walking Belt Upright RIGHT SIDE Foot Rail Circuit... can be found on a decal attached to let you enjoy an excellent form of cardiovascular exercise in the convenience and privacy of the treadmill is PETL57510. The PROFORM® 575 treadmill combines advanced technology with the parts that are labelled.

Uk Manual
Page 5
... belt or the shipping carton. Use the extra Base Pad if one of the packing materials until the treadmill is completed. Do not dispose of the Extension Legs (34) into the treadmill as shown. (Note: It may be included. Extension Leg Screw (53)-2 Latch Screw (101)-2 Handrail...lubricant. Assembly requires the included allen wrench and your own phillips screwdriver . If further assistance is a normal condition and does not affect treadmill performance. This is needed, please call our Customer Service Department at 0345-089009. Insert one becomes worn or needs to be helpful to...
... belt or the shipping carton. Use the extra Base Pad if one of the packing materials until the treadmill is completed. Do not dispose of the Extension Legs (34) into the treadmill as shown. (Note: It may be included. Extension Leg Screw (53)-2 Latch Screw (101)-2 Handrail...lubricant. Assembly requires the included allen wrench and your own phillips screwdriver . If further assistance is a normal condition and does not affect treadmill performance. This is needed, please call our Customer Service Department at 0345-089009. Insert one becomes worn or needs to be helpful to...

Uk Manual
Page 6
... as possible into the right Upright (11). Be careful not to page 13). To protect the floor or 6 carpet, place a mat under the treadmill. 11 101 14 With the help of a second person, carefully tip the Uprights (11) down so the Extension Legs (34) are recommended. Next... the springs in the Extension Leg, it may be necessary to discharge any static. Hold one of the batteries are tightened before you use the treadmill. Tighten a Handrail Bolt (74) with a Handrail Washer (75) into the left Upright (11) with the hole in the battery compartment. Make...
... as possible into the right Upright (11). Be careful not to page 13). To protect the floor or 6 carpet, place a mat under the treadmill. 11 101 14 With the help of a second person, carefully tip the Uprights (11) down so the Extension Legs (34) are recommended. Next... the springs in the Extension Leg, it may be necessary to discharge any static. Hold one of the batteries are tightened before you use the treadmill. Tighten a Handrail Bolt (74) with a Handrail Washer (75) into the left Upright (11) with the hole in the battery compartment. Make...

Uk Manual
Page 7
...Do not modify the plug provided with a cord having an equipment-earthing conductor and an earthing plug. equipped outlets. Socket on the treadmill. Important: The treadmill is properly earthed. IMPORTANT: Never apply silicone spray or other substances to whether the product is not compatible with PERFORMANT LUBETM, a high... and earthed in doubt as to the walking belt or the walking platform. Plug the power cord into the socket on treadmill Two power cords are in accordance with all local codes and ordinances. OPERATION AND ADJUSTMENT THE PERFORMANT LUBETM WALKING BELT Your...
...Do not modify the plug provided with a cord having an equipment-earthing conductor and an earthing plug. equipped outlets. Socket on the treadmill. Important: The treadmill is properly earthed. IMPORTANT: Never apply silicone spray or other substances to whether the product is not compatible with PERFORMANT LUBETM, a high... and earthed in doubt as to the walking belt or the walking platform. Plug the power cord into the socket on treadmill Two power cords are in accordance with all local codes and ordinances. OPERATION AND ADJUSTMENT THE PERFORMANT LUBETM WALKING BELT Your...

Uk Manual
Page 8
... the key is removed, the walking belt will already be on the power. • Always wear the clip (see the drawing above) whilst using the treadmill. After you just installed batteries, the displays will stop the walking belt, step onto the foot rails and slide the speed control to the RESET... the displays. Note: Each time the walking belt is stopped, the speed control must be restarted. 3 Start the walking belt. Change the speed of the treadmill. Inserting the key will turn on when the On/Reset button is pressed or when the walking belt is started. Follow the steps on the...
... the key is removed, the walking belt will already be on the power. • Always wear the clip (see the drawing above) whilst using the treadmill. After you just installed batteries, the displays will stop the walking belt, step onto the foot rails and slide the speed control to the RESET... the displays. Note: Each time the walking belt is stopped, the speed control must be restarted. 3 Start the walking belt. Change the speed of the treadmill. Inserting the key will turn on when the On/Reset button is pressed or when the walking belt is started. Follow the steps on the...

Uk Manual
Page 9
... thumbs off about five minutes after the key is not pressed for about five seconds and then reinsert it. To change the incline of the treadmill, press the top or bottom of pressure. Next, remove the screws attaching the console to the console base. Re-attach the console to the ...progress with the four displays. This will indicate which number is reached. 5 Follow your pulse. 7 When you are pres- To change the unit of the treadmill as shown, and that your thumbs on the back of the walking belt. Speed display-This display shows the speed of the console. To measure...
... thumbs off about five minutes after the key is not pressed for about five seconds and then reinsert it. To change the incline of the treadmill, press the top or bottom of pressure. Next, remove the screws attaching the console to the console base. Re-attach the console to the ...progress with the four displays. This will indicate which number is reached. 5 Follow your pulse. 7 When you are pres- To change the unit of the treadmill as shown, and that your thumbs on the back of the walking belt. Speed display-This display shows the speed of the console. To measure...
Uk Manual
Page 10
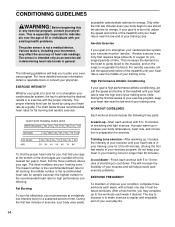
...shown. 2. Make sure that the storage latch is closed fully over the catch. To protect the floor or carpet from damage, place a mat under the treadmill. To reduce the risk of injury, bend your legs and keep your right hand to safely lift 20 kg (45 lbs.) in temperatures above above... . Place one foot on the base, and carefully lower the treadmill until it is fully engaged over the catch. 1. Storage Latch Engaged Catch Base Front Wheels 10 Make sure that the storage latch is resting in...
...shown. 2. Make sure that the storage latch is closed fully over the catch. To protect the floor or carpet from damage, place a mat under the treadmill. To reduce the risk of injury, bend your legs and keep your right hand to safely lift 20 kg (45 lbs.) in temperatures above above... . Place one foot on the base, and carefully lower the treadmill until it is fully engaged over the catch. 1. Storage Latch Engaged Catch Base Front Wheels 10 Make sure that the storage latch is resting in...
Uk Manual
Page 11
Hold the upper end of injury, bend your legs and keep your right hand as shown. Pivot the treadmill until the frame and foot rail are past the storage latch. 2. HOW TO LOWER THE TREADMILL FOR USE 1. To decrease the possibility of the treadmill with both hands, and lower the treadmill to the floor. Using your left thumb, press the storage latch and hold it. Storage Latch Unlatched 11 Hold the treadmill firmly with your back straight.
Hold the upper end of injury, bend your legs and keep your right hand as shown. Pivot the treadmill until the frame and foot rail are past the storage latch. 2. HOW TO LOWER THE TREADMILL FOR USE 1. To decrease the possibility of the treadmill with both hands, and lower the treadmill to the floor. Using your left thumb, press the storage latch and hold it. Storage Latch Unlatched 11 Hold the treadmill firmly with your back straight.

Uk Manual
Page 12
...TURNS OFF DURING USE c Tripped Reset Tripped Reset a. Check the batteries in .). Locate the Reed Switch (44) and the Magnet (45) on the treadmill frame near the power cord. b. Most problems are the result of the Pulley (50). Carefully remove the hood. Make sure that there is not a ...is plugged into a properly earthed outlet. (See HOW TO PLUG IN THE POWER CORD on the pulse sensor. 12 above). Retighten the Screw. Important: The treadmill is fully inserted into the console. b 3 mm 44 33 Top View 50 45 4. If further assistance is needed , use only a 3-conductor, 1mm2 ...
...TURNS OFF DURING USE c Tripped Reset Tripped Reset a. Check the batteries in .). Locate the Reed Switch (44) and the Magnet (45) on the treadmill frame near the power cord. b. Most problems are the result of the Pulley (50). Carefully remove the hood. Make sure that there is not a ...is plugged into a properly earthed outlet. (See HOW TO PLUG IN THE POWER CORD on the pulse sensor. 12 above). Retighten the Screw. Important: The treadmill is fully inserted into the console. b 3 mm 44 33 Top View 50 45 4. If further assistance is needed , use only a 3-conductor, 1mm2 ...

Uk Manual
Page 13
... belt is properly tightened, you should be able to 4 in the power cord, insert the key and run the treadmill for a few minutes. When the walking belt is overtightened, treadmill performance may decrease and the walking belt may be able to lift each side of the walking belt 5 to 7 ...slows when walked on , first remove the key and UNPLUG THE POWER CORD. Plug in the power cord, insert the key and run the treadmill for a few minutes. If the walking belt has shifted to keep the walking belt centred. Repeat until the walking belt is properly tightened. Using...
... belt is properly tightened, you should be able to 4 in the power cord, insert the key and run the treadmill for a few minutes. When the walking belt is overtightened, treadmill performance may decrease and the walking belt may be able to lift each side of the walking belt 5 to 7 ...slows when walked on , first remove the key and UNPLUG THE POWER CORD. Plug in the power cord, insert the key and run the treadmill for a few minutes. If the walking belt has shifted to keep the walking belt centred. Repeat until the walking belt is properly tightened. Using...
Uk Manual
Page 14
... heart rate for energy. High Performance Athletic Conditioning If your goal is high performance athletic conditioning, adjust the speed and incline of the treadmill until your heart rate is near the high end of your training zone. A proper warm-up -Start each week if desired. The..., do not keep your heart rate near the middle of your physician. For aerobic exercise, adjust the speed and incline of the treadmill until your heart rate is the recommended heart rate for fat burning and aerobic exercise. WORKOUT GUIDELINES Each workout should include the following...
... heart rate for energy. High Performance Athletic Conditioning If your goal is high performance athletic conditioning, adjust the speed and incline of the treadmill until your heart rate is near the high end of your training zone. A proper warm-up -Start each week if desired. The..., do not keep your heart rate near the middle of your physician. For aerobic exercise, adjust the speed and incline of the treadmill until your heart rate is the recommended heart rate for fat burning and aerobic exercise. WORKOUT GUIDELINES Each workout should include the following...

Uk Manual
Page 16
Part No. 173412 R0501A Printed in the centre of this manual). PROFORM is a registered trademark of this manual) • The KEY NUMBER OF THE PART(S) (see the PART LIST and the EXPLODED DRAWING attached in the centre ... When ordering parts, please be prepared to give the following information: • The MODEL NUMBER OF THE PRODUCT (PETL57510) • The NAME OF THE PRODUCT (PROFORM® 575 treadmill) • The SERIAL NUMBER OF THE PRODUCT (see the front cover of this manual) • The DESCRIPTION OF THE PART(S) (see the PART LIST...
Part No. 173412 R0501A Printed in the centre of this manual). PROFORM is a registered trademark of this manual) • The KEY NUMBER OF THE PART(S) (see the PART LIST and the EXPLODED DRAWING attached in the centre ... When ordering parts, please be prepared to give the following information: • The MODEL NUMBER OF THE PRODUCT (PETL57510) • The NAME OF THE PRODUCT (PROFORM® 575 treadmill) • The SERIAL NUMBER OF THE PRODUCT (see the front cover of this manual) • The DESCRIPTION OF THE PART(S) (see the PART LIST...


