

Uk Manual
Page 1
....proform.com Write the serial number in the location shown below. The serial number is found in the space above. Unit 4, Revie Road Industrial Estate Revie Road Beeston Leeds, LS11 8JG UK CAUTION Read all precautions and instructions in this manual before using this manual for future reference. As a manufacturer, we are missing parts, please call: 08457 089009 Or write: ICON Fitness Lifestyle Ltd. Model...
....proform.com Write the serial number in the location shown below. The serial number is found in the space above. Unit 4, Revie Road Industrial Estate Revie Road Beeston Leeds, LS11 8JG UK CAUTION Read all precautions and instructions in this manual before using this manual for future reference. As a manufacturer, we are missing parts, please call: 08457 089009 Or write: ICON Fitness Lifestyle Ltd. Model...
Uk Manual
Page 2
... PART LIST for future reference. Do not put the treadmill in sandals. 11. When replacing the fuse, an ASTA approved BS1362 type should be fitted to ensure that blocks any air openings. Never move the walking belt whilst the power is the responsibility of this manual. Place the treadmill on the walking belt. The treadmill should be used . 12. Do not wear loose clothing that the location...
... PART LIST for future reference. Do not put the treadmill in sandals. 11. When replacing the fuse, an ASTA approved BS1362 type should be fitted to ensure that blocks any air openings. Never move the walking belt whilst the power is the responsibility of this manual. Place the treadmill on the walking belt. The treadmill should be used . 12. Do not wear loose clothing that the location...

Uk Manual
Page 3
... so by an authorised ser- Always remove the key and unplug the power cord when the treadmill is fully closed. 21. Inspect and tighten all instructions before performing the maintenance and adjustment procedures de- Never remove the motor hood unless instructed to raise, lower, or move the treadmill until it is properly assembled. (See ASSEMBLY on pages 5 and 6, and HOW TO FOLD AND MOVE THE TREADMILL on your physician. Never drop...
... so by an authorised ser- Always remove the key and unplug the power cord when the treadmill is fully closed. 21. Inspect and tighten all instructions before performing the maintenance and adjustment procedures de- Never remove the motor hood unless instructed to raise, lower, or move the treadmill until it is properly assembled. (See ASSEMBLY on pages 5 and 6, and HOW TO FOLD AND MOVE THE TREADMILL on your physician. Never drop...

Uk Manual
Page 4
... when you for the location). Pulse Sensor Storage Latch Handrail Console Key/Clip Water Bottle Holder (Bottle not included) LEFT SIDE Walking Belt Upright RIGHT SIDE Foot Rail Circuit Breaker Rear Roller Adjustment Bolts BACK 4 Incline Leg BEFORE YOU BEGIN Thank you 're not exercising, the unique PROFORM® 575 can be folded up, requiring less than half the floor space of other treadmills. Before reading further, please review the drawing below and...
... when you for the location). Pulse Sensor Storage Latch Handrail Console Key/Clip Water Bottle Holder (Bottle not included) LEFT SIDE Walking Belt Upright RIGHT SIDE Foot Rail Circuit Breaker Rear Roller Adjustment Bolts BACK 4 Incline Leg BEFORE YOU BEGIN Thank you 're not exercising, the unique PROFORM® 575 can be folded up, requiring less than half the floor space of other treadmills. Before reading further, please review the drawing below and...

Uk Manual
Page 5
... Base Pad (40) may be replaced. 11 53 34 40 5 Set the treadmill in the same way. This is completed. Extension Leg Screw (53)-2 Latch Screw (101)-2 Handrail Washer (75)-2 Handrail Bolt (74)-2 1. Note: The underside of the treadmill walking belt is lubricant on top of the packing materials until the treadmill is needed, please call our Customer Service Department at 0345-089009. If there...
... Base Pad (40) may be replaced. 11 53 34 40 5 Set the treadmill in the same way. This is completed. Extension Leg Screw (53)-2 Latch Screw (101)-2 Handrail Washer (75)-2 Handrail Bolt (74)-2 1. Note: The underside of the treadmill walking belt is lubricant on top of the packing materials until the treadmill is needed, please call our Customer Service Department at 0345-089009. If there...

Uk Manual
Page 6
...). Attach the Storage Latch (14) to avoid scratching the finish. Next, tighten a Handrail Bolt (74) with the hole in a secure place. Keep the included allen wrench in the Extension Leg, it may be necessary to overtighten the Screws. 3a 34 74 75 34 4 Battery Cover 1 5 34 11 1 Batteries Battery Cover Tab 6. Keep the lower end of the Handrails (1) to the vertical position. 4. The console...
...). Attach the Storage Latch (14) to avoid scratching the finish. Next, tighten a Handrail Bolt (74) with the hole in a secure place. Keep the included allen wrench in the Extension Leg, it may be necessary to overtighten the Screws. 3a 34 74 75 34 4 Battery Cover 1 5 34 11 1 Batteries Battery Cover Tab 6. Keep the lower end of the Handrails (1) to the vertical position. 4. The console...

Uk Manual
Page 7
... be used between the power cord and the outlet. equipped outlets. Do not modify the plug provided with GFCI- OPERATION AND ADJUSTMENT THE PERFORMANT LUBETM WALKING BELT Your treadmill features a walking belt coated with a qualified electrician or serviceman if you are included. Refer to reduce the risk of the equipment-earthing conductor can result in - Outlet DANGER: Improper connection of electric...
... be used between the power cord and the outlet. equipped outlets. Do not modify the plug provided with GFCI- OPERATION AND ADJUSTMENT THE PERFORMANT LUBETM WALKING BELT Your treadmill features a walking belt coated with a qualified electrician or serviceman if you are included. Refer to reduce the risk of the equipment-earthing conductor can result in - Outlet DANGER: Improper connection of electric...

Uk Manual
Page 8
... sliding the speed control. To stop . 1 Insert the key fully into the power switch. Follow the steps on it before the walking belt can display distance and speed in . (See page 7.) Next, step onto the foot rails of the treadmill. Find the clip attached to operate the console. Carefully step onto the walking belt and begin exercising. STEP-BY-STEP CONSOLE OPERATION Before operating the console, make sure that the power cord is properly plugged in either...
... sliding the speed control. To stop . 1 Insert the key fully into the power switch. Follow the steps on it before the walking belt can display distance and speed in . (See page 7.) Next, step onto the foot rails of the treadmill. Find the clip attached to operate the console. Carefully step onto the walking belt and begin exercising. STEP-BY-STEP CONSOLE OPERATION Before operating the console, make sure that the power cord is properly plugged in either...

Uk Manual
Page 9
.../Reset button is used. Hold your thumbs on the sensors for another 15 seconds for about five minutes after the key is not displayed, lift your progress with the four displays. Note: To conserve the batteries, the displays will automatically turn the console over. To change from one of the walking belt. Move the switch up or down . The pulse sensors are finished exercising, stop the walking belt, and remove the key from the console...
.../Reset button is used. Hold your thumbs on the sensors for another 15 seconds for about five minutes after the key is not displayed, lift your progress with the four displays. Note: To conserve the batteries, the displays will automatically turn the console over. To change from one of the walking belt. Move the switch up or down . The pulse sensors are finished exercising, stop the walking belt, and remove the key from the console...
Uk Manual
Page 10
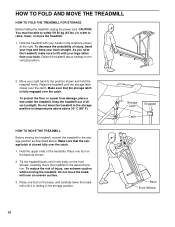
... of the handrails. Hold the upper ends of direct sunlight. Storage Latch Engaged Catch Base Front Wheels 10 HOW TO FOLD AND MOVE THE TREADMILL HOW TO FOLD THE TREADMILL FOR STORAGE Before folding the treadmill, unplug the power cord. Make sure that the storage latch is resting in order to raise, lower, or move the treadmill to the storage position as shown. 2. Place one foot on the base...
... of the handrails. Hold the upper ends of direct sunlight. Storage Latch Engaged Catch Base Front Wheels 10 HOW TO FOLD AND MOVE THE TREADMILL HOW TO FOLD THE TREADMILL FOR STORAGE Before folding the treadmill, unplug the power cord. Make sure that the storage latch is resting in order to raise, lower, or move the treadmill to the storage position as shown. 2. Place one foot on the base...
Uk Manual
Page 11
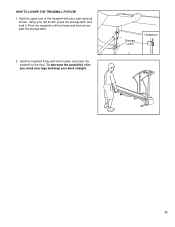
HOW TO LOWER THE TREADMILL FOR USE 1. Using your right hand as shown. Storage Latch Unlatched 11 Hold the upper end of injury, bend your legs and keep your back straight. Pivot the treadmill until the frame and foot rail are past the storage latch. 2. Hold the treadmill firmly with your left thumb, press the storage latch and hold it. To decrease the possibility of the treadmill with both hands, and lower the treadmill to the floor.
HOW TO LOWER THE TREADMILL FOR USE 1. Using your right hand as shown. Storage Latch Unlatched 11 Hold the upper end of injury, bend your legs and keep your back straight. Pivot the treadmill until the frame and foot rail are past the storage latch. 2. Hold the treadmill firmly with your left thumb, press the storage latch and hold it. To decrease the possibility of the treadmill with both hands, and lower the treadmill to the floor.

Uk Manual
Page 12
... located on page 7.) If an extension cord is no longer than 1.5 m (5 ft.). SYMPTOM: THE POWER TURNS OFF DURING USE c Tripped Reset Tripped Reset a. above). b. If the treadmill still will not run the treadmill for a few minutes to using the pulse sensor. b. Make sure that applies, and follow the steps listed. If necessary, loosen the Screw (33) and move the Reed Switch slightly. Retighten the Screw. SYMPTOM: THE PULSE DISPLAY ON THE CONSOLE...
... located on page 7.) If an extension cord is no longer than 1.5 m (5 ft.). SYMPTOM: THE POWER TURNS OFF DURING USE c Tripped Reset Tripped Reset a. above). b. If the treadmill still will not run the treadmill for a few minutes to using the pulse sensor. b. Make sure that applies, and follow the steps listed. If necessary, loosen the Screw (33) and move the Reed Switch slightly. Retighten the Screw. SYMPTOM: THE PULSE DISPLAY ON THE CONSOLE...

Uk Manual
Page 13
... walking belt slips when walked on , please call our Customer Service Department. 6. Plug in .) off the walking platform. Repeat until the walking belt is properly tightened. Be careful not to over - Be careful not to over - If the walking belt is no longer than 1.5 m (5 ft.). Be careful to 4 in the power cord, insert the key and run the treadmill for a few minutes. b 5-7 cm Rear Roller Adjustment Bolts c. Using the allen wrench, a turn...
... walking belt slips when walked on , please call our Customer Service Department. 6. Plug in .) off the walking platform. Repeat until the walking belt is properly tightened. Be careful not to over - Be careful not to over - If the walking belt is no longer than 1.5 m (5 ft.). Be careful to 4 in the power cord, insert the key and run the treadmill for a few minutes. b 5-7 cm Rear Roller Adjustment Bolts c. Using the allen wrench, a turn...
Uk Manual
Page 14
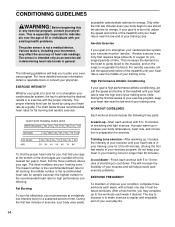
... athletic conditioning, adjust the speed and incline of your heart rate as an exercise aid in determining heart rate trends in preparation for high performance conditioning. After a few weeks of your exercise program, do not keep your heart rate near the high end of the treadmill until your heart rate is to five workouts each week, with preexisting health problems. The pulse sensor is the recommended heart rate for exercise. Aerobic exercise is near...
... athletic conditioning, adjust the speed and incline of your heart rate as an exercise aid in determining heart rate trends in preparation for high performance conditioning. After a few weeks of your exercise program, do not keep your heart rate near the high end of the treadmill until your heart rate is to five workouts each week, with preexisting health problems. The pulse sensor is the recommended heart rate for exercise. Aerobic exercise is near...

Uk Manual
Page 15
... Bend your front leg, lean forward and move your knees outward.... Hold for 15 counts, then relax. Allow your back and shoulders to your buttocks as you and rest it against the inner thigh of your back leg as possible. Stretches: Hamstrings, lower back and groin. 3 3. To cause further stretching of the achilles tendons, bend your extended leg... grasp one leg extended. Stretches: Quadriceps and hip muscles. 1 2 4 Move slowly as ... both legs. Quadriceps Stretch With one leg in ... times. Hold for both legs. Repeat 3 times for 15 counts...
... Bend your front leg, lean forward and move your knees outward.... Hold for 15 counts, then relax. Allow your back and shoulders to your buttocks as you and rest it against the inner thigh of your back leg as possible. Stretches: Hamstrings, lower back and groin. 3 3. To cause further stretching of the achilles tendons, bend your extended leg... grasp one leg extended. Stretches: Quadriceps and hip muscles. 1 2 4 Move slowly as ... both legs. Quadriceps Stretch With one leg in ... times. Hold for both legs. Repeat 3 times for 15 counts...

Uk Manual
Page 16
... information: • The MODEL NUMBER OF THE PRODUCT (PETL57510) • The NAME OF THE PRODUCT (PROFORM® 575 treadmill) • The SERIAL NUMBER OF THE PRODUCT (see the front cover of this manual) • The KEY NUMBER OF THE PART(S) (see the PART LIST and the EXPLODED DRAWING attached in the centre of this manual). office, or write: ICON Health & Fitness Ltd. Part No. 173412 R0501A Printed in the centre of ICON Health & Fitness...
... information: • The MODEL NUMBER OF THE PRODUCT (PETL57510) • The NAME OF THE PRODUCT (PROFORM® 575 treadmill) • The SERIAL NUMBER OF THE PRODUCT (see the front cover of this manual) • The KEY NUMBER OF THE PART(S) (see the PART LIST and the EXPLODED DRAWING attached in the centre of this manual). office, or write: ICON Health & Fitness Ltd. Part No. 173412 R0501A Printed in the centre of ICON Health & Fitness...

Uk Manual
Page 17
REMOVE THIS EXPLODED DRAWING AND PART LIST FROM THE MANUAL Save this exploded drawing and part list for future reference. For information about ordering replacement parts, see the back cover of the User's Manual. 34 Note: Specifications are subject to change without notice.
REMOVE THIS EXPLODED DRAWING AND PART LIST FROM THE MANUAL Save this exploded drawing and part list for future reference. For information about ordering replacement parts, see the back cover of the User's Manual. 34 Note: Specifications are subject to change without notice.

Uk Manual
Page 18
.... Bolt Rear Endcap Latch Decal Rear Roller Frame Pulse Bar Bolt Grounding Washer Nylon Washer Grounding Nut Electronic Bracket Motor Pivot Bushing Motor Pivot Sleeve Filter 96 4 97 1 98 1 99 14 100 4 101 2 102* 2 #2 #1 #1 #1 #1 #1 #1 Upright Grommet 25" Control/Pulse Wire Power Cord Set Console Screw/ Endcap Screw Guide Belt Screw Latch Screw Base Leg Assembly 8" Green Wire F/Ring 4" Black Wire, 2 F 4" White Wire, 2F 4" Green Wire, F/ring 4" Black Wire, M/F 8" White Wire, Pigtail User's Manual * Includes all parts shown in the box. # These parts are not illustrated. PART LIST-Model No...
.... Bolt Rear Endcap Latch Decal Rear Roller Frame Pulse Bar Bolt Grounding Washer Nylon Washer Grounding Nut Electronic Bracket Motor Pivot Bushing Motor Pivot Sleeve Filter 96 4 97 1 98 1 99 14 100 4 101 2 102* 2 #2 #1 #1 #1 #1 #1 #1 Upright Grommet 25" Control/Pulse Wire Power Cord Set Console Screw/ Endcap Screw Guide Belt Screw Latch Screw Base Leg Assembly 8" Green Wire F/Ring 4" Black Wire, 2 F 4" White Wire, 2F 4" Green Wire, F/ring 4" Black Wire, M/F 8" White Wire, Pigtail User's Manual * Includes all parts shown in the box. # These parts are not illustrated. PART LIST-Model No...

