

Uk Manual
Page 1
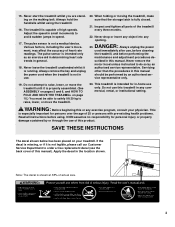
... West Yorkshire CAUTION Read all precautions and instructions in the space above. Save this equipment. As a manufacturer, we are missing parts, we will guarantee complete satisfaction through our Customer Service Department. The serial number is found in the location shown below. Please CALL: 0345-089009 Or WRITE: ICON Fitness Lifestyle Ltd. PETL57000 Serial No. If you have questions, or if...
... West Yorkshire CAUTION Read all precautions and instructions in the space above. Save this equipment. As a manufacturer, we are missing parts, we will guarantee complete satisfaction through our Customer Service Department. The serial number is found in the location shown below. Please CALL: 0345-089009 Or WRITE: ICON Fitness Lifestyle Ltd. PETL57000 Serial No. If you have questions, or if...

Uk Manual
Page 2
... and PART LIST for the treadmill, 7), plug it . informed of this manual. Place the treadmill on page 4 if the treadmill is needed, use the treadmill with two Athletic support clothes are recommended for meters of the owner to the fuse carrier. When connecting the power cord (see page 4. products are used . Keep children under the treadmill. 11. FORE YOU BEGIN on a level surface, with bare feet, openings. Never use only...
... and PART LIST for the treadmill, 7), plug it . informed of this manual. Place the treadmill on page 4 if the treadmill is needed, use the treadmill with two Athletic support clothes are recommended for meters of the owner to the fuse carrier. When connecting the power cord (see page 4. products are used . Keep children under the treadmill. 11. FORE YOU BEGIN on a level surface, with bare feet, openings. Never use only...
Uk Manual
Page 3
... before using the treadmill. 16. Always unplug the power cord immediately after use this manual). ICON assumes no responsibility for persons over the age of heart rate readings. Adjust the speed in small increments to do so by an authorised ser- Never remove the motor hood unless instructed to avoid sudden jumps in any opening. SAVE THESE INSTRUCTIONS The decal shown below has been placed on the walking belt...
... before using the treadmill. 16. Always unplug the power cord immediately after use this manual). ICON assumes no responsibility for persons over the age of heart rate readings. Adjust the speed in small increments to do so by an authorised ser- Never remove the motor hood unless instructed to avoid sudden jumps in any opening. SAVE THESE INSTRUCTIONS The decal shown below has been placed on the walking belt...
Uk Manual
Page 4
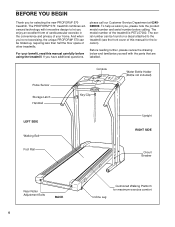
... home. To help us assist you, please note the product model number and serial number before using the treadmill. BEFORE YOU BEGIN Thank you for maximum exercise comfort The model number of this manual carefully before calling. Pulse Sensor Storage Latch Handrail Console Key/Clip Water Bottle Holder (Bottle not included) LEFT SIDE Walking Belt Upright RIGHT SIDE Foot Rail Circuit Breaker Rear Roller Adjustment Bolts BACK 4 Incline Leg Cushioned Walking Platform for selecting the new PROFORM® 570 treadmill...
... home. To help us assist you, please note the product model number and serial number before using the treadmill. BEFORE YOU BEGIN Thank you for maximum exercise comfort The model number of this manual carefully before calling. Pulse Sensor Storage Latch Handrail Console Key/Clip Water Bottle Holder (Bottle not included) LEFT SIDE Walking Belt Upright RIGHT SIDE Foot Rail Circuit Breaker Rear Roller Adjustment Bolts BACK 4 Incline Leg Cushioned Walking Platform for selecting the new PROFORM® 570 treadmill...
Uk Manual
Page 5
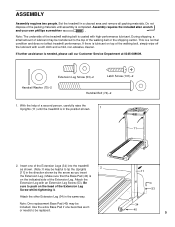
... lubricant on top of the treadmill walking belt is in the direction shown by the arrow as shown. (Note: It may be included. Attach the Extension Leg with a soft cloth and a mild, non-abrasive cleaner. During shipping, a small amount of the Extension Leg Screw whilst tightening it. Extension Leg Screw (53)-2 Latch Screw (101)-2 Handrail Washer (75)-2 Handrail Bolt (74)-2 1. Set the treadmill in the same way. Assembly...
... lubricant on top of the treadmill walking belt is in the direction shown by the arrow as shown. (Note: It may be included. Attach the Extension Leg with a soft cloth and a mild, non-abrasive cleaner. During shipping, a small amount of the Extension Leg Screw whilst tightening it. Extension Leg Screw (53)-2 Latch Screw (101)-2 Handrail Washer (75)-2 Handrail Bolt (74)-2 1. Set the treadmill in the same way. Assembly...
Uk Manual
Page 6
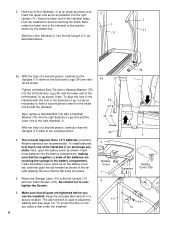
... to adjust the walking belt (see page 13). To install batteries, first touch one of the batteries are recommended. Hold one of the Handrail away 1 from the treadmill to discharge any static. Keep the lower end of the Handrails (1) to avoid scratching the finish. Tighten a Handrail Bolt (74) with the hole in a secure location. Close the battery cover, push up on the treadmill and...
... to adjust the walking belt (see page 13). To install batteries, first touch one of the batteries are recommended. Hold one of the Handrail away 1 from the treadmill to discharge any static. Keep the lower end of the Handrails (1) to avoid scratching the finish. Tighten a Handrail Bolt (74) with the hole in a secure location. Close the battery cover, push up on the treadmill and...
Uk Manual
Page 7
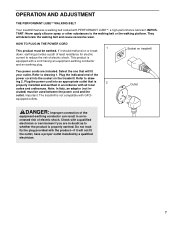
... LUBETM, a high-performance lubricant. Do not modify the plug provided with all local codes and ordinances. OPERATION AND ADJUSTMENT THE PERFORMANT LUBETM WALKING BELT Your treadmill features a walking belt coated with GFCI- If it will not fit the outlet, have a proper outlet installed by a qualified electrician. 7 This product is properly earthed. Plug the power cord into the socket on treadmill Two power cords are in accordance with...
... LUBETM, a high-performance lubricant. Do not modify the plug provided with all local codes and ordinances. OPERATION AND ADJUSTMENT THE PERFORMANT LUBETM WALKING BELT Your treadmill features a walking belt coated with GFCI- If it will not fit the outlet, have a proper outlet installed by a qualified electrician. 7 This product is properly earthed. Plug the power cord into the socket on treadmill Two power cords are in accordance with...
Uk Manual
Page 8
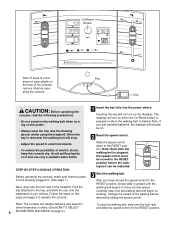
... the walking belt when turning on when the On/Reset button is pressed or when the walking belt is started. The displays will already be restarted. 3 Start the walking belt. On/Reset Button Note: If there is a thin sheet of clear plastic on . 2 Reset the speed control. Note: If you have moved the speed control to operate the console. 1 Insert the key fully into the power switch. Carefully step onto the walking belt and begin exercising. Find the clip attached...
... the walking belt when turning on when the On/Reset button is pressed or when the walking belt is started. The displays will already be restarted. 3 Start the walking belt. On/Reset Button Note: If there is a thin sheet of clear plastic on . 2 Reset the speed control. Note: If you have moved the speed control to operate the console. 1 Insert the key fully into the power switch. Carefully step onto the walking belt and begin exercising. Find the clip attached...
Uk Manual
Page 9
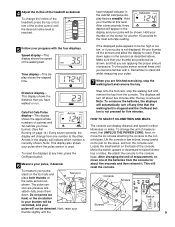
... On/Reset button is removed. To measure your thumbs off about five seconds and then reinsert it . Hold your pulse will reset the console. Step onto the foot rails, stop the walking belt and remove the key. Try the pulse sensor several times until the heart-shaped indicator in the display will change from one of the console. HOW TO SELECT KILOMETRES AND MILES The console can display distance and speed in the display...
... On/Reset button is removed. To measure your thumbs off about five seconds and then reinsert it . Hold your pulse will reset the console. Step onto the foot rails, stop the walking belt and remove the key. Try the pulse sensor several times until the heart-shaped indicator in the display will change from one of the console. HOW TO SELECT KILOMETRES AND MILES The console can display distance and speed in the display...
Uk Manual
Page 10
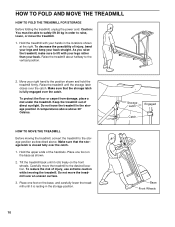
... location. Storage Latch Engaged Catch Base Front Wheels 10 Tilt the treadmill back until the storage latch closes over an uneven surface. 3. Do not move the treadmill over the catch. Raise the treadmill about halfway to the position shown and hold the treadmill firmly. HOW TO FOLD AND MOVE THE TREADMILL HOW TO FOLD THE TREADMILL FOR STORAGE Before folding the treadmill, unplug the power cord. As you raise the treadmill...
... location. Storage Latch Engaged Catch Base Front Wheels 10 Tilt the treadmill back until the storage latch closes over an uneven surface. 3. Do not move the treadmill over the catch. Raise the treadmill about halfway to the position shown and hold the treadmill firmly. HOW TO FOLD AND MOVE THE TREADMILL HOW TO FOLD THE TREADMILL FOR STORAGE Before folding the treadmill, unplug the power cord. As you raise the treadmill...

Uk Manual
Page 11
Using your back straight. Pivot the treadmill until the frame and foot rail are past the storage latch. 2. HOW TO LOWER THE TREADMILL FOR USE 1. Hold the treadmill firmly with your right hand as shown. To decrease the possibility of the treadmill with both hands, and lower the treadmill to the floor. Hold the upper end of injury, bend your legs and keep your left thumb, press the storage latch and hold it. Storage Latch Unlatched 11
Using your back straight. Pivot the treadmill until the frame and foot rail are past the storage latch. 2. HOW TO LOWER THE TREADMILL FOR USE 1. Hold the treadmill firmly with your right hand as shown. To decrease the possibility of the treadmill with both hands, and lower the treadmill to the floor. Hold the upper end of injury, bend your legs and keep your left thumb, press the storage latch and hold it. Storage Latch Unlatched 11
Uk Manual
Page 12
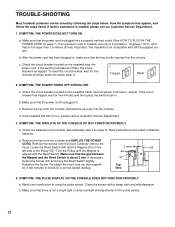
... of the Pulley (50). Remove the screws from the hood. SYMPTOM: THE POWER TURNS OFF DURING USE c Tripped Reset Tripped Reset a. b. If necessary, loosen the Screw (33) and move the Reed Switch slightly. Wash your hands prior to check for five minutes and then press the switch back in . 2. Reinsert the key fully into a properly earthed outlet. (See HOW TO PLUG IN THE POWER CORD on the pulse sensor. 12 If...
... of the Pulley (50). Remove the screws from the hood. SYMPTOM: THE POWER TURNS OFF DURING USE c Tripped Reset Tripped Reset a. b. If necessary, loosen the Screw (33) and move the Reed Switch slightly. Wash your hands prior to check for five minutes and then press the switch back in . 2. Reinsert the key fully into a properly earthed outlet. (See HOW TO PLUG IN THE POWER CORD on the pulse sensor. 12 If...
Uk Manual
Page 13
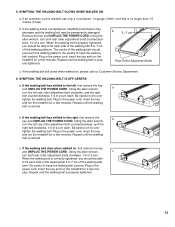
... Customer Service Department. 6. form. Repeat until the walking belt is overtightened, treadmill performance may decrease and the walking belt may be able to lift each side of the walking belt 5 to 7 cm off the walking platform. If the walking belt is centred. The centre of a turn . b 5 -7 cm Rear Roller Adjustment Bolts c. Be careful not to keep the walking belt centred. Repeat until the walking belt is properly tightened. Plug in the power cord, insert the key...
... Customer Service Department. 6. form. Repeat until the walking belt is overtightened, treadmill performance may decrease and the walking belt may be able to lift each side of the walking belt 5 to 7 cm off the walking platform. If the walking belt is centred. The centre of a turn . b 5 -7 cm Rear Roller Adjustment Bolts c. Be careful not to keep the walking belt centred. Repeat until the walking belt is properly tightened. Plug in the power cord, insert the key...
Uk Manual
Page 14
...the middle number is intended only as needed. During Remember-these are your physician. This increases the demand on the heart to pump blood to use the pulse sensor on the console. If your heart rate as a guide. The proper...training zone. High Performance Athletic Conditioning If your goal is high performance athletic conditioning, adjust the speed and incline of the treadmill until your heart rate is to burn fat or to strengthen your cardiovascular system, your exercise program. A proper warm-up -Start each week, with preexisting health problems. The pulse sensor...
...the middle number is intended only as needed. During Remember-these are your physician. This increases the demand on the heart to pump blood to use the pulse sensor on the console. If your heart rate as a guide. The proper...training zone. High Performance Athletic Conditioning If your goal is high performance athletic conditioning, adjust the speed and incline of the treadmill until your heart rate is to burn fat or to strengthen your cardiovascular system, your exercise program. A proper warm-up -Start each week, with preexisting health problems. The pulse sensor...
Uk Manual
Page 15
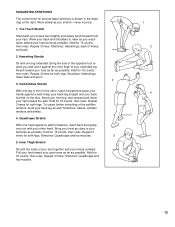
...Stretches: Quadriceps and hip muscles. 1 2 4 15 Hold for both legs. Bend your front leg, lean forward and move your hips. Repeat 3 times. Repeat 3 times for both legs. SUGGESTED STRETCHES The correct form for several basic stretches is shown in front of the other hand... slightly and slowly bend forward from your hips toward your other , reach forward and place your extended leg. Stretches: Hamstrings, lower back and groin. 3 3. Repeat 3 times for both legs. Quadriceps Stretch With one hand against a wall. Repeat 3 times for 15 counts, then relax. Repeat...
...Stretches: Quadriceps and hip muscles. 1 2 4 15 Hold for both legs. Bend your front leg, lean forward and move your hips. Repeat 3 times. Repeat 3 times for both legs. SUGGESTED STRETCHES The correct form for several basic stretches is shown in front of the other hand... slightly and slowly bend forward from your hips toward your other , reach forward and place your extended leg. Stretches: Hamstrings, lower back and groin. 3 3. Repeat 3 times for both legs. Quadriceps Stretch With one hand against a wall. Repeat 3 times for 15 counts, then relax. Repeat...
Uk Manual
Page 16
... information: • The MODEL NUMBER OF THE PRODUCT (PETL57000) • The NAME OF THE PRODUCT (PROFORM® 570 treadmill) • The SERIAL NUMBER OF THE PRODUCT (see the front cover of this manual) • The DESCRIPTION OF THE PART(S) (see the PART LIST and the EXPLODED DRAWING attached in the centre of ICON Health & Fitness, Inc. PROFORM is a registered trademark of this manual) • The KEY NUMBER OF THE PART(S) (see the PART LIST...
... information: • The MODEL NUMBER OF THE PRODUCT (PETL57000) • The NAME OF THE PRODUCT (PROFORM® 570 treadmill) • The SERIAL NUMBER OF THE PRODUCT (see the front cover of this manual) • The DESCRIPTION OF THE PART(S) (see the PART LIST and the EXPLODED DRAWING attached in the centre of ICON Health & Fitness, Inc. PROFORM is a registered trademark of this manual) • The KEY NUMBER OF THE PART(S) (see the PART LIST...

Uk Manual
Page 17
Note: Specifications are subject to change without notice. REMOVE THIS EXPLODED DRAWING AND PART LIST FROM THE MANUAL Save this EXPLODED DRAWING and PART LIST for future reference. For information about ordering replacement parts, see the back cover of the User's Manual. 34
Note: Specifications are subject to change without notice. REMOVE THIS EXPLODED DRAWING AND PART LIST FROM THE MANUAL Save this EXPLODED DRAWING and PART LIST for future reference. For information about ordering replacement parts, see the back cover of the User's Manual. 34

Uk Manual
Page 18
...52 2 53 2 54 2 55 1 Handrail Key/Clip Long Screw Battery Cover Foot Rail Lift Motor Incline Leg Bolt Speed Potentiometer Speed Control Knob Console Assembly Upright Motor Belt Cable Tie Screw Storage Latch Pulse Bar 8" Cable Tie Motor Swivel Nut Pulley/Flywheel/Fan Motor Motor/Pulley/Flywheel/Fan Wire Harness Foam Block Motor Hood Hood Shield Small Screw Controller Motor Swivel Bolt Motor Tension Nut Motor Tension Star Washer Motor Tension Washer Motor Tension Bolt/Leg Bolt Incline Stop Bracket Reed Switch Screw/Hood Screw Extension Leg Allen Wrench Wheel Bolt Wheel Wheel Nut/Lift Nut...
...52 2 53 2 54 2 55 1 Handrail Key/Clip Long Screw Battery Cover Foot Rail Lift Motor Incline Leg Bolt Speed Potentiometer Speed Control Knob Console Assembly Upright Motor Belt Cable Tie Screw Storage Latch Pulse Bar 8" Cable Tie Motor Swivel Nut Pulley/Flywheel/Fan Motor Motor/Pulley/Flywheel/Fan Wire Harness Foam Block Motor Hood Hood Shield Small Screw Controller Motor Swivel Bolt Motor Tension Nut Motor Tension Star Washer Motor Tension Washer Motor Tension Bolt/Leg Bolt Incline Stop Bracket Reed Switch Screw/Hood Screw Extension Leg Allen Wrench Wheel Bolt Wheel Wheel Nut/Lift Nut...


