

Uk Manual
Page 1
... instructions in this manual before using this manual for future reference. Serial Number Decal QUESTIONS? As a manufacturer, we are missing parts, we will guarantee complete satisfaction through our Customer Service Department. Save this equipment. USER'S MANUAL Visit our website at www.proform.com new products, prizes, fitness tips, and much more! The serial number is found in the space above. HC Class Fitness Product Model No. PETL57000 Serial...
... instructions in this manual before using this manual for future reference. Serial Number Decal QUESTIONS? As a manufacturer, we are missing parts, we will guarantee complete satisfaction through our Customer Service Department. Save this equipment. USER'S MANUAL Visit our website at www.proform.com new products, prizes, fitness tips, and much more! The serial number is found in the space above. HC Class Fitness Product Model No. PETL57000 Serial...

Uk Manual
Page 2
... YOU BEGIN 4 ASSEMBLY 5 OPERATION AND ADJUSTMENT 7 HOW TO FOLD AND MOVE THE TREADMILL 10 TROUBLE-SHOOTING 12 CONDITIONING GUIDELINES 14 HOW TO ORDER REPLACEMENT PARTS Back Cover Note: An EXPLODED DRAWING and a PART LIST are used or where oxygen is being administered. 13. Always wear athletic the treadmill on the same circuit. Keep the power cord away from mois- Never move the walking belt whilst the power is the...
... YOU BEGIN 4 ASSEMBLY 5 OPERATION AND ADJUSTMENT 7 HOW TO FOLD AND MOVE THE TREADMILL 10 TROUBLE-SHOOTING 12 CONDITIONING GUIDELINES 14 HOW TO ORDER REPLACEMENT PARTS Back Cover Note: An EXPLODED DRAWING and a PART LIST are used or where oxygen is being administered. 13. Always wear athletic the treadmill on the same circuit. Keep the power cord away from mois- Never move the walking belt whilst the power is the...
Uk Manual
Page 3
... walking belt. ICON assumes no responsibility for in the location shown. Never start the treadmill whilst you are standing on your physician. vice representative only. 19. This is capable of heart rate readings. Always hold the handrails whilst using . Inspect and tighten all parts of 35 or persons with pre-existing health problems. Read all instructions before performing the maintenance and adjustment procedures de- scribed in speed...
... walking belt. ICON assumes no responsibility for in the location shown. Never start the treadmill whilst you are standing on your physician. vice representative only. 19. This is capable of heart rate readings. Always hold the handrails whilst using . Inspect and tighten all parts of 35 or persons with pre-existing health problems. Read all instructions before performing the maintenance and adjustment procedures de- scribed in speed...
Uk Manual
Page 4
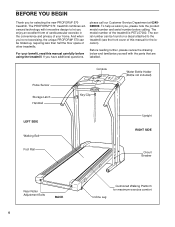
... our Customer Service Department at 0345089009. Pulse Sensor Storage Latch Handrail Console Key/Clip Water Bottle Holder (Bottle not included) LEFT SIDE Walking Belt Upright RIGHT SIDE Foot Rail Circuit Breaker Rear Roller Adjustment Bolts BACK 4 Incline Leg Cushioned Walking Platform for selecting the new PROFORM® 570 treadmill. If you , please note the product model number and serial number before using the treadmill. And when you're not exercising, the unique PROFORM® 570 can be folded up, requiring...
... our Customer Service Department at 0345089009. Pulse Sensor Storage Latch Handrail Console Key/Clip Water Bottle Holder (Bottle not included) LEFT SIDE Walking Belt Upright RIGHT SIDE Foot Rail Circuit Breaker Rear Roller Adjustment Bolts BACK 4 Incline Leg Cushioned Walking Platform for selecting the new PROFORM® 570 treadmill. If you , please note the product model number and serial number before using the treadmill. And when you're not exercising, the unique PROFORM® 570 can be folded up, requiring...
Uk Manual
Page 5
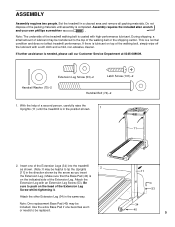
.... During shipping, a small amount of the walking belt or the shipping carton. Attach the Extension Leg with high-performance lubricant. Use the extra Base Pad if one of the Extension Leg. Assembly requires the included allen wrench and your own phillips screwdriver . Extension Leg Screw (53)-2 Latch Screw (101)-2 Handrail Washer (75)-2 Handrail Bolt (74)-2 1. Note: One replacement Base Pad (40) may be transferred...
.... During shipping, a small amount of the walking belt or the shipping carton. Attach the Extension Leg with high-performance lubricant. Use the extra Base Pad if one of the Extension Leg. Assembly requires the included allen wrench and your own phillips screwdriver . Extension Leg Screw (53)-2 Latch Screw (101)-2 Handrail Washer (75)-2 Handrail Bolt (74)-2 1. Note: One replacement Base Pad (40) may be transferred...
Uk Manual
Page 6
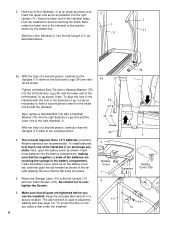
... right Handrail (1). To install batteries, first touch one of a second person, carefully tip the Uprights (11) down so the Extension Legs (34) are tightened before you use the treadmill. Insert three batteries into the right Extension Leg (34) and the lower end of the left Handrail (1) as shown. Be careful not to adjust the walking belt (see page 13). Tighten a Handrail Bolt (74) with the...
... right Handrail (1). To install batteries, first touch one of a second person, carefully tip the Uprights (11) down so the Extension Legs (34) are tightened before you use the treadmill. Insert three batteries into the right Extension Leg (34) and the lower end of the left Handrail (1) as shown. Be careful not to adjust the walking belt (see page 13). Tighten a Handrail Bolt (74) with the...
Uk Manual
Page 7
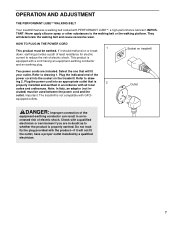
... you are included. Plug the power cord into the socket on treadmill Two power cords are in accordance with all local codes and ordinances. OPERATION AND ADJUSTMENT THE PERFORMANT LUBETM WALKING BELT Your treadmill features a walking belt coated with GFCI- Important: The treadmill is equipped with the product-if it should malfunction or break down, earthing provides a path of least resistance for electric current to...
... you are included. Plug the power cord into the socket on treadmill Two power cords are in accordance with all local codes and ordinances. OPERATION AND ADJUSTMENT THE PERFORMANT LUBETM WALKING BELT Your treadmill features a walking belt coated with GFCI- Important: The treadmill is equipped with the product-if it should malfunction or break down, earthing provides a path of least resistance for electric current to...
Uk Manual
Page 8
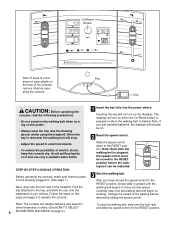
... the console. 1 Insert the key fully into the power switch. Find the clip attached to the RESET position. The displays will stop the walking belt, step onto the foot rails and slide the speed control to the key, and slide the clip onto the waistband of the walking belt as desired by sliding the speed control. After you just installed batteries, the displays will not turn on when the On/Reset button is pressed or...
... the console. 1 Insert the key fully into the power switch. Find the clip attached to the RESET position. The displays will stop the walking belt, step onto the foot rails and slide the speed control to the key, and slide the clip onto the waistband of the walking belt as desired by sliding the speed control. After you just installed batteries, the displays will not turn on when the On/Reset button is pressed or...
Uk Manual
Page 9
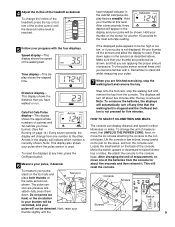
Speed display-This display shows the speed of measurement, first UNPLUG THE POWER CORD. Distance display- Arrows in the display will reset the console. The pulse sen- Hold your thumbs on the back of the console. Step onto the foot rails, stop the walking belt and remove the key. Locate the small switch on the sensor for another 15 seconds for the most accurate reading. This display shows the distance that you have burned. (See...
Speed display-This display shows the speed of measurement, first UNPLUG THE POWER CORD. Distance display- Arrows in the display will reset the console. The pulse sen- Hold your thumbs on the back of the console. Step onto the foot rails, stop the walking belt and remove the key. Locate the small switch on the sensor for another 15 seconds for the most accurate reading. This display shows the distance that you have burned. (See...
Uk Manual
Page 10
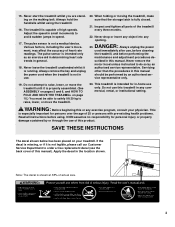
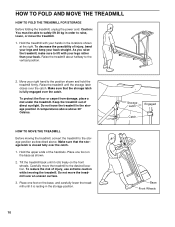
... ends of direct sunlight. Place one foot on the base as described above 30° Celsius. Make sure that the storage latch is closed fully over the catch. HOW TO FOLD AND MOVE THE TREADMILL HOW TO FOLD THE TREADMILL FOR STORAGE Before folding the treadmill, unplug the power cord. Raise the treadmill about halfway to the desired location. HOW TO MOVE THE TREADMILL Before moving the treadmill. Caution...
... ends of direct sunlight. Place one foot on the base as described above 30° Celsius. Make sure that the storage latch is closed fully over the catch. HOW TO FOLD AND MOVE THE TREADMILL HOW TO FOLD THE TREADMILL FOR STORAGE Before folding the treadmill, unplug the power cord. Raise the treadmill about halfway to the desired location. HOW TO MOVE THE TREADMILL Before moving the treadmill. Caution...

Uk Manual
Page 11
Hold the treadmill firmly with your right hand as shown. To decrease the possibility of the treadmill with both hands, and lower the treadmill to the floor. Pivot the treadmill until the frame and foot rail are past the storage latch. 2. HOW TO LOWER THE TREADMILL FOR USE 1. Storage Latch Unlatched 11 Using your back straight. Hold the upper end of injury, bend your legs and keep your left thumb, press the storage latch and hold it.
Hold the treadmill firmly with your right hand as shown. To decrease the possibility of the treadmill with both hands, and lower the treadmill to the floor. Pivot the treadmill until the frame and foot rail are past the storage latch. 2. HOW TO LOWER THE TREADMILL FOR USE 1. Storage Latch Unlatched 11 Using your back straight. Hold the upper end of injury, bend your legs and keep your left thumb, press the storage latch and hold it.
Uk Manual
Page 12
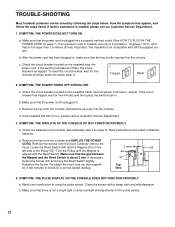
... POWER TURNS OFF DURING USE c Tripped Reset Tripped Reset a. above). b. d. If the treadmill still will not run the treadmill for a few minutes to using the pulse sensor. Check the batteries in , make sure that is about 3 mm. b. Remove the key from the console and UNPLUG THE POWER CORD. Locate the Reed Switch (44) and the Magnet (45) on the pulse sensor. 12 Turn the Pulley until the Magnet is not a bright light or direct...
... POWER TURNS OFF DURING USE c Tripped Reset Tripped Reset a. above). b. d. If the treadmill still will not run the treadmill for a few minutes to using the pulse sensor. Check the batteries in , make sure that is about 3 mm. b. Remove the key from the console and UNPLUG THE POWER CORD. Locate the Reed Switch (44) and the Magnet (45) on the pulse sensor. 12 Turn the Pulley until the Magnet is not a bright light or direct...
Uk Manual
Page 13
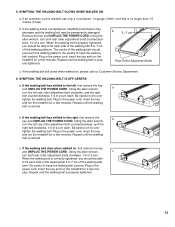
... the treadmill for a few minutes. If the walking belt slips when walked on , please call our Customer Service Department. 6. Remove the key and UNPLUG THE POWER CORD. When the walking belt is properly tightened. Be careful to 7 cm off the walking platform. tighten the walking belt. Repeat until the walking belt is properly tightened, you should just touch the walking platform. form. SYMPTOM: THE WALKING BELT SLOWS WHEN WALKED ON a. Using the allen wrench, a turn the left rear roller adjustment bolt...
... the treadmill for a few minutes. If the walking belt slips when walked on , please call our Customer Service Department. 6. Remove the key and UNPLUG THE POWER CORD. When the walking belt is properly tightened. Be careful to 7 cm off the walking platform. tighten the walking belt. Repeat until the walking belt is properly tightened, you should just touch the walking platform. form. SYMPTOM: THE WALKING BELT SLOWS WHEN WALKED ON a. Using the allen wrench, a turn the left rear roller adjustment bolt...
Uk Manual
Page 14
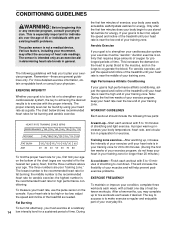
... any exercise program, consult your physician. the first few months, you must be found by using your "training zone." For aerobic exercise, adjust the speed and incline of the treadmill until your heart rate is near the high end of your age on the console. Next, find your training zone. the highest number is intended only as a guide. During The sensor is the recommended heart rate for exercise. The chart...
... any exercise program, consult your physician. the first few months, you must be found by using your "training zone." For aerobic exercise, adjust the speed and incline of the treadmill until your heart rate is near the high end of your age on the console. Next, find your training zone. the highest number is intended only as a guide. During The sensor is the recommended heart rate for exercise. The chart...
Uk Manual
Page 15
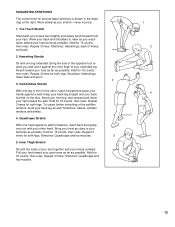
...from your hips. Hold for 15 counts, then relax. Bend your front leg, lean forward and move your hips toward your back leg as possible. Quadriceps Stretch With one foot with the soles of the achilles ... as you and rest it against a wall. Stretches: Hamstrings, lower back and groin. 3 3. Bring your buttocks as possible. Repeat 3 times. Hold for both legs. Allow your back and shoulders to your heel as close to ... foot flat on the floor. SUGGESTED STRETCHES The correct form for both legs. Calf/Achilles Stretch With one leg extended. Reach toward the wall.
...from your hips. Hold for 15 counts, then relax. Bend your front leg, lean forward and move your hips toward your back leg as possible. Quadriceps Stretch With one foot with the soles of the achilles ... as you and rest it against a wall. Stretches: Hamstrings, lower back and groin. 3 3. Bring your buttocks as possible. Repeat 3 times. Hold for both legs. Allow your back and shoulders to your heel as close to ... foot flat on the floor. SUGGESTED STRETCHES The correct form for both legs. Calf/Achilles Stretch With one leg extended. Reach toward the wall.
Uk Manual
Page 16
... 2AA West Yorkshire Tel: Country Code: 0345-089009 Fax: 0113-2411120 When ordering parts, please be prepared to give the following information: • The MODEL NUMBER OF THE PRODUCT (PETL57000) • The NAME OF THE PRODUCT (PROFORM® 570 treadmill) • The SERIAL NUMBER OF THE PRODUCT (see the front cover of this manual). HOW TO ORDER REPLACEMENT PARTS To order replacement parts, contact the ICON Health & Fitness Ltd.
... 2AA West Yorkshire Tel: Country Code: 0345-089009 Fax: 0113-2411120 When ordering parts, please be prepared to give the following information: • The MODEL NUMBER OF THE PRODUCT (PETL57000) • The NAME OF THE PRODUCT (PROFORM® 570 treadmill) • The SERIAL NUMBER OF THE PRODUCT (see the front cover of this manual). HOW TO ORDER REPLACEMENT PARTS To order replacement parts, contact the ICON Health & Fitness Ltd.

Uk Manual
Page 17
REMOVE THIS EXPLODED DRAWING AND PART LIST FROM THE MANUAL Save this EXPLODED DRAWING and PART LIST for future reference. For information about ordering replacement parts, see the back cover of the User's Manual. 34 Note: Specifications are subject to change without notice.
REMOVE THIS EXPLODED DRAWING AND PART LIST FROM THE MANUAL Save this EXPLODED DRAWING and PART LIST for future reference. For information about ordering replacement parts, see the back cover of the User's Manual. 34 Note: Specifications are subject to change without notice.

Uk Manual
Page 18
...52 2 53 2 54 2 55 1 Handrail Key/Clip Long Screw Battery Cover Foot Rail Lift Motor Incline Leg Bolt Speed Potentiometer Speed Control Knob Console Assembly Upright Motor Belt Cable Tie Screw Storage Latch Pulse Bar 8" Cable Tie Motor Swivel Nut Pulley/Flywheel/Fan Motor Motor/Pulley/Flywheel/Fan Wire Harness Foam Block Motor Hood Hood Shield Small Screw Controller Motor Swivel Bolt Motor Tension Nut Motor Tension Star Washer Motor Tension Washer Motor Tension Bolt/Leg Bolt Incline Stop Bracket Reed Switch Screw/Hood Screw Extension Leg Allen Wrench Wheel Bolt Wheel Wheel Nut/Lift Nut...
...52 2 53 2 54 2 55 1 Handrail Key/Clip Long Screw Battery Cover Foot Rail Lift Motor Incline Leg Bolt Speed Potentiometer Speed Control Knob Console Assembly Upright Motor Belt Cable Tie Screw Storage Latch Pulse Bar 8" Cable Tie Motor Swivel Nut Pulley/Flywheel/Fan Motor Motor/Pulley/Flywheel/Fan Wire Harness Foam Block Motor Hood Hood Shield Small Screw Controller Motor Swivel Bolt Motor Tension Nut Motor Tension Star Washer Motor Tension Washer Motor Tension Bolt/Leg Bolt Incline Stop Bracket Reed Switch Screw/Hood Screw Extension Leg Allen Wrench Wheel Bolt Wheel Wheel Nut/Lift Nut...

