
Uk Manual
Page 3
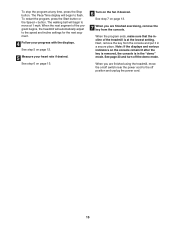
... than 1.5 m (5 ft.). 2. Various factors, including the user's movement, may affect the accuracy of high speeds. Always wear athletic shoes. When connecting the power cord (see page 10), plug the power cord into an earthed circuit. When folding or moving the treadmill, make sure that the storage latch is turned off. Use the treadmill only as an exercise aid in determining heart rate trends in small increments to persons, read...
... than 1.5 m (5 ft.). 2. Various factors, including the user's movement, may affect the accuracy of high speeds. Always wear athletic shoes. When connecting the power cord (see page 10), plug the power cord into an earthed circuit. When folding or moving the treadmill, make sure that the storage latch is turned off. Use the treadmill only as an exercise aid in determining heart rate trends in small increments to persons, read...
Uk Manual
Page 4
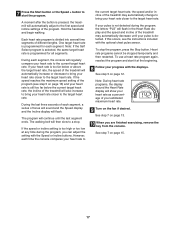
... or VCR when you are not shown actual size. 4 NOT SHOWN AT ACTUAL SIZE Always remove iFIT.com CDs and videos from your treadmill. Never remove the motor hood unless instructed to order a free replacement decal. The treadmill is heard, the speed and/or incline will alert you can manually override the speed and incline settings at any exercise program, consult your physician. ICON assumes no responsibility for the "chirp" and be...
... or VCR when you are not shown actual size. 4 NOT SHOWN AT ACTUAL SIZE Always remove iFIT.com CDs and videos from your treadmill. Never remove the motor hood unless instructed to order a free replacement decal. The treadmill is heard, the speed and/or incline will alert you can manually override the speed and incline settings at any exercise program, consult your physician. ICON assumes no responsibility for the "chirp" and be...
Uk Manual
Page 5
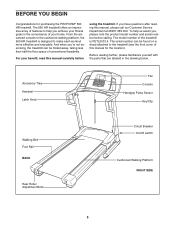
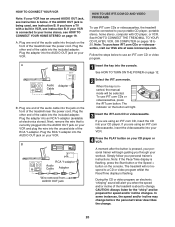
... treadmill. The model number of your home. For your fitness goals in the drawing below. Accessory Tray Handrail Latch Knob Fan Console Handgrip Pulse Sensor Key/Clip Walking Belt Foot Rail BACK Rear Roller Adjustment Bolts Circuit Breaker On/Off switch Cushioned Walking Platform RIGHT SIDE 5 The 560 HR treadmill offers an impressive array of features to help us assist you achieve your benefit, read this manual, please call our Customer Service...
... treadmill. The model number of your home. For your fitness goals in the drawing below. Accessory Tray Handrail Latch Knob Fan Console Handgrip Pulse Sensor Key/Clip Walking Belt Foot Rail BACK Rear Roller Adjustment Bolts Circuit Breaker On/Off switch Cushioned Walking Platform RIGHT SIDE 5 The 560 HR treadmill offers an impressive array of features to help us assist you achieve your benefit, read this manual, please call our Customer Service...
Uk Manual
Page 6
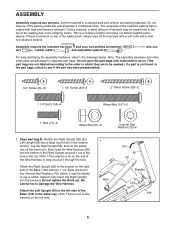
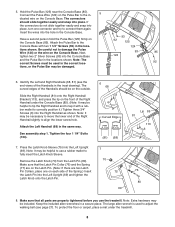
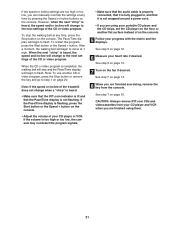
... included hex keys and your own phillips screwdriver ters , rubber mallet , and adjustable spanner . Open part bag B. Attach the Left Upright (69) to be transferred to the top of the Wire Harness to help identifying the assembly hardware, refer to damage the Wire Harness. Set the treadmill in the location shown). Attach the Right Upright (82) to the bracket on top of the treadmill walking belt is...
... included hex keys and your own phillips screwdriver ters , rubber mallet , and adjustable spanner . Open part bag B. Attach the Left Upright (69) to be transferred to the top of the Wire Harness to help identifying the assembly hardware, refer to damage the Wire Harness. Set the treadmill in the location shown). Attach the Right Upright (82) to the bracket on top of the treadmill walking belt is...
Uk Manual
Page 8
... the Pulse Wire (124) or the wire on the Console Base (85). Make sure that all parts are two Latch Pin Collars, place one connector and try to adjust the walking belt (see the end views of the Spring.) Insert the Latch Pin into the Left Upright (69) and tighten the Latch Knob onto the Latch Pin. 7 70 77 75 76 80 69 8. The large allen wrench is used...
... the Pulse Wire (124) or the wire on the Console Base (85). Make sure that all parts are two Latch Pin Collars, place one connector and try to adjust the walking belt (see the end views of the Spring.) Insert the Latch Pin into the Left Upright (69) and tighten the Latch Knob onto the Latch Pin. 7 70 77 75 76 80 69 8. The large allen wrench is used...
Uk Manual
Page 10
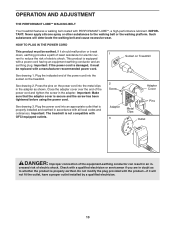
... is properly installed and earthed in the adapter. Socket on the power cord into an appropriate outlet that the adapter cover is not compatible with PERFORMANT LUBETM, a high-performance lubricant. Plug the indicated end of the power cord and tighten the screw in accordance with a manufacturer-recommended power cord. Press the pins on Treadmill See drawing 1. Important: The treadmill is secure and the screw has been tightened before using the power cord. creased...
... is properly installed and earthed in the adapter. Socket on the power cord into an appropriate outlet that the adapter cover is not compatible with PERFORMANT LUBETM, a high-performance lubricant. Plug the indicated end of the power cord and tighten the screw in accordance with a manufacturer-recommended power cord. Press the pins on Treadmill See drawing 1. Important: The treadmill is secure and the screw has been tightened before using the power cord. creased...
Uk Manual
Page 11
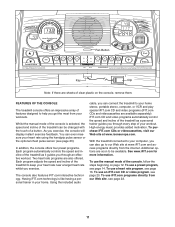
... program adjusts the speed and incline of your heart rate near a target heart rate whilst you can even measure your home stereo, portable stereo, computer, or VCR and play special iFIT.com CD and video programs (iFIT.com CDs and videocassettes are available separately). The console also features iFIT.com interactive technology. Using the included audio cable, you exercise. iFIT.com CD and video programs automatically control the speed and incline of the treadmill as it guides...
... program adjusts the speed and incline of your heart rate near a target heart rate whilst you can even measure your home stereo, portable stereo, computer, or VCR and play special iFIT.com CD and video programs (iFIT.com CDs and videocassettes are available separately). The console also features iFIT.com interactive technology. Using the included audio cable, you exercise. iFIT.com CD and video programs automatically control the speed and incline of the treadmill as it guides...
Uk Manual
Page 12
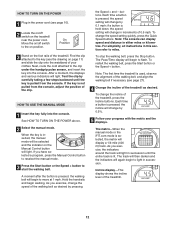
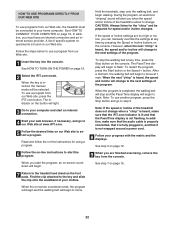
...: The console can display speed and distance in either miles or kilometres. Note: The first time the treadmill is pressed, the speed setting will again begin walking. HOW TO TURN ON THE POWER 1 Plug in the power cord (see page 10). 2 Locate the on/off switch to flash. Hold the handrails and begin to start the walking belt. Each time a button is used, observe the alignment of the walking belt, and align the walking belt if...
...: The console can display speed and distance in either miles or kilometres. Note: The first time the treadmill is pressed, the speed setting will again begin walking. HOW TO TURN ON THE POWER 1 Plug in the power cord (see page 10). 2 Locate the on/off switch to flash. Hold the handrails and begin to start the walking belt. Each time a button is used, observe the alignment of the walking belt, and align the walking belt if...

Uk Manual
Page 13
... the treadmill is folded to the other every few minutes after the key is removed, the console is in the Heart Rate display, and then your pace (in the program. The incline must be at high speed, press the button a second time. Heart Rate display- The display will appear in the "demo" mode. grip pulse sen- Avoid moving your heart rate if desired. When your pulse is lit, the console will automatically turn off switch near the power cord...
... the treadmill is folded to the other every few minutes after the key is removed, the console is in the Heart Rate display, and then your pace (in the program. The incline must be at high speed, press the button a second time. Heart Rate display- The display will appear in the "demo" mode. grip pulse sen- Avoid moving your heart rate if desired. When your pulse is lit, the console will automatically turn off switch near the power cord...
Uk Manual
Page 15
See step 6 on page 13. 6 Turn on /off the demo mode. When the next segment of the treadmill is in a secure place. See step 5 on page 12. 5 Measure your progress with the displays. See step 7 on the console remain lit after the key is removed, the console is at any time, press the Stop button. See page 23 and turn off switch near the power cord to the speed and incline settings for...
See step 6 on page 13. 6 Turn on /off the demo mode. When the next segment of the treadmill is in a secure place. See step 5 on page 12. 5 Measure your progress with the displays. See step 7 on the console remain lit after the key is removed, the console is at any time, press the Stop button. See page 23 and turn off switch near the power cord to the speed and incline settings for...
Uk Manual
Page 17
... target heart rate. Heart rate programs cannot be stopped temporarily and then restarted. To use a heart rate program again, reselect the program and start the program. See step 5 on page 15. 17 A moment after the button is too far below the current target heart rate, the incline of the program. One target heart rate is divided into several time segments of the program (see the instructions included with the optional chest pulse sensor. If the speed reaches...
... target heart rate. Heart rate programs cannot be stopped temporarily and then restarted. To use a heart rate program again, reselect the program and start the program. See step 5 on page 15. 17 A moment after the button is too far below the current target heart rate, the incline of the program. One target heart rate is divided into several time segments of the program (see the instructions included with the optional chest pulse sensor. If the speed reaches...
Uk Manual
Page 20
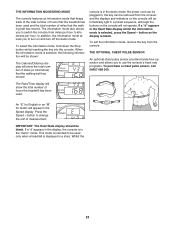
... speed and/or incline changes. Next, remove the wire that is about to your home stereo, see instruction B. Follow the steps below . See HOW TO TURN ON THE POWER on your VCR. If you when the speed and/or incline of the treadmill is currently plugged into the unused side of the RCA Y-adapter. Note: If the Pace/Time display is being used, see HOW TO CONNECT YOUR HOME...
... speed and/or incline changes. Next, remove the wire that is about to your home stereo, see instruction B. Follow the steps below . See HOW TO TURN ON THE POWER on your VCR. If you when the speed and/or incline of the treadmill is currently plugged into the unused side of the RCA Y-adapter. Note: If the Pace/Time display is being used, see HOW TO CONNECT YOUR HOME...
Uk Manual
Page 21
... the audio cable is properly connected, that it is fully plugged in, and that the Pace/Time display is completed, the walking belt will begin to the next settings of on the console. However, when the next "chirp" is not wrapped around a power cord. • If you are using them. 21 If the speed or incline settings are too high or too low, you can manually...
... the audio cable is properly connected, that it is fully plugged in, and that the Pace/Time display is completed, the walking belt will begin to the next settings of on the console. However, when the next "chirp" is not wrapped around a power cord. • If you are using them. 21 If the speed or incline settings are too high or too low, you can manually...
Uk Manual
Page 22
... www.iFIT.com. 5 Follow the desired links on the button will light. 3 Go to change when a "chirp" is heard, make sure that the audio cable is properly connected, that it is fully plugged in, and that the Pace/Time display is not flashing. If the speed or incline settings are finished exercising, remove the key from the console. After a moment, the walking belt will be prepared for using a program...
... www.iFIT.com. 5 Follow the desired links on the button will light. 3 Go to change when a "chirp" is heard, make sure that the audio cable is properly connected, that it is fully plugged in, and that the Pace/Time display is not flashing. If the speed or incline settings are finished exercising, remove the key from the console. After a moment, the walking belt will be prepared for using a program...
Uk Manual
Page 23
... mode is blank. button so the display is intended to be shown: The Calories/Distance display will show the total number of miles (or kilometres) that the walking belt has moved. The Pace/Time display will show the total number of miles that the walking belt has moved. IMPORTANT: The Heart Rate display should be removed from the console. The information mode also allows you to kilometres per hour to use the console's heart rate programs. To purchase a chest pulse sensor...
... mode is blank. button so the display is intended to be shown: The Calories/Distance display will show the total number of miles (or kilometres) that the walking belt has moved. The Pace/Time display will show the total number of miles that the walking belt has moved. IMPORTANT: The Heart Rate display should be removed from the console. The information mode also allows you to kilometres per hour to use the console's heart rate programs. To purchase a chest pulse sensor...

Uk Manual
Page 26
... on position. Remove the key and UNPLUG THE POWER CORD. c. Using the included allen wrench, turn both rear roller adjustment bolts counterclockwise 1/4 of the walking belt 5-7 cm (2-3 in.) off switch is overtightened, treadmill performance may decrease and the walking belt may be able to keep the walking belt centred. c Tripped d On Position Reset PROBLEM: The power turns off switch located on /off during use only a 3-conductor, 1mm2 (14-gauge) cord that applies, and follow the steps listed. If...
... on position. Remove the key and UNPLUG THE POWER CORD. c. Using the included allen wrench, turn both rear roller adjustment bolts counterclockwise 1/4 of the walking belt 5-7 cm (2-3 in.) off switch is overtightened, treadmill performance may decrease and the walking belt may be able to keep the walking belt centred. c Tripped d On Position Reset PROBLEM: The power turns off switch located on /off during use only a 3-conductor, 1mm2 (14-gauge) cord that applies, and follow the steps listed. If...

Uk Manual
Page 27
.... When the walking belt is correctly tightened, you should be able to keep the walking belt centred. Be careful to lift each side of the walking belt 5-7 cm (2-3 in the power cord, insert the key and run the treadmill for a few minutes to turn . Remove the key from the console and UNPLUG THE a POWER CORD. Note: A phillips 121 screwdriver with the Reed Switch. PROBLEM: The displays of a turn the left rear roller bolt clockwise 1/2 of...
.... When the walking belt is correctly tightened, you should be able to keep the walking belt centred. Be careful to lift each side of the walking belt 5-7 cm (2-3 in the power cord, insert the key and run the treadmill for a few minutes to turn . Remove the key from the console and UNPLUG THE a POWER CORD. Note: A phillips 121 screwdriver with the Reed Switch. PROBLEM: The displays of a turn the left rear roller bolt clockwise 1/2 of...
Uk Manual
Page 28
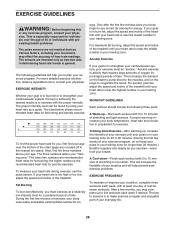
... preexisting health problems. The pulse sensors are rounded off to make exercise a regular and enjoyable part of time. For aerobic exercise, adjust the speed and incline of the treadmill until your training zone for individuals over the age of the chart (ages are not medical devices. Next, find the proper heart rate for prolonged periods of your exercise program. To measure your "training zone." The sensors are recommended heart rates for...
... preexisting health problems. The pulse sensors are rounded off to make exercise a regular and enjoyable part of time. For aerobic exercise, adjust the speed and incline of the treadmill until your training zone for individuals over the age of the chart (ages are not medical devices. Next, find the proper heart rate for prolonged periods of your exercise program. To measure your "training zone." The sensors are recommended heart rates for...
Uk Manual
Page 30
HOW TO ORDER REPLACEMENT PARTS To order replacement parts, contact the ICON Health & Fitness, Ltd. office, or write: ICON Health & Fitness, Ltd. Customer Service Department Unit 4, Revie Road Industrial Estate Revie Road Beeston Leeds, LS118JG UK Tel: 08457 089 009 Outside the...to give the following information: • The MODEL NUMBER of the product (PETL5013.4) • The NAME of the product (PROFORM® 560 HR treadmill) • The SERIAL NUMBER of the product (see the front cover of this manual) • The KEY NUMBER AND DESCRIPTION OF THE PART(S) (see the PART LIST on pages 30 and...
HOW TO ORDER REPLACEMENT PARTS To order replacement parts, contact the ICON Health & Fitness, Ltd. office, or write: ICON Health & Fitness, Ltd. Customer Service Department Unit 4, Revie Road Industrial Estate Revie Road Beeston Leeds, LS118JG UK Tel: 08457 089 009 Outside the...to give the following information: • The MODEL NUMBER of the product (PETL5013.4) • The NAME of the product (PROFORM® 560 HR treadmill) • The SERIAL NUMBER of the product (see the front cover of this manual) • The KEY NUMBER AND DESCRIPTION OF THE PART(S) (see the PART LIST on pages 30 and...

Uk Manual
Page 32
... 1 120 1 121 4 122 1 123 2 124 1 125 1 126 2 127 2 128 2 Description Clevis Pin Hairpin Cotter Cage Nut 1 1/4" Bolt Rear Base Pad Wheel Housing Wheel Bolt Wheel Base Incline Stop Bracket Incline Motor Bolt Incline Motor Right Handrail Bracket Right Decal Holder 5/16" Allen Wrench iFIT.com Cable Motor Bracket J-Nut Front Roller Adj. Bolt Front Roller/Pulley Long Belly Pan Screw Controller Wire Rear Roller Star Washer Pulse Wire Pulse Bar Caution Decal Nylon Washer Motor Pivot Bushing Key No.
... 1 120 1 121 4 122 1 123 2 124 1 125 1 126 2 127 2 128 2 Description Clevis Pin Hairpin Cotter Cage Nut 1 1/4" Bolt Rear Base Pad Wheel Housing Wheel Bolt Wheel Base Incline Stop Bracket Incline Motor Bolt Incline Motor Right Handrail Bracket Right Decal Holder 5/16" Allen Wrench iFIT.com Cable Motor Bracket J-Nut Front Roller Adj. Bolt Front Roller/Pulley Long Belly Pan Screw Controller Wire Rear Roller Star Washer Pulse Wire Pulse Bar Caution Decal Nylon Washer Motor Pivot Bushing Key No.


