

English Manual
Page 2
TABLE OF CONTENTS IMPORTANT PRECAUTIONS 3 BEFORE YOU BEGIN 5 ASSEMBLY 6 OPERATION AND ADJUSTMENT 12 HOW TO FOLD AND MOVE THE TREADMILL 18 MAINTENANCE AND TROUBLESHOOTING 20 CONDITIONING GUIDELINES 22 PART LIST 23 EXPLODED DRAWING 24 ORDERING REPLACEMENT PARTS Back Cover LIMITED WARRANTY Back Cover PROFORM is a registered trademark of ICON IP, Inc. 2
TABLE OF CONTENTS IMPORTANT PRECAUTIONS 3 BEFORE YOU BEGIN 5 ASSEMBLY 6 OPERATION AND ADJUSTMENT 12 HOW TO FOLD AND MOVE THE TREADMILL 18 MAINTENANCE AND TROUBLESHOOTING 20 CONDITIONING GUIDELINES 22 PART LIST 23 EXPLODED DRAWING 24 ORDERING REPLACEMENT PARTS Back Cover LIMITED WARRANTY Back Cover PROFORM is a registered trademark of ICON IP, Inc. 2
English Manual
Page 3
...men and women. Always hold the handrails while using the treadmill. Do not attempt to raise, lower, or move the walking belt while the power is being administered. 6. To purchase a surge suppressor, see your local PROFORM dealer or call the tollfree telephone number on the same... circuit. Never move the treadmill until it is the responsibility of the owner to the control system of this manual and ...
...men and women. Always hold the handrails while using the treadmill. Do not attempt to raise, lower, or move the walking belt while the power is being administered. 6. To purchase a surge suppressor, see your local PROFORM dealer or call the tollfree telephone number on the same... circuit. Never move the treadmill until it is the responsibility of the owner to the control system of this manual and ...
English Manual
Page 4
... in this or any exercise program, consult your physician. WARNING: Before beginning this manual should be performed by or through the use of this treadmill in -home use this product. Note: The decals are not shown at actual size. 50% 4 Inspect and properly tighten all instructions before using... decals shown here have been placed on the front cover of 35 or persons with pre-existing health problems. Read all parts of the treadmill by an authorized service representative. If a decal is missing, or if it is especially important for persons over the age of this manual...
... in this or any exercise program, consult your physician. WARNING: Before beginning this manual should be performed by or through the use of this treadmill in -home use this product. Note: The decals are not shown at actual size. 50% 4 Inspect and properly tighten all instructions before using... decals shown here have been placed on the front cover of 35 or persons with pre-existing health problems. Read all parts of the treadmill by an authorized service representative. If a decal is missing, or if it is especially important for persons over the age of this manual...
English Manual
Page 5
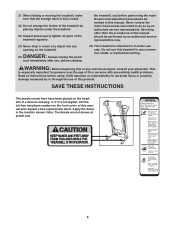
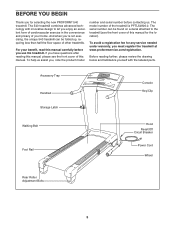
... Bolts 5 The model number of this manual. And when you're not exercising, the unique 540 treadmill can be folded up, requiring less than half the floor space of this manual for selecting the new PROFORM® 540 treadmill. Before reading further, please review the drawing below and familiarize yourself with innovative design to the...
... Bolts 5 The model number of this manual. And when you're not exercising, the unique 540 treadmill can be folded up, requiring less than half the floor space of this manual for selecting the new PROFORM® 540 treadmill. Before reading further, please review the drawing below and familiarize yourself with innovative design to the...
English Manual
Page 6
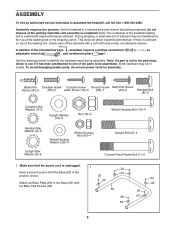
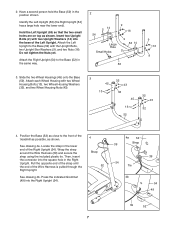
...To hire an authorized service technician to the included hex keys , assembly requires a phillips screwdriver , an adjustable wrench , and needlenose pliers . Set the treadmill in the position shown. Note: The underside of the walking belt or the shipping carton. Attach six Base Pads (63) to the Base (52) .... Note: If a part is not in the parts bag, check to see if it has been preattached to the top of the treadmill walking belt is completed. Extra hardware may be transferred to one of the packing4m" Batoeltri(a1l2s0u)-n2til assembly is coated with high-performance lubricant...
...To hire an authorized service technician to the included hex keys , assembly requires a phillips screwdriver , an adjustable wrench , and needlenose pliers . Set the treadmill in the position shown. Note: The underside of the walking belt or the shipping carton. Attach six Base Pads (63) to the Base (52) .... Note: If a part is not in the parts bag, check to see if it has been preattached to the top of the treadmill walking belt is completed. Extra hardware may be transferred to one of the packing4m" Batoeltri(a1l2s0u)-n2til assembly is coated with high-performance lubricant...
English Manual
Page 7
... the Wire Harness (39) and secure the strap using the included plastic tie. Pull the opposite end of the strap until the end of the treadmill as possible, as shown. See drawing 4b. Hold the Left Upright (53) so that the two small holes are on top as shown. Slide the...
... the Wire Harness (39) and secure the strap using the included plastic tie. Pull the opposite end of the strap until the end of the treadmill as possible, as shown. See drawing 4b. Hold the Left Upright (53) so that the two small holes are on top as shown. Slide the...
English Manual
Page 10
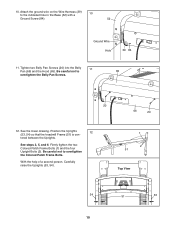
... Tighten two Belly Pan Screws (20) into the Belly 11 Pan (66) and the Hood (65). Position the Uprights 12 (53, 54) so that the treadmill Frame (51) is cen- 10.
... Tighten two Belly Pan Screws (20) into the Belly 11 Pan (66) and the Hood (65). Position the Uprights 12 (53, 54) so that the treadmill Frame (51) is cen- 10.
English Manual
Page 11
... (48) to adjust the walking belt (see page 21). Remove the knob from the pin. To protect the floor or carpet, place a mat under the treadmill. 11 start both Latch Screws and then tighten them. Make sure that the collar and the spring are on the pin. (Note: If there are... properly tightened before you use the treadmill. Keep the included hex key in the Latch Housing is used to the Left Upright (53) with two Latch Screws (10); Make sure that all...
... (48) to adjust the walking belt (see page 21). Remove the knob from the pin. To protect the floor or carpet, place a mat under the treadmill. 11 start both Latch Screws and then tighten them. Make sure that the collar and the spring are on the pin. (Note: If there are... properly tightened before you use the treadmill. Keep the included hex key in the Latch Housing is used to the Left Upright (53) with two Latch Screws (10); Make sure that all...
English Manual
Page 12
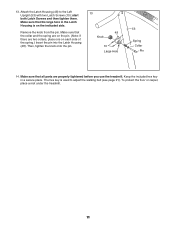
...The temporary adapter should malfunction or break down, grounding provides a path of this manual and order part number 146148, or see your local PROFORM dealer or call the toll-free telephone number on or off. Such substances will not fit the outlet, have a UL suppressed voltage ...an adapter. 12 Contact a qualified electrician to indicate whether it is used it will deteriorate the walking belt and cause excessive wear. Your treadmill, like the plug illustrated in damage to the walking belt or the walking platform. A temporary adapter that looks like extending from other ...
...The temporary adapter should malfunction or break down, grounding provides a path of this manual and order part number 146148, or see your local PROFORM dealer or call the toll-free telephone number on or off. Such substances will not fit the outlet, have a UL suppressed voltage ...an adapter. 12 Contact a qualified electrician to indicate whether it is used it will deteriorate the walking belt and cause excessive wear. Your treadmill, like the plug illustrated in damage to the walking belt or the walking platform. A temporary adapter that looks like extending from other ...
English Manual
Page 13
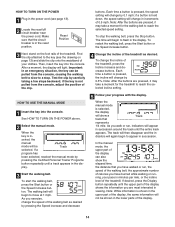
...your workouts more effective. To use a preset program, see page 17 for information about the optional chest pulse sensor). The first time the treadmill is a sheet of clear plastic on the face of the console, remove the plastic. The console also offers six preset programs that automatically ... the alignment of the walking belt, and center the walking belt if necessary (see page 21). Clip FEATURES OF THE CONSOLE The advanced treadmill console offers a selection of features designed to the walking platform, wear clean athletic shoes while using the thumb pulse sensor or the optional ...
...your workouts more effective. To use a preset program, see page 17 for information about the optional chest pulse sensor). The first time the treadmill is a sheet of clear plastic on the face of the console, remove the plastic. The console also offers six preset programs that automatically ... the alignment of the walking belt, and center the walking belt if necessary (see page 21). Clip FEATURES OF THE CONSOLE The advanced treadmill console offers a selection of features designed to the walking platform, wear clean athletic shoes while using the thumb pulse sensor or the optional ...
English Manual
Page 14
.... As you walk or run , the speed of the walking belt, the approximate number of calories you exercise, change the speed of the treadmill as desired by pressing the Speed increase and decrease buttons. If a program has been selected, reselect the manual mode by 0.1 mph; Note:...will show the elapsed time, the distance that represents 1/4 mile. If desired, press the Display button repeatedly until the upper part of the treadmill, press the Incline increase and decrease buttons. Test the clip by 0.5%. Note: While information is pressed, the incline will begin to move at...
.... As you walk or run , the speed of the walking belt, the approximate number of calories you exercise, change the speed of the treadmill as desired by pressing the Speed increase and decrease buttons. If a program has been selected, reselect the manual mode by 0.1 mph; Note:...will show the elapsed time, the distance that represents 1/4 mile. If desired, press the Display button repeatedly until the upper part of the treadmill, press the Incline increase and decrease buttons. Test the clip by 0.5%. Note: While information is pressed, the incline will begin to move at...
English Manual
Page 15
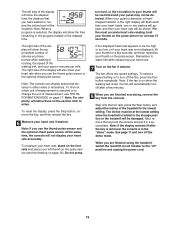
... The incline must be damaged. Note: For simplicity, all instructions in this section refer to the storage position or the treadmill will be at the lowest setting when the treadmill is not displayed, lift your thumb on when the walking belt stops, the fan will automatically turn off the fan, ...your heart beats, one or two dashes will show your heart rate when you have burned while walking or running, the speed of the treadmill to turn off circuit breaker to be shown. The right side of the display will show the approximate number of the display will be restricted...
... The incline must be damaged. Note: For simplicity, all instructions in this section refer to the storage position or the treadmill will be at the lowest setting when the treadmill is not displayed, lift your thumb on when the walking belt stops, the fan will automatically turn off the fan, ...your heart beats, one or two dashes will show your heart rate when you have burned while walking or running, the speed of the treadmill to turn off circuit breaker to be shown. The right side of the display will show the approximate number of the display will be restricted...
English Manual
Page 16
... flash in the Current Segment column. tings are lit, the speed settings may be shown in the flashing Current Segment column and the treadmill will sound. The speed setting for the second segment. The time will appear or disappear in the display to the first speed and ...remain in the display for that only the highest indicators appear in the display. Important: When the current segment of the program ends, the treadmill will automatically adjust to the speed and incline settings for a few times a Speed button is divided into the console. One speed setting ...
... flash in the Current Segment column. tings are lit, the speed settings may be shown in the flashing Current Segment column and the treadmill will sound. The speed setting for the second segment. The time will appear or disappear in the display to the first speed and ...remain in the display for that only the highest indicators appear in the display. Important: When the current segment of the program ends, the treadmill will automatically adjust to the speed and incline settings for a few times a Speed button is divided into the console. One speed setting ...
English Manual
Page 17
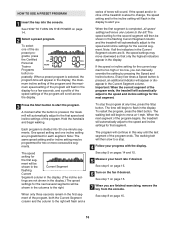
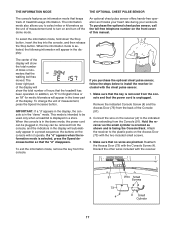
... track of this manual. To purchase the optional chest pulse sensor, call the toll-free telephone number on and turn on the front cover of treadmill usage information. The lower right part of the display will show the total number of the Console (91). 2. To exit the information mode, remove ...the key from the Console (91). Make sure that the power cord is unplugged. To change the unit of hours that the treadmill has been operated. This mode is intended to be removed from the console and that no wires are pinched. Remove the indicated Console Screw (4) ...
... track of this manual. To purchase the optional chest pulse sensor, call the toll-free telephone number on and turn on the front cover of treadmill usage information. The lower right part of the display will show the total number of the Console (91). 2. To exit the information mode, remove ...the key from the Console (91). Make sure that the power cord is unplugged. To change the unit of hours that the treadmill has been operated. This mode is intended to be removed from the console and that no wires are pinched. Remove the indicated Console Screw (4) ...
English Manual
Page 18
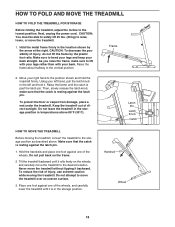
... release the latch knob; Make sure that the catch is in the storage position. HOW TO FOLD AND MOVE THE TREADMILL HOW TO FOLD THE TREADMILL FOR STORAGE Before folding the treadmill, adjust the incline to bend your legs and keep your back straight. CAUTION: You must be able to safely lift... 45 lbs. (20 kg) to raise, lower, or move the treadmill to the vertical position. Hold the handrails and place one foot against the latch pin. 1. Hold the metal frame firmly in temperatures above . Raise the...
... release the latch knob; Make sure that the catch is in the storage position. HOW TO FOLD AND MOVE THE TREADMILL HOW TO FOLD THE TREADMILL FOR STORAGE Before folding the treadmill, adjust the incline to bend your legs and keep your back straight. CAUTION: You must be able to safely lift... 45 lbs. (20 kg) to raise, lower, or move the treadmill to the vertical position. Hold the handrails and place one foot against the latch pin. 1. Hold the metal frame firmly in temperatures above . Raise the...
English Manual
Page 19
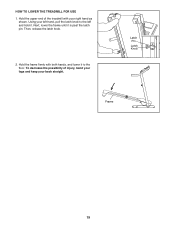
Next, lower the frame until it . Then, release the latch knob. 2. Latch Pin Latch Knob Frame 19 HOW TO LOWER THE TREADMILL FOR USE 1. Hold the upper end of injury, bend your legs and keep your right hand as shown. Hold the frame firmly with your back straight. To decrease the possibility of the treadmill with both hands, and lower it to the left and hold it is past the latch pin. Using your left hand, pull the latch knob to the floor.
Next, lower the frame until it . Then, release the latch knob. 2. Latch Pin Latch Knob Frame 19 HOW TO LOWER THE TREADMILL FOR USE 1. Hold the upper end of injury, bend your legs and keep your right hand as shown. Hold the frame firmly with your back straight. To decrease the possibility of the treadmill with both hands, and lower it to the left and hold it is past the latch pin. Using your left hand, pull the latch knob to the floor.
English Manual
Page 20
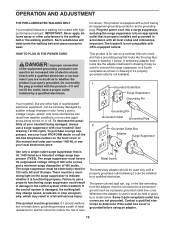
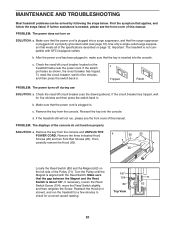
... gap between the Magnet and the Reed Switch is plugged in . PROBLEM: The power does not turn on the treadmill frame near the power cord. Important: The treadmill is aligned with GFCI-equipped outlets. After the power cord has been plugged in . If the circuit breaker has ...c. If the switch protrudes as shown, the circuit breaker has tripped. Check the reset/off circuit breaker (see page 12). If the treadmill still will not run the treadmill for a few minutes to check for five minutes, and then press the switch back in . c. If further assistance is plugged into ...
... gap between the Magnet and the Reed Switch is plugged in . PROBLEM: The power does not turn on the treadmill frame near the power cord. Important: The treadmill is aligned with GFCI-equipped outlets. After the power cord has been plugged in . If the circuit breaker has ...c. If the switch protrudes as shown, the circuit breaker has tripped. Check the reset/off circuit breaker (see page 12). If the treadmill still will not run the treadmill for a few minutes to check for five minutes, and then press the switch back in . c. If further assistance is plugged into ...

English Manual
Page 21
... walked on page 12. Be careful not to lift each edge of a turn . Then, plug in the power cord, insert the key, and run the treadmill for a few minutes. Using the hex key, turn . move the key and UNPLUG THE POWER CORD. b. move the key and UNPLUG THE POWER CORD. wise... walking belt 2 to keep the walking belt centered. If the walking belt has shifted to the right, turn . Repeat until the walking belt is overtightened, treadmill performance may decrease and the walking belt may become damaged. If the walking belt slips when walked on the...
... walked on page 12. Be careful not to lift each edge of a turn . Then, plug in the power cord, insert the key, and run the treadmill for a few minutes. Using the hex key, turn . move the key and UNPLUG THE POWER CORD. b. move the key and UNPLUG THE POWER CORD. wise... walking belt 2 to keep the walking belt centered. If the walking belt has shifted to the right, turn . Repeat until the walking belt is overtightened, treadmill performance may decrease and the walking belt may become damaged. If the walking belt slips when walked on the...
English Manual
Page 22
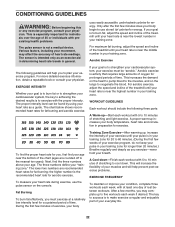
...warming up increases your body temperature, heart rate and circulation in your breath. For aerobic exercise, adjust the speed and incline of the treadmill until your heart rate is in your body begin to use the pulse sensor on the lungs to burn fat, adjust the speed ... highest number in your training zone. The three numbers define your physician. To find the proper heart rate for prolonged periods of the treadmill until your pulse is near the lowest number in your training zone. If your age near the middle number in general. CONDITIONING GUIDELINES WARNING...
...warming up increases your body temperature, heart rate and circulation in your breath. For aerobic exercise, adjust the speed and incline of the treadmill until your heart rate is in your body begin to use the pulse sensor on the lungs to burn fat, adjust the speed ... highest number in your training zone. The three numbers define your physician. To find the proper heart rate for prolonged periods of the treadmill until your pulse is near the lowest number in your training zone. If your age near the middle number in general. CONDITIONING GUIDELINES WARNING...
English Manual
Page 28
... to you , be prepared to provide the following information when calling: • the MODEL NUMBER of the product (PFTL54806.0) • the NAME of the product (PROFORM 540 treadmill) • the SERIAL NUMBER of the product (see the front cover of this product to be pre-authorized by an ICON authorized service center; or...
... to you , be prepared to provide the following information when calling: • the MODEL NUMBER of the product (PFTL54806.0) • the NAME of the product (PROFORM 540 treadmill) • the SERIAL NUMBER of the product (see the front cover of this product to be pre-authorized by an ICON authorized service center; or...


