

English Manual
Page 1
Model No. Serial Number Decal QUESTIONS? MST ON THE WEB: www.proformservice.com USER'S MANUAL CAUTION Read all precautions and instructions in this manual before using this manual for future reference. Save this equipment. PFTL54806.0 Serial No. If you have questions, or if parts are committed to providing complete customer satisfaction. CALL TOLL-FREE: 1-888-533-1333 Mon.-Fri. 6 a.m.-6 p.m. Visit our website at...
Model No. Serial Number Decal QUESTIONS? MST ON THE WEB: www.proformservice.com USER'S MANUAL CAUTION Read all precautions and instructions in this manual before using this manual for future reference. Save this equipment. PFTL54806.0 Serial No. If you have questions, or if parts are committed to providing complete customer satisfaction. CALL TOLL-FREE: 1-888-533-1333 Mon.-Fri. 6 a.m.-6 p.m. Visit our website at...
English Manual
Page 3
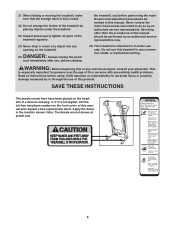
... as described. 3. Never move the walking belt while the power is running. Athletic support clothes are adequately informed of all times. 14. If the control system is not working properly. (See MAINTENANCE AND TROUBLESHOOTING on any surface that meets all users of this manual and order part number 146148, or see your movement, may affect the accuracy of high speeds. The treadmill should be on page...
... as described. 3. Never move the walking belt while the power is running. Athletic support clothes are adequately informed of all times. 14. If the control system is not working properly. (See MAINTENANCE AND TROUBLESHOOTING on any surface that meets all users of this manual and order part number 146148, or see your movement, may affect the accuracy of high speeds. The treadmill should be on page...
English Manual
Page 4
... incline of this manual and request a free replacement decal. Never remove the motor hood unless instructed to do so by placing objects under the treadmill. 23. Never drop or insert any object into any opening on the front cover of the treadmill by an authorized service representative. Always unplug the power cord immediately after use only. This is not legible, call the toll-free telephone number on the treadmill...
... incline of this manual and request a free replacement decal. Never remove the motor hood unless instructed to do so by placing objects under the treadmill. 23. Never drop or insert any object into any opening on the front cover of the treadmill by an authorized service representative. Always unplug the power cord immediately after use only. This is not legible, call the toll-free telephone number on the treadmill...
English Manual
Page 5
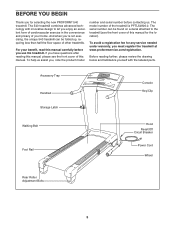
... manual for the location). Accessory Tray Handrail Storage Latch Console Key/Clip Walking Belt Foot Rail Hood Reset/Off Circuit Breaker Power Cord Wheel Rear Roller Adjustment Bolts 5 For your home. And when you're not exercising, the unique 540 treadmill can be folded up, requiring less than half the floor space of this manual carefully before contacting us. The serial number can be found on a decal attached to let you enjoy an excellent form of cardiovascular exercise...
... manual for the location). Accessory Tray Handrail Storage Latch Console Key/Clip Walking Belt Foot Rail Hood Reset/Off Circuit Breaker Power Cord Wheel Rear Roller Adjustment Bolts 5 For your home. And when you're not exercising, the unique 540 treadmill can be folded up, requiring less than half the floor space of this manual carefully before contacting us. The serial number can be found on a decal attached to let you enjoy an excellent form of cardiovascular exercise...
English Manual
Page 6
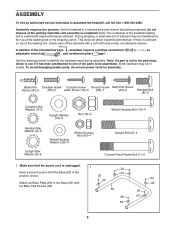
... Housing Bolt (13)-4 6 Extra hardware may be assembled. To avoid damaging plastic parts, do not dispose of the walking belt, simply wipe off the lubricant with a soft cloth and a mild, non-abrasive cleaner. do not use power tools for assembly. Note: If a part is not in the parts bag, check to see if it has been preattached to one of the treadmill walking belt...
... Housing Bolt (13)-4 6 Extra hardware may be assembled. To avoid damaging plastic parts, do not dispose of the walking belt, simply wipe off the lubricant with a soft cloth and a mild, non-abrasive cleaner. do not use power tools for assembly. Note: If a part is not in the parts bag, check to see if it has been preattached to one of the treadmill walking belt...
English Manual
Page 7
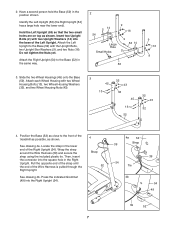
... not tighten the Nuts yet. Locate the strap in the same way. 2 2 14 54 Large Hole Small Holes 9 16 9 52 14 2 53 9 16 9 3. See drawing 4a. Attach the Right Upright (54) to the front of the Wire Harness is pulled through the Right Upright. Identify the Left Upright (53) (the Right Upright [54] has a large hole near the lower end...
... not tighten the Nuts yet. Locate the strap in the same way. 2 2 14 54 Large Hole Small Holes 9 16 9 52 14 2 53 9 16 9 3. See drawing 4a. Attach the Right Upright (54) to the front of the Wire Harness is pulled through the Right Upright. Identify the Left Upright (53) (the Right Upright [54] has a large hole near the lower end...
English Manual
Page 9
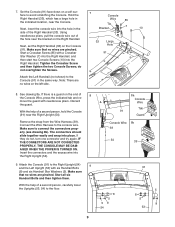
... Console Wire, press the indicated tab and re- IF THE CONNECTORS ARE NOT CONNECTED PROPERLY, THE CONSOLE MAY BE DAMAGED WHEN THE POWER IS TURNED ON. If there is a guard on the left side. 8. Discard the guard. Set the Console (91) face-down on the Console Hole (91). Next, insert the console wire into place. Tighten the Crossbar Screw and then tighten the two Console Screws; Remove the strap...
... Console Wire, press the indicated tab and re- IF THE CONNECTORS ARE NOT CONNECTED PROPERLY, THE CONSOLE MAY BE DAMAGED WHEN THE POWER IS TURNED ON. If there is a guard on the left side. 8. Discard the guard. Set the Console (91) face-down on the Console Hole (91). Next, insert the console wire into place. Tighten the Crossbar Screw and then tighten the two Console Screws; Remove the strap...
English Manual
Page 11
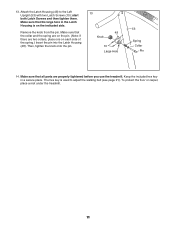
... indicated side. Attach the Latch Housing (48) to adjust the walking belt (see page 21). Make sure that the collar and the spring are on the pin. (Note: If there are properly tightened before you use the treadmill. Remove the knob from the pin. Then, tighten the knob onto the pin. 13 48 Knob 10 Large Hole 53 Spring Collar Pin 14. The hex key is on each...
... indicated side. Attach the Latch Housing (48) to adjust the walking belt (see page 21). Make sure that the collar and the spring are on the pin. (Note: If there are properly tightened before you use the treadmill. Remove the knob from the pin. Then, tighten the knob onto the pin. 13 48 Knob 10 Large Hole 53 Spring Collar Pin 14. The hex key is on each...
English Manual
Page 12
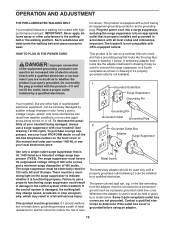
...). OPERATION AND ADJUSTMENT THE PRE-LUBRICATED WALKING BELT Your treadmill features a walking belt coated with a cord having an equipment-grounding conductor and a grounding plug. This product is properly installed and grounded in a fall and serious injury. Your treadmill, like the adapter illustrated in drawing 2 may result in accordance with all local codes and ordinances. This product must be connected to the walking belt or the walking platform...
...). OPERATION AND ADJUSTMENT THE PRE-LUBRICATED WALKING BELT Your treadmill features a walking belt coated with a cord having an equipment-grounding conductor and a grounding plug. This product is properly installed and grounded in a fall and serious injury. Your treadmill, like the adapter illustrated in drawing 2 may result in accordance with all local codes and ordinances. This product must be connected to the walking belt or the walking platform...
English Manual
Page 13
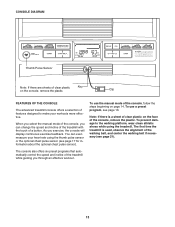
... to make your heart rate using the treadmill. Note: If there is used, observe the alignment of the walking belt, and center the walking belt if necessary (see page 16. The console also offers six preset programs that automatically control the speed and incline of the treadmill while guiding you can even measure your workouts more effective. As you exercise, the console will display continuous exercise feedback. CONSOLE DIAGRAM Thumb Pulse Sensor Note: If there...
... to make your heart rate using the treadmill. Note: If there is used, observe the alignment of the walking belt, and center the walking belt if necessary (see page 16. The console also offers six preset programs that automatically control the speed and incline of the treadmill while guiding you can even measure your workouts more effective. As you exercise, the console will display continuous exercise feedback. CONSOLE DIAGRAM Thumb Pulse Sensor Note: If there...
English Manual
Page 14
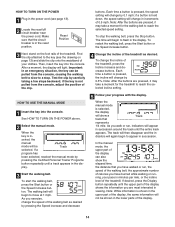
... HOW TO TURN ON THE POWER above. 2 Select the manual mode. If a program has been selected, reselect the manual mode by pressing the Certified Personal Trainer Programs button repeatedly until a track appears in the reset position. As you walk or run , the speed of the walking belt, the approximate number of calories you are most interested in minutes per mile, or the incline level of the treadmill. Each time a button is in...
... HOW TO TURN ON THE POWER above. 2 Select the manual mode. If a program has been selected, reselect the manual mode by pressing the Certified Personal Trainer Programs button repeatedly until a track appears in the reset position. As you walk or run , the speed of the walking belt, the approximate number of calories you are most interested in minutes per mile, or the incline level of the treadmill. Each time a button is in...
English Manual
Page 15
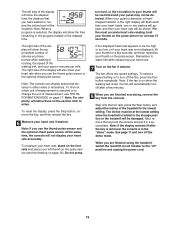
... speed of the treadmill. To select a speed setting or to stand still while measuring your heart rate if desired. Note: When a program is on when the walking belt stops, the fan will be shown. Note: If you use the thumb pulse sensor and the optional chest pulse sensor at least 15 seconds. Remember to turn off the demo mode. To reset the display, press the Stop button, remove the key, and then reinsert the key. 6 Measure your heart rate. 7 Turn...
... speed of the treadmill. To select a speed setting or to stand still while measuring your heart rate if desired. Note: When a program is on when the walking belt stops, the fan will be shown. Note: If you use the thumb pulse sensor and the optional chest pulse sensor at least 15 seconds. Remember to turn off the demo mode. To reset the display, press the Stop button, remove the key, and then reinsert the key. 6 Measure your heart rate. 7 Turn...
English Manual
Page 16
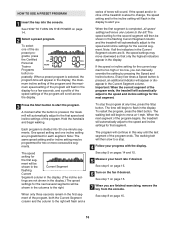
... the treadmill will automatically adjust to the speed and incline settings for the second segment will begin to the speed and incline settings for the next segment. When a preset program is pressed, an additional indicator will continue in the display.) The speed settings for the next several segments will begin walking. tings are finished exercising, remove the key from the console. The walking belt will scroll across the display. 3 Press the Start button to...
... the treadmill will automatically adjust to the speed and incline settings for the second segment will begin to the speed and incline settings for the next segment. When a preset program is pressed, an additional indicator will continue in the display.) The speed settings for the next several segments will begin walking. tings are finished exercising, remove the key from the console. The walking belt will scroll across the display. 3 Press the Start button to...
English Manual
Page 17
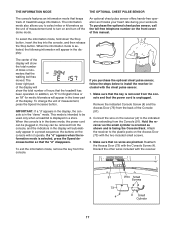
... demo mode, the power cord can be plugged in the "demo" mode. the buttons on the Access Door (73) with the chest pulse sensor. 1. To change the unit of this manual. This mode is displayed in a preset sequence; To exit the information mode, remove the key from the console and that the power cord is removed from the console. Connect the wire on the front cover of measurement, press the Speed increase button. To purchase the optional chest pulse sensor, call the toll-free...
... demo mode, the power cord can be plugged in the "demo" mode. the buttons on the Access Door (73) with the chest pulse sensor. 1. To change the unit of this manual. This mode is displayed in a preset sequence; To exit the information mode, remove the key from the console and that the power cord is removed from the console. Connect the wire on the front cover of measurement, press the Speed increase button. To purchase the optional chest pulse sensor, call the toll-free...
English Manual
Page 18
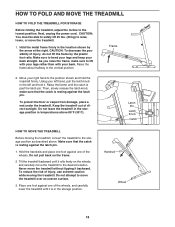
... the power cord. Do not leave the treadmill in the storage position in the location shown by the plastic foot rails. Place one foot against the latch pin. To reduce the risk of the wheels. Tilt the treadmill backward until the catch is in the storage position. Frame 2. HOW TO FOLD AND MOVE THE TREADMILL HOW TO FOLD THE TREADMILL FOR STORAGE Before folding the treadmill, adjust the incline...
... the power cord. Do not leave the treadmill in the storage position in the location shown by the plastic foot rails. Place one foot against the latch pin. To reduce the risk of the wheels. Tilt the treadmill backward until the catch is in the storage position. Frame 2. HOW TO FOLD AND MOVE THE TREADMILL HOW TO FOLD THE TREADMILL FOR STORAGE Before folding the treadmill, adjust the incline...
English Manual
Page 20
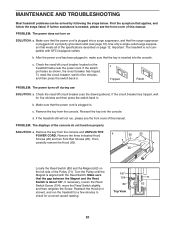
... breaker, wait for five minutes and then press the switch back in . PROBLEM: The displays of the Pulley (71). If necessary, loosen the Reed Switch Screw (104), move the Reed Switch slightly, and then retighten the Screw. Reinsert the key into the console. After the power cord has been plugged in . c. Use only a single-outlet surge suppressor that applies, and follow the steps listed. If the circuit breaker has tripped...
... breaker, wait for five minutes and then press the switch back in . PROBLEM: The displays of the Pulley (71). If necessary, loosen the Reed Switch Screw (104), move the Reed Switch slightly, and then retighten the Screw. Reinsert the key into the console. After the power cord has been plugged in . c. Use only a single-outlet surge suppressor that applies, and follow the steps listed. If the circuit breaker has tripped...

English Manual
Page 21
... the walking belt 2 to the left rear roller bolt counterclockwise 1/2 of a turn . When the walking belt is properly tightened. 21 b. Using the hex key, turn the left rear roller bolt clock- move the key and UNPLUG THE POWER CORD. Then, plug in the power cord, insert the key, and run the treadmill for a few minutes. If the walking belt still slows when walked on , first re- Remove the key and UNPLUG THE POWER CORD. PROBLEM: The walking belt slows when walked on page 12. Use only...
... the walking belt 2 to the left rear roller bolt counterclockwise 1/2 of a turn . When the walking belt is properly tightened. 21 b. Using the hex key, turn the left rear roller bolt clock- move the key and UNPLUG THE POWER CORD. Then, plug in the power cord, insert the key, and run the treadmill for a few minutes. If the walking belt still slows when walked on , first re- Remove the key and UNPLUG THE POWER CORD. PROBLEM: The walking belt slows when walked on page 12. Use only...
English Manual
Page 22
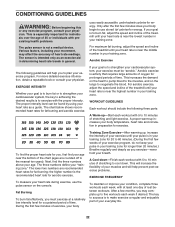
... -Start each workout with preexisting health problems. uses easily accessible carbohydrate calories for energy. The chart below shows recommended heart rates for aerobic exercise. WORKOUT GUIDELINES Each workout should include the following guidelines will help you must be found by using your everyday life. 22 Next, find your training zone. If your goal is to burn fat, adjust the speed and incline of the treadmill until your heart rate...
... -Start each workout with preexisting health problems. uses easily accessible carbohydrate calories for energy. The chart below shows recommended heart rates for aerobic exercise. WORKOUT GUIDELINES Each workout should include the following guidelines will help you must be found by using your everyday life. 22 Next, find your training zone. If your goal is to burn fat, adjust the speed and incline of the treadmill until your heart rate...
English Manual
Page 23
... 1 Walking Platform 46 1 Motor Pivot Nut 87 1 Controller 47 3 Hood Clip 88 1 Console Crossbar 48 1 Latch Housing 89 1 Reed Switch 49 2 Grommet 90 1 Power Cord 50 2 Isolator Fastener 91 1 Console 51 1 Frame 92 1 Incline Motor 52 1 Base Nut, Lower 53 1 Left Upright 93 2 Belt Guide 54 1 Right Upright 94 1 5 mm Hex Key 55 1 Rear Roller 95 2 Controller Screw 56 1 Motor Belt 96 1 Releasable Tie 57 1 Electronics Bracket 97 1 Rear Foot, Right 58 1 Incline Motor 98 1 Filter Wire Bolt, Upper 99 1 Power Cord...
... 1 Walking Platform 46 1 Motor Pivot Nut 87 1 Controller 47 3 Hood Clip 88 1 Console Crossbar 48 1 Latch Housing 89 1 Reed Switch 49 2 Grommet 90 1 Power Cord 50 2 Isolator Fastener 91 1 Console 51 1 Frame 92 1 Incline Motor 52 1 Base Nut, Lower 53 1 Left Upright 93 2 Belt Guide 54 1 Right Upright 94 1 5 mm Hex Key 55 1 Rear Roller 95 2 Controller Screw 56 1 Motor Belt 96 1 Releasable Tie 57 1 Electronics Bracket 97 1 Rear Foot, Right 58 1 Incline Motor 98 1 Filter Wire Bolt, Upper 99 1 Power Cord...
English Manual
Page 28
... this manual) • the KEY NUMBER and DESCRIPTION of the desired part(s) (see the front cover of incidental or consequential damages. All repairs for ninety (90) days after the date of purchase. or products used for a minimal trip charge. ICON is shipped to a service center, freight charges to and from defects in workmanship and material under this warranty is limited in connection...
... this manual) • the KEY NUMBER and DESCRIPTION of the desired part(s) (see the front cover of incidental or consequential damages. All repairs for ninety (90) days after the date of purchase. or products used for a minimal trip charge. ICON is shipped to a service center, freight charges to and from defects in workmanship and material under this warranty is limited in connection...

