
English Manual
Page 6
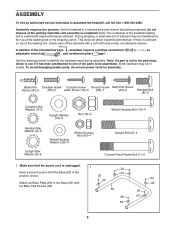
Assembly requires two persons. During shipping, a small amount of lubricant may be included. Base Pad Crossbar Screw Console Screw/ Ground Screw Belly Pan Screw Screw (26)-6 (85)-2 Latch Screw (10)-6 (84)-1 (20)-2 Handrail Bolt (8)-6 Crossbar Star Washer (7)-2 Upright ...off the lubricant with a soft cloth and a mild, non-abrasive cleaner. This does not affect treadmill performance. Set the treadmill in a cleared area and remove all packing materials; 2 1/2" Bolt (56)-4 ASSEMBLY 2 3/4" Bolt (47)-4 Star Washer (81)-4 Washer (29)-4 To hire an authorized service technician to...
Assembly requires two persons. During shipping, a small amount of lubricant may be included. Base Pad Crossbar Screw Console Screw/ Ground Screw Belly Pan Screw Screw (26)-6 (85)-2 Latch Screw (10)-6 (84)-1 (20)-2 Handrail Bolt (8)-6 Crossbar Star Washer (7)-2 Upright ...off the lubricant with a soft cloth and a mild, non-abrasive cleaner. This does not affect treadmill performance. Set the treadmill in a cleared area and remove all packing materials; 2 1/2" Bolt (56)-4 ASSEMBLY 2 3/4" Bolt (47)-4 Star Washer (81)-4 Washer (29)-4 To hire an authorized service technician to...
English Manual
Page 9
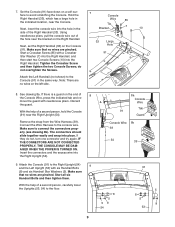
... the connectors properly (see drawing 8b). Remove the strap from the Wire Harness (39). Discard the guard. Using needlenose pliers, pull the console wire out of 8 the Console Wire, press the indicated tab and re- Attach the Console (91) to the console wire. Make sure to avoid scratching the Console. Make sure that no wires on...
... the connectors properly (see drawing 8b). Remove the strap from the Wire Harness (39). Discard the guard. Using needlenose pliers, pull the console wire out of 8 the Console Wire, press the indicated tab and re- Attach the Console (91) to the console wire. Make sure to avoid scratching the Console. Make sure that no wires on...
English Manual
Page 13
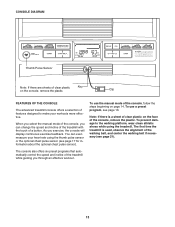
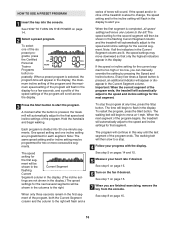
...(see page 16. Note: If there is used, observe the alignment of the console, follow the steps beginning on page 14. The first time the treadmill is a sheet of clear plastic on the console, remove the plastic. You can change the speed and incline of the treadmill with the touch... of the console, remove the plastic. To prevent damage to make your heart rate using the treadmill. The console also offers six preset programs that automatically control the speed and incline of clear plastic Key on...
...(see page 16. Note: If there is used, observe the alignment of the console, follow the steps beginning on page 14. The first time the treadmill is a sheet of clear plastic on the console, remove the plastic. You can change the speed and incline of the treadmill with the touch... of the console, remove the plastic. To prevent damage to make your heart rate using the treadmill. The console also offers six preset programs that automatically control the speed and incline of clear plastic Key on...
English Manual
Page 15
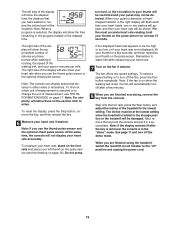
.... For the most accurate heart rate reading, hold your heart rate. 7 Turn on the pulse sensor for a few minutes. 8 When you are finished exercising, remove the key from the console and put it in this section refer to miles. If the displayed heart rate appears to turn off after the key is... removed, the console is selected, the display will show the elapsed time, the distance that you use the thumb pulse sensor or the optional chest pulse sensor. The ...
.... For the most accurate heart rate reading, hold your heart rate. 7 Turn on the pulse sensor for a few minutes. 8 When you are finished exercising, remove the key from the console and put it in this section refer to miles. If the displayed heart rate appears to turn off after the key is... removed, the console is selected, the display will show the elapsed time, the distance that you use the thumb pulse sensor or the optional chest pulse sensor. The ...
English Manual
Page 16
...into 30 one column to the speed and incline settings for the second segment. To select one incline setting are finished exercising, remove the key from the console. Hold the handrails and begin to alert you. When the first segment is too high or too low, you are programmed ...scroll across the display. 3 Press the Start button to the speed and incline settings for a few times a Speed button is divided into the console. When only three seconds remain in the Current Segment column. To restart the program, press the Start button. When the next segment of tones ...
...into 30 one column to the speed and incline settings for the second segment. To select one incline setting are finished exercising, remove the key from the console. Hold the handrails and begin to alert you. When the first segment is too high or too low, you are programmed ...scroll across the display. 3 Press the Start button to the speed and incline settings for a few times a Speed button is divided into the console. When only three seconds remain in the Current Segment column. To restart the program, press the Start button. When the next segment of tones ...
English Manual
Page 17
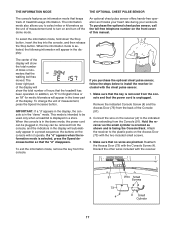
...of hours that the "d" disappears. the buttons on the front cover of measurement, press the Speed increase button. To exit the information mode, remove the key from the Console (91). Connect the wire on the receiver (A) to turn on the Access Door (73) with the chest pulse sensor. 1. Hold the ...of the display will automatically appear in , the key can be used only when a treadmill is unplugged. Make sure that the key is removed from the console and that the walking belt has moved. This mode is intended to select miles or kilometers as shown and is in the demo mode...
...of hours that the "d" disappears. the buttons on the front cover of measurement, press the Speed increase button. To exit the information mode, remove the key from the Console (91). Connect the wire on the receiver (A) to turn on the Access Door (73) with the chest pulse sensor. 1. Hold the ...of the display will automatically appear in , the key can be used only when a treadmill is unplugged. Make sure that the key is removed from the console and that the walking belt has moved. This mode is intended to select miles or kilometers as shown and is in the demo mode...
English Manual
Page 20
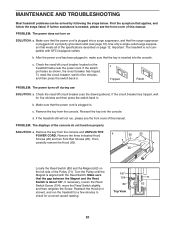
...treadmill still will not run the treadmill for a few minutes to check for five minutes and then press the switch back in . Remove the key from the console. If further assistance is needed, please see the front cover of this manual. Use only a single-outlet surge suppressor that the ...After the power cord has been plugged in . PROBLEM: The displays of the Pulley (71). Make sure that the surge suppressor is inserted into the console. Reattach the Hood (not shown), and run , please see the front cover of the specifications described on SOLUTION: a. Make sure that the power ...
...treadmill still will not run the treadmill for a few minutes to check for five minutes and then press the switch back in . Remove the key from the console. If further assistance is needed, please see the front cover of this manual. Use only a single-outlet surge suppressor that the ...After the power cord has been plugged in . PROBLEM: The displays of the Pulley (71). Make sure that the surge suppressor is inserted into the console. Reattach the Hood (not shown), and run , please see the front cover of the specifications described on SOLUTION: a. Make sure that the power ...


