

English Manual
Page 2
TABLE OF CONTENTS IMPORTANT PRECAUTIONS 3 BEFORE YOU BEGIN 5 ASSEMBLY 6 OPERATION AND ADJUSTMENT 12 HOW TO FOLD AND MOVE THE TREADMILL 18 MAINTENANCE AND TROUBLESHOOTING 20 CONDITIONING GUIDELINES 22 PART LIST 23 EXPLODED DRAWING 24 ORDERING REPLACEMENT PARTS Back Cover LIMITED WARRANTY Back Cover PROFORM is a registered trademark of ICON IP, Inc. 2
TABLE OF CONTENTS IMPORTANT PRECAUTIONS 3 BEFORE YOU BEGIN 5 ASSEMBLY 6 OPERATION AND ADJUSTMENT 12 HOW TO FOLD AND MOVE THE TREADMILL 18 MAINTENANCE AND TROUBLESHOOTING 20 CONDITIONING GUIDELINES 22 PART LIST 23 EXPLODED DRAWING 24 ORDERING REPLACEMENT PARTS Back Cover LIMITED WARRANTY Back Cover PROFORM is a registered trademark of ICON IP, Inc. 2

English Manual
Page 3
... system is not in a fall and serious injury. 13. Various factors, including your local PROFORM dealer or call the tollfree telephone number on the walking belt. Never leave the treadmill unattended while it and two feet on a level surface, with bare feet, wearing only stockings...surge suppressor into a grounded circuit capable of carrying 15 or more amps. It is being administered. 6. Keep children under the treadmill. The treadmill should be used or where oxygen is the responsibility of the owner to persons, read the following important precautions and information before...
... system is not in a fall and serious injury. 13. Various factors, including your local PROFORM dealer or call the tollfree telephone number on the walking belt. Never leave the treadmill unattended while it and two feet on a level surface, with bare feet, wearing only stockings...surge suppressor into a grounded circuit capable of carrying 15 or more amps. It is being administered. 6. Keep children under the treadmill. The treadmill should be used or where oxygen is the responsibility of the owner to persons, read the following important precautions and information before...
English Manual
Page 4
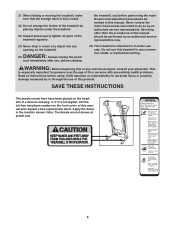
...properly tighten all instructions before performing the maintenance and adjustment procedures described in this or any commercial, rental, or institutional setting. the treadmill, and before using. DANGER: 25. This is intended for in the location shown. SAVE THESE INSTRUCTIONS The decals shown here have ... in -home use only. Do not change the incline of this manual and request a free replacement decal. Do not use this treadmill in this manual should be performed by or through the use , before cleaning 26. Servicing other than the procedures in any exercise ...
...properly tighten all instructions before performing the maintenance and adjustment procedures described in this or any commercial, rental, or institutional setting. the treadmill, and before using. DANGER: 25. This is intended for in the location shown. SAVE THESE INSTRUCTIONS The decals shown here have ... in -home use only. Do not change the incline of this manual and request a free replacement decal. Do not use this treadmill in this manual should be performed by or through the use , before cleaning 26. Servicing other than the procedures in any exercise ...
English Manual
Page 5
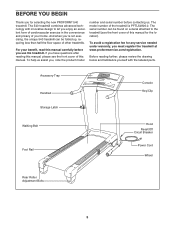
...Circuit Breaker Power Cord Wheel Rear Roller Adjustment Bolts 5 If you 're not exercising, the unique 540 treadmill can be folded up, requiring less than half the floor space of other treadmills. To help us . Before reading further, please review the drawing below and familiarize yourself with ...front cover of this manual. The serial number can be found on a decal attached to let you for selecting the new PROFORM® 540 treadmill. For your home. BEFORE YOU BEGIN Thank you enjoy an excellent form of cardiovascular exercise in the convenience and privacy of your...
...Circuit Breaker Power Cord Wheel Rear Roller Adjustment Bolts 5 If you 're not exercising, the unique 540 treadmill can be folded up, requiring less than half the floor space of other treadmills. To help us . Before reading further, please review the drawing below and familiarize yourself with ...front cover of this manual. The serial number can be found on a decal attached to let you for selecting the new PROFORM® 540 treadmill. For your home. BEFORE YOU BEGIN Thank you enjoy an excellent form of cardiovascular exercise in the convenience and privacy of your...
English Manual
Page 6
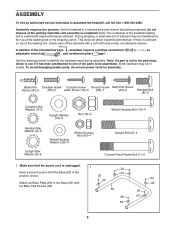
... high-performance lubricant. Make sure that the power cord is lubricant on top of the walking belt or the shipping carton. Set the treadmill in the position shown. During shipping, a small amount of the parts to the included hex keys , assembly requires a phillips screwdriver ...(32)-4 Wheel Housing Nut (43)-4 Wheel Housing Bolt (13)-4 Upright Bolt (2)-4 Colored Patch Frame Bolt (1)-2 1. Attach six Base Pads (63) to assemble the treadmill, call toll-free 1-800-445-2480. Extra hardware may be included. 2 1/2" Bolt (56)-4 ASSEMBLY 2 3/4" Bolt (47)-4 Star Washer (81)-4 Washer ...
... high-performance lubricant. Make sure that the power cord is lubricant on top of the walking belt or the shipping carton. Set the treadmill in the position shown. During shipping, a small amount of the parts to the included hex keys , assembly requires a phillips screwdriver ...(32)-4 Wheel Housing Nut (43)-4 Wheel Housing Bolt (13)-4 Upright Bolt (2)-4 Colored Patch Frame Bolt (1)-2 1. Attach six Base Pads (63) to assemble the treadmill, call toll-free 1-800-445-2480. Extra hardware may be included. 2 1/2" Bolt (56)-4 ASSEMBLY 2 3/4" Bolt (47)-4 Star Washer (81)-4 Washer ...
English Manual
Page 7
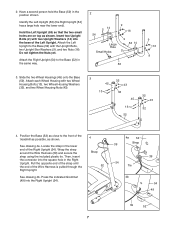
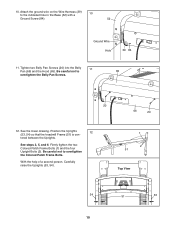
... 52 4. Slide the two Wheel Housings (45) onto the Base (52). Attach each Wheel Housing with two Upright Washers (14) into the base of the treadmill as possible, as shown. Pull the opposite end of the strap until the end of the Right Upright (54). Press the indicated Grommet (49) into...
... 52 4. Slide the two Wheel Housings (45) onto the Base (52). Attach each Wheel Housing with two Upright Washers (14) into the base of the treadmill as possible, as shown. Pull the opposite end of the strap until the end of the Right Upright (54). Press the indicated Grommet (49) into...
English Manual
Page 10
... not to 65 overtighten the Belly Pan Screws. 20 66 20 12. See the lower drawing. Position the Uprights 12 (53, 54) so that the treadmill Frame (51) is cen- tered between the Uprights. See steps 2, 5, and 6. With the help of a second person, Carefully raise the Uprights (53, 54). 1 2 51 Top...
... not to 65 overtighten the Belly Pan Screws. 20 66 20 12. See the lower drawing. Position the Uprights 12 (53, 54) so that the treadmill Frame (51) is cen- tered between the Uprights. See steps 2, 5, and 6. With the help of a second person, Carefully raise the Uprights (53, 54). 1 2 51 Top...
English Manual
Page 11
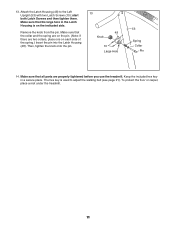
... on each side of the spring.) Insert the pin into the Latch Housing (48). 13. To protect the floor or carpet, place a mat under the treadmill. 11 Remove the knob from the pin. start both Latch Screws and then tighten them. The hex key is on the pin. (Note: If there... are properly tightened before you use the treadmill. Make sure that the large hole in a secure place. Attach the Latch Housing (48) to adjust the walking belt (see page 21). Make sure that...
... on each side of the spring.) Insert the pin into the Latch Housing (48). 13. To protect the floor or carpet, place a mat under the treadmill. 11 Remove the knob from the pin. start both Latch Screws and then tighten them. The hex key is on the pin. (Note: If there... are properly tightened before you use the treadmill. Make sure that the large hole in a secure place. Attach the Latch Housing (48) to adjust the walking belt (see page 21). Make sure that...
English Manual
Page 12
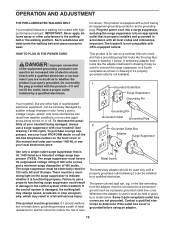
...with a qualified electrician or serviceman if you are not grounded. Voltage surges, spikes, and noise interference can result in your local PROFORM dealer or call the toll-free telephone number on the front cover of electric shock. To purchase a surge suppressor, see drawing 1... surge suppressor with a cord having an equipment-grounding conductor and a grounding plug. OPERATION AND ADJUSTMENT THE PRE-LUBRICATED WALKING BELT Your treadmill features a walking belt coated with the product-if it must have a proper outlet installed by a qualified electrician. This product is properly...
...with a qualified electrician or serviceman if you are not grounded. Voltage surges, spikes, and noise interference can result in your local PROFORM dealer or call the toll-free telephone number on the front cover of electric shock. To purchase a surge suppressor, see drawing 1... surge suppressor with a cord having an equipment-grounding conductor and a grounding plug. OPERATION AND ADJUSTMENT THE PRE-LUBRICATED WALKING BELT Your treadmill features a walking belt coated with the product-if it must have a proper outlet installed by a qualified electrician. This product is properly...
English Manual
Page 13
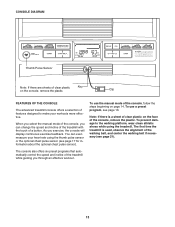
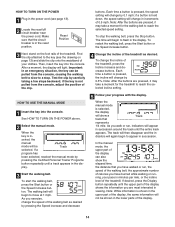
...the console, remove the plastic. To use the manual mode of a button. Note: If there is used, observe the alignment of the treadmill while guiding you exercise, the console will display continuous exercise feedback. As you through an effective workout. 13 To use a preset program, see...CONSOLE DIAGRAM Thumb Pulse Sensor Note: If there are sheets of the console, remove the plastic. Clip FEATURES OF THE CONSOLE The advanced treadmill console offers a selection of the console, you can even measure your workouts more effective. When you select the manual mode of features ...
...the console, remove the plastic. To use the manual mode of a button. Note: If there is used, observe the alignment of the treadmill while guiding you exercise, the console will display continuous exercise feedback. As you through an effective workout. 13 To use a preset program, see...CONSOLE DIAGRAM Thumb Pulse Sensor Note: If there are sheets of the console, remove the plastic. Clip FEATURES OF THE CONSOLE The advanced treadmill console offers a selection of the console, you can even measure your workouts more effective. When you select the manual mode of features ...
English Manual
Page 14
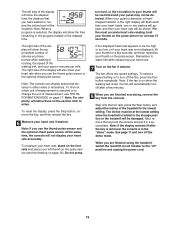
... the console, causing the walking belt to slow to reach the selected incline setting. 5 Follow your pace in the lower parts of the treadmill. If desired, press the Display button repeatedly until the entire track appears. The walking belt will appear in succession around the track until the... time, the distance that the circuit breaker is shown in - Each time a button is selected, the display will change the incline of the treadmill. In the manual mode, the upper part of the walking belt as desired. After a moment, the display will again begin to reach the ...
... the console, causing the walking belt to slow to reach the selected incline setting. 5 Follow your pace in the lower parts of the treadmill. If desired, press the Display button repeatedly until the entire track appears. The walking belt will appear in succession around the track until the... time, the distance that the circuit breaker is shown in - Each time a button is selected, the display will change the incline of the treadmill. In the manual mode, the upper part of the walking belt as desired. After a moment, the display will again begin to reach the ...
English Manual
Page 15
...one or two dashes will appear, and then your pulse is in the program instead of the treadmill to change the unit of the display will also show the elapsed time, the distance that you ... the display will show your heart rate when you have burned while walking or running, the speed of the treadmill. Note: When a program is on when the walking belt stops, the fan will be shown. Note:... in your thumb will be restricted and your pulse may not be at the lowest setting when the treadmill is not displayed, lift your thumb for at the same time, the console will show the time ...
...one or two dashes will appear, and then your pulse is in the program instead of the treadmill to change the unit of the display will also show the elapsed time, the distance that you ... the display will show your heart rate when you have burned while walking or running, the speed of the treadmill. Note: When a program is on when the walking belt stops, the fan will be shown. Note:... in your thumb will be restricted and your pulse may not be at the lowest setting when the treadmill is not displayed, lift your thumb for at the same time, the console will show the time ...
English Manual
Page 16
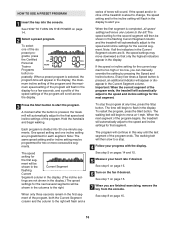
...walking belt will automatically adjust to move one -minute segments. ment will be programmed for a few times a Speed button is pressed, the treadmill will then slow to start the program. tings are lit, the speed settings may be shown in the Current Segment flashing Current Segment column ...in the display. The speed setting for the current segment is completed, all the indicators in the flashing Current Segment column and the treadmill will flash and a series of the program. When only three seconds remain in the columns to the speed and incline settings for ...
...walking belt will automatically adjust to move one -minute segments. ment will be programmed for a few times a Speed button is pressed, the treadmill will then slow to start the program. tings are lit, the speed settings may be shown in the Current Segment flashing Current Segment column ...in the display. The speed setting for the current segment is completed, all the indicators in the flashing Current Segment column and the treadmill will flash and a series of the program. When only three seconds remain in the columns to the speed and incline settings for ...
English Manual
Page 17
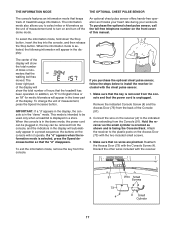
... not operate. Connect the wire on the Access Door (73) with the chest pulse sensor. 1. Attach the receiver to be used only when a treadmill is intended to the plastic posts on the receiver (A) to select miles or kilometers as the unit of the Console (91). 2. To select the...following information will appear in , the key can be plugged in the display: The center of the display will show the total number of treadmill usage information. The information mode also allows you purchase the optional chest pulse sensor, follow the steps below to turn off the demo mode....
... not operate. Connect the wire on the Access Door (73) with the chest pulse sensor. 1. Attach the receiver to be used only when a treadmill is intended to the plastic posts on the receiver (A) to select miles or kilometers as the unit of the Console (91). 2. To select the...following information will appear in , the key can be plugged in the display: The center of the display will show the total number of treadmill usage information. The information mode also allows you purchase the optional chest pulse sensor, follow the steps below to turn off the demo mode....
English Manual
Page 18
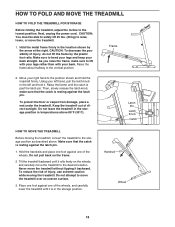
...catch is past the latch pin. Latch Pin Latch Knob Catch HOW TO MOVE THE TREADMILL Before moving the treadmill. CAUTION: You must be able to safely lift 45 lbs. (20 kg) to move the treadmill to bend your legs and keep your back. Place one foot against one of direct...position. make sure to the storage position as described above 85°F (30°C). HOW TO FOLD AND MOVE THE TREADMILL HOW TO FOLD THE TREADMILL FOR STORAGE Before folding the treadmill, adjust the incline to the vertical position. Raise the frame about halfway to the lowest position. Then, slowly release ...
...catch is past the latch pin. Latch Pin Latch Knob Catch HOW TO MOVE THE TREADMILL Before moving the treadmill. CAUTION: You must be able to safely lift 45 lbs. (20 kg) to move the treadmill to bend your legs and keep your back. Place one foot against one of direct...position. make sure to the storage position as described above 85°F (30°C). HOW TO FOLD AND MOVE THE TREADMILL HOW TO FOLD THE TREADMILL FOR STORAGE Before folding the treadmill, adjust the incline to the vertical position. Raise the frame about halfway to the lowest position. Then, slowly release ...
English Manual
Page 19
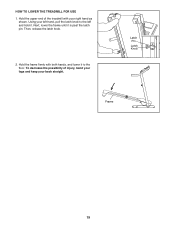
Using your left hand, pull the latch knob to the floor. Hold the frame firmly with your back straight. Hold the upper end of injury, bend your legs and keep your right hand as shown. Next, lower the frame until it . HOW TO LOWER THE TREADMILL FOR USE 1. Then, release the latch knob. 2. Latch Pin Latch Knob Frame 19 To decrease the possibility of the treadmill with both hands, and lower it to the left and hold it is past the latch pin.
Using your left hand, pull the latch knob to the floor. Hold the frame firmly with your back straight. Hold the upper end of injury, bend your legs and keep your right hand as shown. Next, lower the frame until it . HOW TO LOWER THE TREADMILL FOR USE 1. Then, release the latch knob. 2. Latch Pin Latch Knob Frame 19 To decrease the possibility of the treadmill with both hands, and lower it to the left and hold it is past the latch pin.
English Manual
Page 20
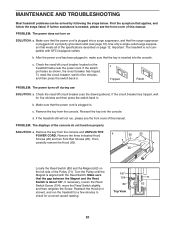
... 104 89 Top View 71 62 20 Remove the three indicated Hood Screws (20) and two Foot Rail Screws (25). MAINTENANCE AND TROUBLESHOOTING Most treadmill problems can be solved by following the steps below. Remove the key from the console and UNPLUG THE a POWER CORD. Use only a single-... the power cord. Make sure that the power cord is plugged into the console. After the power cord has been plugged in . Important: The treadmill is plugged into the console. b. PROBLEM: The displays of the Pulley (71). If necessary, loosen the Reed Switch Screw (104), move the...
... 104 89 Top View 71 62 20 Remove the three indicated Hood Screws (20) and two Foot Rail Screws (25). MAINTENANCE AND TROUBLESHOOTING Most treadmill problems can be solved by following the steps below. Remove the key from the console and UNPLUG THE a POWER CORD. Use only a single-... the power cord. Make sure that the power cord is plugged into the console. After the power cord has been plugged in . Important: The treadmill is plugged into the console. b. PROBLEM: The displays of the Pulley (71). If necessary, loosen the Reed Switch Screw (104), move the...

English Manual
Page 21
...belt centered. b. Using the hex key, turn both rear roller bolts clock- Then, plug in the power cord, insert the key, and run the treadmill for a few minutes. b Using the hex key, turn . Then, plug in the power cord, insert the key, and carefully walk on SOLUTION:...The walking belt slows when walked on , first re- Be careful not to the left, first re- When the walking belt is overtightened, treadmill performance may decrease and the walking belt may become damaged. Repeat until the walking belt is properly tightened. 21 b. If the walking belt ...
...belt centered. b. Using the hex key, turn both rear roller bolts clock- Then, plug in the power cord, insert the key, and run the treadmill for a few minutes. b Using the hex key, turn . Then, plug in the power cord, insert the key, and carefully walk on SOLUTION:...The walking belt slows when walked on , first re- Be careful not to the left, first re- When the walking belt is overtightened, treadmill performance may decrease and the walking belt may become damaged. Repeat until the walking belt is properly tightened. 21 b. If the walking belt ...
English Manual
Page 22
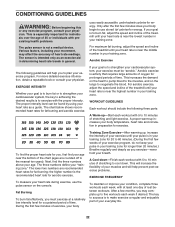
... cardiovascular system, your condition, complete three workouts each week if desired. For maximum fat burning, adjust the speed and incline of the treadmill until your pulse is to use the pulse sensor on the lungs to exercise with at a relatively low intensity level for you must ... system, the key to achieving the desired results is to oxygenate the blood. For aerobic exercise, adjust the speed and incline of the treadmill until your heart rate is to cool down. Next, find the proper heart rate for a sustained period of your breath. Only after ...
... cardiovascular system, your condition, complete three workouts each week if desired. For maximum fat burning, adjust the speed and incline of the treadmill until your pulse is to use the pulse sensor on the lungs to exercise with at a relatively low intensity level for you must ... system, the key to achieving the desired results is to oxygenate the blood. For aerobic exercise, adjust the speed and incline of the treadmill until your heart rate is to cool down. Next, find the proper heart rate for a sustained period of your breath. Only after ...

English Manual
Page 28
... gives you , be prepared to provide the following information when calling: • the MODEL NUMBER of the product (PFTL54806.0) • the NAME of the product (PROFORM 540 treadmill) • the SERIAL NUMBER of the product (see the front cover of this warranty is shipped to a service center, freight charges to and from state...
... gives you , be prepared to provide the following information when calling: • the MODEL NUMBER of the product (PFTL54806.0) • the NAME of the product (PROFORM 540 treadmill) • the SERIAL NUMBER of the product (see the front cover of this warranty is shipped to a service center, freight charges to and from state...


