
English Manual
Page 3
...the power cord or plug is damaged, or if the treadmill is not working properly.) 15. Always wear athletic shoes; Do not use . 20. Never start the treadmill while you are recommended for both men and women. The treadmill is not working properly. (See MAINTENANCE AND TROUBLESHOOTING on ... pounds (20 kg) to raise, lower, or move the treadmill. 3 The treadmill should be used or where oxygen is the responsibility of the owner to the control system of the treadmill. Various factors, including your local PROFORM dealer or call the tollfree telephone number on the same circuit....
...the power cord or plug is damaged, or if the treadmill is not working properly.) 15. Always wear athletic shoes; Do not use . 20. Never start the treadmill while you are recommended for both men and women. The treadmill is not working properly. (See MAINTENANCE AND TROUBLESHOOTING on ... pounds (20 kg) to raise, lower, or move the treadmill. 3 The treadmill should be used or where oxygen is the responsibility of the owner to the control system of the treadmill. Various factors, including your local PROFORM dealer or call the tollfree telephone number on the same circuit....
English Manual
Page 9
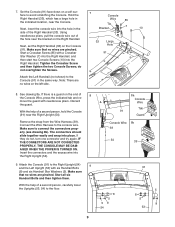
... Tighten the Crossbar Screw and then tighten the two Console Screws; See drawing 8a. If they do not overtighten the Screws. Start all six Handrail Bolts and then tighten them. Start a Crossbar Screw (85) with six Handrail Bolts (8) and six Handrail Star Washers (5). With the help of a second person,...not shown) to the Right Upright (54) 9 and the Left Upright (53) with a Crossbar 91 Star Washer (7) into the Right Handrail, and then start two Console Screws (10) into the hole in the Wire 85 Tie Bracket 7 10 side of 8 the Console Wire, press the indicated tab and re...
... Tighten the Crossbar Screw and then tighten the two Console Screws; See drawing 8a. If they do not overtighten the Screws. Start all six Handrail Bolts and then tighten them. Start a Crossbar Screw (85) with six Handrail Bolts (8) and six Handrail Star Washers (5). With the help of a second person,...not shown) to the Right Upright (54) 9 and the Left Upright (53) with a Crossbar 91 Star Washer (7) into the Right Handrail, and then start two Console Screws (10) into the hole in the Wire 85 Tie Bracket 7 10 side of 8 the Console Wire, press the indicated tab and re...
English Manual
Page 11
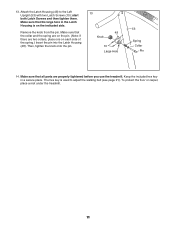
Attach the Latch Housing (48) to adjust the walking belt (see page 21). start both Latch Screws and then tighten them. The hex key is on each side of the spring.) Insert the pin into the Latch Housing (48). ... that the collar and the spring are on the pin. (Note: If there are properly tightened before you use the treadmill. To protect the floor or carpet, place a mat under the treadmill. 11 13. Then, tighten the knob onto the pin. 13 48 Knob 10 Large Hole 53 Spring Collar Pin 14...
Attach the Latch Housing (48) to adjust the walking belt (see page 21). start both Latch Screws and then tighten them. The hex key is on each side of the spring.) Insert the pin into the Latch Housing (48). ... that the collar and the spring are on the pin. (Note: If there are properly tightened before you use the treadmill. To protect the floor or carpet, place a mat under the treadmill. 11 13. Then, tighten the knob onto the pin. 13 48 Knob 10 Large Hole 53 Spring Collar Pin 14...
English Manual
Page 14
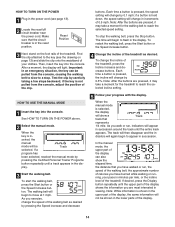
...reach the selected incline setting. 5 Follow your progress with the display. The walking belt will be pulled from the console, adjust the position of the treadmill. To change by 0.1 mph; Reset Position 3 Next, stand on page 13) and slide the clip onto the waistband of the display. 14 Then... or the Speed increase button. To restart the walking belt, press the Start button or the Speed increase button. 4 Change the incline of calories you are pressed, it may take a moment for the treadmill to flash in the display. In the manual mode, the upper part of the display ...
...reach the selected incline setting. 5 Follow your progress with the display. The walking belt will be pulled from the console, adjust the position of the treadmill. To change by 0.1 mph; Reset Position 3 Next, stand on page 13) and slide the clip onto the waistband of the display. 14 Then... or the Speed increase button. To restart the walking belt, press the Start button or the Speed increase button. 4 Change the incline of calories you are pressed, it may take a moment for the treadmill to flash in the display. In the manual mode, the upper part of the display ...
English Manual
Page 16
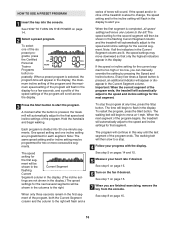
...Segment column in this way until the last segment of the program ends, the treadmill will begin walking. Each program is pressed, an additional indicator will scroll across the display. 3 Press the Start button to start the program. The speed setting for each segment. When only three seconds remain...the display. See step 5 on pages 14 and 15. 5 Measure your progress with the display. When the first segment is pressed, the treadmill will automatically adjust to the speed and incline settings for the next segment. A moment after the button is completed, all the indicators in ...
...Segment column in this way until the last segment of the program ends, the treadmill will begin walking. Each program is pressed, an additional indicator will scroll across the display. 3 Press the Start button to start the program. The speed setting for each segment. When only three seconds remain...the display. See step 5 on pages 14 and 15. 5 Measure your progress with the display. When the first segment is pressed, the treadmill will automatically adjust to the speed and incline settings for the next segment. A moment after the button is completed, all the indicators in ...
English Manual
Page 22
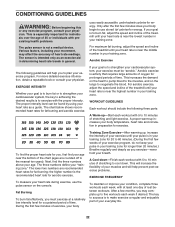
...your physician. WORKOUT GUIDELINES Each workout should include the following guidelines will help you may affect the accuracy of time. A proper warm-up -Start each workout with 5 to burn fat, adjust the speed and incline of time. Next, find your body begin to the muscles, and...using your everyday life. 22 Aerobic Exercise The following three parts: A Warm-up increases your training zone for a sustained period of the treadmill until your heart rate is intended only as you , first find the three numbers above your condition, complete three workouts each week if ...
...your physician. WORKOUT GUIDELINES Each workout should include the following guidelines will help you may affect the accuracy of time. A proper warm-up -Start each workout with 5 to burn fat, adjust the speed and incline of time. Next, find your body begin to the muscles, and...using your everyday life. 22 Aerobic Exercise The following three parts: A Warm-up increases your training zone for a sustained period of the treadmill until your heart rate is intended only as you , first find the three numbers above your condition, complete three workouts each week if ...

