

English Manual
Page 1
.... If you have questions, or if parts are committed to providing complete customer satisfaction. MST ON THE WEB: www.proformservice.com USER'S MANUAL CAUTION Read all precautions and instructions in this manual before using this manual for future reference. Save this equipment. Serial Number Decal QUESTIONS? Model No. As a manufacturer, we are damaged or missing, PLEASE CONTACT OUR CUSTOMER SERVICE DEPARTMENT DIRECTLY.
.... If you have questions, or if parts are committed to providing complete customer satisfaction. MST ON THE WEB: www.proformservice.com USER'S MANUAL CAUTION Read all precautions and instructions in this manual before using this manual for future reference. Save this equipment. Serial Number Decal QUESTIONS? Model No. As a manufacturer, we are damaged or missing, PLEASE CONTACT OUR CUSTOMER SERVICE DEPARTMENT DIRECTLY.
English Manual
Page 3
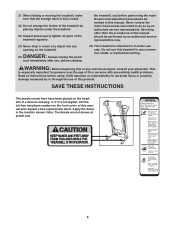
... TURN ON THE POWER on page 14). 7. The pulse sensor is turned off. Adjust the speed in small increments to persons, read the following important precautions and information before using the treadmill (see your local PROFORM dealer or call the tollfree telephone number on the front cover of clearance behind it and two feet on the walking belt. Always remove the key and unplug the power cord when the treadmill...
... TURN ON THE POWER on page 14). 7. The pulse sensor is turned off. Adjust the speed in small increments to persons, read the following important precautions and information before using the treadmill (see your local PROFORM dealer or call the tollfree telephone number on the front cover of clearance behind it and two feet on the walking belt. Always remove the key and unplug the power cord when the treadmill...
English Manual
Page 4
... this manual and request a free replacement decal. Never drop or insert any object into any opening on the front cover of the treadmill by an authorized service representative only. 24. WARNING: Before beginning this manual. Note: The decals are not shown at actual size. 50% 4 the treadmill, and before performing the maintenance and adjustment procedures described in -home use , before using. Never remove the motor hood unless instructed to...
... this manual and request a free replacement decal. Never drop or insert any object into any opening on the front cover of the treadmill by an authorized service representative only. 24. WARNING: Before beginning this manual. Note: The decals are not shown at actual size. 50% 4 the treadmill, and before performing the maintenance and adjustment procedures described in -home use , before using. Never remove the motor hood unless instructed to...
English Manual
Page 5
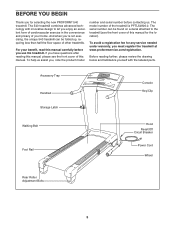
... form of cardiovascular exercise in the convenience and privacy of your benefit, read this manual for the location). The 540 treadmill combines advanced technology with the labeled parts. If you must register the treadmill at www.proformservice.com/registration. To avoid a registration fee for selecting the new PROFORM® 540 treadmill. Accessory Tray Handrail Storage Latch Console Key/Clip Walking Belt Foot Rail Hood Reset/Off Circuit Breaker Power Cord Wheel Rear Roller Adjustment Bolts...
... form of cardiovascular exercise in the convenience and privacy of your benefit, read this manual for the location). The 540 treadmill combines advanced technology with the labeled parts. If you must register the treadmill at www.proformservice.com/registration. To avoid a registration fee for selecting the new PROFORM® 540 treadmill. Accessory Tray Handrail Storage Latch Console Key/Clip Walking Belt Foot Rail Hood Reset/Off Circuit Breaker Power Cord Wheel Rear Roller Adjustment Bolts...
English Manual
Page 6
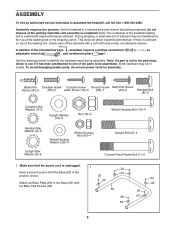
... the walking belt, simply wipe off the lubricant with a soft cloth and a mild, non-abrasive cleaner. This does not affect treadmill performance. Note: If a part is lubricant on top of lubricant may be included. do not use power tools for assembly. Assembly requires two persons. Base Pad Crossbar Screw Console Screw/ Ground Screw Belly Pan Screw Screw (26)-6 (85)-2 Latch Screw (10)-6 (84)-1 (20)-2 Handrail Bolt (8)-6 Crossbar Star Washer (7)-2 Upright Washer...
... the walking belt, simply wipe off the lubricant with a soft cloth and a mild, non-abrasive cleaner. This does not affect treadmill performance. Note: If a part is lubricant on top of lubricant may be included. do not use power tools for assembly. Assembly requires two persons. Base Pad Crossbar Screw Console Screw/ Ground Screw Belly Pan Screw Screw (26)-6 (85)-2 Latch Screw (10)-6 (84)-1 (20)-2 Handrail Bolt (8)-6 Crossbar Star Washer (7)-2 Upright Washer...
English Manual
Page 7
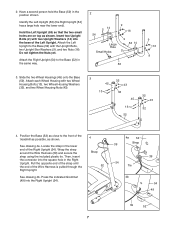
... of the Right Upright (54). Insert two Upright Bolts (2) with two Upright Washers (14) into the square hole in the lower end of the treadmill as possible, as shown. Locate the strap in the Right Upright. See drawing 4b. Position the Base (52) as shown. Press the indicated Grommet (49) into the Right Upright (54). 4 Strap 52 4a 54 Strap 39 54 Tie...
... of the Right Upright (54). Insert two Upright Bolts (2) with two Upright Washers (14) into the square hole in the lower end of the treadmill as possible, as shown. Locate the strap in the Right Upright. See drawing 4b. Position the Base (52) as shown. Press the indicated Grommet (49) into the Right Upright (54). 4 Strap 52 4a 54 Strap 39 54 Tie...
English Manual
Page 9
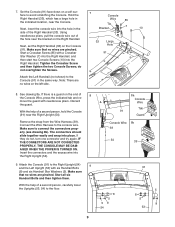
... Next, set the Right Handrail (33) on a soft sur- 7 face to the console wire. Remove the strap from the Wire Harness (39). Make sure that no wires are pinched. See drawing 8a. Start a Crossbar Screw (85) with needlenose pliers. Connect the Wire Harness to avoid scratching the Console. IF THE CONNECTORS ARE NOT CONNECTED PROPERLY, THE CONSOLE MAY BE DAMAGED WHEN THE POWER IS TURNED ON...
... Next, set the Right Handrail (33) on a soft sur- 7 face to the console wire. Remove the strap from the Wire Harness (39). Make sure that no wires are pinched. See drawing 8a. Start a Crossbar Screw (85) with needlenose pliers. Connect the Wire Harness to avoid scratching the Console. IF THE CONNECTORS ARE NOT CONNECTED PROPERLY, THE CONSOLE MAY BE DAMAGED WHEN THE POWER IS TURNED ON...
English Manual
Page 11
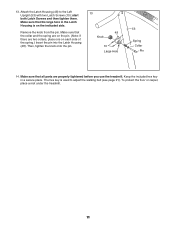
Then, tighten the knob onto the pin. 13 48 Knob 10 Large Hole 53 Spring Collar Pin 14. Attach the Latch Housing (48) to adjust the walking belt (see page 21). Remove the knob from the pin. Make sure that the collar and the spring are on the pin. (Note: If there are properly tightened before you use the treadmill. The hex key is on each side of the...
Then, tighten the knob onto the pin. 13 48 Knob 10 Large Hole 53 Spring Collar Pin 14. Attach the Latch Housing (48) to adjust the walking belt (see page 21). Remove the knob from the pin. Make sure that the collar and the spring are on the pin. (Note: If there are properly tightened before you use the treadmill. The hex key is on each side of the...
English Manual
Page 12
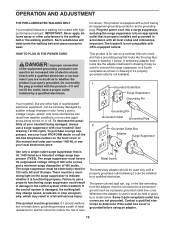
... treadmill (see your treadmill being turned on the surge suppressor to use a surge suppressor with GFCI-equipped outlets. tric shock. HOW TO PLUG IN THE POWER CORD DANGER: Improper connection of the equipment-grounding conductor can result from weather conditions or from the adapter must have a proper outlet installed by a metal screw. OPERATION AND ADJUSTMENT THE PRE-LUBRICATED WALKING BELT Your treadmill features a walking belt coated with highperformance lubricant...
... treadmill (see your treadmill being turned on the surge suppressor to use a surge suppressor with GFCI-equipped outlets. tric shock. HOW TO PLUG IN THE POWER CORD DANGER: Improper connection of the equipment-grounding conductor can result from weather conditions or from the adapter must have a proper outlet installed by a metal screw. OPERATION AND ADJUSTMENT THE PRE-LUBRICATED WALKING BELT Your treadmill features a walking belt coated with highperformance lubricant...
English Manual
Page 13
... a button. The first time the treadmill is a sheet of clear plastic on the console, remove the plastic. To use a preset program, see page 17 for information about the optional chest pulse sensor). The console also offers six preset programs that automatically control the speed and incline of the treadmill while guiding you exercise, the console will display continuous exercise feedback. When you select the manual mode of the console, you can even measure your workouts...
... a button. The first time the treadmill is a sheet of clear plastic on the console, remove the plastic. To use a preset program, see page 17 for information about the optional chest pulse sensor). The console also offers six preset programs that automatically control the speed and incline of the treadmill while guiding you exercise, the console will display continuous exercise feedback. When you select the manual mode of the console, you can even measure your workouts...
English Manual
Page 14
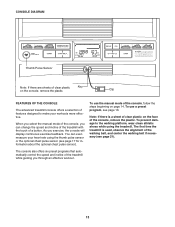
... a Track track that represents 1/4 mile. See HOW TO TURN ON THE POWER above. 2 Select the manual mode. Each time a button is selected, the display will change by 0.1 mph; To restart the walking belt, press the Start button or the Speed increase button. 4 Change the incline of the treadmill as desired by pressing the Certified Personal Trainer Programs button repeatedly until the upper part of the display shows the information you walk or run , the speed of the walking belt, the approximate number...
... a Track track that represents 1/4 mile. See HOW TO TURN ON THE POWER above. 2 Select the manual mode. Each time a button is selected, the display will change by 0.1 mph; To restart the walking belt, press the Start button or the Speed increase button. 4 Change the incline of the treadmill as desired by pressing the Certified Personal Trainer Programs button repeatedly until the upper part of the display shows the information you walk or run , the speed of the walking belt, the approximate number...
English Manual
Page 15
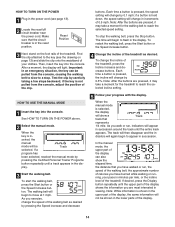
... optional chest pulse sensor. The incline must be too high or too low, or if your heart rate is on when the walking belt stops, the fan will automatically turn off " position and unplug the power cord. 15 Note: If you are finished using the treadmill, switch the reset/off circuit breaker to stand still while measuring your pace in the "demo" mode. Note: When a program is selected, the display...
... optional chest pulse sensor. The incline must be too high or too low, or if your heart rate is on when the walking belt stops, the fan will automatically turn off " position and unplug the power cord. 15 Note: If you are finished using the treadmill, switch the reset/off circuit breaker to stand still while measuring your pace in the "demo" mode. Note: When a program is selected, the display...
English Manual
Page 16
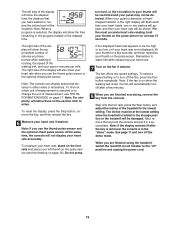
... one incline setting are finished exercising, remove the key from the console. Every few seconds, and a profile of the speed settings of the treadmill is pressed, an additional indicator will sound. The walking belt will begin walking. The walking belt will automatically adjust to the right. To restart the program, press the Start button. See step 5 on page 15. 16 See step 8 on pages 14 and 15. 5 Measure your progress with the display...
... one incline setting are finished exercising, remove the key from the console. Every few seconds, and a profile of the speed settings of the treadmill is pressed, an additional indicator will sound. The walking belt will begin walking. The walking belt will automatically adjust to the right. To restart the program, press the Start button. See step 5 on page 15. 16 See step 8 on pages 14 and 15. 5 Measure your progress with the display...
English Manual
Page 17
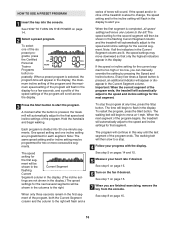
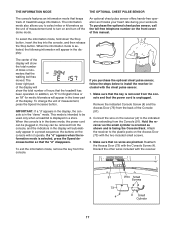
... toll-free telephone number on and turn on the front cover of this manual. Remove the indicated Console Screw (4) and the Access Door (73) from the console and that the power cord is displayed in a preset sequence; THE INFORMATION MODE THE OPTIONAL CHEST PULSE SENSOR The console features an information mode that keeps track of measurement, press the Speed increase button. To change the unit of treadmill usage information. To select the information mode, hold down the Stop button, insert the key...
... toll-free telephone number on and turn on the front cover of this manual. Remove the indicated Console Screw (4) and the Access Door (73) from the console and that the power cord is displayed in a preset sequence; THE INFORMATION MODE THE OPTIONAL CHEST PULSE SENSOR The console features an information mode that keeps track of measurement, press the Speed increase button. To change the unit of treadmill usage information. To select the information mode, hold down the Stop button, insert the key...
English Manual
Page 18
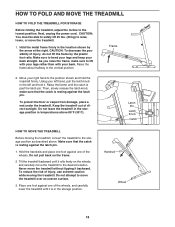
... while moving the treadmill, convert the treadmill to the desired location. Move your back straight. Latch Pin Latch Knob Catch HOW TO MOVE THE TREADMILL Before moving the treadmill. Next, unplug the power cord. To reduce the risk of the wheels, and carefully lower the treadmill until it . CAUTION: To decrease the possibility of direct sunlight. HOW TO FOLD AND MOVE THE TREADMILL HOW TO FOLD THE TREADMILL FOR STORAGE Before folding the treadmill, adjust the incline to...
... while moving the treadmill, convert the treadmill to the desired location. Move your back straight. Latch Pin Latch Knob Catch HOW TO MOVE THE TREADMILL Before moving the treadmill. Next, unplug the power cord. To reduce the risk of the wheels, and carefully lower the treadmill until it . CAUTION: To decrease the possibility of direct sunlight. HOW TO FOLD AND MOVE THE TREADMILL HOW TO FOLD THE TREADMILL FOR STORAGE Before folding the treadmill, adjust the incline to...
English Manual
Page 20
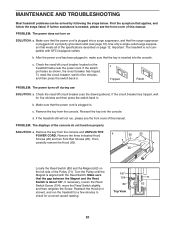
... Reed Switch. Make sure that the power cord is needed, please see the drawing above). If the circuit breaker has tripped, wait for a correct speed reading. 1/8" 104 89 Top View 71 62 20 MAINTENANCE AND TROUBLESHOOTING Most treadmill problems can be solved by following the steps below. Check the reset/off circuit breaker located on SOLUTION: a. Check the reset/off during use SOLUTION: a. Reinsert the key...
... Reed Switch. Make sure that the power cord is needed, please see the drawing above). If the circuit breaker has tripped, wait for a correct speed reading. 1/8" 104 89 Top View 71 62 20 MAINTENANCE AND TROUBLESHOOTING Most treadmill problems can be solved by following the steps below. Check the reset/off circuit breaker located on SOLUTION: a. Check the reset/off during use SOLUTION: a. Reinsert the key...

English Manual
Page 21
... walking belt centered. PROBLEM: The walking belt is correctly tightened, you should be able to lift each edge of the specifications described on SOLUTION: a. a Using the hex key, turn . b Using the hex key, turn both rear roller bolts counterclockwise, 1/4 of the walking belt 2 to the right, turn the left rear roller bolt clock- When the walking belt is centered. ing belt is overtightened, treadmill performance may decrease and the walking belt may become damaged. move the key and UNPLUG THE POWER CORD...
... walking belt centered. PROBLEM: The walking belt is correctly tightened, you should be able to lift each edge of the specifications described on SOLUTION: a. a Using the hex key, turn . b Using the hex key, turn both rear roller bolts counterclockwise, 1/4 of the walking belt 2 to the right, turn the left rear roller bolt clock- When the walking belt is centered. ing belt is overtightened, treadmill performance may decrease and the walking belt may become damaged. move the key and UNPLUG THE POWER CORD...
English Manual
Page 22
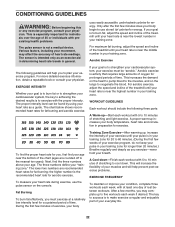
The pulse sensor is to cool down -Finish each workout with 5 to exercise with the proper intensity. For maximum fat burning, adjust the speed and incline of the treadmill until your heart rate is near the middle number in your breath. The chart below shows recommended heart rates for aerobic exercise. If your goal is near the highest number in your exercise must exercise at least one day of...
The pulse sensor is to cool down -Finish each workout with 5 to exercise with the proper intensity. For maximum fat burning, adjust the speed and incline of the treadmill until your heart rate is near the middle number in your breath. The chart below shows recommended heart rates for aerobic exercise. If your goal is near the highest number in your exercise must exercise at least one day of...
English Manual
Page 23
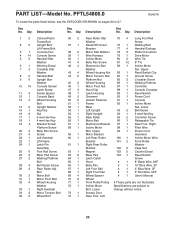
... 1 Walking Platform 46 1 Motor Pivot Nut 87 1 Controller 47 3 Hood Clip 88 1 Console Crossbar 48 1 Latch Housing 89 1 Reed Switch 49 2 Grommet 90 1 Power Cord 50 2 Isolator Fastener 91 1 Console 51 1 Frame 92 1 Incline Motor 52 1 Base Nut, Lower 53 1 Left Upright 93 2 Belt Guide 54 1 Right Upright 94 1 5 mm Hex Key 55 1 Rear Roller 95 2 Controller Screw 56 1 Motor Belt 96 1 Releasable Tie 57 1 Electronics Bracket 97 1 Rear Foot, Right 58 1 Incline Motor 98 1 Filter Wire Bolt, Upper 99 1 Power Cord...
... 1 Walking Platform 46 1 Motor Pivot Nut 87 1 Controller 47 3 Hood Clip 88 1 Console Crossbar 48 1 Latch Housing 89 1 Reed Switch 49 2 Grommet 90 1 Power Cord 50 2 Isolator Fastener 91 1 Console 51 1 Frame 92 1 Incline Motor 52 1 Base Nut, Lower 53 1 Left Upright 93 2 Belt Guide 54 1 Right Upright 94 1 5 mm Hex Key 55 1 Rear Roller 95 2 Controller Screw 56 1 Motor Belt 96 1 Releasable Tie 57 1 Electronics Bracket 97 1 Rear Foot, Right 58 1 Incline Motor 98 1 Filter Wire Bolt, Upper 99 1 Power Cord...
English Manual
Page 28
... information when calling: • the MODEL NUMBER of the product (PFTL54806.0) • the NAME of the product (PROFORM 540 treadmill) • the SERIAL NUMBER of the product (see the front cover of this manual) • the KEY NUMBER and DESCRIPTION of the desired part(s) (see the front cover of this product to the terms set forth above limitation may also have other warranty beyond that specifically set forth herein. ICON...
... information when calling: • the MODEL NUMBER of the product (PFTL54806.0) • the NAME of the product (PROFORM 540 treadmill) • the SERIAL NUMBER of the product (see the front cover of this manual) • the KEY NUMBER and DESCRIPTION of the desired part(s) (see the front cover of this product to the terms set forth above limitation may also have other warranty beyond that specifically set forth herein. ICON...

