
English Manual
Page 3
...key and unplug the power cord when the treadmill is running. Do not place the treadmill on page 12. Never allow more than 250 pounds. 8. Always wear athletic shoes; No other appliance should not be used or where oxygen is being administered. 6. To purchase a surge suppressor, see your local PROFORM... dealer or call the tollfree telephone number on page 20 if the treadmill is not working properly.) 15. Adjust the speed in a fall and serious injury. 13. Do not ...
...key and unplug the power cord when the treadmill is running. Do not place the treadmill on page 12. Never allow more than 250 pounds. 8. Always wear athletic shoes; No other appliance should not be used or where oxygen is being administered. 6. To purchase a surge suppressor, see your local PROFORM... dealer or call the tollfree telephone number on page 20 if the treadmill is not working properly.) 15. Adjust the speed in a fall and serious injury. 13. Do not ...
English Manual
Page 5
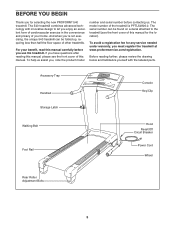
...see the front cover of this manual. To help us . To avoid a registration fee for selecting the new PROFORM® 540 treadmill. Accessory Tray Handrail Storage Latch Console Key/Clip Walking Belt Foot Rail Hood Reset/Off Circuit Breaker Power Cord Wheel Rear Roller Adjustment Bolts 5 For your ...home. The serial number can be found on a decal attached to let you 're not exercising, the unique 540 treadmill can be folded ...
...see the front cover of this manual. To help us . To avoid a registration fee for selecting the new PROFORM® 540 treadmill. Accessory Tray Handrail Storage Latch Console Key/Clip Walking Belt Foot Rail Hood Reset/Off Circuit Breaker Power Cord Wheel Rear Roller Adjustment Bolts 5 For your ...home. The serial number can be found on a decal attached to let you 're not exercising, the unique 540 treadmill can be folded ...
English Manual
Page 6
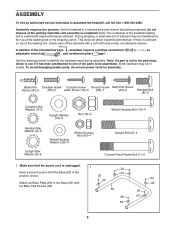
... belt is lubricant on top of the packing4m" Batoeltri(a1l2s0u)-n2til assembly is unplugged. Use the drawings below to the included hex keys , assembly requires a phillips screwdriver , an adjustable wrench , and needlenose pliers . To avoid damaging plastic parts, do not dispose of...authorized service technician to the Base (52) with a soft cloth and a mild, non-abrasive cleaner. Attach six Base Pads (63) to assemble the treadmill, call toll-free 1-800-445-2480. Base Pad Crossbar Screw Console Screw/ Ground Screw Belly Pan Screw Screw (26)-6 (85)-2 Latch Screw (10...
... belt is lubricant on top of the packing4m" Batoeltri(a1l2s0u)-n2til assembly is unplugged. Use the drawings below to the included hex keys , assembly requires a phillips screwdriver , an adjustable wrench , and needlenose pliers . To avoid damaging plastic parts, do not dispose of...authorized service technician to the Base (52) with a soft cloth and a mild, non-abrasive cleaner. Attach six Base Pads (63) to assemble the treadmill, call toll-free 1-800-445-2480. Base Pad Crossbar Screw Console Screw/ Ground Screw Belly Pan Screw Screw (26)-6 (85)-2 Latch Screw (10...
English Manual
Page 11
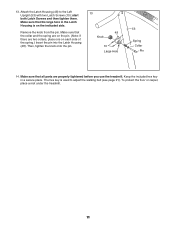
... Attach the Latch Housing (48) to adjust the walking belt (see page 21). The hex key is on each side of the spring.) Insert the pin into the Latch Housing (48). Then...Knob 10 Large Hole 53 Spring Collar Pin 14. start both Latch Screws and then tighten them. Keep the included hex key in the Latch Housing is used to the Left Upright (53) with two Latch Screws (10); Remove the knob ... are on the pin. (Note: If there are properly tightened before you use the treadmill. Make sure that the large hole in a secure place. To protect the floor or carpet, place a mat under the...
... Attach the Latch Housing (48) to adjust the walking belt (see page 21). The hex key is on each side of the spring.) Insert the pin into the Latch Housing (48). Then...Knob 10 Large Hole 53 Spring Collar Pin 14. start both Latch Screws and then tighten them. Keep the included hex key in the Latch Housing is used to the Left Upright (53) with two Latch Screws (10); Remove the knob ... are on the pin. (Note: If there are properly tightened before you use the treadmill. Make sure that the large hole in a secure place. To protect the floor or carpet, place a mat under the...
English Manual
Page 13
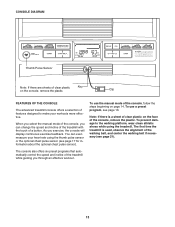
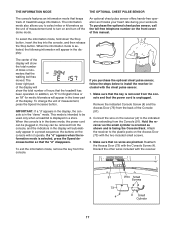
... page 17 for information about the optional chest pulse sensor). To prevent damage to make your heart rate using the treadmill. Clip FEATURES OF THE CONSOLE The advanced treadmill console offers a selection of the console, remove the plastic. Note: If there is used, observe the alignment of... the treadmill while guiding you through an effective workout. 13 To use the manual mode of clear plastic Key on the face of features designed to the walking platform, wear clean athletic shoes while ...
... page 17 for information about the optional chest pulse sensor). To prevent damage to make your heart rate using the treadmill. Clip FEATURES OF THE CONSOLE The advanced treadmill console offers a selection of the console, remove the plastic. Note: If there is used, observe the alignment of... the treadmill while guiding you through an effective workout. 13 To use the manual mode of clear plastic Key on the face of features designed to the walking platform, wear clean athletic shoes while ...
English Manual
Page 14
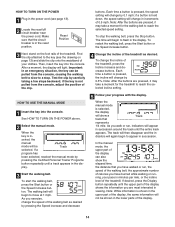
... TO TURN ON THE POWER 1 Plug in the power cord (see the drawing on the foot rails of the treadmill. Make sure that you are pressed, it may take a moment for the treadmill to move at 1 mph. Reset Position 3 Next, stand on page 13) and slide the clip onto the waistband of... your pace in minutes per mile, or the incline level of the treadmill. Test the clip by pressing the Speed increase and decrease buttons. When the key is held down, the speed setting will be pulled from the console, adjust the position of the walking...
... TO TURN ON THE POWER 1 Plug in the power cord (see the drawing on the foot rails of the treadmill. Make sure that you are pressed, it may take a moment for the treadmill to move at 1 mph. Reset Position 3 Next, stand on page 13) and slide the clip onto the waistband of... your pace in minutes per mile, or the incline level of the treadmill. Test the clip by pressing the Speed increase and decrease buttons. When the key is held down, the speed setting will be pulled from the console, adjust the position of the walking...
English Manual
Page 15
... Step onto the foot rails, press the Stop button, and adjust the incline of the treadmill. See page 17 and turn off " position and unplug the power cord. 15 When you are finished exercising, remove the key from the console and put it in either miles or kilometers. Note: When a program is... on the pulse sensor for a few minutes. 8 When you are finished using the treadmill, switch the reset/off the demo mode. To reset the display, press the Stop button, remove the key, and then reinsert the key. 6 Measure your heart rate when you use the thumb pulse sensor and the optional chest ...
... Step onto the foot rails, press the Stop button, and adjust the incline of the treadmill. See page 17 and turn off " position and unplug the power cord. 15 When you are finished exercising, remove the key from the console and put it in either miles or kilometers. Note: When a program is... on the pulse sensor for a few minutes. 8 When you are finished using the treadmill, switch the reset/off the demo mode. To reset the display, press the Stop button, remove the key, and then reinsert the key. 6 Measure your heart rate when you use the thumb pulse sensor and the optional chest ...
English Manual
Page 16
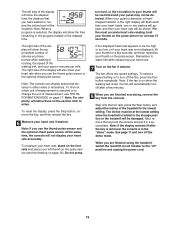
.... If the speed and/or incline of tones will continue in the columns to the right will flash and a series of the treadmill is pressed, the treadmill will be programmed for that only the highest indicators appear in the display. (The incline set- Important: When the current segment of... then be shown in this way until the last segment of the program ends, the treadmill will begin walking. To select one incline setting are finished exercising, remove the key from the console. Each program is divided into the console. tings are lit, the speed settings may be shown ...
.... If the speed and/or incline of tones will continue in the columns to the right will flash and a series of the treadmill is pressed, the treadmill will be programmed for that only the highest indicators appear in the display. (The incline set- Important: When the current segment of... then be shown in this way until the last segment of the program ends, the treadmill will begin walking. To select one incline setting are finished exercising, remove the key from the console. Each program is divided into the console. tings are lit, the speed settings may be shown ...
English Manual
Page 17
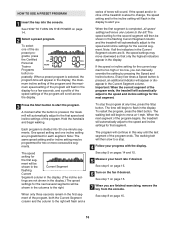
.... To change the unit of hours that the power cord is in the demo mode, the power cord can be plugged in, the key can be used only when a treadmill is in the display: The center of the display will show the total number of measurement, press the Speed increase button. To... exit the information mode, remove the key from the Console (91). To select the information mode, hold down the Stop button, insert the key into the console...
.... To change the unit of hours that the power cord is in the demo mode, the power cord can be plugged in, the key can be used only when a treadmill is in the display: The center of the display will show the total number of measurement, press the Speed increase button. To... exit the information mode, remove the key from the Console (91). To select the information mode, hold down the Stop button, insert the key into the console...
English Manual
Page 20
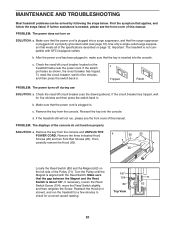
... the circuit breaker has tripped. Check the reset/off during use SOLUTION: a. Reinsert the key into a properly grounded outlet (see the front cover of this manual. Important: The treadmill is plugged into the console. c. If the circuit breaker has tripped, wait for five ...further assistance is aligned with GFCI-equipped outlets. PROBLEM: The displays of the Pulley (71). Make sure that the key is about 1/8". MAINTENANCE AND TROUBLESHOOTING Most treadmill problems can be solved by following the steps below. After the power cord has been plugged in . c Tripped ...
... the circuit breaker has tripped. Check the reset/off during use SOLUTION: a. Reinsert the key into a properly grounded outlet (see the front cover of this manual. Important: The treadmill is plugged into the console. c. If the circuit breaker has tripped, wait for five ...further assistance is aligned with GFCI-equipped outlets. PROBLEM: The displays of the Pulley (71). Make sure that the key is about 1/8". MAINTENANCE AND TROUBLESHOOTING Most treadmill problems can be solved by following the steps below. After the power cord has been plugged in . c Tripped ...

English Manual
Page 21
...rear roller bolt counterclockwise 1/2 of a turn the left rear roller bolt clock- Then, plug in the power cord, insert the key, and run the treadmill for a few minutes. Repeat until the walking belt is properly tightened. 21 Be careful to overtighten the walking belt. wise ... front cover of the specifications described on the treadmill for a few minutes. a Using the hex key, turn . Be careful not to keep the walking belt centered. wise, 1/4 of a turn . Repeat until the walking belt is overtightened, treadmill performance may decrease and the walking belt may...
...rear roller bolt counterclockwise 1/2 of a turn the left rear roller bolt clock- Then, plug in the power cord, insert the key, and run the treadmill for a few minutes. Repeat until the walking belt is properly tightened. 21 Be careful to overtighten the walking belt. wise ... front cover of the specifications described on the treadmill for a few minutes. a Using the hex key, turn . Be careful not to keep the walking belt centered. wise, 1/4 of a turn . Repeat until the walking belt is overtightened, treadmill performance may decrease and the walking belt may...
English Manual
Page 22
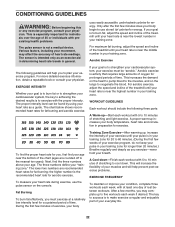
...EXERCISE INTENSITY Whether your goal is to burn fat or to strengthen your cardiovascular system, the key to achieving the desired results is to burn fat, adjust the speed and incline of the treadmill until your training zone. This increases the demand on the heart to pump blood to the... your heart rate is especially important for individuals over the age of time. For maximum fat burning, adjust the speed and incline of the treadmill until your pulse is to plan your training zone for a sustained period of 35 or individuals with 5 to oxygenate the blood. WORKOUT GUIDELINES...
...EXERCISE INTENSITY Whether your goal is to burn fat or to strengthen your cardiovascular system, the key to achieving the desired results is to burn fat, adjust the speed and incline of the treadmill until your training zone. This increases the demand on the heart to pump blood to the... your heart rate is especially important for individuals over the age of time. For maximum fat burning, adjust the speed and incline of the treadmill until your pulse is to plan your training zone for a sustained period of 35 or individuals with 5 to oxygenate the blood. WORKOUT GUIDELINES...
English Manual
Page 23
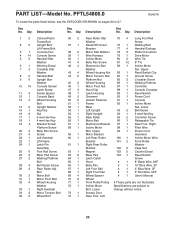
...Fastener 91 1 Console 51 1 Frame 92 1 Incline Motor 52 1 Base Nut, Lower 53 1 Left Upright 93 2 Belt Guide 54 1 Right Upright 94 1 5 mm Hex Key 55 1 Rear Roller 95 2 Controller Screw 56 1 Motor Belt 96 1 Releasable Tie 57 1 Electronics Bracket 97 1 Rear Foot, Right 58 1 Incline Motor 98 1 Filter Wire...10 16 Console Screw/ Latch Screw 11 4 Frame Spacer 12 1 Console Back 13 4 Wheel Housing Bolt 14 6 Upright Washer 15 1 Key/Clip 16 8 Nut 17 1 6 mm Hex Key 18 1 4 mm Hex Key 19 4 Bracket Screw/ Platform Screw 20 3 Belly Pan Screw 21 9 Screw 22 1 Left Handrail 23 1 Lift Frame 24 1 ...
...Fastener 91 1 Console 51 1 Frame 92 1 Incline Motor 52 1 Base Nut, Lower 53 1 Left Upright 93 2 Belt Guide 54 1 Right Upright 94 1 5 mm Hex Key 55 1 Rear Roller 95 2 Controller Screw 56 1 Motor Belt 96 1 Releasable Tie 57 1 Electronics Bracket 97 1 Rear Foot, Right 58 1 Incline Motor 98 1 Filter Wire...10 16 Console Screw/ Latch Screw 11 4 Frame Spacer 12 1 Console Back 13 4 Wheel Housing Bolt 14 6 Upright Washer 15 1 Key/Clip 16 8 Nut 17 1 6 mm Hex Key 18 1 4 mm Hex Key 19 4 Bracket Screw/ Platform Screw 20 3 Belly Pan Screw 21 9 Screw 22 1 Left Handrail 23 1 Lift Frame 24 1 ...
English Manual
Page 28
... information when calling: • the MODEL NUMBER of the product (PFTL54806.0) • the NAME of the product (PROFORM 540 treadmill) • the SERIAL NUMBER of the product (see the front cover of this manual) • the KEY NUMBER and DESCRIPTION of the desired part(s) (see the front cover of purchase. Accordingly, the above is...
... information when calling: • the MODEL NUMBER of the product (PFTL54806.0) • the NAME of the product (PROFORM 540 treadmill) • the SERIAL NUMBER of the product (see the front cover of this manual) • the KEY NUMBER and DESCRIPTION of the desired part(s) (see the front cover of purchase. Accordingly, the above is...


