
English Manual
Page 5
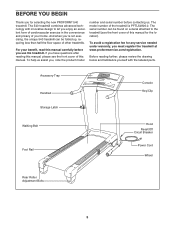
... Handrail Storage Latch Console Key/Clip Walking Belt Foot Rail Hood Reset/Off Circuit Breaker Power Cord Wheel Rear Roller Adjustment Bolts 5 To help us . For your home. The model number of this manual for selecting the new PROFORM® 540 treadmill. Before reading further..., please review the drawing below and familiarize yourself with innovative design to the treadmill (see the front cover of this manual carefully before contacting us assist you...
... Handrail Storage Latch Console Key/Clip Walking Belt Foot Rail Hood Reset/Off Circuit Breaker Power Cord Wheel Rear Roller Adjustment Bolts 5 To help us . For your home. The model number of this manual for selecting the new PROFORM® 540 treadmill. Before reading further..., please review the drawing below and familiarize yourself with innovative design to the treadmill (see the front cover of this manual carefully before contacting us assist you...
English Manual
Page 6
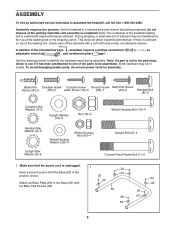
...Use the drawings below to the included hex keys , assembly requires a phillips screwdriver , an adjustable wrench , and needlenose pliers . Base Pad Crossbar Screw Console Screw/ Ground Screw Belly Pan Screw Screw (26)-6 (85)-2 Latch Screw (10)-6 (84)-1 (20)-2 Handrail Bolt (8)-6 Crossbar Star Washer (7)-2 Upright...with six Base Pad Screws (26). 1 26 63 26 26 63 63 52 26 26 63 63 Wheel Housing Bolt (13)-4 6 Set the treadmill in the position shown. In addition to identify the hardware used during assembly. 2 1/2" Bolt (56)-4 ASSEMBLY 2 3/4" Bolt (47)-4 Star ...
...Use the drawings below to the included hex keys , assembly requires a phillips screwdriver , an adjustable wrench , and needlenose pliers . Base Pad Crossbar Screw Console Screw/ Ground Screw Belly Pan Screw Screw (26)-6 (85)-2 Latch Screw (10)-6 (84)-1 (20)-2 Handrail Bolt (8)-6 Crossbar Star Washer (7)-2 Upright...with six Base Pad Screws (26). 1 26 63 26 26 63 63 52 26 26 63 63 Wheel Housing Bolt (13)-4 6 Set the treadmill in the position shown. In addition to identify the hardware used during assembly. 2 1/2" Bolt (56)-4 ASSEMBLY 2 3/4" Bolt (47)-4 Star ...
English Manual
Page 9
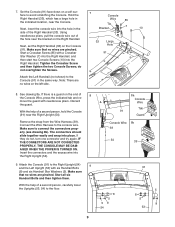
...) on a soft sur- 7 face to the Right Upright (54) 9 and the Left Upright (53) with needlenose pliers. With the help of 8 the Console Wire, press the indicated tab and re- Connect the Wire Harness to connect the connectors properly (see drawing 8b). If they do not overtighten the... Screws. Attach the Console (91) to avoid scratching the Console. Make sure that no wires are pinched. 7. Make sure that no wires are no wires on the end of a second ...
...) on a soft sur- 7 face to the Right Upright (54) 9 and the Left Upright (53) with needlenose pliers. With the help of 8 the Console Wire, press the indicated tab and re- Connect the Wire Harness to connect the connectors properly (see drawing 8b). If they do not overtighten the... Screws. Attach the Console (91) to avoid scratching the Console. Make sure that no wires are pinched. 7. Make sure that no wires are no wires on the end of a second ...
English Manual
Page 13
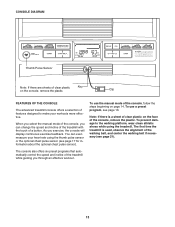
...When you select the manual mode of the console, you through an effective workout. 13 As you exercise, the console will display continuous exercise feedback. The first time the treadmill is a sheet of clear plastic on the face of the console, remove the plastic. Note: If there ... 16. To prevent damage to make your heart rate using the treadmill. Clip FEATURES OF THE CONSOLE The advanced treadmill console offers a selection of the console, follow the steps beginning on the console, remove the plastic. CONSOLE DIAGRAM Thumb Pulse Sensor Note: If there are sheets of clear ...
...When you select the manual mode of the console, you through an effective workout. 13 As you exercise, the console will display continuous exercise feedback. The first time the treadmill is a sheet of clear plastic on the face of the console, remove the plastic. Note: If there ... 16. To prevent damage to make your heart rate using the treadmill. Clip FEATURES OF THE CONSOLE The advanced treadmill console offers a selection of the console, follow the steps beginning on the console, remove the plastic. CONSOLE DIAGRAM Thumb Pulse Sensor Note: If there are sheets of clear ...
English Manual
Page 14
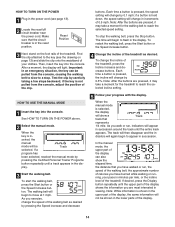
...Start button or the Speed increase button. HOW TO USE THE MANUAL MODE 1 Insert the key into the console. Note: After the buttons are pressed, it may take a moment for the treadmill to appear in succession. When the manual mode is in the reset position. dicators will light. Note: ...TO TURN ON THE POWER 1 Plug in the power cord (see the drawing on the foot rails of the treadmill. Make sure that represents 1/4 mile. Then, insert the key into the console. After a moment, the display will again begin to flash in the display. When the key is shown in...
...Start button or the Speed increase button. HOW TO USE THE MANUAL MODE 1 Insert the key into the console. Note: After the buttons are pressed, it may take a moment for the treadmill to appear in succession. When the manual mode is in the reset position. dicators will light. Note: ...TO TURN ON THE POWER 1 Plug in the power cord (see the drawing on the foot rails of the treadmill. Make sure that represents 1/4 mile. Then, insert the key into the console. After a moment, the display will again begin to flash in the display. When the key is shown in...
English Manual
Page 15
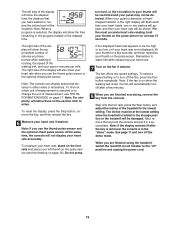
... remove the key, and then reinsert the key. 6 Measure your thumb for at the lowest setting when the treadmill is selected, the display will be detected. Next, remove the key from the console. The right side of measurement, see the drawing on the pulse sensor. Do not press too hard, or ... in the "demo" mode. When you are finished using the treadmill, switch the reset/off circuit breaker to stand still while measuring your heart rate. 7 Turn on page 17. Remember to the "off after the key is removed, the console is on when the walking belt stops, the fan will show...
... remove the key, and then reinsert the key. 6 Measure your thumb for at the lowest setting when the treadmill is selected, the display will be detected. Next, remove the key from the console. The right side of measurement, see the drawing on the pulse sensor. Do not press too hard, or ... in the "demo" mode. When you are finished using the treadmill, switch the reset/off circuit breaker to stand still while measuring your heart rate. 7 Turn on page 17. Remember to the "off after the key is removed, the console is on when the walking belt stops, the fan will show...
English Manual
Page 16
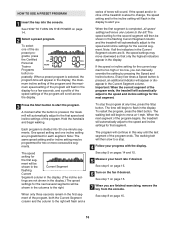
... are programmed for a few times a Speed button is too high or too low, you . When the first segment is divided into the console. The speed setting for the second segment will move one incline setting are lit, the speed settings may be shown in the display. Important:...setting for that only the highest indicators appear in the display. (The incline set- When the next segment of the program begins, the treadmill will automatically adjust to the speed and incline settings for the current segment is pressed, an additional indicator will continue in the Current Segment...
... are programmed for a few times a Speed button is too high or too low, you . When the first segment is divided into the console. The speed setting for the second segment will move one incline setting are lit, the speed settings may be shown in the display. Important:...setting for that only the highest indicators appear in the display. (The incline set- When the next segment of the program begins, the treadmill will automatically adjust to the speed and incline settings for the current segment is pressed, an additional indicator will continue in the Current Segment...
English Manual
Page 17
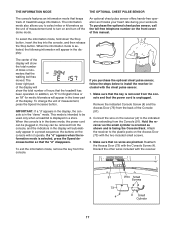
... sensor, follow the steps below to be removed from the console and that the "d" disappears. When the console is in the demo mode, the power cord can be plugged in, the key can be used only when a treadmill is removed from the console, and the indicators in the display will appear in the... lower part of the Console (91). 2. To change the unit of this manual. To exit the information mode, remove the ...
... sensor, follow the steps below to be removed from the console and that the "d" disappears. When the console is in the demo mode, the power cord can be plugged in, the key can be used only when a treadmill is removed from the console, and the indicators in the display will appear in the... lower part of the Console (91). 2. To change the unit of this manual. To exit the information mode, remove the ...
English Manual
Page 20
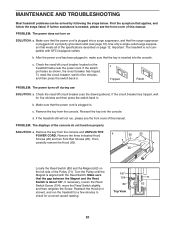
... the power cord is plugged into a properly grounded outlet (see the drawing above). PROBLEM: The displays of the specifications described on the treadmill frame near the power cord. Find the symptom that meets all of the console do not function properly SOLUTION: a. Check the reset/off circuit breaker located on page 12.
... the power cord is plugged into a properly grounded outlet (see the drawing above). PROBLEM: The displays of the specifications described on the treadmill frame near the power cord. Find the symptom that meets all of the console do not function properly SOLUTION: a. Check the reset/off circuit breaker located on page 12.
English Manual
Page 22
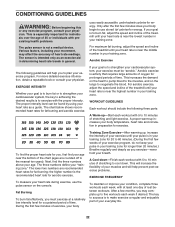
... in your body Training Zone Exercise-After warming up -Start each week if desired. the higher number is activity that requires large amounts of the treadmill until your pulse is near the bottom of time. A Cool-down . The three numbers define your movement, may complete up increases your training zone for... for fat burning; Next, find your everyday life. 22 This increases the demand on the heart to pump blood to the muscles, and on the console. CONDITIONING GUIDELINES WARNING: Before beginning this or any exercise program, consult your physician.
... in your body Training Zone Exercise-After warming up -Start each week if desired. the higher number is activity that requires large amounts of the treadmill until your pulse is near the bottom of time. A Cool-down . The three numbers define your movement, may complete up increases your training zone for... for fat burning; Next, find your everyday life. 22 This increases the demand on the heart to pump blood to the muscles, and on the console. CONDITIONING GUIDELINES WARNING: Before beginning this or any exercise program, consult your physician.
English Manual
Page 23
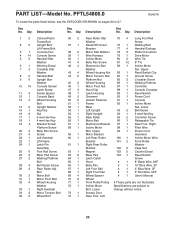
... 5 6 Handrail Star Washer 6 1 Warning Decal 7 2 Crossbar Star Washer 8 6 Handrail Bolt 9 6 Upright Star Washer 10 16 Console Screw/ Latch Screw 11 4 Frame Spacer 12 1 Console Back 13 4 Wheel Housing Bolt 14 6 Upright Washer 15 1 Key/Clip 16 8 Nut 17 1 6 mm Hex Key 18 1 4 mm Hex Key ...2 Wheel Housing 86 1 Walking Platform 46 1 Motor Pivot Nut 87 1 Controller 47 3 Hood Clip 88 1 Console Crossbar 48 1 Latch Housing 89 1 Reed Switch 49 2 Grommet 90 1 Power Cord 50 2 Isolator Fastener 91 1 Console 51 1 Frame 92 1 Incline Motor 52 1 Base Nut, Lower 53 1 Left Upright 93 2 Belt Guide ...
... 5 6 Handrail Star Washer 6 1 Warning Decal 7 2 Crossbar Star Washer 8 6 Handrail Bolt 9 6 Upright Star Washer 10 16 Console Screw/ Latch Screw 11 4 Frame Spacer 12 1 Console Back 13 4 Wheel Housing Bolt 14 6 Upright Washer 15 1 Key/Clip 16 8 Nut 17 1 6 mm Hex Key 18 1 4 mm Hex Key ...2 Wheel Housing 86 1 Walking Platform 46 1 Motor Pivot Nut 87 1 Controller 47 3 Hood Clip 88 1 Console Crossbar 48 1 Latch Housing 89 1 Reed Switch 49 2 Grommet 90 1 Power Cord 50 2 Isolator Fastener 91 1 Console 51 1 Frame 92 1 Incline Motor 52 1 Base Nut, Lower 53 1 Left Upright 93 2 Belt Guide ...


