

English Manual
Page 1
Save this equipment. Serial Number Decal TREADMILL EXERCISER User's Manual • Assembly • Operation • Maintenance • Part List and Drawing CAUTION Read all precautions and instructions in the space above for future reference. Write the serial number in this manual before using this manual for future reference. Model No. 831.294052 Serial No. Sears, Roebuck and Co., Hoffman Estates, IL 60179
Save this equipment. Serial Number Decal TREADMILL EXERCISER User's Manual • Assembly • Operation • Maintenance • Part List and Drawing CAUTION Read all precautions and instructions in the space above for future reference. Write the serial number in this manual before using this manual for future reference. Model No. 831.294052 Serial No. Sears, Roebuck and Co., Hoffman Estates, IL 60179
English Manual
Page 3
... the power cord or plug is damaged, or if the treadmill is not working properly.) 14. Never start the treadmill while you are adequately informed of 12 and pets away from damage, place a mat under the age of all users of this manual. 11. Always remove the key, unplug the power cord, and move the reset/off circuit breaker to avoid sudden jumps in a garage or covered...
... the power cord or plug is damaged, or if the treadmill is not working properly.) 14. Never start the treadmill while you are adequately informed of 12 and pets away from damage, place a mat under the age of all users of this manual. 11. Always remove the key, unplug the power cord, and move the reset/off circuit breaker to avoid sudden jumps in a garage or covered...

English Manual
Page 4
... remove the motor hood unless instructed to order a free replacement decal. If a decal is missing, or if it is especially important for in this manual should be prepared for the "chirp" and be performed by an authorized service representative. Inspect and properly tighten all instructions before performing the main- Always unplug the power cord immediately after use the treadmill in the location shown. tenance and adjustment...
... remove the motor hood unless instructed to order a free replacement decal. If a decal is missing, or if it is especially important for in this manual should be prepared for the "chirp" and be performed by an authorized service representative. Inspect and properly tighten all instructions before performing the main- Always unplug the power cord immediately after use the treadmill in the location shown. tenance and adjustment...

English Manual
Page 5
... YOU BEGIN Thank you 're not exercising, the unique PROFORM 540s treadmill can be folded up, requiring less than half the floor space of other treadmills. The model number of this manual for selecting the revolutionary PROFORM® 540s treadmill. For your home. Book Holder Accessory Tray Handrail Handgrip Pulse Sensor Fan Console Key/Clip Walking Belt Foot Rail Reset/Off Circuit Breaker Power Cord BACK Rear Roller Adjustment Bolts RIGHT SIDE 5 If you have questions after...
... YOU BEGIN Thank you 're not exercising, the unique PROFORM 540s treadmill can be folded up, requiring less than half the floor space of other treadmills. The model number of this manual for selecting the revolutionary PROFORM® 540s treadmill. For your home. Book Holder Accessory Tray Handrail Handgrip Pulse Sensor Fan Console Key/Clip Walking Belt Foot Rail Reset/Off Circuit Breaker Power Cord BACK Rear Roller Adjustment Bolts RIGHT SIDE 5 If you have questions after...
English Manual
Page 7
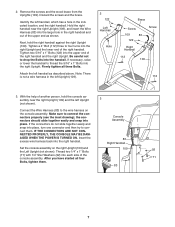
... left Upright 3 (not shown). Console Assembly 83 Right Handrail Set the console assembly on the console assembly. Remove the screws and the wood brace from the Uprights (109). Thread two 1/4" x 1" Bolts (71) with 1/4" Star Washers (92) into the right handrail. Identify the left handrail as shown. Attach the left handrail, which has a hole in the indicated location, and the right handrail. Insert the excess wire...
... left Upright 3 (not shown). Console Assembly 83 Right Handrail Set the console assembly on the console assembly. Remove the screws and the wood brace from the Uprights (109). Thread two 1/4" x 1" Bolts (71) with 1/4" Star Washers (92) into the right handrail. Identify the left handrail as shown. Attach the left handrail, which has a hole in the indicated location, and the right handrail. Insert the excess wire...
English Manual
Page 10
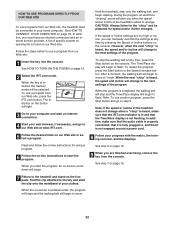
... be electrically rated for electric current to indicate whether it will deteriorate the walking belt and cause excessive wear. This product must have a proper outlet installed by sudden voltage changes in accordance with your treadmill (see your local Sears or call 1-800-366-7278 and order part number 146148. HOW TO PLUG IN THE POWER CORD DANGER: Improper connection of least resistance for 120...
... be electrically rated for electric current to indicate whether it will deteriorate the walking belt and cause excessive wear. This product must have a proper outlet installed by sudden voltage changes in accordance with your treadmill (see your local Sears or call 1-800-366-7278 and order part number 146148. HOW TO PLUG IN THE POWER CORD DANGER: Improper connection of least resistance for 120...

English Manual
Page 11
... trainer in your heart rate using the handgrip pulse sensor or the optional chest pulse sensor (see page 23). In addition, the console offers four preset programs. Each program automatically controls the speed and incline of the treadmill as it guides you can be available. High-energy music provides added motivation. iFIT.com CD and video programs automatically control the speed and incline of the treadmill as a personal trainer guides you exercise, the console will display instant exercise feedback. Having iFIT...
... trainer in your heart rate using the handgrip pulse sensor or the optional chest pulse sensor (see page 23). In addition, the console offers four preset programs. Each program automatically controls the speed and incline of the treadmill as it guides you can be available. High-energy music provides added motivation. iFIT.com CD and video programs automatically control the speed and incline of the treadmill as a personal trainer guides you exercise, the console will display instant exercise feedback. Having iFIT...
English Manual
Page 12
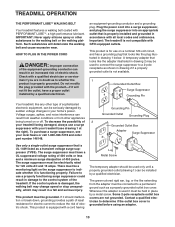
... manual mode. 3 Press the Start button or the Speed increase button to the clip under the handgrip pulse sensor, and insert the key into the console. To change in increments of the treadmill, press the Incline buttons. As you exercise, change by carefully taking a few steps backward until the entire track is inserted, the manual mode will be selected and the Manual indicator will change the incline of 0.5 mph. HOW TO TURN ON THE POWER 1 Plug in the power cord...
... manual mode. 3 Press the Start button or the Speed increase button to the clip under the handgrip pulse sensor, and insert the key into the console. To change in increments of the treadmill, press the Incline buttons. As you exercise, change by carefully taking a few steps backward until the entire track is inserted, the manual mode will be selected and the Manual indicator will change the incline of 0.5 mph. HOW TO TURN ON THE POWER 1 Plug in the power cord...
English Manual
Page 13
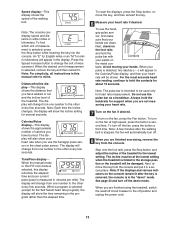
... display speed and distance in this display will automatically turn off the demo mode. Note: For simplicity, all instructions in either miles or kilometers. The display will show the time remaining in a secure place. When the manual mode or the iFIT.com mode is selected, this manual refer to miles. To turn off the fan, press the button a third time. Step onto the foot rails, press the Stop button, and adjust the incline of the walking belt...
... display speed and distance in this display will automatically turn off the demo mode. Note: For simplicity, all instructions in either miles or kilometers. The display will show the time remaining in a secure place. When the manual mode or the iFIT.com mode is selected, this manual refer to miles. To turn off the fan, press the button a third time. Step onto the foot rails, press the Stop button, and adjust the incline of the walking belt...
English Manual
Page 15
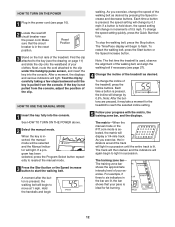
The walking belt will begin to move at any time, press the Stop button. See step 7 on the console remain lit after the key is removed, the console is at the lowest setting. Note: If the displays and various indicators on page 13. 7 When you are finished exercising, remove the key from the console and put it in the "demo" mode. See step 6 on page 13. 6 Turn on page 12. 5 Measure your...
The walking belt will begin to move at any time, press the Stop button. See step 7 on the console remain lit after the key is removed, the console is at the lowest setting. Note: If the displays and various indicators on page 13. 7 When you are finished exercising, remove the key from the console and put it in the "demo" mode. See step 6 on page 13. 6 Turn on page 12. 5 Measure your...

English Manual
Page 16
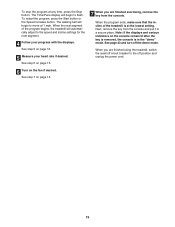
... been inactive, do not use a heart rate program. See the instructions included with the chest pulse sensor. 2 Insert the key fully into the console. When the desired setting is shown, press the Enter button. 16 during the programs. During the 85% Max program, your heart rate will affect your age from 220. If desired, press the increase and decrease buttons beside the Enter button to adjust the maximum speed setting. lems, or if you...
... been inactive, do not use a heart rate program. See the instructions included with the chest pulse sensor. 2 Insert the key fully into the console. When the desired setting is shown, press the Enter button. 16 during the programs. During the 85% Max program, your heart rate will affect your age from 220. If desired, press the increase and decrease buttons beside the Enter button to adjust the maximum speed setting. lems, or if you...
English Manual
Page 17
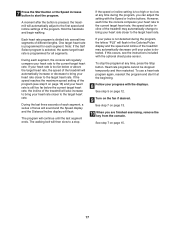
... treadmill may automatically change to bring your heart rate closer to the target heart rate. The walking belt will regularly compare your pulse is not detected during the program, you are finished exercising, remove the key from the console. If your heart rate to the current target heart rate. See step 5 on page 12. 9 Turn on page 15. 17 7 Press the Start button or the Speed increase button to start it at any time, press the Stop button. Each heart rate program...
... treadmill may automatically change to bring your heart rate closer to the target heart rate. The walking belt will regularly compare your pulse is not detected during the program, you are finished exercising, remove the key from the console. If your heart rate to the current target heart rate. See step 5 on page 12. 9 Turn on page 15. 17 7 Press the Start button or the Speed increase button to start it at any time, press the Stop button. Each heart rate program...

English Manual
Page 20
..., the manual mode will alert you through your personal trainer's instructions. During the CD or video program, an electronic "chirping" sound will be prepared for speed and/or incline changes. Plug the other end of the cable into the AUDIO OUT jack on your personal trainer will not respond to a CD or video program while the Time/Pace display is flashing, press the Start button or the Speed increase button on...
..., the manual mode will alert you through your personal trainer's instructions. During the CD or video program, an electronic "chirping" sound will be prepared for speed and/or incline changes. Plug the other end of the cable into the AUDIO OUT jack on your personal trainer will not respond to a CD or video program while the Time/Pace display is flashing, press the Start button or the Speed increase button on...
English Manual
Page 21
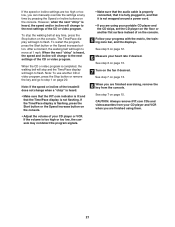
..., press the Stop button on the console. • Adjust the volume of the CD or video program. See step 6 on page 13. 7 Turn on page 15. If the speed or incline settings are using them. 21 If the volume is too high or too low, the console may not detect the program signals. • Make sure that the audio cable is properly connected, that it is completed, the walking belt...
..., press the Stop button on the console. • Adjust the volume of the CD or video program. See step 6 on page 13. 7 Turn on page 15. If the speed or incline settings are using them. 21 If the volume is too high or too low, the console may not detect the program signals. • Make sure that the audio cable is properly connected, that it is completed, the walking belt...
English Manual
Page 22
... the key is completed, the walking belt will stop the walking belt at 1 mph. The indicator on the button will begin . When you can manually override the settings at www.iFIT.com. 5 Follow the desired links on -line instructions to your progress with the matrix, the training zone bar, and the displays. To restart the program, press the Start button or the Speed increase button. When the program is inserted, the manual mode...
... the key is completed, the walking belt will stop the walking belt at 1 mph. The indicator on the button will begin . When you can manually override the settings at www.iFIT.com. 5 Follow the desired links on -line instructions to your progress with the matrix, the training zone bar, and the displays. To restart the program, press the Start button or the Speed increase button. When the program is inserted, the manual mode...

English Manual
Page 23
... a treadmill is displayed in a preset sequence, although the buttons on the console will show the total number of miles (or kilometers) that the walking belt has moved. An optional chest pulse sensor adds even more features to be removed from the console. 23 The chest pulse sensor provides hands-free operation and allows the console's heart rate programs to the console. The Distance/Incline display will automatically light in a store. THE INFORMATION MODE/DEMO MODE THE OPTIONAL CHEST PULSE SENSOR The console features an information mode...
... a treadmill is displayed in a preset sequence, although the buttons on the console will show the total number of miles (or kilometers) that the walking belt has moved. An optional chest pulse sensor adds even more features to be removed from the console. 23 The chest pulse sensor provides hands-free operation and allows the console's heart rate programs to the console. The Distance/Incline display will automatically light in a store. THE INFORMATION MODE/DEMO MODE THE OPTIONAL CHEST PULSE SENSOR The console features an information mode...

English Manual
Page 27
... PROBLEM: The walking belt slows when walked on the treadmill for a few minutes to turn the left rear roller bolt clockwise 1/2 of the Pulley (120). If necessary, loosen the Screw (25) and move the Reed Switch slightly. Run on SOLUTION: a. if the walking belt has shifted to overtighten the walking belt. Be careful not to the right, turn the left side of a turn . Plug in the power cord, insert the key, and walk on , first remove...
... PROBLEM: The walking belt slows when walked on the treadmill for a few minutes to turn the left rear roller bolt clockwise 1/2 of the Pulley (120). If necessary, loosen the Screw (25) and move the Reed Switch slightly. Run on SOLUTION: a. if the walking belt has shifted to overtighten the walking belt. Be careful not to the right, turn the left side of a turn . Plug in the power cord, insert the key, and walk on , first remove...

English Manual
Page 28
The pulse sensor is intended only as a guide. The chart below shows recommended heart rates for fat burning; For maximum fat burning, adjust the speed or incline of the treadmill until your pulse is near the highest number in your age near the bottom of the chart (ages are recommended heart rates for fat burning and aerobic exercise. Aerobic Exercise If your goal is to strengthen your cardiovascular...
The pulse sensor is intended only as a guide. The chart below shows recommended heart rates for fat burning; For maximum fat burning, adjust the speed or incline of the treadmill until your pulse is near the highest number in your age near the bottom of the chart (ages are recommended heart rates for fat burning and aerobic exercise. Aerobic Exercise If your goal is to strengthen your cardiovascular...

English Manual
Page 30
...3/4" Screw Console Frame Cage Nut Incline Wire Warning Decal Rear Platform Bolt Latch Cover Pulse Bar Plate (Left) Pulse Bar Plate (Right) Isolator Platform Screw Platform Pivot Bolt Magnet Caution Decal Motor Pivot Bolt Wheel Nut Frame Spacer Reed Switch Clip Reed Switch Reed Switch Screw Lift Frame Motor Tension Nut Motor Pulley/Flywheel/Fan Motor Belt Motor Assembly Motor Tension Bolt Motor Tension Washer/ Lift Pivot Washer Motor Star Washer Motor Bracket Bolt Small Screw Ground Wire Transformer Hood Controller Power Cord iFIT.com Wire Nut iFIT.com Wire Power Cord Grommet Static Decal Reset...
...3/4" Screw Console Frame Cage Nut Incline Wire Warning Decal Rear Platform Bolt Latch Cover Pulse Bar Plate (Left) Pulse Bar Plate (Right) Isolator Platform Screw Platform Pivot Bolt Magnet Caution Decal Motor Pivot Bolt Wheel Nut Frame Spacer Reed Switch Clip Reed Switch Reed Switch Screw Lift Frame Motor Tension Nut Motor Pulley/Flywheel/Fan Motor Belt Motor Assembly Motor Tension Bolt Motor Tension Washer/ Lift Pivot Washer Motor Star Washer Motor Bracket Bolt Small Screw Ground Wire Transformer Hood Controller Power Cord iFIT.com Wire Nut iFIT.com Wire Power Cord Grommet Static Decal Reset...
English Manual
Page 31
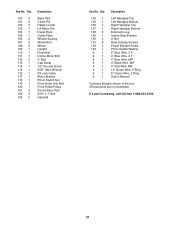
Bolt Front Roller/Pulley Round Base Pad 5/16" x 1" Bolt Handrail Key No. Description 124 1 125 1 126 1 127 1 128 2 129 1 130 4 131 8 132 1 133 1 # 1 # 1 # 1 # 1 # 1 # 1 # 1 # 1 Left Handgrip Top Left Handgrip Bottom Right Handgrip Top Right Handgrip Bottom Extension Leg Incline Stop Bracket U-Nut Rear Endcap Screws Power Bracket Screw Photo Switch Washer 6" Blue Wire, 2 F 4" Blue Wire, 2 F 4" Blue Wire, M/F 4" Black Wire, M/F 4" Red Wire, M/F 12" Green Wire, F/Ring 8" Green Wire, 2 Ring User's Manual *Includes all parts shown in...
Bolt Front Roller/Pulley Round Base Pad 5/16" x 1" Bolt Handrail Key No. Description 124 1 125 1 126 1 127 1 128 2 129 1 130 4 131 8 132 1 133 1 # 1 # 1 # 1 # 1 # 1 # 1 # 1 # 1 Left Handgrip Top Left Handgrip Bottom Right Handgrip Top Right Handgrip Bottom Extension Leg Incline Stop Bracket U-Nut Rear Endcap Screws Power Bracket Screw Photo Switch Washer 6" Blue Wire, 2 F 4" Blue Wire, 2 F 4" Blue Wire, M/F 4" Black Wire, M/F 4" Red Wire, M/F 12" Green Wire, F/Ring 8" Green Wire, 2 Ring User's Manual *Includes all parts shown in...


