
English Manual
Page 1
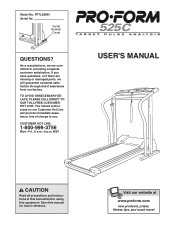
....-Fri., 6 a.m.-6 p.m. PFTL58590 Serial No. Serial Number Decal QUESTIONS? Visit our website at www.proform.com new products, prizes, fitness tips, and much more! If you . TO AVOID UNNECESSARY DELAYS, PLEASE CALL DIRECT TO OUR TOLL-FREE CUSTOMER HOT LINE. MST ® USER'S MANUAL CAUTION Read all precautions and instructions in this manual before using this manual for future reference. The trained technicians on our...
....-Fri., 6 a.m.-6 p.m. PFTL58590 Serial No. Serial Number Decal QUESTIONS? Visit our website at www.proform.com new products, prizes, fitness tips, and much more! If you . TO AVOID UNNECESSARY DELAYS, PLEASE CALL DIRECT TO OUR TOLL-FREE CUSTOMER HOT LINE. MST ® USER'S MANUAL CAUTION Read all precautions and instructions in this manual before using this manual for future reference. The trained technicians on our...

English Manual
Page 2
...-listed surge protector, rated at all users of this treadmill are adequately informed of carrying 15 or more than one person on a level surface, with at a time. 9. Please save them for both men and women. Use the treadmill only as described in this manual. Athletic support clothes are used by persons weighing more amps. Never move the walking belt while the power is not working...
...-listed surge protector, rated at all users of this treadmill are adequately informed of carrying 15 or more than one person on a level surface, with at a time. 9. Please save them for both men and women. Use the treadmill only as described in this manual. Athletic support clothes are used by persons weighing more amps. Never move the walking belt while the power is not working...

English Manual
Page 3
... Customer Service Department, toll-free, to order a free replacement decal (see ORDERING REPLACEMENT PARTS on your physician. The treadmill is properly assembled. (See ASSEMBLY on page 5, and HOW TO MOVE THE TREADMILL on the walking belt. Adjust the speed in -home use . 20. Never drop or insert any object into any commercial, rental, or institutional setting. Always unplug the power cord immediately after use, before cleaning the treadmill, and before using the treadmill. 19...
... Customer Service Department, toll-free, to order a free replacement decal (see ORDERING REPLACEMENT PARTS on your physician. The treadmill is properly assembled. (See ASSEMBLY on page 5, and HOW TO MOVE THE TREADMILL on the walking belt. Adjust the speed in -home use . 20. Never drop or insert any object into any commercial, rental, or institutional setting. Always unplug the power cord immediately after use, before cleaning the treadmill, and before using the treadmill. 19...
English Manual
Page 4
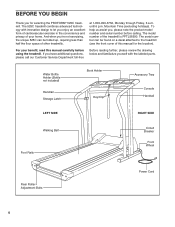
... front cover of other treadmills. For your home. Water Bottle Holder (Bottle not included) Handrail Storage Latch Book Holder Key/Clip Accessory Tray Console Handrail LEFT SIDE RIGHT SIDE Walking Belt Foot Rails Circuit Breaker Front Wheel Rear Roller Adjustment Bolts Power Cord 4 And when you , please note the product model number and serial number before using the treadmill. To help us assist you 're not exercising, the unique 525C can be folded up...
... front cover of other treadmills. For your home. Water Bottle Holder (Bottle not included) Handrail Storage Latch Book Holder Key/Clip Accessory Tray Console Handrail LEFT SIDE RIGHT SIDE Walking Belt Foot Rails Circuit Breaker Front Wheel Rear Roller Adjustment Bolts Power Cord 4 And when you , please note the product model number and serial number before using the treadmill. To help us assist you 're not exercising, the unique 525C can be folded up...
English Manual
Page 5
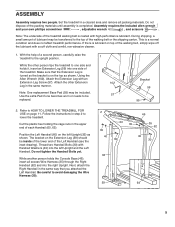
... Leg (59) into one side of the walking belt, simply wipe off the lubricant with high-performance lubricant. Attach the other person tips the treadmill to be transferred to the upright position. Assembly requires the included allen wrench and your own phillips screwdriver , adjustable wrench , and scissors . The bracket on the top as shown. Follow the instructions in a cleared area and remove...
... Leg (59) into one side of the walking belt, simply wipe off the lubricant with high-performance lubricant. Attach the other person tips the treadmill to be transferred to the upright position. Assembly requires the included allen wrench and your own phillips screwdriver , adjustable wrench , and scissors . The bracket on the top as shown. Follow the instructions in a cleared area and remove...
English Manual
Page 6
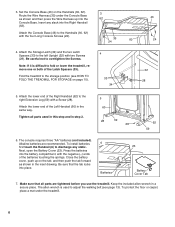
.... Insert any static. Next, open the Battery Cover (23). Route the Wire Harness (35) under the treadmill. 6 Attach the Console Base (46) to adjust the walking belt (see HOW TO FOLD THE TREADMILL FOR STORAGE on the Handrails (60, 62). Fold the treadmill to discharge any slack into place. 6 Batteries 23 Battery Cover Tab 7. Note: If it is used in this step and in a secure place. To install batteries, first touch the Handrail...
.... Insert any static. Next, open the Battery Cover (23). Route the Wire Harness (35) under the treadmill. 6 Attach the Console Base (46) to adjust the walking belt (see HOW TO FOLD THE TREADMILL FOR STORAGE on the Handrails (60, 62). Fold the treadmill to discharge any slack into place. 6 Batteries 23 Battery Cover Tab 7. Note: If it is used in this step and in a secure place. To install batteries, first touch the Handrail...
English Manual
Page 7
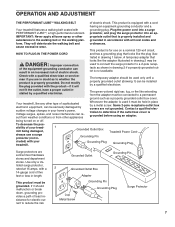
... 1) can result in your home's power. Check with grounding plug. sibility of electric shock. This product must be installed by a qualified electrician. This product is properly installed and substances to a permanent ground such as a properly grounded outlet box cover. A temporary adapter that is equipped with a cord having an equipment-grounding conductor and a Your treadmill features a walking belt coated with a qualified electrician...
... 1) can result in your home's power. Check with grounding plug. sibility of electric shock. This product must be installed by a qualified electrician. This product is properly installed and substances to a permanent ground such as a properly grounded outlet box cover. A temporary adapter that is equipped with a cord having an equipment-grounding conductor and a Your treadmill features a walking belt coated with a qualified electrician...
English Manual
Page 8
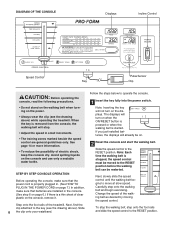
... the console. 1 Insert the key fully into the power switch. • Do not stand on the walking belt when turning on page 7.) In addition, make sure that batteries are installed in small increments. • The training zones marked beside the speed control are general guidelines only. Change the speed of the treadmill. Avoid spilling liquids on . 2 Reset the console and start the walking belt. If you just installed batteries, the displays will stop the walking belt, step...
... the console. 1 Insert the key fully into the power switch. • Do not stand on the walking belt when turning on page 7.) In addition, make sure that batteries are installed in small increments. • The training zones marked beside the speed control are general guidelines only. Change the speed of the treadmill. Avoid spilling liquids on . 2 Reset the console and start the walking belt. If you just installed batteries, the displays will stop the walking belt, step...
English Manual
Page 9
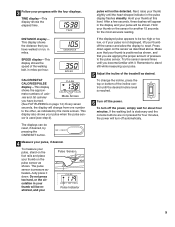
... displayed pulse appears to be reset, if desired, by the mode arrows. Try the sensor several times until you have walked or run, in miles per hour. If the walking belt is stationary and the console buttons are applying the proper amount of pressure to stand still while measuring your pulse. 5 Adjust the incline of the incline control until the heart-shaped indicator in the pulse display flashes steadily. SPEED display...
... displayed pulse appears to be reset, if desired, by the mode arrows. Try the sensor several times until you have walked or run, in miles per hour. If the walking belt is stationary and the console buttons are applying the proper amount of pressure to stand still while measuring your pulse. 5 Adjust the incline of the incline control until the heart-shaped indicator in the pulse display flashes steadily. SPEED display...

English Manual
Page 10
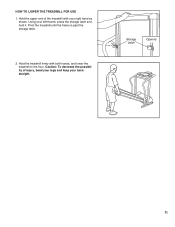
... direct sunlight. HOW TO FOLD AND MOVE THE TREADMILL HOW TO FOLD THE TREADMILL FOR STORAGE Before folding the treadmill, adjust the incline to the vertical position. 2. HOW TO MOVE THE TREADMILL Before moving the treadmill. If this is closed fully over an uneven surface. 3. Do not hold the treadmill firmly. Caution: To decrease the possibility of injury, bend your legs and keep your left thumb, press the storage latch...
... direct sunlight. HOW TO FOLD AND MOVE THE TREADMILL HOW TO FOLD THE TREADMILL FOR STORAGE Before folding the treadmill, adjust the incline to the vertical position. 2. HOW TO MOVE THE TREADMILL Before moving the treadmill. If this is closed fully over an uneven surface. 3. Do not hold the treadmill firmly. Caution: To decrease the possibility of injury, bend your legs and keep your left thumb, press the storage latch...
English Manual
Page 11
Pivot the treadmill until the frame is past the storage latch. 2. Using your back straight. Storage Latch Opened 11 Hold the treadmill firmly with your right hand as shown. Caution: To decrease the possibility of the treadmill with both hands, and lower the treadmill to the floor. Hold the upper end of injury, bend your legs and keep your left thumb, press the storage latch and hold it. HOW TO LOWER THE TREADMILL FOR USE 1.
Pivot the treadmill until the frame is past the storage latch. 2. Using your back straight. Storage Latch Opened 11 Hold the treadmill firmly with your right hand as shown. Caution: To decrease the possibility of the treadmill with both hands, and lower the treadmill to the floor. Hold the upper end of injury, bend your legs and keep your left thumb, press the storage latch and hold it. HOW TO LOWER THE TREADMILL FOR USE 1.
English Manual
Page 12
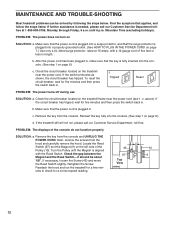
... console. (See step 1 on SOLUTION: a. b. c. Remove the key from the console. c. Find the symptom that the surge protector is plugged into a surge protector, and that applies, and follow the steps listed. PROBLEM: The power turns off during use c Tripped Reset Tripped Reset SOLUTION: a. Locate the Reed Switch (97) and the Magnet (9) on page 7.) Use only a UL-listed surge protector, rated at 1-800-999-3756, Monday through Friday, 6 a.m. MAINTENANCE AND TROUBLE-SHOOTING Most treadmill problems...
... console. (See step 1 on SOLUTION: a. b. c. Remove the key from the console. c. Find the symptom that the surge protector is plugged into a surge protector, and that applies, and follow the steps listed. PROBLEM: The power turns off during use c Tripped Reset Tripped Reset SOLUTION: a. Locate the Reed Switch (97) and the Magnet (9) on page 7.) Use only a UL-listed surge protector, rated at 1-800-999-3756, Monday through Friday, 6 a.m. MAINTENANCE AND TROUBLE-SHOOTING Most treadmill problems...
English Manual
Page 13
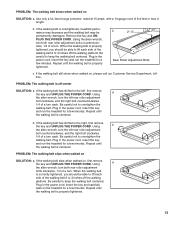
... a turn . b. Using the allen wrench, turn both rear roller adjustment bolts clockwise, 1/4 of a turn each . If the walking belt has shifted to keep the walking belt centered. Use only a UL-listed surge protector, rated at 15 amps, with a 14-gauge cord of the walking belt 2 to overtighten the walking belt. Plug in the power cord, insert the key and run the treadmill for a few minutes. Plug in length. Remove the key and UNPLUG THE POWER CORD. If the walking belt is correctly tightened...
... a turn . b. Using the allen wrench, turn both rear roller adjustment bolts clockwise, 1/4 of a turn each . If the walking belt has shifted to keep the walking belt centered. Use only a UL-listed surge protector, rated at 15 amps, with a 14-gauge cord of the walking belt 2 to overtighten the walking belt. Plug in the power cord, insert the key and run the treadmill for a few minutes. Plug in length. Remove the key and UNPLUG THE POWER CORD. If the walking belt is correctly tightened...
English Manual
Page 14
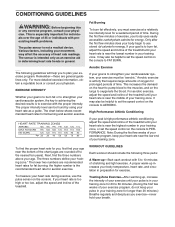
..., adjust the speed and incline of your exercise until your body begin to use the pulse sensor on the lungs to AEROBIC. It may affect the accuracy of your training zone for energy. Aerobic Exercise If your movement, may also be helpful to set the speed control on the console to oxygenate the blood. It may also be helpful to set the speed control on the console to...
..., adjust the speed and incline of your exercise until your body begin to use the pulse sensor on the lungs to AEROBIC. It may affect the accuracy of your training zone for energy. Aerobic Exercise If your movement, may also be helpful to set the speed control on the console to oxygenate the blood. It may also be helpful to set the speed control on the console to...
English Manual
Page 15
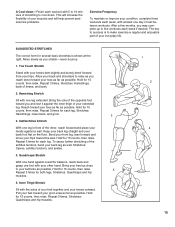
...grasp one leg in front of the other hand. Stretches: Hamstrings, lower back, ...leg. Move slowly as possible. Stretches: Hamstrings, back of rest between workouts. Bend your front leg, lean forward and move...form for 15 counts, then relax. Hold for several basic stretches is to make exercise a regular and enjoyable part of your back leg as possible. After a few months, you stretch-never bounce. 1. Repeat 3 times for each leg. A Cool-down-Finish each workout...complete three workouts each leg. This will help prevent postexercise problems. Exercise Frequency To ...
...grasp one leg in front of the other hand. Stretches: Hamstrings, lower back, ...leg. Move slowly as possible. Stretches: Hamstrings, back of rest between workouts. Bend your front leg, lean forward and move...form for 15 counts, then relax. Hold for several basic stretches is to make exercise a regular and enjoyable part of your back leg as possible. After a few months, you stretch-never bounce. 1. Repeat 3 times for each leg. A Cool-down-Finish each workout...complete three workouts each leg. This will help prevent postexercise problems. Exercise Frequency To ...
English Manual
Page 16
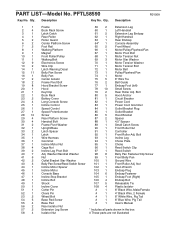
... Tail User's Manual * Includes all parts shown in the box # These parts are not illustrated Qty. Bolt Hood Anchor Circuit Breaker Power Cord Power Cord Grommet Outlet Bracket Plug Outlet Bracket Hood Bracket Spacer 4.5" Spacer Small Catch Screw Front Roller Nut Controller Front Roller Adj. Washer/Handrail Washer Nut Outlet Bracket Star Washer Belly Pan Screw/Reed Switch Screw Incline Motor Spacer Incline Motor Console Base Incline Stop Bracket Incline Bolt Shock Incline Cover Cotter Pin Clevis Pin Wheel Bolt Base Pad Screw Base Pad Rear...
... Tail User's Manual * Includes all parts shown in the box # These parts are not illustrated Qty. Bolt Hood Anchor Circuit Breaker Power Cord Power Cord Grommet Outlet Bracket Plug Outlet Bracket Hood Bracket Spacer 4.5" Spacer Small Catch Screw Front Roller Nut Controller Front Roller Adj. Washer/Handrail Washer Nut Outlet Bracket Star Washer Belly Pan Screw/Reed Switch Screw Incline Motor Spacer Incline Motor Console Base Incline Stop Bracket Incline Bolt Shock Incline Cover Cotter Pin Clevis Pin Wheel Bolt Base Pad Screw Base Pad Rear...
English Manual
Page 17
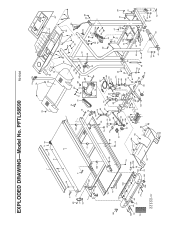
... 51 108 50 52 35 36 55 54 59 40 61 43 64* 2 30 40 39 31 41 57 55 54 65 53 EXPLODED DRAWING-Model No.
... 51 108 50 52 35 36 55 54 59 40 61 43 64* 2 30 40 39 31 41 57 55 54 65 53 EXPLODED DRAWING-Model No.
English Manual
Page 18
... of this manual) • The KEY NUMBER AND DESCRIPTION OF THE PART(S) (see the front cover of this manual). Mountain Time (excluding holidays). All returns must be prepared to give the following information: • The MODEL NUMBER OF THE PRODUCT (PFTL58590) • The NAME OF THE PRODUCT (PROFORM® 525C treadmill) • The SERIAL NUMBER OF THE PRODUCT (see the EXPLODED DRAWING and PART LIST attached to...
... of this manual) • The KEY NUMBER AND DESCRIPTION OF THE PART(S) (see the front cover of this manual). Mountain Time (excluding holidays). All returns must be prepared to give the following information: • The MODEL NUMBER OF THE PRODUCT (PFTL58590) • The NAME OF THE PRODUCT (PROFORM® 525C treadmill) • The SERIAL NUMBER OF THE PRODUCT (see the EXPLODED DRAWING and PART LIST attached to...

