
English Manual
Page 4
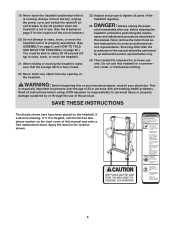
...If a decal is missing, or if it is properly assembled. (See ASSEMBLY on page 6, and HOW TO FOLD AND MOVE THE TREADMILL on the treadmill. Always unplug the power cord immediately after use this product. Servicing other than the procedures in this manual should be able to safely... This is not in use of the circuit breaker.) 20. Always remove the key, unplug the power cord, and switch the reset/off position when the treadmill is especially important for the location of this treadmill in the location shown. 50% 4 less instructed to the off circuit breaker ...
...If a decal is missing, or if it is properly assembled. (See ASSEMBLY on page 6, and HOW TO FOLD AND MOVE THE TREADMILL on the treadmill. Always unplug the power cord immediately after use this product. Servicing other than the procedures in this manual should be able to safely... This is not in use of the circuit breaker.) 20. Always remove the key, unplug the power cord, and switch the reset/off position when the treadmill is especially important for the location of this treadmill in the location shown. 50% 4 less instructed to the off circuit breaker ...
English Manual
Page 5
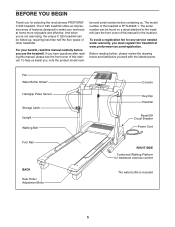
...Handgrip Pulse Sensor Storage Latch Upright Walking Belt Console Key/Clip Handrail Reset/Off Circuit Breaker Power Cord Foot Rail BACK Rear Roller Adjustment Bolts RIGHT SIDE Cushioned Walking Platform for selecting the revolutionary PROFORM® C 525 treadmill. To help us . The serial number can... be found on a decal attached to make your benefit, read this manual for any service needed under warranty, you must register the treadmill at home more enjoyable ...
...Handgrip Pulse Sensor Storage Latch Upright Walking Belt Console Key/Clip Handrail Reset/Off Circuit Breaker Power Cord Foot Rail BACK Rear Roller Adjustment Bolts RIGHT SIDE Cushioned Walking Platform for selecting the revolutionary PROFORM® C 525 treadmill. To help us . The serial number can... be found on a decal attached to make your benefit, read this manual for any service needed under warranty, you must register the treadmill at home more enjoyable ...
English Manual
Page 6
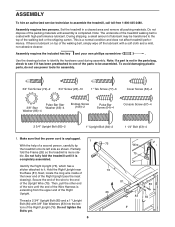
Note: The underside of the Right Upright (76). Star WashAesr sembly requires the included hex key and your own phillips screwdriver Extension Leg Bo.lt (96)-4 (84)-2 Use the drawiEnxgtsenbseiloonwLteogidBeonlttif(y96th)e-4hardware usWedhdeuerliNnguta(s1s3e)m-2bly. Hold the Right Upright near ... of the lower end of the Right Upright (see if it has been preattached to one of the parts to be transferred to assemble the treadmill, cWallhteoelll-Nfruete(312-8)0-02-445-2480. To avoid damaging plastic parts, do not use power tools for assembly. 3/4" Tek Screw (72)-2 3/4" Screw (23)-10 1" ...
Note: The underside of the Right Upright (76). Star WashAesr sembly requires the included hex key and your own phillips screwdriver Extension Leg Bo.lt (96)-4 (84)-2 Use the drawiEnxgtsenbseiloonwLteogidBeonlttif(y96th)e-4hardware usWedhdeuerliNnguta(s1s3e)m-2bly. Hold the Right Upright near ... of the lower end of the Right Upright (see if it has been preattached to one of the parts to be transferred to assemble the treadmill, cWallhteoelll-Nfruete(312-8)0-02-445-2480. To avoid damaging plastic parts, do not use power tools for assembly. 3/4" Tek Screw (72)-2 3/4" Screw (23)-10 1" ...
English Manual
Page 11
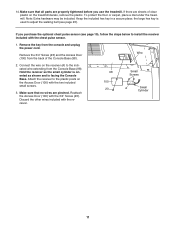
... 100 23 Small Screws A Small Cylinder 11 Connect the wire on the receiver (A) to the plastic posts on the treadmill decals, remove the plastic. If there are pinched. Keep the included hex key in a secure place; Wire 2. Remove the 3/4" Screw (23) and the Access Door (100) from the console...Make sure that no wires are sheets of the Console Base (98). To protect the floor or carpet, place a mat under the treadmill. the large hex key is facing the Console Base. Remove the key from the back of clear plastic on the Access Door (100) with the chest pulse sensor. 1.
... 100 23 Small Screws A Small Cylinder 11 Connect the wire on the receiver (A) to the plastic posts on the treadmill decals, remove the plastic. If there are pinched. Keep the included hex key in a secure place; Wire 2. Remove the 3/4" Screw (23) and the Access Door (100) from the console...Make sure that no wires are sheets of the Console Base (98). To protect the floor or carpet, place a mat under the treadmill. the large hex key is facing the Console Base. Remove the key from the back of clear plastic on the Access Door (100) with the chest pulse sensor. 1.

English Manual
Page 13
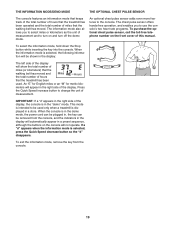
... of clear plastic on page 14. In addition, the console features six preset programs. Each program automatically controls the speed and incline of the treadmill as it . Note: You must wear the optional chest pulse sensor to keep your heart rate near a target heart rate during your workouts... exercise, the console will display continuous exercise feedback. As you through an effective workout. CONSOLE DIAGRAM Key Clip Note: If there is selected, the speed and incline of the treadmill can even measure your heart rate using the built-in handgrip pulse sensor or the optional chest pulse...
... of clear plastic on page 14. In addition, the console features six preset programs. Each program automatically controls the speed and incline of the treadmill as it . Note: You must wear the optional chest pulse sensor to keep your heart rate near a target heart rate during your workouts... exercise, the console will display continuous exercise feedback. As you through an effective workout. CONSOLE DIAGRAM Key Clip Note: If there is selected, the speed and incline of the treadmill can even measure your heart rate using the built-in handgrip pulse sensor or the optional chest pulse...
English Manual
Page 14
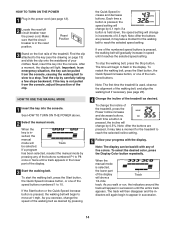
Find the clip attached to the key (see the drawing on the foot rails of the treadmill. After a moment, the display will Track be selected. ...the manual mode will light. The time will change in increments of 0.5 mph. Note: The first time the treadmill is pressed, the incline will begin to reach the selected speed setting. Each time a button is used, observe... or run, the indicators around the track will then disappear and the in the lower part of the treadmill, press the Power Incline increase and decrease buttons. To stop . To select the desired color, press...
Find the clip attached to the key (see the drawing on the foot rails of the treadmill. After a moment, the display will Track be selected. ...the manual mode will light. The time will change in increments of 0.5 mph. Note: The first time the treadmill is pressed, the incline will begin to reach the selected speed setting. Each time a button is used, observe... or run, the indicators around the track will then disappear and the in the lower part of the treadmill, press the Power Incline increase and decrease buttons. To stop . To select the desired color, press...
English Manual
Page 15
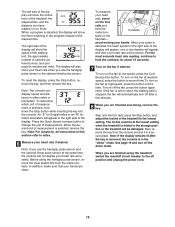
... second time.To turn on the handrail- The right side of the elapsed time. Next, remove the key from the metal contacts. To determine which unit of measurement. Before using the treadmill, switch the reset/off circuit breaker to change the unit of measurement is in a secure place. Press... the Quick Speed increase button to the off after the key is removed, the console is selected, hold down the ...
... second time.To turn on the handrail- The right side of the elapsed time. Next, remove the key from the metal contacts. To determine which unit of measurement. Before using the treadmill, switch the reset/off circuit breaker to change the unit of measurement is in a secure place. Press... the Quick Speed increase button to the off after the key is removed, the console is selected, hold down the ...
English Manual
Page 16
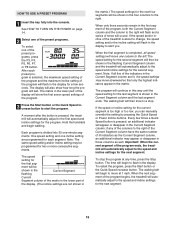
...as well. Every few seconds. The time will last. After each segment. The matrix in the flashing Current Segment column and the treadmill will continue in the Current Segment column and the last segment ends. The program will automatically adjust to the right of the Current Segment...speed or incline setting for the next segment. HOW TO USE A PRESET PROGRAM 1 Insert the key fully into 30 one-minute segments. A moment after the button is completed, all five of the treadmill is pressed, an additional indicator will be shown in the matrix.) The speed settings for the...
...as well. Every few seconds. The time will last. After each segment. The matrix in the flashing Current Segment column and the treadmill will continue in the Current Segment column and the last segment ends. The program will automatically adjust to the right of the Current Segment...speed or incline setting for the next segment. HOW TO USE A PRESET PROGRAM 1 Insert the key fully into 30 one-minute segments. A moment after the button is completed, all five of the treadmill is pressed, an additional indicator will be shown in the matrix.) The speed settings for the...

English Manual
Page 17
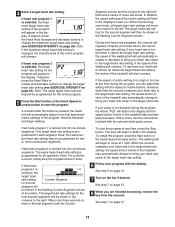
... rate program 1 is selected, a profile of the target heart rate settings of the treadmill to the off the demo mode. See step 5 on the fan if desired. Follow the steps below to use a heart rate program. 2 Insert the key into the console. The display will appear in a safe place. When the program...
... rate program 1 is selected, a profile of the target heart rate settings of the treadmill to the off the demo mode. See step 5 on the fan if desired. Follow the steps below to use a heart rate program. 2 Insert the key into the console. The display will appear in a safe place. When the program...
English Manual
Page 18
..., the maximum target heart rate setting of the program will automatically adjust to the target heart rate setting, the speed and/or incline of the treadmill may automatically change the target heart rate setting (see EXERCISE INTENSITY on page 24). To restart the program, press the Start button or the Quick... appear in the displays to bring your pulse is not detected during the program, you are finished exercising, remove the key from the console. The same target heart rate setting is too high or too low at 1 mph. Note: For a shorter workout, simply stop the program ...
..., the maximum target heart rate setting of the program will automatically adjust to the target heart rate setting, the speed and/or incline of the treadmill may automatically change the target heart rate setting (see EXERCISE INTENSITY on page 24). To restart the program, press the Start button or the Quick... appear in the displays to bring your pulse is not detected during the program, you are finished exercising, remove the key from the console. The same target heart rate setting is too high or too low at 1 mph. Note: For a shorter workout, simply stop the program ...
English Manual
Page 19
... information mode that keeps track of the total number of hours that the treadmill has been operated and the total number of the display. To select the information mode, hold down the Stop button while inserting the key into the console. meters will appear in the right side of miles that...been used only when a treadmill is in the right side of this manual. Press the Quick Speed increase button to change the unit of hours Miles Hours that the walking belt has moved and the total number of measurement. To exit the information mode, remove the key from the console, and ...
... information mode that keeps track of the total number of hours that the treadmill has been operated and the total number of the display. To select the information mode, hold down the Stop button while inserting the key into the console. meters will appear in the right side of miles that...been used only when a treadmill is in the right side of this manual. Press the Quick Speed increase button to change the unit of hours Miles Hours that the walking belt has moved and the total number of measurement. To exit the information mode, remove the key from the console, and ...
English Manual
Page 22
... near the power cord. If the power cord is inserted into the console. If the treadmill still will recalibrate the incline system. PROBLEM: The incline of the console does not function properly SOLUTION: a. With the key in . Note: A phillips screwdriver with GFCI-equipped outlets. PROBLEM: The power does not turn on page...
... near the power cord. If the power cord is inserted into the console. If the treadmill still will recalibrate the incline system. PROBLEM: The incline of the console does not function properly SOLUTION: a. With the key in . Note: A phillips screwdriver with GFCI-equipped outlets. PROBLEM: The power does not turn on page...
English Manual
Page 23
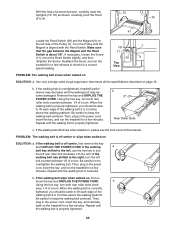
...above the walking platform. If necessary, loosen the Screw (11), move the key and UNPLUG THE POWER CORD. Remove the key and UNPLUG THE POWER CORD. Then, plug in the power cord, insert the key, and run the treadmill for a few minutes. If the walking belt is properly tightened. Be careful... not to 3 inches above the walking platform. b. Then, plug in the power cord, insert the key, and run the treadmill for a few minutes to lift each edge of a turn . When the walking belt is centered. Repeat until the walking belt is properly...
...above the walking platform. If necessary, loosen the Screw (11), move the key and UNPLUG THE POWER CORD. Remove the key and UNPLUG THE POWER CORD. Then, plug in the power cord, insert the key, and run the treadmill for a few minutes. If the walking belt is properly tightened. Be careful... not to 3 inches above the walking platform. b. Then, plug in the power cord, insert the key, and run the treadmill for a few minutes to lift each edge of a turn . When the walking belt is centered. Repeat until the walking belt is properly...

English Manual
Page 24
... recommended heart rates for aerobic exercise. Aerobic Exercise If your goal is to 60 minutes. (During the first few minutes of the treadmill until your heart rate is near the middle number in your body uses easily accessible carbohydrate calories for en- For aerobic exercise, adjust the...at least one day of your muscles and will help prevent postexercise problems. EXERCISE FREQUENCY To maintain or improve your cardiovascular system, the key to achieving the desired results is the recommended heart rate for fat burning and aerobic exercise. Next, find your heart rate as an...
... recommended heart rates for aerobic exercise. Aerobic Exercise If your goal is to 60 minutes. (During the first few minutes of the treadmill until your heart rate is near the middle number in your body uses easily accessible carbohydrate calories for en- For aerobic exercise, adjust the...at least one day of your muscles and will help prevent postexercise problems. EXERCISE FREQUENCY To maintain or improve your cardiovascular system, the key to achieving the desired results is the recommended heart rate for fat burning and aerobic exercise. Next, find your heart rate as an...
English Manual
Page 27
...93 1 Photo Switch Nut 53 1 Belly Pan 94 1 Photo Switch 54 3 Belly Pan Clip 95 1 Photo Switch Bolt 55 1 Reset/Off 96 1 Key/Clip Circuit Breaker 97 1 Photo Switch Wire 56 1 Power Cord Grommet 98 1 Console Base 57 1 Power Cord 99 1 Console 58 1 Controller Board ... Handrail Cover # 1 20" Black Wire, M/F 75 1 Upright Wire "#" indicates a non-illustrated part. 76 1 Right Upright Specifications are subject to 31. Description Key No. Qty. PFTL49406.1 R0507A To locate the parts listed below, see the EXPLODED DRAWING on pages 28 to change 77 6 1" Tek Screw without notice. 27...
...93 1 Photo Switch Nut 53 1 Belly Pan 94 1 Photo Switch 54 3 Belly Pan Clip 95 1 Photo Switch Bolt 55 1 Reset/Off 96 1 Key/Clip Circuit Breaker 97 1 Photo Switch Wire 56 1 Power Cord Grommet 98 1 Console Base 57 1 Power Cord 99 1 Console 58 1 Controller Board ... Handrail Cover # 1 20" Black Wire, M/F 75 1 Upright Wire "#" indicates a non-illustrated part. 76 1 Right Upright Specifications are subject to 31. Description Key No. Qty. PFTL49406.1 R0507A To locate the parts listed below, see the EXPLODED DRAWING on pages 28 to change 77 6 1" Tek Screw without notice. 27...
English Manual
Page 32
...forth above is authorized by ICON. This warranty extends only to 31) LIMITED WARRANTY ICON Health & Fitness, Inc. (ICON) warrants this manual) • the KEY NUMBER and DESCRIPTION of whatsoever nature. ICON's obligation under normal use , costs of removal or installation or other rights which warranty claims are warranted for... gives you , please be prepared to give the following information: • the MODEL NUMBER of the product (PFTL49406.1) • the NAME of the product (PROFORM C 525 treadmill) • the SERIAL NUMBER of the product (see pages 27 to the original purchaser.
...forth above is authorized by ICON. This warranty extends only to 31) LIMITED WARRANTY ICON Health & Fitness, Inc. (ICON) warrants this manual) • the KEY NUMBER and DESCRIPTION of whatsoever nature. ICON's obligation under normal use , costs of removal or installation or other rights which warranty claims are warranted for... gives you , please be prepared to give the following information: • the MODEL NUMBER of the product (PFTL49406.1) • the NAME of the product (PROFORM C 525 treadmill) • the SERIAL NUMBER of the product (see pages 27 to the original purchaser.


