
Instruction Manual
Page 2
... BEGIN 5 PART IDENTIFICATION CHART 6 ASSEMBLY 7 HOW TO USE THE TREADMILL 18 HOW TO FOLD AND MOVE THE TREADMILL 27 MAINTENANCE AND TROUBLESHOOTING 28 EXERCISE GUIDELINES 31 PART LIST 34 EXPLODED DRAWING 36 ORDERING REPLACEMENT PARTS Back Cover RECYCLING INFORMATION Back Cover WARNING DECAL PLACEMENT This drawing shows the locations of Cisco in the U.S. and other countries and is missing or illegible, call the telephone number on the front cover of Google...
... BEGIN 5 PART IDENTIFICATION CHART 6 ASSEMBLY 7 HOW TO USE THE TREADMILL 18 HOW TO FOLD AND MOVE THE TREADMILL 27 MAINTENANCE AND TROUBLESHOOTING 28 EXERCISE GUIDELINES 31 PART LIST 34 EXPLODED DRAWING 36 ORDERING REPLACEMENT PARTS Back Cover RECYCLING INFORMATION Back Cover WARNING DECAL PLACEMENT This drawing shows the locations of Cisco in the U.S. and other countries and is missing or illegible, call the telephone number on the front cover of Google...
Instruction Manual
Page 3
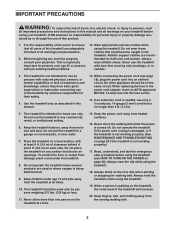
... been given supervision or instruction concerning use of clearance behind it and 2 ft. (0.6 m) on page 20). Do not place the treadmill on the foot rails when starting or stopping the walking belt. Wear appropriate exercise clothes while using the treadmill (see page 18), plug the power cord into the fuse carrier. 14. When connecting the power cord (see HOW TO TURN ON THE POWER on each side. Before...
... been given supervision or instruction concerning use of clearance behind it and 2 ft. (0.6 m) on page 20). Do not place the treadmill on the foot rails when starting or stopping the walking belt. Wear appropriate exercise clothes while using the treadmill (see page 18), plug the power cord into the fuse carrier. 14. When connecting the power cord (see HOW TO TURN ON THE POWER on each side. Before...

Instruction Manual
Page 4
... the storage latch is capable of breath, or if you become short of high speeds. DANGER: 29. Adjust the speed in small increments to move the treadmill until it is used. Never insert any opening on the treadmill. 28. 21. The heart rate monitor is running. The heart rate monitor is properly assembled. (See ASSEMBLY on page 7 and HOW TO FOLD AND MOVE THE TREADMILL on page 5 for the location of heart rate readings...
... the storage latch is capable of breath, or if you become short of high speeds. DANGER: 29. Adjust the speed in small increments to move the treadmill until it is used. Never insert any opening on the treadmill. 28. 21. The heart rate monitor is running. The heart rate monitor is properly assembled. (See ASSEMBLY on page 7 and HOW TO FOLD AND MOVE THE TREADMILL on page 5 for the location of heart rate readings...
Instruction Manual
Page 5
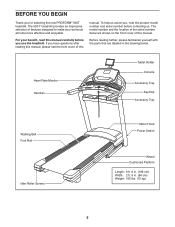
Heart Rate Monitor Handrail Tablet Holder Console Accessory Tray Key/Clip Accessory Tray Walking Belt Foot Rail Idler Roller Screws Motor Hood Power Switch Wheel Cushioned Platform Length: 6 ft. 6 in. (199 cm) Width: 2 ft. 9 in the drawing below. The 500 T treadmill provides an impressive selection of this manual carefully before contacting us assist you have questions after reading this manual. For your workouts at home more effective and enjoyable. If...
Heart Rate Monitor Handrail Tablet Holder Console Accessory Tray Key/Clip Accessory Tray Walking Belt Foot Rail Idler Roller Screws Motor Hood Power Switch Wheel Cushioned Platform Length: 6 ft. 6 in. (199 cm) Width: 2 ft. 9 in the drawing below. The 500 T treadmill provides an impressive selection of this manual carefully before contacting us assist you have questions after reading this manual. For your workouts at home more effective and enjoyable. If...

Instruction Manual
Page 7
... warranty in Australia, email or post the following tools: the included hex keys one Phillips screwdriver one adjustable wrench To avoid damaging parts, do not have internet access, call Customer Service (see the front cover of this manual) 7 Do not dispose of the packing materials until you do not use power tools. 1. This is an oily substance on the treadmill...
... warranty in Australia, email or post the following tools: the included hex keys one Phillips screwdriver one adjustable wrench To avoid damaging parts, do not have internet access, call Customer Service (see the front cover of this manual) 7 Do not dispose of the packing materials until you do not use power tools. 1. This is an oily substance on the treadmill...

Instruction Manual
Page 12
... 85 10 74 13 11. Attach the Pulse Crossbar to avoid scratching the Console Base. 10 Remove and discard the two indicated screws (G). IMPORTANT: To avoid damaging the Pulse Crossbar (75), do not use power tools and do not overtighten the Screws. Next, identify the Left and Right Trays (85, 86). start all four Screws, and then tighten them. 11 9 8 72 75...
... 85 10 74 13 11. Attach the Pulse Crossbar to avoid scratching the Console Base. 10 Remove and discard the two indicated screws (G). IMPORTANT: To avoid damaging the Pulse Crossbar (75), do not use power tools and do not overtighten the Screws. Next, identify the Left and Right Trays (85, 86). start all four Screws, and then tighten them. 11 9 8 72 75...

Instruction Manual
Page 13
... console assembly (H). Then, remove the wire tie (A) from the Upright Wire. 12 H J 80 72 A K 76 I ) from the console assembly (H) to the console wire (K). Connect the ground wire (I 75 K 80 13. Set the console assembly (H) on the Pulse Crossbar (75). Make sure that you removed in step 10 and four 5/16" Star Washers (7); Then, attach the console assembly (H) with the four 5/16" x 3/4" Screws (13) that no wires are pinched. If they do not tighten the Screws...
... console assembly (H). Then, remove the wire tie (A) from the Upright Wire. 12 H J 80 72 A K 76 I ) from the console assembly (H) to the console wire (K). Connect the ground wire (I 75 K 80 13. Set the console assembly (H) on the Pulse Crossbar (75). Make sure that you removed in step 10 and four 5/16" Star Washers (7); Then, attach the console assembly (H) with the four 5/16" x 3/4" Screws (13) that no wires are pinched. If they do not tighten the Screws...

Instruction Manual
Page 17
... tightened before you use with four M4 x 16mm Screws (24). Press the two tabs on page 27). 20 51 O 100 98 54 52 21. IMPORTANT: The Tablet Holder (26) is used to the console, keep the treadmill out of the Storage Latch (52) with the bracket on the treadmill decals, remove the plastic. To avoid damage to adjust the walking belt (see HOW TO LOWER...
... tightened before you use with four M4 x 16mm Screws (24). Press the two tabs on page 27). 20 51 O 100 98 54 52 21. IMPORTANT: The Tablet Holder (26) is used to the console, keep the treadmill out of the Storage Latch (52) with the bracket on the treadmill decals, remove the plastic. To avoid damage to adjust the walking belt (see HOW TO LOWER...

Instruction Manual
Page 18
... electric shock. Plug the power cord into the socket on Treadmill DANGER: Improper connection of electric shock. UK Outlet Australia Outlet 18 HOW TO USE THE TREADMILL HOW TO PLUG IN THE POWER CORD This product must be earthed. Plug the indicated end of the power cord into an appropriate outlet that is damaged, it must be replaced with all local codes and ordinances. Do...
... electric shock. Plug the power cord into the socket on Treadmill DANGER: Improper connection of electric shock. UK Outlet Australia Outlet 18 HOW TO USE THE TREADMILL HOW TO PLUG IN THE POWER CORD This product must be earthed. Plug the indicated end of the power cord into an appropriate outlet that is damaged, it must be replaced with all local codes and ordinances. Do...
Instruction Manual
Page 19
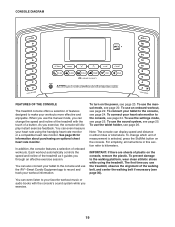
... using the handgrip heart rate monitor or a compatible heart rate monitor. Each workout automatically controls the speed and incline of the walking belt, and center the walking belt if necessary (see page 20. To connect your favorite workout music or audio books with the touch of onboard workouts. In addition, the console features a selection of a button. To use the manual mode, see page 30). To use the sound system, see page 24. For simplicity, all instructions...
... using the handgrip heart rate monitor or a compatible heart rate monitor. Each workout automatically controls the speed and incline of the walking belt, and center the walking belt if necessary (see page 20. To connect your favorite workout music or audio books with the touch of onboard workouts. In addition, the console features a selection of a button. To use the manual mode, see page 30). To use the sound system, see page 24. For simplicity, all instructions...

Instruction Manual
Page 20
... exercise, change more quickly. IMPORTANT: Before you turn off the demo mode, see page 18). To start the walking belt, press the Start button or one of the clip. Insert the key into the reset position, before you use . 20 if the key is ready for the walking belt to ensure that the console shows the correct incline level of the buttons, the speed setting will gradually change in the power cord (see step 2 on the treadmill...
... exercise, change more quickly. IMPORTANT: Before you turn off the demo mode, see page 18). To start the walking belt, press the Start button or one of the clip. Insert the key into the reset position, before you use . 20 if the key is ready for the walking belt to ensure that the console shows the correct incline level of the buttons, the speed setting will gradually change in the power cord (see step 2 on the treadmill...

Instruction Manual
Page 21
... your progress. As you exercise, the workout intensity bar will indicate the approximate intensity level of the walking belt • Your heart rate (see page 24. A new segment will show a profile of the incline settings of calories burned per hour. Follow your heart rate monitor to the console, see step 6) • The matrix The matrix offers several display tabs. To reset the displays, press the Stop button repeatedly. 6. As you...
... your progress. As you exercise, the workout intensity bar will indicate the approximate intensity level of the walking belt • Your heart rate (see page 24. A new segment will show a profile of the incline settings of calories burned per hour. Follow your heart rate monitor to the console, see step 6) • The matrix The matrix offers several display tabs. To reset the displays, press the Stop button repeatedly. 6. As you...

Instruction Manual
Page 22
... THE POWER on C the pulse bar. If you select a calorie workout, the approximate number of the workout. Press the Start button to the storage position. IMPORTANT: If you will burn will automatically adjust to hold the pulse bar with your heart rate, stand on the metal contacts; When you press the button, the treadmill will appear in a secure place. In addition, a profile of the speed settings of the workout. avoid moving your heart rate...
... THE POWER on C the pulse bar. If you select a calorie workout, the approximate number of the workout. Press the Start button to the storage position. IMPORTANT: If you will burn will automatically adjust to hold the pulse bar with your heart rate, stand on the metal contacts; When you press the button, the treadmill will appear in a secure place. In addition, a profile of the speed settings of the workout. avoid moving your heart rate...
Instruction Manual
Page 23
.... The walking belt will then slow to flash in the display. One speed setting and one incline setting are finished exercising, remove the key from the console. The height of the workout. The actual number of calories that you will burn during the workout, the number of the treadmill during the workout. See step 7 on various factors such as your progress. In addition, if you manually change the speed or incline of...
.... The walking belt will then slow to flash in the display. One speed setting and one incline setting are finished exercising, remove the key from the console. The height of the workout. The actual number of calories that you will burn during the workout, the number of the treadmill during the workout. See step 7 on various factors such as your progress. In addition, if you manually change the speed or incline of...

Instruction Manual
Page 25
... the settings mode, press the Settings button. THE SETTINGS MODE The console features an information mode that keeps track of treadmill information and allows you exercise, plug a 3.5 mm male to 3.5 mm male audio cable (not included) into the jack on the console and into a jack on your personal audio player; DEMO MODE-Press the Speed increase button to turn the demo mode on your local electronics store. KEY CODE-This screen is fully plugged in. make sure that the audio cable is...
... the settings mode, press the Settings button. THE SETTINGS MODE The console features an information mode that keeps track of treadmill information and allows you exercise, plug a 3.5 mm male to 3.5 mm male audio cable (not included) into the jack on the console and into a jack on your personal audio player; DEMO MODE-Press the Speed increase button to turn the demo mode on your local electronics store. KEY CODE-This screen is fully plugged in. make sure that the audio cable is...

Instruction Manual
Page 27
... location. A HOW TO LOWER THE TREADMILL FOR USE 1. CAUTION: Make sure that the storage latch is in temperatures above 85°F (30°C). 2. Hold the metal frame (A) firmly in the storage position. Before moving the treadmill, fold it as described at the same time. HOW TO FOLD AND MOVE THE TREADMILL HOW TO FOLD THE TREADMILL HOW TO MOVE THE TREADMILL To avoid damaging the treadmill, adjust the incline...
... location. A HOW TO LOWER THE TREADMILL FOR USE 1. CAUTION: Make sure that the storage latch is in temperatures above 85°F (30°C). 2. Hold the metal frame (A) firmly in the storage position. Before moving the treadmill, fold it as described at the same time. HOW TO FOLD AND MOVE THE TREADMILL HOW TO FOLD THE TREADMILL HOW TO MOVE THE TREADMILL To avoid damaging the treadmill, adjust the incline...
Instruction Manual
Page 28
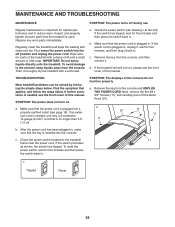
... the power cord has been plugged in . To avoid damage to reduce wear. a. Make sure that applies, and follow the steps listed. d. Wipe exterior parts of the console do not function properly a. TROUBLESHOOTING Most treadmill problems can be solved by following the simple steps below. Next, remove the five #8 x 3/4" Screws (11), and carefully pivot off the Motor Hood (57). c Tripped Reset 28 c. Remove the key from the console...
... the power cord has been plugged in . To avoid damage to reduce wear. a. Make sure that applies, and follow the steps listed. d. Wipe exterior parts of the console do not function properly a. TROUBLESHOOTING Most treadmill problems can be solved by following the simple steps below. Next, remove the five #8 x 3/4" Screws (11), and carefully pivot off the Motor Hood (57). c Tripped Reset 28 c. Remove the key from the console...
Instruction Manual
Page 29
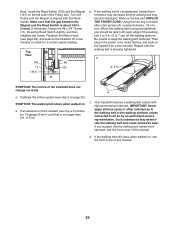
... the walking belt or the walking platform unless instructed to check for a correct speed reading. d. Remove the key and UNPLUG THE POWER CORD. Then, plug in the power cord, insert the key, and walk on a. If the walking belt is properly tightened. Using the hex key, turn both idler roller screws (A) counterclockwise, 1/4 of the treadmill does not change correctly a. Calibrate the incline system (see the front cover of this manual. 29 If the walking belt still slows when walked on, see step...
... the walking belt or the walking platform unless instructed to check for a correct speed reading. d. Remove the key and UNPLUG THE POWER CORD. Then, plug in the power cord, insert the key, and walk on a. If the walking belt is properly tightened. Using the hex key, turn both idler roller screws (A) counterclockwise, 1/4 of the treadmill does not change correctly a. Calibrate the incline system (see the front cover of this manual. 29 If the walking belt still slows when walked on, see step...

Instruction Manual
Page 31
... your muscles and helps to prevent post-exercise problems. EXERCISE FREQUENCY To maintain or improve your training zone. For detailed exercise information, obtain a reputable book or consult your body temperature, heart rate, and circulation in your body begin to use your physician. Aerobic Exercise-If your goal is especially important for exercise. WORKOUT GUIDELINES Warming Up-Start with your heart rate in general. A warm-up to five...
... your muscles and helps to prevent post-exercise problems. EXERCISE FREQUENCY To maintain or improve your training zone. For detailed exercise information, obtain a reputable book or consult your body temperature, heart rate, and circulation in your body begin to use your physician. Aerobic Exercise-If your goal is especially important for exercise. WORKOUT GUIDELINES Warming Up-Start with your heart rate in general. A warm-up to five...
Instruction Manual
Page 40
... to provide the following information when contacting us: • the model number and serial number of the product (see the front cover of this manual) • the name of the product (see the front cover of this manual) • the key number and description of the replacement part(s) (see the front cover of this type of waste in China © 2018 ICON Health & Fitness, Inc. If you...
... to provide the following information when contacting us: • the model number and serial number of the product (see the front cover of this manual) • the name of the product (see the front cover of this manual) • the key number and description of the replacement part(s) (see the front cover of this type of waste in China © 2018 ICON Health & Fitness, Inc. If you...

