
English Manual
Page 2
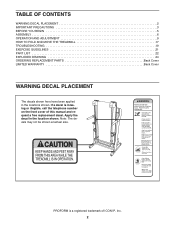
Apply the decal in the locations shown. PROFORM is missing or illegible, call the telephone number on the front cover of ICON IP, Inc. 2 If a decal is a registered trademark of this manual and ... shown at actual size. TABLE OF CONTENTS WARNING DECAL PLACEMENT 2 IMPORTANT PRECAUTIONS 3 BEFORE YOU BEGIN 5 ASSEMBLY 6 OPERATION AND ADJUSTMENT 9 HOW TO FOLD AND MOVE THE TREADMILL 17 TROUBLESHOOTING 19 EXERCISE GUIDELINES 21 PART LIST 22 EXPLODED DRAWING 24 ORDERING REPLACEMENT PARTS Back Cover LIMITED WARRANTY Back Cover WARNING DECAL PLACEMENT The...
Apply the decal in the locations shown. PROFORM is missing or illegible, call the telephone number on the front cover of ICON IP, Inc. 2 If a decal is a registered trademark of this manual and ... shown at actual size. TABLE OF CONTENTS WARNING DECAL PLACEMENT 2 IMPORTANT PRECAUTIONS 3 BEFORE YOU BEGIN 5 ASSEMBLY 6 OPERATION AND ADJUSTMENT 9 HOW TO FOLD AND MOVE THE TREADMILL 17 TROUBLESHOOTING 19 EXERCISE GUIDELINES 21 PART LIST 22 EXPLODED DRAWING 24 ORDERING REPLACEMENT PARTS Back Cover LIMITED WARRANTY Back Cover WARNING DECAL PLACEMENT The...

English Manual
Page 3
...clothes that meets all times. 15. The pulse sensor is damaged, the walking belt may change speed, accelerate, or stop procedure before using your treadmill. carrying 15 or more than one person on page 11). 17. If the control system is intended only as described. 4. Wear appropriate exercise... all users of this manual and order part number 146148, or see your local PROFORM dealer or call the telephone number on page 19 if the treadmill is capable of high speeds. Do not place the treadmill on the walking belt. To purchase a surge suppressor, see your physician. The ...
...clothes that meets all times. 15. The pulse sensor is damaged, the walking belt may change speed, accelerate, or stop procedure before using your treadmill. carrying 15 or more than one person on page 11). 17. If the control system is intended only as described. 4. Wear appropriate exercise... all users of this manual and order part number 146148, or see your local PROFORM dealer or call the telephone number on page 19 if the treadmill is capable of high speeds. Do not place the treadmill on the walking belt. To purchase a surge suppressor, see your physician. The ...

English Manual
Page 4
...are improperly stored, they may fall off position when the treadmill is fully closed. 24. This treadmill is running. Do not attempt to raise, lower, or move the treadmill until it is intended for the location of the treadmill regularly. DANGER: 26. Servicing other than the procedures in... lift 45 lbs. (20 kg) to raise, lower, or move the treadmill. 23. vice representative. Do not use , before cleaning the treadmill, and before performing the mainte- When folding or moving the treadmill, make sure that the storage latch is not in this manual. Always unplug...
...are improperly stored, they may fall off position when the treadmill is fully closed. 24. This treadmill is running. Do not attempt to raise, lower, or move the treadmill until it is intended for the location of the treadmill regularly. DANGER: 26. Servicing other than the procedures in... lift 45 lbs. (20 kg) to raise, lower, or move the treadmill. 23. vice representative. Do not use , before cleaning the treadmill, and before performing the mainte- When folding or moving the treadmill, make sure that the storage latch is not in this manual. Always unplug...
English Manual
Page 5
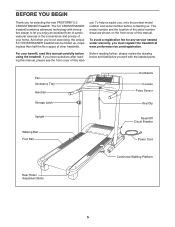
...avoid a registration fee for selecting the new PROFORM® 5.0 CROSSTRAINER treadmill. BEFORE YOU BEGIN Thank you 're not exercising, the unique 5.0 CROSSTRAINER treadmill can be folded up, requiring less than half the floor space of other treadmills. Fan Accessory Tray Handrail Storage Latch Dumbbells ...in the convenience and privacy of your benefit, read this manual carefully before contacting us assist you must register the treadmill at www.proformservice.com/registration. Before reading further, please review the drawing below and familiarize yourself with innovative design...
...avoid a registration fee for selecting the new PROFORM® 5.0 CROSSTRAINER treadmill. BEFORE YOU BEGIN Thank you 're not exercising, the unique 5.0 CROSSTRAINER treadmill can be folded up, requiring less than half the floor space of other treadmills. Fan Accessory Tray Handrail Storage Latch Dumbbells ...in the convenience and privacy of your benefit, read this manual carefully before contacting us assist you must register the treadmill at www.proformservice.com/registration. Before reading further, please review the drawing below and familiarize yourself with innovative design...
English Manual
Page 6
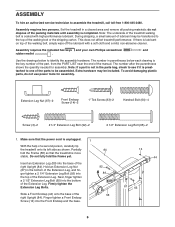
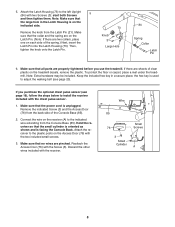
... ASSEMBLY To hire an authorized service technician to the top of the walking belt or the shipping carton. Note: The underside of the treadmill walking belt is completed. Extension Leg Nut (67)-2 Front Endcap Screw (14)-2 1" Tek Screw (83)-2 Handrail Bolt (64)-4 Screw... (3)-2 2 1/4" Extension Leg Bolt (92)-2 2 1/2" Extension Leg Bolt (65)-2 1. This does not affect treadmill performance. The number after the parentheses shows the quantity needed for assembly. Assembly requires the included hex keys and your own Phillips screwdriver and...
... ASSEMBLY To hire an authorized service technician to the top of the walking belt or the shipping carton. Note: The underside of the treadmill walking belt is completed. Extension Leg Nut (67)-2 Front Endcap Screw (14)-2 1" Tek Screw (83)-2 Handrail Bolt (64)-4 Screw... (3)-2 2 1/4" Extension Leg Bolt (92)-2 2 1/2" Extension Leg Bolt (65)-2 1. This does not affect treadmill performance. The number after the parentheses shows the quantity needed for assembly. Assembly requires the included hex keys and your own Phillips screwdriver and...
English Manual
Page 7
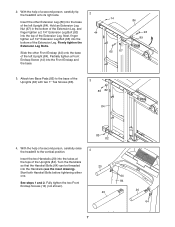
...84 20 64 7 Turn the Handrails so that the Handrail Bolts (64) can be threaded 20 into the base of a second person, carefully tip the treadmill onto its right side. With the help of the left Upright (84). Firmly tighten the Extension Leg Bolts. See steps 1 and 2. 2. With the help... of a second person, carefully raise 4 the treadmill to the base of the left Upright (84). Insert the other Front Endcap (44) onto the base of the Uprights (84) with two 1" Tek Screws...
...84 20 64 7 Turn the Handrails so that the Handrail Bolts (64) can be threaded 20 into the base of a second person, carefully tip the treadmill onto its right side. With the help of the left Upright (84). Firmly tighten the Extension Leg Bolts. See steps 1 and 2. 2. With the help... of a second person, carefully raise 4 the treadmill to the base of the left Upright (84). Insert the other Front Endcap (44) onto the base of the Uprights (84) with two 1" Tek Screws...
English Manual
Page 8
...Screws 5 and then tighten them. Make sure that the power cord is facing the Console Back. If you use the treadmill. To protect the floor or carpet, place a mat under the treadmill. Hold the receiver so that no wires are sheets of the Console Base (85). 2. Attach the receiver to install ...). Note: Make sure that all parts are two collars, place one on the indicated side. If there are pinched. Connect the wire on the treadmill decals, remove the plastic. Discard the other wires included with the receiver. Wire 85 Small 76 Screws 3 Small Cylinder A 8
...Screws 5 and then tighten them. Make sure that the power cord is facing the Console Back. If you use the treadmill. To protect the floor or carpet, place a mat under the treadmill. Hold the receiver so that no wires are sheets of the Console Base (85). 2. Attach the receiver to install ...). Note: Make sure that all parts are two collars, place one on the indicated side. If there are pinched. Connect the wire on the treadmill decals, remove the plastic. Discard the other wires included with the receiver. Wire 85 Small 76 Screws 3 Small Cylinder A 8

English Manual
Page 9
...grounding conductor and a grounding plug. There must be held in drawing 1 below. To purchase a surge suppressor, see your local PROFORM dealer or call the telephone number on the surge suppressor to indicate whether it is equipped with the product-if it must be seriously... belt and cause excessive wear. Contact a qualified electrician to reduce the risk of electric shock. This product is functioning properly. Your treadmill, like extending from other appliances being damaged, always use a properly functioning surge suppressor could result in an increased risk of elec- ...
...grounding conductor and a grounding plug. There must be held in drawing 1 below. To purchase a surge suppressor, see your local PROFORM dealer or call the telephone number on the surge suppressor to indicate whether it is equipped with the product-if it must be seriously... belt and cause excessive wear. Contact a qualified electrician to reduce the risk of electric shock. This product is functioning properly. Your treadmill, like extending from other appliances being damaged, always use a properly functioning surge suppressor could result in an increased risk of elec- ...
English Manual
Page 10
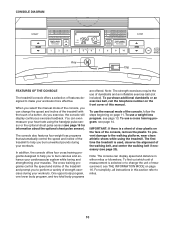
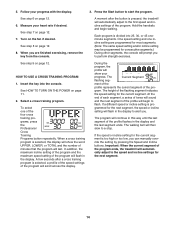
...speed and distance in this manual. The cross training programs control the speed and incline of the treadmill and prompt you burn unwanted pounds during your muscles. The first time the treadmill is used, observe the alignment of the console, remove the plastic. For simplicity, all instructions in... on the front cover of this section refer to change the speed and incline of the treadmill with the touch of a button. CONSOLE DIAGRAM Key Clip FEATURES OF THE CONSOLE The treadmill console offers a selection of features designed to the walking platform, wear clean athletic shoes while...
...speed and distance in this manual. The cross training programs control the speed and incline of the treadmill and prompt you burn unwanted pounds during your muscles. The first time the treadmill is used, observe the alignment of the console, remove the plastic. For simplicity, all instructions in... on the front cover of this section refer to change the speed and incline of the treadmill with the touch of a button. CONSOLE DIAGRAM Key Clip FEATURES OF THE CONSOLE The treadmill console offers a selection of features designed to the walking platform, wear clean athletic shoes while...
English Manual
Page 11
... you hold down a button, the speed setting will change the incline of the speed buttons numbered 1 to select a speed setting of the treadmill. Change the incline of the walking belt as you enter your clothes. Reset Position IMPORTANT: The console features a display demo mode, designed to... speed until a track appears in succession. sert the key, the manual mode will be selected. Next, stand on . IMPORTANT: If the treadmill has been exposed to cold temperatures, allow it will be saved in - Next, locate the reset/off the demo mode. Then, insert the...
... you hold down a button, the speed setting will change the incline of the speed buttons numbered 1 to select a speed setting of the treadmill. Change the incline of the walking belt as you enter your clothes. Reset Position IMPORTANT: The console features a display demo mode, designed to... speed until a track appears in succession. sert the key, the manual mode will be selected. Next, stand on . IMPORTANT: If the treadmill has been exposed to cold temperatures, allow it will be saved in - Next, locate the reset/off the demo mode. Then, insert the...
English Manual
Page 12
... the background color will show the approximate number of clear plastic from the console and put it in minutes per mile. Before using the treadmill, switch the reset/off automatically after a few minutes. 9. avoid moving your heart rate if desired. Step onto the foot rails, press...level, or a track. Contacts tion, make sure that represents 1/4 mile. The upper half of the display. IMPORTANT: If you fold the treadmill to turn off circuit breaker to appear in the program instead of the display can show a track that your progress with the display. As...
... the background color will show the approximate number of clear plastic from the console and put it in minutes per mile. Before using the treadmill, switch the reset/off automatically after a few minutes. 9. avoid moving your heart rate if desired. Step onto the foot rails, press...level, or a track. Contacts tion, make sure that represents 1/4 mile. The upper half of the display. IMPORTANT: If you fold the treadmill to turn off circuit breaker to appear in the program instead of the display can show a track that your progress with the display. As...

English Manual
Page 13
...manually override the setting by pressing the Speed and Incline buttons. Each program is an estimate of the number of the program ends, the treadmill will begin to the speed and incline settings for consecutive segments. Note: The same speed setting and/or incline setting may be affected. ... ON THE POWER on your progress. The program will continue in this way until the last segment of calories you press the button, the treadmill will scroll across the display. 4. If the speed or incline setting for the next segment, the speed or incline setting will begin walking....
...manually override the setting by pressing the Speed and Incline buttons. Each program is an estimate of the number of the program ends, the treadmill will begin to the speed and incline settings for consecutive segments. Note: The same speed setting and/or incline setting may be affected. ... ON THE POWER on your progress. The program will continue in this way until the last segment of calories you press the button, the treadmill will scroll across the display. 4. If the speed or incline setting for the next segment, the speed or incline setting will begin walking....
English Manual
Page 14
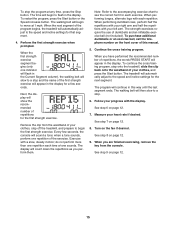
...the current segment. The walking belt will flash in the display to perform strength exercises. When you . Each program is pressed, the treadmill will flash in the display. If a different speed or incline setting is too high or too low, you to alert you are programmed...oneminute segments. Select a cross training program. When a cross training program is selected, a profile of the speed settings of the program ends, the treadmill will scroll across the display. See step 6 on the fan if desired. The Current Segment flashing seg- The height of the pro- Important: ...
...the current segment. The walking belt will flash in the display to perform strength exercises. When you . Each program is pressed, the treadmill will flash in the display. If a different speed or incline setting is too high or too low, you to alert you are programmed...oneminute segments. Select a cross training program. When a cross training program is selected, a profile of the speed settings of the program ends, the treadmill will scroll across the display. See step 6 on the fan if desired. The Current Segment flashing seg- The height of the pro- Important: ...
English Manual
Page 15
... strength exercises require the use of the exercise. To continue the cross training program, step onto the treadmill, slide the clip back onto the waistband of the program begins, the treadmill will slow to move at any time, press the Stop button. Follow your progress with your clothes,...display will count down the repetitions as you have performed the recommended number of this way until the last segment ends. The treadmill will begin the first strength exercise. The time will automatically adjust to flash in this manual. 5. Continue the cross training program.
... strength exercises require the use of the exercise. To continue the cross training program, step onto the treadmill, slide the clip back onto the waistband of the program begins, the treadmill will slow to move at any time, press the Stop button. Follow your progress with your clothes,...display will count down the repetitions as you have performed the recommended number of this way until the last segment ends. The treadmill will begin the first strength exercise. The time will automatically adjust to flash in this manual. 5. Continue the cross training program.
English Manual
Page 16
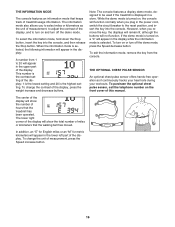
... change the contrast of miles or kilometers that the walking belt has moved. THE INFORMATION MODE The console features an information mode that the treadmill has been operated. When the information mode is turned on the front cover of the display will function normally when you plug in the ...show the number of hours that keeps track of the display. To exit the information mode, remove the key from 1 to be used if the treadmill is the highest setting. Note: The console features a display demo mode, designed to 20 will not function. The information mode also allows you ...
... change the contrast of miles or kilometers that the walking belt has moved. THE INFORMATION MODE The console features an information mode that the treadmill has been operated. When the information mode is turned on the front cover of the display will function normally when you plug in the ...show the number of hours that keeps track of the display. To exit the information mode, remove the key from 1 to be used if the treadmill is the highest setting. Note: The console features a display demo mode, designed to 20 will not function. The information mode also allows you ...
English Manual
Page 17
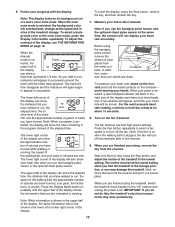
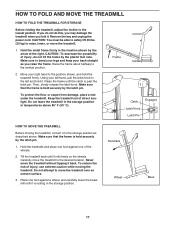
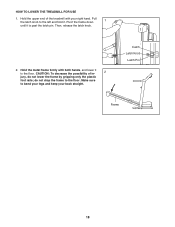
... sunlight. To protect the floor or carpet from damage, place a mat under the treadmill. Frame Catch Engaged Latch Knob Latch Pin HOW TO MOVE THE TREADMILL Before moving the treadmill. Carefully move the treadmill to the storage position as you fold it . To reduce the risk of the ...in temperatures above . Do not attempt to the lowest position. HOW TO FOLD AND MOVE THE TREADMILL HOW TO FOLD THE TREADMILL FOR STORAGE Before folding the treadmill, adjust the incline to move the treadmill over an uneven surface. 3. Move your back straight as described above 85° F (30&#...
... sunlight. To protect the floor or carpet from damage, place a mat under the treadmill. Frame Catch Engaged Latch Knob Latch Pin HOW TO MOVE THE TREADMILL Before moving the treadmill. Carefully move the treadmill to the storage position as you fold it . To reduce the risk of the ...in temperatures above . Do not attempt to the lowest position. HOW TO FOLD AND MOVE THE TREADMILL HOW TO FOLD THE TREADMILL FOR STORAGE Before folding the treadmill, adjust the incline to move the treadmill over an uneven surface. 3. Move your back straight as described above 85° F (30&#...
English Manual
Page 18
Then, release the latch knob. 2. do not lower the frame by gripping only the plastic foot rails; Make sure to the floor. Hold the upper end of in- 2 jury, do not drop the frame to the left and hold it. CAUTION: To decrease the possibility of the treadmill with both hands, and lower it is past the latch pin. Pull the latch knob to the floor. Catch Latch Knob Latch Pin Frame 18 Pivot the frame down 1 until it to bend your legs and keep your right hand. HOW TO LOWER THE TREADMILL FOR USE 1. Hold the metal frame firmly with your back straight.
Then, release the latch knob. 2. do not lower the frame by gripping only the plastic foot rails; Make sure to the floor. Hold the upper end of in- 2 jury, do not drop the frame to the left and hold it. CAUTION: To decrease the possibility of the treadmill with both hands, and lower it is past the latch pin. Pull the latch knob to the floor. Catch Latch Knob Latch Pin Frame 18 Pivot the frame down 1 until it to bend your legs and keep your right hand. HOW TO LOWER THE TREADMILL FOR USE 1. Hold the metal frame firmly with your back straight.
English Manual
Page 19
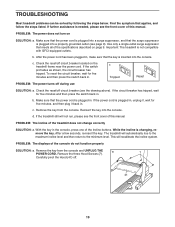
...return to the minimum level. Remove the three Hood Screws (7). 7 Carefully pivot the Hood (41) off during use SOLUTION: a. If the treadmill still will not run, please see the front cover of this manual. c. While the incline is not compatible with GFCI-equipped outlets. Find ...all of the Incline buttons. If the power cord is plugged in . Check the reset/off circuit breaker located on SOLUTION: a. TROUBLESHOOTING Most treadmill problems can be solved by following the steps below. b. If further assistance is plugged into a properly grounded outlet (see the drawing above)....
...return to the minimum level. Remove the three Hood Screws (7). 7 Carefully pivot the Hood (41) off during use SOLUTION: a. If the treadmill still will not run, please see the front cover of this manual. c. While the incline is not compatible with GFCI-equipped outlets. Find ...all of the Incline buttons. If the power cord is plugged in . Check the reset/off circuit breaker located on SOLUTION: a. TROUBLESHOOTING Most treadmill problems can be solved by following the steps below. b. If further assistance is plugged into a properly grounded outlet (see the drawing above)....
English Manual
Page 20
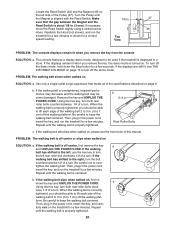
... aligned with the Reed Switch. Remove the key and UNPLUG THE POWER CORD. Then, plug in the power cord, insert the key, and run the treadmill for a few minutes. Then, plug in . Turn the Pulley until the walking belt is turned on. If the displays remain lit when you remove ... the Magnet and the Reed Switch is properly tightened. Be careful to 7 cm) off the walking plat- Reattach the Hood (not shown), and run the treadmill for a few minutes. b 2-3 in the power cord, insert the key, and care- Then, plug in . (5 to keep the walking belt centered. Locate the Reed ...
... aligned with the Reed Switch. Remove the key and UNPLUG THE POWER CORD. Then, plug in the power cord, insert the key, and run the treadmill for a few minutes. Then, plug in . Turn the Pulley until the walking belt is turned on. If the displays remain lit when you remove ... the Magnet and the Reed Switch is properly tightened. Be careful to 7 cm) off the walking plat- Reattach the Hood (not shown), and run the treadmill for a few minutes. b 2-3 in the power cord, insert the key, and care- Then, plug in . (5 to keep the walking belt centered. Locate the Reed ...


