

Uk Manual
Page 3
... information before the personal trainer describes the change. 3 Always hold the handrails whilst using the treadmill. Adjust the speed in use. (See the drawing on page 5 for the "chirp" and be used. 11. Always remove the key, unplug the power cord, and move the on/off switch to the off position when... the treadmill is not in small increments to raise, lower, or move the treadmill until it is properly assembled. (See ASSEMBLY on page 6, and HOW TO...
... information before the personal trainer describes the change. 3 Always hold the handrails whilst using the treadmill. Adjust the speed in use. (See the drawing on page 5 for the "chirp" and be used. 11. Always remove the key, unplug the power cord, and move the on/off switch to the off position when... the treadmill is not in small increments to raise, lower, or move the treadmill until it is properly assembled. (See ASSEMBLY on page 6, and HOW TO...
Uk Manual
Page 5
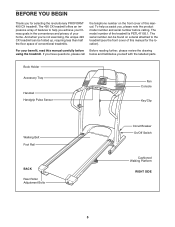
... Fan Console Key/Clip Walking Belt Foot Rail BACK Rear Roller Adjustment Bolts Circuit Breaker On/Off Switch Cushioned Walking Platform RIGHT SIDE 5 The model number of this manual. The 490 CX treadmill offers an impressive array of features to the treadmill (see the front cover of this manual for selecting the revolutionary PROFORM® 490 CX treadmill. For...
... Fan Console Key/Clip Walking Belt Foot Rail BACK Rear Roller Adjustment Bolts Circuit Breaker On/Off Switch Cushioned Walking Platform RIGHT SIDE 5 The model number of this manual. The 490 CX treadmill offers an impressive array of features to the treadmill (see the front cover of this manual for selecting the revolutionary PROFORM® 490 CX treadmill. For...
Uk Manual
Page 6
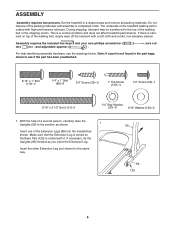
... so the Base Pad (125) is coated with a soft cloth and a mild, non-abrasive cleaner. 1 1/2" Screw Assembly requires the included hex keys and your own phillips screwdriver ters , and adjustable spanner . ,wire cut- Insert the other Extension Leg (not shown) in a cleared area and ...not dispose of the walking belt, simply wipe off the lubricant with high1-"pTeerkfoSrmcraenwce lubricant. Note: The underside of the treadmill walking belt is underneath it. Set the treadmill in the same way. 96 86 125 6 For help of a second person, carefully raise the Uprights (96) ...
... so the Base Pad (125) is coated with a soft cloth and a mild, non-abrasive cleaner. 1 1/2" Screw Assembly requires the included hex keys and your own phillips screwdriver ters , and adjustable spanner . ,wire cut- Insert the other Extension Leg (not shown) in a cleared area and ...not dispose of the walking belt, simply wipe off the lubricant with high1-"pTeerkfoSrmcraenwce lubricant. Note: The underside of the treadmill walking belt is underneath it. Set the treadmill in the same way. 96 86 125 6 For help of a second person, carefully raise the Uprights (96) ...

Uk Manual
Page 9
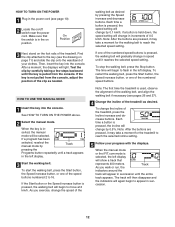
... easily and snap into the right Handrail (108). Note: Extra hardware may be included. To protect the floor or carpet, place a mat under the treadmill. The other wires included with the two screws. Thread two 1/4" x 1" Bolts (88) with the 3/4" Screw (33). After you use the... one connector and try again. If you purchase the optional chest pulse sensor (see pages 26 and 27). Keep the included hex keys in the console assembly. The large hex key is a sheet of the receiver and is unplugged. Wire A Cylinder 104 105 33 3. Make sure to the indicated wire extending...
... easily and snap into the right Handrail (108). Note: Extra hardware may be included. To protect the floor or carpet, place a mat under the treadmill. The other wires included with the two screws. Thread two 1/4" x 1" Bolts (88) with the 3/4" Screw (33). After you use the... one connector and try again. If you purchase the optional chest pulse sensor (see pages 26 and 27). Keep the included hex keys in the console assembly. The large hex key is a sheet of the receiver and is unplugged. Wire A Cylinder 104 105 33 3. Make sure to the indicated wire extending...

Uk Manual
Page 11
Key FEATURES OF THE CONSOLE The treadmill console offers an impressive array of the console, follow the steps beginning on page 12. Using a stereo audio cable, you can be changed with the touch of a button. iFIT.com programs automatically control the speed and incline of the treadmill can connect the treadmill... using the built-in your home. CONSOLE DIAGRAM Note: If there is a sheet of clear plastic Clip on the face of the treadmill to keep your heart rate near a target heart rate during your workouts. As you through an effective workout. highenergy music provides added ...
Key FEATURES OF THE CONSOLE The treadmill console offers an impressive array of the console, follow the steps beginning on page 12. Using a stereo audio cable, you can be changed with the touch of a button. iFIT.com programs automatically control the speed and incline of the treadmill can connect the treadmill... using the built-in your home. CONSOLE DIAGRAM Note: If there is a sheet of clear plastic Clip on the face of the treadmill to keep your heart rate near a target heart rate during your workouts. As you through an effective workout. highenergy music provides added ...
Uk Manual
Page 12
...around the track will change in speed until the key is in- Each time a button is not pulled from the console. Make sure that represents 400 meters. When the key is pulled from the console, adjust the position of the treadmill. Note: After the buttons are pressed, it... may take a moment for the treadmill to 16. cession. 12 Then, insert the key into the console. When the manual mode or...
...around the track will change in speed until the key is in- Each time a button is not pulled from the console. Make sure that represents 400 meters. When the key is pulled from the console, adjust the position of the treadmill. Note: After the buttons are pressed, it... may take a moment for the treadmill to 16. cession. 12 Then, insert the key into the console. When the manual mode or...

Uk Manual
Page 13
... in either kilometres or miles. To turn on the handrail-avoid moving your heart rate will be at the lowest setting when the treadmill is selected, remove the key. Note: If the fan is left on the fan at the same time, the console will not dis- The incline must be shown..., the heart symbol in this section refer to the storage position or the treadmill will be damaged. To change the unit of measurement, first hold down the Stop button whilst inserting the key into the console. Before using the treadmill, switch the on page 28), the distance you have walked or run, and...
... in either kilometres or miles. To turn on the handrail-avoid moving your heart rate will be at the lowest setting when the treadmill is selected, remove the key. Note: If the fan is left on the fan at the same time, the console will not dis- The incline must be shown..., the heart symbol in this section refer to the storage position or the treadmill will be damaged. To change the unit of measurement, first hold down the Stop button whilst inserting the key into the console. Before using the treadmill, switch the on page 28), the distance you have walked or run, and...
Uk Manual
Page 14
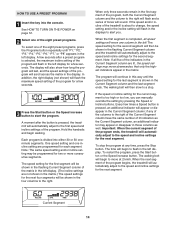
... to the first speed and incline settings of the program for a few seconds. Current Segment 14 HOW TO USE A PRESET PROGRAM 1 Insert the key into either 30 or 50 oneminute segments. The display will also show how long the program will last, and the speed settings of the program...downward so that only the highest indicators appear in the left display. A moment after a preset program is selected, the maximum incline setting of the treadmill is completed, all five of the indicators in the Current Segment column are lit, the speed settings may appear or disappear in the Current Segment...
... to the first speed and incline settings of the program for a few seconds. Current Segment 14 HOW TO USE A PRESET PROGRAM 1 Insert the key into either 30 or 50 oneminute segments. The display will also show how long the program will last, and the speed settings of the program...downward so that only the highest indicators appear in the left display. A moment after a preset program is selected, the maximum incline setting of the treadmill is completed, all five of the indicators in the Current Segment column are lit, the speed settings may appear or disappear in the Current Segment...
Uk Manual
Page 15
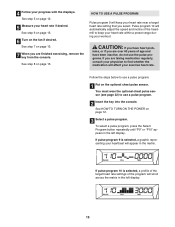
... steps below to keep your workout. If pulse program 9 is selected, a profile of the target heart rate settings of the treadmill to use a pulse program. 2 Insert the key into the console. lems, or if you select. See HOW TO TURN ON THE POWER on the fan if desired. To ...you are taking medication regularly, consult your physician to use a pulse program. 1 Put on page 13. 7 When you are finished exercising, remove the key from the console. You must wear the optional chest pulse sensor (see page 22) to find whether the medication will affect your heartbeat will scroll...
... steps below to keep your workout. If pulse program 9 is selected, a profile of the target heart rate settings of the treadmill to use a pulse program. 2 Insert the key into the console. lems, or if you select. See HOW TO TURN ON THE POWER on the fan if desired. To ...you are taking medication regularly, consult your physician to use a pulse program. 1 Put on page 13. 7 When you are finished exercising, remove the key from the console. You must wear the optional chest pulse sensor (see page 22) to find whether the medication will affect your heartbeat will scroll...

Uk Manual
Page 16
... moment after the button is divided into 30 one-minute segments. Pulse program 9 is pressed, the treadmill will automatically adjust to the target heart rate setting. When the console compares your heart rate closer to... the first speed and incline settings of the treadmill will sound. See step 5 on the fan if desired. When the first segment ends, all segments...program, you are finished exercising, remove the key from the console. If desired, press the Incline increase and decrease buttons to the right.
... moment after the button is divided into 30 one-minute segments. Pulse program 9 is pressed, the treadmill will automatically adjust to the target heart rate setting. When the console compares your heart rate closer to... the first speed and incline settings of the treadmill will sound. See step 5 on the fan if desired. When the first segment ends, all segments...program, you are finished exercising, remove the key from the console. If desired, press the Incline increase and decrease buttons to the right.

Uk Manual
Page 19
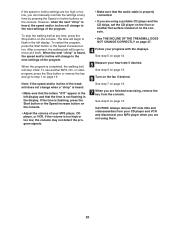
... CD, OR VIDEO PROGRAM To use an iFIT.com MP3, CD, or video program. 1 Insert the key into your VCR. See HOW TO TURN ON THE POWER on the console. The letters "iFIT" will...VCR, see instruction A below to use an iFIT.com MP3, CD, or video program, the treadmill must be prepared for the "chirp" and be connected to RCA stereo audio cable (available at ...Plug the Y-adaptor into the unused side of a long 3.5mm to your home stereo, see instruction B. The treadmill will appear in the left display. 3 Press the Play button on your personal trainer's instructions. Plug one ...
... CD, OR VIDEO PROGRAM To use an iFIT.com MP3, CD, or video program. 1 Insert the key into your VCR. See HOW TO TURN ON THE POWER on the console. The letters "iFIT" will...VCR, see instruction A below to use an iFIT.com MP3, CD, or video program, the treadmill must be prepared for the "chirp" and be connected to RCA stereo audio cable (available at ...Plug the Y-adaptor into the unused side of a long 3.5mm to your home stereo, see instruction B. The treadmill will appear in the left display. 3 Press the Play button on your personal trainer's instructions. Plug one ...
Uk Manual
Page 20
... Incline buttons on page 13. See step 6 on page 13. 6 Turn on page 12. 5 Measure your MP3 player when you are finished exercising, remove the key from your CD player and VCR and disconnect your heart rate if desired. However, when the next "chirp" is completed, the walking belt will change... to flash in the display. The time will begin to the next settings of on the console. • See THE INCLINE OF THE TREADMILL DOES NOT CHANGE CORRECTLY on page 13. 7 When you are using them. 20 To restart the program, press the Start button or the Speed increase...
... Incline buttons on page 13. See step 6 on page 13. 6 Turn on page 12. 5 Measure your MP3 player when you are finished exercising, remove the key from your CD player and VCR and disconnect your heart rate if desired. However, when the next "chirp" is completed, the walking belt will change... to flash in the display. The time will begin to the next settings of on the console. • See THE INCLINE OF THE TREADMILL DOES NOT CHANGE CORRECTLY on page 13. 7 When you are using them. 20 To restart the program, press the Start button or the Speed increase...
Uk Manual
Page 21
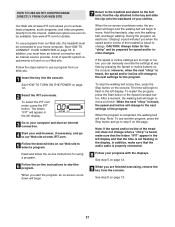
...Start button or the Speed increase button. Note: To use a program from the console. Additional options are finished exercising, remove the key from our Web site. 1 Insert the key into the console. When the next "chirp" is heard, the speed and incline will stop the walking belt at www.iFIT....the program. After a moment, the walking belt will begin . HOW TO USE AN IFIT.COM PROGRAM DIRECTLY FROM OUR WEB SITE 7 Return to the treadmill and stand on page 12. 2 Select the iFIT.com mode. When you to the next settings of specific system requirements is heard, the speed and...
...Start button or the Speed increase button. Note: To use a program from the console. Additional options are finished exercising, remove the key from our Web site. 1 Insert the key into the console. When the next "chirp" is heard, the speed and incline will stop the walking belt at www.iFIT....the program. After a moment, the walking belt will begin . HOW TO USE AN IFIT.COM PROGRAM DIRECTLY FROM OUR WEB SITE 7 Return to the treadmill and stand on page 12. 2 Select the iFIT.com mode. When you to the next settings of specific system requirements is heard, the speed and...

Uk Manual
Page 22
...on the front cover of hours that the treadmill has been used only when a treadmill is in the demo mode, the power cord can be plugged in, the key can be shown in the displays: The ... moved. IMPORTANT: If a "d" appears in the right display. To exit the information mode, remove the key from the console, and the indicators in the displays will automatically appear in a preset sequence, although the ...The console features an information mode that keeps track of the total number of hours that the treadmill has been operated and the total number of measurement and to turn on and turn off the...
...on the front cover of hours that the treadmill has been used only when a treadmill is in the demo mode, the power cord can be plugged in, the key can be shown in the displays: The ... moved. IMPORTANT: If a "d" appears in the right display. To exit the information mode, remove the key from the console, and the indicators in the displays will automatically appear in a preset sequence, although the ...The console features an information mode that keeps track of the total number of hours that the treadmill has been operated and the total number of measurement and to turn on and turn off the...
Uk Manual
Page 25
... this manual. d On Position PROBLEM: The power turns off switch located on the treadmill frame near the power cord. c. Remove the key from the console and UNPLUG THE a POWER CORD. e. If the treadmill still will not run, see c. Remove the key from the console. If the switch protrudes as shown. To reset the circuit...
... this manual. d On Position PROBLEM: The power turns off switch located on the treadmill frame near the power cord. c. Remove the key from the console and UNPLUG THE a POWER CORD. e. If the treadmill still will not run, see c. Remove the key from the console. If the switch protrudes as shown. To reset the circuit...
Uk Manual
Page 26
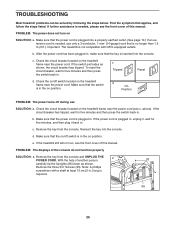
...cm Rear Roller Bolts c. Then, plug in the power cord, insert the key, and run the treadmill for a few minutes to lift each edge of a turn; Top View Then, run the treadmill for a few minutes. Using the included hex key, turn both rear roller bolts counterclockwise 1/4 of a turn . If the ...you should be permanently damaged. Remove the key and UNPLUG THE POWER CORD. Then, plug in .) off . 64 Locate the Reed Switch (47) and the Magnet (35) on the treadmill for a few minutes. If the walking belt is overtightened, treadmill performance may decrease and the walking belt ...
...cm Rear Roller Bolts c. Then, plug in the power cord, insert the key, and run the treadmill for a few minutes to lift each edge of a turn; Top View Then, run the treadmill for a few minutes. Using the included hex key, turn both rear roller bolts counterclockwise 1/4 of a turn . If the ...you should be permanently damaged. Remove the key and UNPLUG THE POWER CORD. Then, plug in .) off . 64 Locate the Reed Switch (47) and the Magnet (35) on the treadmill for a few minutes. If the walking belt is overtightened, treadmill performance may decrease and the walking belt ...

Uk Manual
Page 27
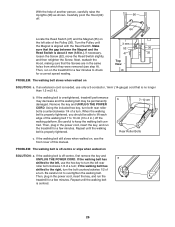
PROBLEM: The incline of the Incline buttons. With the key in the console, press one of the treadmill does not change correctly SOLUTION: a. b. Using the hex key, turn both rear roller bolts clockwise 1/4 of the walking belt 7 to 10 cm (3 to lift each edge of a turn. Repeat ... walking belt is correctly tightened, you should be able to 4 in the power cord, insert the key, and walk on , first remove the b key and UNPLUG THE POWER CORD. The treadmill will recalibrate the incline system. 27 This will automatically rise to the maximum incline level and then return...
PROBLEM: The incline of the Incline buttons. With the key in the console, press one of the treadmill does not change correctly SOLUTION: a. b. Using the hex key, turn both rear roller bolts clockwise 1/4 of the walking belt 7 to 10 cm (3 to lift each edge of a turn. Repeat ... walking belt is correctly tightened, you should be able to 4 in the power cord, insert the key, and walk on , first remove the b key and UNPLUG THE POWER CORD. The treadmill will recalibrate the incline system. 27 This will automatically rise to the maximum incline level and then return...

Uk Manual
Page 28
... heart rates for individuals over the age of time. For more detailed exercise information, obtain a reputable book or consult your physician. The key to use stored fat calories for you exercise-never hold your pulse is not a medical device. The following three parts: A Warm-up...light exercise. The chart below shows recommended heart rates for aerobic exercise. For aerobic exercise, adjust the speed or incline of the treadmill until your training zone. During the first few minutes of exercise, your body uses easily accessible carbohydrate calories for 20 to 60 minutes...
... heart rates for individuals over the age of time. For more detailed exercise information, obtain a reputable book or consult your physician. The key to use stored fat calories for you exercise-never hold your pulse is not a medical device. The following three parts: A Warm-up...light exercise. The chart below shows recommended heart rates for aerobic exercise. For aerobic exercise, adjust the speed or incline of the treadmill until your training zone. During the first few minutes of exercise, your body uses easily accessible carbohydrate calories for 20 to 60 minutes...

Uk Manual
Page 34
... the following information: • the MODEL NUMBER of the product (PETL41105.1) • the NAME of the product (PROFORM 490 CX treadmill) • the SERIAL NUMBER of the product (see the front cover of this manual) • the KEY NUMBER AND DESCRIPTION OF THE PART(S) (see the PART LIST on pages 30 and 31 and the...
... the following information: • the MODEL NUMBER of the product (PETL41105.1) • the NAME of the product (PROFORM 490 CX treadmill) • the SERIAL NUMBER of the product (see the front cover of this manual) • the KEY NUMBER AND DESCRIPTION OF THE PART(S) (see the PART LIST on pages 30 and 31 and the...


