
Uk Manual
Page 3
... pulse sensor is turned off. Wear appropriate exercise clothes when using the treadmill. 15. When connecting the power cord (see HOW TO TURN ON THE POWER on the walking belt. The treadmill is the responsibility of the owner to raise, lower, or move the walking belt while the power is not a medical device. Do not put the treadmill in speed. 16. Keep children under the treadmill. 4. Do not wear loose clothes that the storage latch...
... pulse sensor is turned off. Wear appropriate exercise clothes when using the treadmill. 15. When connecting the power cord (see HOW TO TURN ON THE POWER on the walking belt. The treadmill is the responsibility of the owner to raise, lower, or move the walking belt while the power is not a medical device. Do not put the treadmill in speed. 16. Keep children under the treadmill. 4. Do not wear loose clothes that the storage latch...

Uk Manual
Page 4
... on the front cover of 35 or persons with pre-existing health problems. Read all parts of this manual and order a free replacement decal. Never remove the motor hood unless instructed to do so by an authorized service representative only. 23. ICON assumes no responsibility for in this or any opening. Do not use , before cleaning the treadmill, and before using. scribed in -home use of the treadmill regularly. 21...
... on the front cover of 35 or persons with pre-existing health problems. Read all parts of this manual and order a free replacement decal. Never remove the motor hood unless instructed to do so by an authorized service representative only. 23. ICON assumes no responsibility for in this or any opening. Do not use , before cleaning the treadmill, and before using. scribed in -home use of the treadmill regularly. 21...
Uk Manual
Page 5
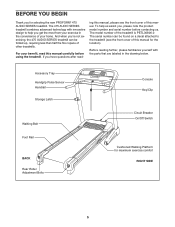
... exercising, the 475 AUDIO SERIES treadmill can be folded up, requiring less than half the floor space of the treadmill is PETL30806.0 The serial number can be found on a decal attached to help us . Accessory Tray Handgrip Pulse Sensor Handrail Storage Latch Walking Belt Foot Rail BACK Rear Roller Adjustment Bolts Console Key/Clip Circuit Breaker On/Off Switch Cushioned Walking Platform for selecting the new PROFORM® 475 AUDIO SERIES treadmill. ing this manual, please see the front cover of this manual...
... exercising, the 475 AUDIO SERIES treadmill can be folded up, requiring less than half the floor space of the treadmill is PETL30806.0 The serial number can be found on a decal attached to help us . Accessory Tray Handgrip Pulse Sensor Handrail Storage Latch Walking Belt Foot Rail BACK Rear Roller Adjustment Bolts Console Key/Clip Circuit Breaker On/Off Switch Cushioned Walking Platform for selecting the new PROFORM® 475 AUDIO SERIES treadmill. ing this manual, please see the front cover of this manual...
Uk Manual
Page 6
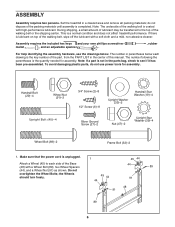
... the walking belt or the shipping carton. Attach a Wheel (45) to the top of the Base (48) with high-performance lubricant. Handrail Bolt (20)-4 ASSEMBLY Assembly requires two persons. do not use power tools for assembly. 1/4 Handrail Bolt 3/4" Screw (2)-8 Handrail Star (20)-4 Wheel Nut Washer (19)-4 (91)-2 Upright Washer (33)-2 1/2" Screw (6)-8 Upright Bolt (40)-4 H Upright Star W Silver Ground Washer (39)-4 Screw (27)-2 Nut (47)-2 Wheel Bolt (89)-2 Frame Bolt (32...
... the walking belt or the shipping carton. Attach a Wheel (45) to the top of the Base (48) with high-performance lubricant. Handrail Bolt (20)-4 ASSEMBLY Assembly requires two persons. do not use power tools for assembly. 1/4 Handrail Bolt 3/4" Screw (2)-8 Handrail Star (20)-4 Wheel Nut Washer (19)-4 (91)-2 Upright Washer (33)-2 1/2" Screw (6)-8 Upright Bolt (40)-4 H Upright Star W Silver Ground Washer (39)-4 Screw (27)-2 Nut (47)-2 Wheel Bolt (89)-2 Frame Bolt (32...
Uk Manual
Page 9
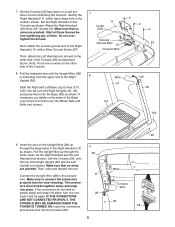
... holes in the location shown. Insert the wire on the Console as shown. Slide the Right and Left Base Leg Covers (101, 102) onto the Left and Right Uprights (31, 36) and press them . Insert the connectors and excess wire into place, turn one connector and try again. Start all three Screws before tightening any of the Console. 8. Next, attach the console ground wire to the...
... holes in the location shown. Insert the wire on the Console as shown. Slide the Right and Left Base Leg Covers (101, 102) onto the Left and Right Uprights (31, 36) and press them . Insert the connectors and excess wire into place, turn one connector and try again. Start all three Screws before tightening any of the Console. 8. Next, attach the console ground wire to the...
Uk Manual
Page 13
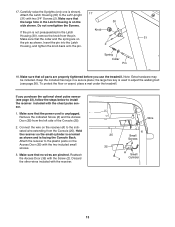
... pin into the Latch 2 Housing, and tighten the knob back onto the pin. Connect the wire on the 30 side shown. 17. Carefully raise the Uprights (only one is unplugged. Attach the receiver to adjust the walking belt (see page 23), follow the steps below to install the receiver included with the receiver. Reattach the Access Door (35) with the Screw (2). Make sure that the power cord...
... pin into the Latch 2 Housing, and tighten the knob back onto the pin. Connect the wire on the 30 side shown. 17. Carefully raise the Uprights (only one is unplugged. Attach the receiver to adjust the walking belt (see page 23), follow the steps below to install the receiver included with the receiver. Reattach the Access Door (35) with the Screw (2). Make sure that the power cord...
Uk Manual
Page 14
... can result in an in the adapter as FR/SP to whether the product is properly earthed. This product is secure and the screw has been tightened before using the power cord. 2 Screw Adapter Cover Pins Adapter Metal Clips FR/ See drawing 3. If it will deteriorate the walking belt and cause excessive wear. IT creased risk of electric shock. Press the pins on treadmill See drawing 1.
... can result in an in the adapter as FR/SP to whether the product is properly earthed. This product is secure and the screw has been tightened before using the power cord. 2 Screw Adapter Cover Pins Adapter Metal Clips FR/ See drawing 3. If it will deteriorate the walking belt and cause excessive wear. IT creased risk of electric shock. Press the pins on treadmill See drawing 1.
Uk Manual
Page 15
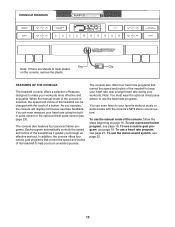
... your heart rate near a target heart rate during your heart rate using the builtin pulse sensor or the optional chest pulse sensor (see page 22. 15 To use the heart rate programs. You can even measure your workouts. The console also features four personal trainer programs. Each program automatically controls the speed and incline of a button. When the manual mode of the console is selected, the speed and incline of the treadmill can be changed with the console's MP3 stereo sound system. CONSOLE DIAGRAM Key Clip...
... your heart rate near a target heart rate during your heart rate using the builtin pulse sensor or the optional chest pulse sensor (see page 22. 15 To use the heart rate programs. You can even measure your workouts. The console also features four personal trainer programs. Each program automatically controls the speed and incline of a button. When the manual mode of the console is selected, the speed and incline of the treadmill can be changed with the console's MP3 stereo sound system. CONSOLE DIAGRAM Key Clip...
Uk Manual
Page 16
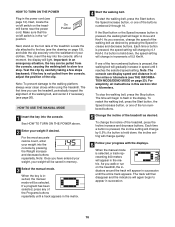
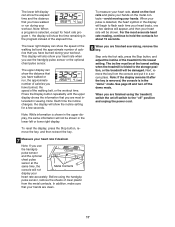
... speed setting. The time will light. To restart the walking belt, press the Start button, the Speed increase button, or one of the ten numbered buttons. 5 Change the incline of the treadmill as desired by pressing the Weight increase and decrease buttons repeatedly. As you exercise, change by 0.1 Km/H; HOW TO TURN ON THE POWER Plug in the power cord (see page 26). Next, locate the on/off switch is pressed, the speed setting will be saved in either miles...
... speed setting. The time will light. To restart the walking belt, press the Start button, the Speed increase button, or one of the ten numbered buttons. 5 Change the incline of the treadmill as desired by pressing the Weight increase and decrease buttons repeatedly. As you exercise, change by 0.1 Km/H; HOW TO TURN ON THE POWER Plug in the power cord (see page 26). Next, locate the on/off switch is pressed, the speed setting will be saved in either miles...
Uk Manual
Page 17
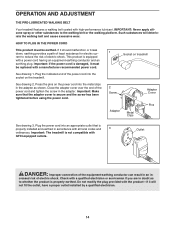
... the power cord. Press the Display button repeatedly until the upper display shows the information that you use the handgrip pulse sensor and the optional chest pulse sensor at the lowest setting when the treadmill is selected, except for heart rate program 1, the display will also show your heart rate accurately. The incline must be at the same time, the Metal Contacts console will be shown in the program instead of the walking belt, or the workout...
... the power cord. Press the Display button repeatedly until the upper display shows the information that you use the handgrip pulse sensor and the optional chest pulse sensor at the lowest setting when the treadmill is selected, except for heart rate program 1, the display will also show your heart rate accurately. The incline must be at the same time, the Metal Contacts console will be shown in the program instead of the walking belt, or the workout...

Uk Manual
Page 18
... trainer program is selected, the maximum speed setting of the treadmill is pressed, an additional indicator will automatically adjust to a stop the program temporarily, press the Stop button. One speed setting and one incline setting are lit, the speed settings may move one -minute periods. If the speed and/or incline of the program will flash in the displays for two or more consecutive periods. if any of the columns to start the program. The walking belt...
... trainer program is selected, the maximum speed setting of the treadmill is pressed, an additional indicator will automatically adjust to a stop the program temporarily, press the Stop button. One speed setting and one incline setting are lit, the speed settings may move one -minute periods. If the speed and/or incline of the program will flash in the displays for two or more consecutive periods. if any of the columns to start the program. The walking belt...

Uk Manual
Page 19
... the matrix. 4 Press the Start button or the Speed increase button to enter your heart rate if desired. Hold the handrails and begin walking. HOW TO USE A CALORIE GOAL PROGRAM 1 Insert the key into 30 or 40 one incline setting are finished exercising, remove the key from the console. A profile of the speed settings of the calorie goal programs based on page 16. 2 Enter your progress with the displays. Note: It...
... the matrix. 4 Press the Start button or the Speed increase button to enter your heart rate if desired. Hold the handrails and begin walking. HOW TO USE A CALORIE GOAL PROGRAM 1 Insert the key into 30 or 40 one incline setting are finished exercising, remove the key from the console. A profile of the speed settings of the calorie goal programs based on page 16. 2 Enter your progress with the displays. Note: It...
Uk Manual
Page 20
... to the speed and incline settings for the next period. To restart the program, press the Start button or the Speed increase button. cline settings are finished exercising, remove the key from the console. If the speed and/or incline of the treadmill is an estimate of the number of treadmill during the program. The speed setting for the next four periods will automatically adjust to the right. See step 7 on your weight. The walking belt will...
... to the speed and incline settings for the next period. To restart the program, press the Start button or the Speed increase button. cline settings are finished exercising, remove the key from the console. If the speed and/or incline of the treadmill is an estimate of the number of treadmill during the program. The speed setting for the next four periods will automatically adjust to the right. See step 7 on your weight. The walking belt will...
Uk Manual
Page 21
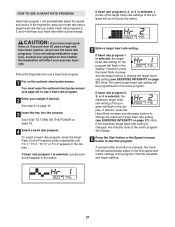
... TO USE A HEART RATE PROGRAM Heart rate program 1 will automatically adjust the speed and incline of the treadmill to keep your heart rate within a preset range. CAUTION: If you select. To select a heart rate program, press the Heart Rate Control Programs button repeatedly until "Hr 1," "Hr 2," "Hr 3," or "Hr 4" appears in the display. If heart rate program 2, 3, or 4 is changed, the intensity level of the entire program will flash in the matrix. 5 Enter a target heart rate setting. Follow the steps below to use a heart rate program...
... TO USE A HEART RATE PROGRAM Heart rate program 1 will automatically adjust the speed and incline of the treadmill to keep your heart rate within a preset range. CAUTION: If you select. To select a heart rate program, press the Heart Rate Control Programs button repeatedly until "Hr 1," "Hr 2," "Hr 3," or "Hr 4" appears in the display. If heart rate program 2, 3, or 4 is changed, the intensity level of the entire program will flash in the matrix. 5 Enter a target heart rate setting. Follow the steps below to use a heart rate program...
Uk Manual
Page 22
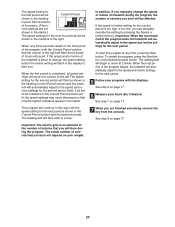
... the treadmill may automatically change to move one column to 3.5mm stereo audio cable into 20, 25, and 30 one end of tones will also increase. If this occurs, see the instructions included with the displays. To stop the program before it ends.) Heart rate programs 2, 3, and 4 are fully plugged in the columns to alert you can adjust the setting with the Speed or Incline buttons. When the console...
... the treadmill may automatically change to move one column to 3.5mm stereo audio cable into 20, 25, and 30 one end of tones will also increase. If this occurs, see the instructions included with the displays. To stop the program before it ends.) Heart rate programs 2, 3, and 4 are fully plugged in the columns to alert you can adjust the setting with the Speed or Incline buttons. When the console...
Uk Manual
Page 23
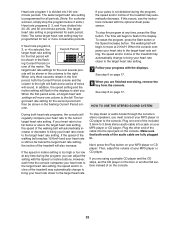
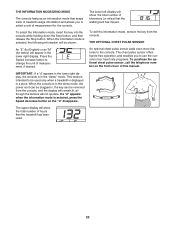
... a treadmill is in , the key can be plugged in the "demo" mode. The lower left display will show the total number of hours that the walking belt has moved. The chest pulse sensor offers hands-free operation, and enables you to be used . 23 IMPORTANT: If a "d" appears in the lower right display, the console is displayed in the lower right display. When the console is selected, press the Speed decrease button so the "d" disappears. THE OPTIONAL CHEST PULSE SENSOR...
... a treadmill is in , the key can be plugged in the "demo" mode. The lower left display will show the total number of hours that the walking belt has moved. The chest pulse sensor offers hands-free operation, and enables you to be used . 23 IMPORTANT: If a "d" appears in the lower right display, the console is displayed in the lower right display. When the console is selected, press the Speed decrease button so the "d" disappears. THE OPTIONAL CHEST PULSE SENSOR...
Uk Manual
Page 26
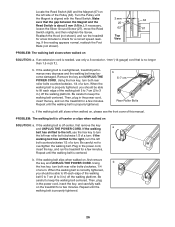
... key, turn both rear roller bolts counterclockwise, 1/4 of this manual. Repeat until the walking belt is about 3 mm (1/8 in the power cord, insert the key, and carefully walk on , please see the front cover of a turn ; Plug in .) off the walking platform. b. Top View ing. Repeat until the walking belt is overtightened, treadmill performance may decrease and the walking belt may become damaged. If necessary, loosen the Silver Ground Screw (27), move the Reed...
... key, turn both rear roller bolts counterclockwise, 1/4 of this manual. Repeat until the walking belt is about 3 mm (1/8 in the power cord, insert the key, and carefully walk on , please see the front cover of a turn ; Plug in .) off the walking platform. b. Top View ing. Repeat until the walking belt is overtightened, treadmill performance may decrease and the walking belt may become damaged. If necessary, loosen the Silver Ground Screw (27), move the Reed...

Uk Manual
Page 27
... workouts each workout with preexisting health problems. The pulse sensor is near the middle number in preparation for energy. The proper intensity level can be "aerobic." If your goal is to strengthen your cardiovascular system, your everyday life. 27 Aerobic Exercise If your heart rate is not a medical device. Aerobic exercise is to burn fat, adjust the speed and incline of the treadmill until your body uses...
... workouts each workout with preexisting health problems. The pulse sensor is near the middle number in preparation for energy. The proper intensity level can be "aerobic." If your goal is to strengthen your cardiovascular system, your everyday life. 27 Aerobic Exercise If your heart rate is not a medical device. Aerobic exercise is to burn fat, adjust the speed and incline of the treadmill until your body uses...
Uk Manual
Page 28
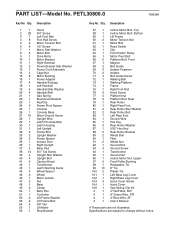
... Roller Bushing Releasable Tie 8" Tie Plastic Tie Left Base Leg Cover Right Base Leg Cover Hood Cover Screw Hood Cover Gas Spring Clip Kit 4" Red Wire, M/F 8" Green Wire, F/R 4" Blue Wire, 2F User's Manual # These parts are subject to change without notice. Description 1 1 Hood 2 28 3/4" Screw 3 1 Left Foot Rail 4 8 Foot Rail Screw 5 2 Motor Tension Bolt 6 8 1/2" Screw 7 1 Motor Star Washer 8 2 Motor Bolt 9 1 Drive Motor 10 1 Motor Bracket 11 1 Right Handrail 12 2 Power Bracket Star Washer 13 1 Power Cord Assembly 14 4 Cage Nut 15 2 Motor Bushing 16 1 Power Adapter...
... Roller Bushing Releasable Tie 8" Tie Plastic Tie Left Base Leg Cover Right Base Leg Cover Hood Cover Screw Hood Cover Gas Spring Clip Kit 4" Red Wire, M/F 8" Green Wire, F/R 4" Blue Wire, 2F User's Manual # These parts are subject to change without notice. Description 1 1 Hood 2 28 3/4" Screw 3 1 Left Foot Rail 4 8 Foot Rail Screw 5 2 Motor Tension Bolt 6 8 1/2" Screw 7 1 Motor Star Washer 8 2 Motor Bolt 9 1 Drive Motor 10 1 Motor Bracket 11 1 Right Handrail 12 2 Power Bracket Star Washer 13 1 Power Cord Assembly 14 4 Cage Nut 15 2 Motor Bushing 16 1 Power Adapter...

Uk Manual
Page 31
... the product (PROFORM 475 AUDIO SERIES treadmill) • the SERIAL NUMBER of the product (see the front cover of this manual) • the KEY NUMBER and DESCRIPTION of the desired part(s) (see the PART LIST and the EXPLODED DRAWING in the center of this manual) Part No. 243114 R0606A Printed in China © 2006 ICON IP, Inc. ORDERING REPLACEMENT PARTS To order replacement parts, contact the ICON Health & Fitness, Ltd. office, or write: ICON Health & Fitness, Ltd.
... the product (PROFORM 475 AUDIO SERIES treadmill) • the SERIAL NUMBER of the product (see the front cover of this manual) • the KEY NUMBER and DESCRIPTION of the desired part(s) (see the PART LIST and the EXPLODED DRAWING in the center of this manual) Part No. 243114 R0606A Printed in China © 2006 ICON IP, Inc. ORDERING REPLACEMENT PARTS To order replacement parts, contact the ICON Health & Fitness, Ltd. office, or write: ICON Health & Fitness, Ltd.

