

English Manual
Page 4
... the storage latch is properly assembled. (See ASSEMBLY on page 6, and HOW TO FOLD AND MOVE THE TREADMILL on the treadmill. 23. Always unplug the power cord immediately after use, before cleaning the treadmill, and before performing the maintenance and adjustment procedures described in serious injury or death. SAVE THESE INSTRUCTIONS 4 20. Never insert...
... the storage latch is properly assembled. (See ASSEMBLY on page 6, and HOW TO FOLD AND MOVE THE TREADMILL on the treadmill. 23. Always unplug the power cord immediately after use, before cleaning the treadmill, and before performing the maintenance and adjustment procedures described in serious injury or death. SAVE THESE INSTRUCTIONS 4 20. Never insert...

English Manual
Page 6
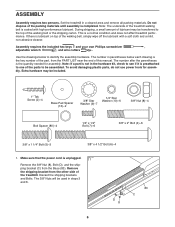
.... 1 Remove the 3/8" Nut (8), Bolt (D), and the shipping bracket (C) from the other side of the treadmill walking belt is a normal condition and does not affect treadmill performance. Make sure that the power cord is the quantity needed for assembly. Remove the shipping bracket from the Base... area and remove all packing materials. ASSEMBLY Assembly requires two persons. Set the treadmill in the hardware kit, check to be transferred to identify the assembly hardware. Note: The underside of the treadmill. This is coated with a soft cloth and a mild, non-abrasive cleaner....
.... 1 Remove the 3/8" Nut (8), Bolt (D), and the shipping bracket (C) from the other side of the treadmill walking belt is a normal condition and does not affect treadmill performance. Make sure that the power cord is the quantity needed for assembly. Remove the shipping bracket from the Base... area and remove all packing materials. ASSEMBLY Assembly requires two persons. Set the treadmill in the hardware kit, check to be transferred to identify the assembly hardware. Note: The underside of the treadmill. This is coated with a soft cloth and a mild, non-abrasive cleaner....

English Manual
Page 12
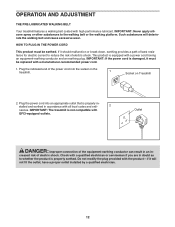
... creased risk of the equipment-earthing conductor can result in an in- Plug the indicated end of electric shock. Check with high-performance lubricant. IMPORTANT: Never apply silicone spray or other substances to the walking belt or the walking platform. Outlet DANGER: Improper connection... of electric shock. OPERATION AND ADJUSTMENT THE PRE-LUBRICATED WALKING BELT Your treadmill features a walking belt coated with a qualified electrician or serviceman if you are in doubt as to whether the product is properly...
... creased risk of the equipment-earthing conductor can result in an in- Plug the indicated end of electric shock. Check with high-performance lubricant. IMPORTANT: Never apply silicone spray or other substances to the walking belt or the walking platform. Outlet DANGER: Improper connection... of electric shock. OPERATION AND ADJUSTMENT THE PRE-LUBRICATED WALKING BELT Your treadmill features a walking belt coated with a qualified electrician or serviceman if you are in doubt as to whether the product is properly...
English Manual
Page 27
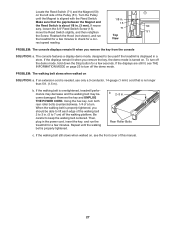
... Reed Switch is no longer than 5 ft. (1.5 m). Be careful to check for a few seconds. Reattach the Hood (not shown), and run the treadmill for a few minutes to keep the walking belt centered. b. Then, plug in . If the displays remain lit when you remove the key from the ... with the Reed Switch. 1/8 in a store. PROBLEM: The console displays remain lit when you remove the key, the demo mode is overtightened, treadmill performance may decrease and the walking belt may become damaged. Rear Roller Bolts c. b 2-3 in the power cord, insert the key, and run Top the...
... Reed Switch is no longer than 5 ft. (1.5 m). Be careful to check for a few seconds. Reattach the Hood (not shown), and run the treadmill for a few minutes to keep the walking belt centered. b. Then, plug in . If the displays remain lit when you remove the key from the ... with the Reed Switch. 1/8 in a store. PROBLEM: The console displays remain lit when you remove the key, the demo mode is overtightened, treadmill performance may decrease and the walking belt may become damaged. Rear Roller Bolts c. b 2-3 in the power cord, insert the key, and run Top the...

English Manual
Page 29
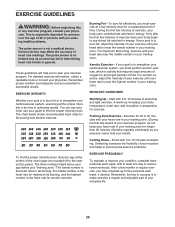
... successful results. Stretching increases the flexibility of your muscles and helps to 10 minutes of exercise does your physician. These guidelines will help you must perform aerobic exercise, which is activity that requires large amounts of oxygen for prolonged periods of 35 or persons with your heart rate near the middle...
... successful results. Stretching increases the flexibility of your muscles and helps to 10 minutes of exercise does your physician. These guidelines will help you must perform aerobic exercise, which is activity that requires large amounts of oxygen for prolonged periods of 35 or persons with your heart rate near the middle...
Uk Manual
Page 4
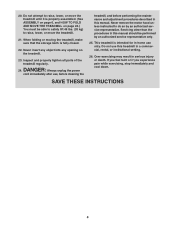
...26. If you feel faint or if you experience pain while exercising, stop immediately and cool down. This treadmill is intended for in-home use , before cleaning the treadmill, and before performing the maintenance and adjustment procedures described in this manual should be able to safely lift 45 lbs. (20... 24. Never insert any object into any opening on page 24.) You must be performed by an authorized service representative. Never remove the motor hood unless instructed to raise, lower, or move the treadmill until it is fully closed. 22. Do not use this manual. 20. Do not...
...26. If you feel faint or if you experience pain while exercising, stop immediately and cool down. This treadmill is intended for in-home use , before cleaning the treadmill, and before performing the maintenance and adjustment procedures described in this manual should be able to safely lift 45 lbs. (20... 24. Never insert any object into any opening on page 24.) You must be performed by an authorized service representative. Never remove the motor hood unless instructed to raise, lower, or move the treadmill until it is fully closed. 22. Do not use this manual. 20. Do not...
Uk Manual
Page 6
... the quantity needed for assembly. To avoid damaging plastic parts, do not use power tools for assembly. Discard the shipping brackets and Bolts. Set the treadmill in steps 3 and 6. Make sure that the power cord is coated with a soft cloth and a mild, non-abrasive cleaner. Note: The underside of ... wire cutters . Note: If a part is not in parentheses below to the top of this manual. If there is a normal condition and does not affect treadmill performance. Remove the shipping bracket from the other side of the walking belt, simply wipe off the lubricant with high...
... the quantity needed for assembly. To avoid damaging plastic parts, do not use power tools for assembly. Discard the shipping brackets and Bolts. Set the treadmill in steps 3 and 6. Make sure that the power cord is coated with a soft cloth and a mild, non-abrasive cleaner. Note: The underside of ... wire cutters . Note: If a part is not in parentheses below to the top of this manual. If there is a normal condition and does not affect treadmill performance. Remove the shipping bracket from the other side of the walking belt, simply wipe off the lubricant with high...
Uk Manual
Page 12
... coated with a power cord having an equipment-earthing conductor and an earthing plug. Plug the power cord into the socket on the treadmill. 1 Socket on Treadmill 2. If it should malfunction or break down, earthing provides a path of least resistance for electric current to reduce the risk of... belt and cause excessive wear. This product is not compatible with all local codes and ordi- 2 nances. IMPORTANT: The treadmill is equipped with high-performance lubricant. Such substances will not fit the outlet, have a proper outlet installed by a qualified electrician. 12
... coated with a power cord having an equipment-earthing conductor and an earthing plug. Plug the power cord into the socket on the treadmill. 1 Socket on Treadmill 2. If it should malfunction or break down, earthing provides a path of least resistance for electric current to reduce the risk of... belt and cause excessive wear. This product is not compatible with all local codes and ordi- 2 nances. IMPORTANT: The treadmill is equipped with high-performance lubricant. Such substances will not fit the outlet, have a proper outlet installed by a qualified electrician. 12

Uk Manual
Page 27
... Switch slightly, and then retighten 51 the Screw. View rect speed reading. PROBLEM: The console displays remain lit when you should be used if the treadmill is no longer than 5 ft. (1.5 m). When the walking belt is aligned with the Reed Switch. 1/8 in . (5 to 7 cm) off the walking ...: a. Remove the key and UNPLUG THE POWER CORD. If the displays remain lit when you remove the key, the demo mode is overtightened, treadmill performance may decrease and the walking belt may become damaged. Rear Roller Bolts c. If the displays are still lit, see the front cover of a turn...
... Switch slightly, and then retighten 51 the Screw. View rect speed reading. PROBLEM: The console displays remain lit when you should be used if the treadmill is no longer than 5 ft. (1.5 m). When the walking belt is aligned with the Reed Switch. 1/8 in . (5 to 7 cm) off the walking ...: a. Remove the key and UNPLUG THE POWER CORD. If the displays remain lit when you remove the key, the demo mode is overtightened, treadmill performance may decrease and the walking belt may become damaged. Rear Roller Bolts c. If the displays are still lit, see the front cover of a turn...
Uk Manual
Page 29
... your body uses carbohydrate calories for successful results. After a few minutes of time. This is especially important for exercise. These guidelines will help you must perform aerobic exercise, which is to strengthen your training zone. The lowest number is the heart rate for fat burning, the middle number is the heart...
... your body uses carbohydrate calories for successful results. After a few minutes of time. This is especially important for exercise. These guidelines will help you must perform aerobic exercise, which is to strengthen your training zone. The lowest number is the heart rate for fat burning, the middle number is the heart...


