
Instruction Manual
Page 1
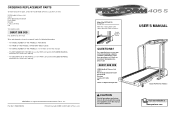
... DRAWING attached in Canada © 2001 ICON Health & Fitness, Ltd. Model No. If you have questions, or if there are committed to give the following information: • The MODEL NUMBER OF THE PRODUCT (PETL40510) • The NAME OF THE PRODUCT (PROFORM® 405S treadmill) • The SERIAL NUMBER OF THE PRODUCT (see the front cover of this manual) • The KEY NUMBER OF THE PART(S) (see the PART LIST and...
... DRAWING attached in Canada © 2001 ICON Health & Fitness, Ltd. Model No. If you have questions, or if there are committed to give the following information: • The MODEL NUMBER OF THE PRODUCT (PETL40510) • The NAME OF THE PRODUCT (PROFORM® 405S treadmill) • The SERIAL NUMBER OF THE PRODUCT (see the front cover of this manual) • The KEY NUMBER OF THE PART(S) (see the PART LIST and...
Instruction Manual
Page 2
... power cord and away from damage, place a mat under the age of this manual. 3. Repeat 3 times. Stretches: Hamstrings, lower back and groin. 3 3. Bring your heel as possible. Hold for both legs. TABLE OF CONTENTS IMPORTANT PRECAUTIONS 2 BEFORE YOU BEGIN 4 ASSEMBLY 5 OPERATION AND ADJUSTMENT 7 HOW TO FOLD AND MOVE THE TREADMILL 10 MAINTENANCE AND TROUBLE-SHOOTING 12 CONDITIONING GUIDELINES 14 ORDERING REPLACEMENT PARTS Back Cover Note: A PART LIST...
... power cord and away from damage, place a mat under the age of this manual. 3. Repeat 3 times. Stretches: Hamstrings, lower back and groin. 3 3. Bring your heel as possible. Hold for both legs. TABLE OF CONTENTS IMPORTANT PRECAUTIONS 2 BEFORE YOU BEGIN 4 ASSEMBLY 5 OPERATION AND ADJUSTMENT 7 HOW TO FOLD AND MOVE THE TREADMILL 10 MAINTENANCE AND TROUBLE-SHOOTING 12 CONDITIONING GUIDELINES 14 ORDERING REPLACEMENT PARTS Back Cover Note: A PART LIST...
Instruction Manual
Page 3
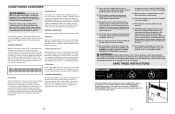
... the top of your body begin to order a free replacement decal (see ORDERING REPLACEMENT PARTS on the lungs to five workouts each workout with pre-existing health problems. The pulse sensor is not a medical device. Always remove the key when the treadmill is near the low end of the chart below your physician. DANGER: Always unplug the power cord before using. lems. Read all parts of heart rate readings. Apply the...
... the top of your body begin to order a free replacement decal (see ORDERING REPLACEMENT PARTS on the lungs to five workouts each workout with pre-existing health problems. The pulse sensor is not a medical device. Always remove the key when the treadmill is near the low end of the chart below your physician. DANGER: Always unplug the power cord before using. lems. Read all parts of heart rate readings. Apply the...

Instruction Manual
Page 4
... the treadmill for selecting the PROFORM® 405S treadmill. Be careful to the treadmill (see the front cover of your benefit, read this manual for a few minutes. PROBLEM: The walking belt is properly tightened. Speed Control Accessory Tray Handrails Storage Latch Water Bottle Holder (Bottle not included) Console Key/Clip Walking Belt Foot Rails BACK Rear Roller Adjustment Bolts FRONT Circuit Breaker RIGHT SIDE Incline Leg 4 PROBLEM: The walking belt slows when walked on , please call our Customer Service Department...
... the treadmill for selecting the PROFORM® 405S treadmill. Be careful to the treadmill (see the front cover of your benefit, read this manual for a few minutes. PROBLEM: The walking belt is properly tightened. Speed Control Accessory Tray Handrails Storage Latch Water Bottle Holder (Bottle not included) Console Key/Clip Walking Belt Foot Rails BACK Rear Roller Adjustment Bolts FRONT Circuit Breaker RIGHT SIDE Incline Leg 4 PROBLEM: The walking belt slows when walked on , please call our Customer Service Department...
Instruction Manual
Page 5
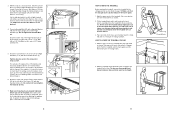
... push on SOLUTION: a. Do not tighten the Handrail Bolt yet. 80 98 44 97 5 If further assistance is needed , use c Tripped Tripped Reset Reset SOLUTION: a. Unplug the power cord, wait for a correct speed reading. Most problems are the result of the hood. b. If necessary, loosen the Electronic Screw (13) and move the Reed Switch slightly. Note: The underside of the Extension Leg (44) as shown. Insert...
... push on SOLUTION: a. Do not tighten the Handrail Bolt yet. 80 98 44 97 5 If further assistance is needed , use c Tripped Tripped Reset Reset SOLUTION: a. Unplug the power cord, wait for a correct speed reading. Most problems are the result of the hood. b. If necessary, loosen the Electronic Screw (13) and move the Reed Switch slightly. Note: The underside of the Extension Leg (44) as shown. Insert...
Instruction Manual
Page 6
... USE 1. Carefully move the treadmill over an uneven surface. 3. Plastic Tie 71 53 38 4. Thread a Handrail Bolt (92) with two Handrail Screws (5). Save the included allen wrench for adjusting the walking belt. Feed all parts used in this step and in the inset drawing. Attach the Console Base (71) to the Left and Right Handrails (4, 32) with both hands, and lower the treadmill to the storage...
... USE 1. Carefully move the treadmill over an uneven surface. 3. Plastic Tie 71 53 38 4. Thread a Handrail Bolt (92) with two Handrail Screws (5). Save the included allen wrench for adjusting the walking belt. Feed all parts used in this step and in the inset drawing. Attach the Console Base (71) to the Left and Right Handrails (4, 32) with both hands, and lower the treadmill to the storage...
Instruction Manual
Page 7
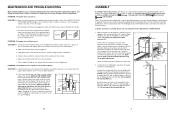
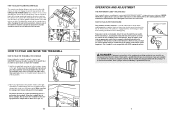
... earthing plug. Locate the small switch on the wires, and turn the console over. Hold the treadmill with PERFORMANT LUBETM, a high-performance lubricant. Do not leave the treadmill in the storage position in temperatures above 30° C (85° F). 10 Storage Latch Frame Guide Closed OPERATION AND ADJUSTMENT THE PERFORMANT LUBETM WALKING BELT Your treadmill features a walking belt coated with your back. Plug the power cord 2 into the socket on treadmill Two power cords are...
... earthing plug. Locate the small switch on the wires, and turn the console over. Hold the treadmill with PERFORMANT LUBETM, a high-performance lubricant. Do not leave the treadmill in the storage position in temperatures above 30° C (85° F). 10 Storage Latch Frame Guide Closed OPERATION AND ADJUSTMENT THE PERFORMANT LUBETM WALKING BELT Your treadmill features a walking belt coated with your back. Plug the power cord 2 into the socket on treadmill Two power cords are...
Instruction Manual
Page 8
... power cord is not displayed, lift your heart rate, if desired. When you are applying the proper amount of pressure. fully press it . Hold your heart rate will stop button, and adjust the incline of electric shock, keep the console dry. If the displayed heart rate appears to reset. Distance-This mode shows the distance that batteries are not using the treadmill, move the speed control to the RESET position before the walking belt can be restarted. After a few steps...
... power cord is not displayed, lift your heart rate, if desired. When you are applying the proper amount of pressure. fully press it . Hold your heart rate will stop button, and adjust the incline of electric shock, keep the console dry. If the displayed heart rate appears to reset. Distance-This mode shows the distance that batteries are not using the treadmill, move the speed control to the RESET position before the walking belt can be restarted. After a few steps...

Instruction Manual
Page 9
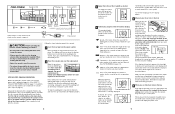
... 1 # 1 # 1 # 1 Choke Belt Guide Walking Platform Isolator Sensor Clip Euro Power Cord Set Front Roller/Pulley Ground Nut Reed Switch Frame Guide Spacer Latch Wire Tie Wire Tie Clamp Magnet Console Base Left Foot Rail Rear Platform Screw Frame Rear Roller Ground Screw Ground Wire Rear Roller Adj. Note: Specifications are subject to change without notice. To order replacement parts, see the back cover of this EXPLODED DRAWING and PART LIST for future reference. PART LIST-Model No. Bolt Rear Endcap 5/16" x 3 1/2" Bolt Allen Wrench Latch Decal Incline Leg Bolt Belly Pan...
... 1 # 1 # 1 # 1 Choke Belt Guide Walking Platform Isolator Sensor Clip Euro Power Cord Set Front Roller/Pulley Ground Nut Reed Switch Frame Guide Spacer Latch Wire Tie Wire Tie Clamp Magnet Console Base Left Foot Rail Rear Platform Screw Frame Rear Roller Ground Screw Ground Wire Rear Roller Adj. Note: Specifications are subject to change without notice. To order replacement parts, see the back cover of this EXPLODED DRAWING and PART LIST for future reference. PART LIST-Model No. Bolt Rear Endcap 5/16" x 3 1/2" Bolt Allen Wrench Latch Decal Incline Leg Bolt Belly Pan...

