

Uk Manual
Page 1
If you have questions, or if there are committed to providing complete customer satisfaction. PETL30506.1 Serial No. Serial Number Decal QUESTIONS? USER'S MANUAL As a manufacturer, we are missing or damaged parts, please call: 08457 089 009 or write: ICON Health & Fitness, Ltd. Save this equipment. Customer Service Department Unit 4 Revie Road Industrial Estate Revie Road Beeston Leeds, LS118JG UK email: [email protected] CAUTION Read all precautions and instructions in this manual before using this manual for future reference. Model No.
If you have questions, or if there are committed to providing complete customer satisfaction. PETL30506.1 Serial No. Serial Number Decal QUESTIONS? USER'S MANUAL As a manufacturer, we are missing or damaged parts, please call: 08457 089 009 or write: ICON Health & Fitness, Ltd. Save this equipment. Customer Service Department Unit 4 Revie Road Industrial Estate Revie Road Beeston Leeds, LS118JG UK email: [email protected] CAUTION Read all precautions and instructions in this manual before using this manual for future reference. Model No.

Uk Manual
Page 2
PROFORM is a registered trademark of this manual. TABLE OF CONTENTS IMPORTANT PRECAUTIONS 3 BEFORE YOU BEGIN 5 ASSEMBLY 6 OPERATION AND ADJUSTMENT 13 HOW TO FOLD AND MOVE THE TREADMILL 18 TROUBLESHOOTING 20 CONDITIONING GUIDELINES 22 HOW TO ORDER REPLACEMENT PARTS Back Cover Note: An EXPLODED DRAWING and a PART LIST are attached in the center of ICON IP, Inc. 2
PROFORM is a registered trademark of this manual. TABLE OF CONTENTS IMPORTANT PRECAUTIONS 3 BEFORE YOU BEGIN 5 ASSEMBLY 6 OPERATION AND ADJUSTMENT 13 HOW TO FOLD AND MOVE THE TREADMILL 18 TROUBLESHOOTING 20 CONDITIONING GUIDELINES 22 HOW TO ORDER REPLACEMENT PARTS Back Cover Note: An EXPLODED DRAWING and a PART LIST are attached in the center of ICON IP, Inc. 2
Uk Manual
Page 3
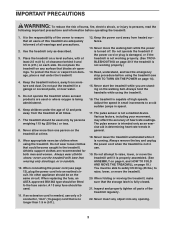
... be used. 11. Athletic support clothes are adequately informed of all parts of the treadmill regularly. 22. When connecting the power cord (see HOW TO TURN ON THE POWER on page 14). 15. If an extension cord is needed, use . ... lift 20 kg (45 lbs.) to persons, read the following important precautions and information before using the treadmill. When folding or moving the treadmill, make sure that could become caught in sandals. 10. Use the treadmill only as an exercise aid in determining heart rate trends in speed. 17. When replacing the fuse...
... be used. 11. Athletic support clothes are adequately informed of all parts of the treadmill regularly. 22. When connecting the power cord (see HOW TO TURN ON THE POWER on page 14). 15. If an extension cord is needed, use . ... lift 20 kg (45 lbs.) to persons, read the following important precautions and information before using the treadmill. When folding or moving the treadmill, make sure that could become caught in sandals. 10. Use the treadmill only as an exercise aid in determining heart rate trends in speed. 17. When replacing the fuse...
Uk Manual
Page 5
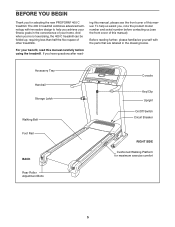
... On/Off Switch Circuit Breaker RIGHT SIDE Cushioned Walking Platform for selecting the new PROFORM® 400 C treadmill. The 400 C treadmill combines advanced technology with the parts that are labeled in the convenience of this manual). If you 're not exercising, the 400 C treadmill can be folded up, requiring less than half the floor space of this manual... when you have questions after read this manual carefully before contacting us assist you, note the product model number and serial number before using the treadmill. For your fitness goals in the drawing below.
... On/Off Switch Circuit Breaker RIGHT SIDE Cushioned Walking Platform for selecting the new PROFORM® 400 C treadmill. The 400 C treadmill combines advanced technology with the parts that are labeled in the convenience of this manual). If you 're not exercising, the 400 C treadmill can be folded up, requiring less than half the floor space of this manual... when you have questions after read this manual carefully before contacting us assist you, note the product model number and serial number before using the treadmill. For your fitness goals in the drawing below.
Uk Manual
Page 6
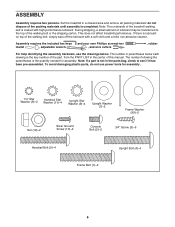
Set the treadmill in the center of this manual. The number in parentheses below . To avoid damaging plastic parts, do not dispose of the packing ...drawing is completed. If there is coated with a soft cloth and a mild, non-abrasive cleaner. Note: If a part is the quantity needed for assembly. 1/4" Star Washer (8)-2 Handrail Star Washer (11)-4 Upright Star Washer (6)-4 Upright Washer... is not in the parts bag, check to the top of the walking belt, simply wipe off the lubricant with high-performance lubricant. Note: The underside of the treadmill walking belt is lubricant ...
Set the treadmill in the center of this manual. The number in parentheses below . To avoid damaging plastic parts, do not dispose of the packing ...drawing is completed. If there is coated with a soft cloth and a mild, non-abrasive cleaner. Note: If a part is the quantity needed for assembly. 1/4" Star Washer (8)-2 Handrail Star Washer (11)-4 Upright Star Washer (6)-4 Upright Washer... is not in the parts bag, check to the top of the walking belt, simply wipe off the lubricant with high-performance lubricant. Note: The underside of the treadmill walking belt is lubricant ...
Uk Manual
Page 12
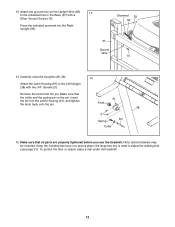
... Attach the Latch Housing (91) to the Left Upright (38) with a Silver Ground Screw (10). To protect the floor or carpet, place a mat under the treadmill. 12 the large hex key is used to the indicated hole in a secure place; Attach the ground wire on the pin. Remove the knob from... 14. Keep the included hex keys in the Base (37) with two 3/4" Screws (3). Insert the pin into the Right Upright (39). Make sure that all parts are on the Upright Wire (69) 13 to adjust the walking belt (see page 21). Press the indicated grommet into the Latch Housing (91), and...
... Attach the Latch Housing (91) to the Left Upright (38) with a Silver Ground Screw (10). To protect the floor or carpet, place a mat under the treadmill. 12 the large hex key is used to the indicated hole in a secure place; Attach the ground wire on the pin. Remove the knob from... 14. Keep the included hex keys in the Base (37) with two 3/4" Screws (3). Insert the pin into the Right Upright (39). Make sure that all parts are on the Upright Wire (69) 13 to adjust the walking belt (see page 21). Press the indicated grommet into the Latch Housing (91), and...
Uk Manual
Page 22
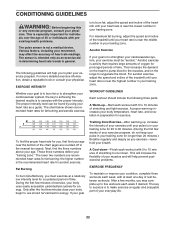
... to 10 minutes of time. Various factors, including your "training zone." is to burn fat, adjust the speed and incline of the treadmill until your heart rate is near the highest number in your condition, complete three workouts each workout with preexisting health problems. The pulse sensor... with 5 to strengthen your exercise program. For maximum fat burning, adjust the speed and incline of the treadmill until your pulse is to make exercise a regular and enjoyable part of your exercise program, do not keep your pulse in preparation for you must be found by using your...
... to 10 minutes of time. Various factors, including your "training zone." is to burn fat, adjust the speed and incline of the treadmill until your heart rate is near the highest number in your condition, complete three workouts each workout with preexisting health problems. The pulse sensor... with 5 to strengthen your exercise program. For maximum fat burning, adjust the speed and incline of the treadmill until your pulse is to make exercise a regular and enjoyable part of your exercise program, do not keep your pulse in preparation for you must be found by using your...
Uk Manual
Page 24
... MODEL NUMBER of the product (PETL30506.1) • the NAME of the product (PROFORM 400 C treadmill) • the SERIAL NUMBER of the product (see the front cover of this manual) • the KEY NUMBER and DESCRIPTION of the desired part(s) (see the PART LIST and the EXPLODED DRAWING in the center of this manual...) Part No. 243447 R0506A Printed in China © 2006 ICON IP, Inc. office, or write: ICON Health &...
... MODEL NUMBER of the product (PETL30506.1) • the NAME of the product (PROFORM 400 C treadmill) • the SERIAL NUMBER of the product (see the front cover of this manual) • the KEY NUMBER and DESCRIPTION of the desired part(s) (see the PART LIST and the EXPLODED DRAWING in the center of this manual...) Part No. 243447 R0506A Printed in China © 2006 ICON IP, Inc. office, or write: ICON Health &...

Uk Manual
Page 25
Note: Specifications are subject to change without notice. REMOVE THIS EXPLODED DRAWING AND PART LIST FROM THE MANUAL Save this EXPLODED DRAWING and PART LIST for future reference. For information about ordering replacement parts, see the back cover of the User's Manual. 34
Note: Specifications are subject to change without notice. REMOVE THIS EXPLODED DRAWING AND PART LIST FROM THE MANUAL Save this EXPLODED DRAWING and PART LIST for future reference. For information about ordering replacement parts, see the back cover of the User's Manual. 34
Uk Manual
Page 26
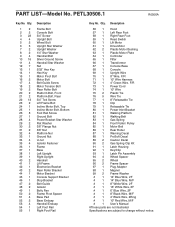
... Wire, 2F # 1 16" White Wire, 2F # 1 6" Blue Wire, 2F # 1 8" Black Wire, M/F # 1 4" Black Wire, 2Ring # 1 10" Red Wire, M/F # 1 User's Manual #These parts are not illustrated Specifications are subject to change without notice. PART LIST-Model No. Qty. 12 22 3 22 44 52 65 72 82 94 10 16 11 4 12 7 13 1 14 1 15...
... Wire, 2F # 1 16" White Wire, 2F # 1 6" Blue Wire, 2F # 1 8" Black Wire, M/F # 1 4" Black Wire, 2Ring # 1 10" Red Wire, M/F # 1 User's Manual #These parts are not illustrated Specifications are subject to change without notice. PART LIST-Model No. Qty. 12 22 3 22 44 52 65 72 82 94 10 16 11 4 12 7 13 1 14 1 15...


