

User Manual
Page 1
Save this manual for reference. Serial Number Decal QUESTIONS? If you have questions, or if there are missing or damaged parts, please see the dealer contact information on the back cover of this equipment. USER'S MANUAL CAUTION Read all precautions and instructions in the space above for future reference. Model No. PATL40907.0 Serial No. Write the serial number in this manual before using this manual or on the included service card.
Save this manual for reference. Serial Number Decal QUESTIONS? If you have questions, or if there are missing or damaged parts, please see the dealer contact information on the back cover of this equipment. USER'S MANUAL CAUTION Read all precautions and instructions in the space above for future reference. Model No. PATL40907.0 Serial No. Write the serial number in this manual before using this manual or on the included service card.

User Manual
Page 2
...size. Apply the decal in the locations shown. PROFORM is illegible, please see the dealer contact information on the included service card and order a free replacement decal. If a decal is missing, or if it is a registered trademark of this manual or on the back cover of ICON IP,... Inc. 2 TABLE OF CONTENTS WARNING DECAL PLACEMENT 2 IMPORTANT PRECAUTIONS 3 BEFORE YOU BEGIN 5 ASSEMBLY 6 OPERATION AND ADJUSTMENT 12 HOW TO FOLD AND MOVE THE TREADMILL 23 TROUBLESHOOTING 25 EXERCISE GUIDELINES 28 PART ...
...size. Apply the decal in the locations shown. PROFORM is illegible, please see the dealer contact information on the included service card and order a free replacement decal. If a decal is missing, or if it is a registered trademark of this manual or on the back cover of ICON IP,... Inc. 2 TABLE OF CONTENTS WARNING DECAL PLACEMENT 2 IMPORTANT PRECAUTIONS 3 BEFORE YOU BEGIN 5 ASSEMBLY 6 OPERATION AND ADJUSTMENT 12 HOW TO FOLD AND MOVE THE TREADMILL 23 TROUBLESHOOTING 25 EXERCISE GUIDELINES 28 PART ...
User Manual
Page 3
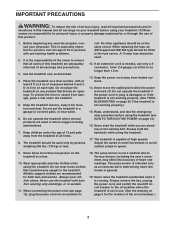
...it is not a medical device. The treadmill should be fitted to avoid sudden jumps in general. 19. If an extension cord is being administered. 7. Before beginning any surface that blocks air openings. Adjust the speed in this manual and all warnings and precautions. 3. Wear... appropriate exercise clothes when using your treadmill. Do not operate the treadmill where aerosol products are recommended for personal injury or property damage sustained...
...it is not a medical device. The treadmill should be fitted to avoid sudden jumps in general. 19. If an extension cord is being administered. 7. Before beginning any surface that blocks air openings. Adjust the speed in this manual and all warnings and precautions. 3. Wear... appropriate exercise clothes when using your treadmill. Do not operate the treadmill where aerosol products are recommended for personal injury or property damage sustained...

User Manual
Page 4
... TO FOLD AND MOVE THE TREADMILL on the treadmill. 23. Do not attempt to raise, lower, or move the treadmill. 21. DANGER: 24. This treadmill is fully closed. 22. When folding or moving the treadmill, make sure that the storage latch is intended for in this manual should be able to safely ...lift 45 lbs. (20 kg) to do so by an authorized service representative only. 25. Inspect and properly tighten all parts of the treadmill regularly. vice representative. Always unplug the power cord ...
... TO FOLD AND MOVE THE TREADMILL on the treadmill. 23. Do not attempt to raise, lower, or move the treadmill. 21. DANGER: 24. This treadmill is fully closed. 22. When folding or moving the treadmill, make sure that the storage latch is intended for in this manual should be able to safely ...lift 45 lbs. (20 kg) to do so by an authorized service representative only. 25. Inspect and properly tighten all parts of the treadmill regularly. vice representative. Always unplug the power cord ...

User Manual
Page 5
... number and serial number before using the treadmill. To help us assist you 're not exercising, the unique PF 4.0 treadmill can be folded up, requiring less than half the floor space of this manual). The PF 4.0 treadmill offers an impressive array of features designed to...manual or on the included service card. BEFORE YOU BEGIN Thank you have questions after read this manual carefully before contacting the dealer (see the dealer contact information on the back cover of this manual, please see the front cover of other treadmills. If you for selecting the revolutionary PROFORM...
... number and serial number before using the treadmill. To help us assist you 're not exercising, the unique PF 4.0 treadmill can be folded up, requiring less than half the floor space of this manual). The PF 4.0 treadmill offers an impressive array of features designed to...manual or on the included service card. BEFORE YOU BEGIN Thank you have questions after read this manual carefully before contacting the dealer (see the dealer contact information on the back cover of this manual, please see the front cover of other treadmills. If you for selecting the revolutionary PROFORM...

User Manual
Page 6
... 83 A 4 8 Make sure that the power cord is coated with a soft cloth and a mild, non-abrasive cleaner. Note: The underside of the treadmill walking belt is unplugged. 1 Remove the 3/8" Nut (8), the 3/8" x 2" Bolt (4), and the shipping bracket (A) from the PART LIST near the end of...drawing is preattached to identify the assembly hardware. To avoid damaging plastic parts, do not use power tools for assembly. Repeat this manual. Assembly requires the included hex key and your own Phillips screwdriver , adjustable wrench , rubber mallet , and scissors . The ...
... 83 A 4 8 Make sure that the power cord is coated with a soft cloth and a mild, non-abrasive cleaner. Note: The underside of the treadmill walking belt is unplugged. 1 Remove the 3/8" Nut (8), the 3/8" x 2" Bolt (4), and the shipping bracket (A) from the PART LIST near the end of...drawing is preattached to identify the assembly hardware. To avoid damaging plastic parts, do not use power tools for assembly. Repeat this manual. Assembly requires the included hex key and your own Phillips screwdriver , adjustable wrench , rubber mallet , and scissors . The ...

User Manual
Page 13
...22 for information about the optional chest pulse sensor). To use the manual mode of the console, see page 17. The cross training workouts automatically control the speed and incline of the treadmill and prompt you to perform a variety of strength exercises during your workouts... console will display continuous exercise feedback. To use the information mode, see the front cover of this manual. CONSOLE DIAGRAM Key Clip FEATURES OF THE CONSOLE The revolutionary treadmill console offers a selection of features designed to make your workout. The iFIT monthly challenge even provides ...
...22 for information about the optional chest pulse sensor). To use the manual mode of the console, see page 17. The cross training workouts automatically control the speed and incline of the treadmill and prompt you to perform a variety of strength exercises during your workouts... console will display continuous exercise feedback. To use the information mode, see the front cover of this manual. CONSOLE DIAGRAM Key Clip FEATURES OF THE CONSOLE The revolutionary treadmill console offers a selection of features designed to make your workout. The iFIT monthly challenge even provides ...

User Manual
Page 14
...numbered 2 to 18. Next, stand on page 21 to turn off the demo mode. The first time the treadmill is a sheet of the walking belt as you do not do this manual refer to kilometers. 14 As you press a button, the speed setting will light. IMPORTANT: If there is ... pressing the Speed increase and decrease buttons. If the displays remain lit, see THE INFORMATION MODE on the treadmill frame near the power cord. if the key is inserted, the manual mode will change speed until only zeros appears in this , the console displays or other electrical components may take...
...numbered 2 to 18. Next, stand on page 21 to turn off the demo mode. The first time the treadmill is a sheet of the walking belt as you do not do this manual refer to kilometers. 14 As you press a button, the speed setting will light. IMPORTANT: If there is ... pressing the Speed increase and decrease buttons. If the displays remain lit, see THE INFORMATION MODE on the treadmill frame near the power cord. if the key is inserted, the manual mode will change speed until only zeros appears in this , the console displays or other electrical components may take...

User Manual
Page 15
...or run . • The speed of the incline buttons numbered 0 to 12. When the manual mode is shown. The display mode that user each time you use the handgrip pulse sensor (see step 6 on the treadmill, the displays can show the following workout information: • The elapsed time. • ...optional chest pulse sensor (see page 22). Each time you press the Incline increase or decrease button, the incline will change the incline of the treadmill, press the Incline increase and decrease buttons or one of the workout session. 5. Then select either user 1 or user 2 in the display....
...or run . • The speed of the incline buttons numbered 0 to 12. When the manual mode is shown. The display mode that user each time you use the handgrip pulse sensor (see step 6 on the treadmill, the displays can show the following workout information: • The elapsed time. • ...optional chest pulse sensor (see page 22). Each time you press the Incline increase or decrease button, the incline will change the incline of the treadmill, press the Incline increase and decrease buttons or one of the workout session. 5. Then select either user 1 or user 2 in the display....

User Manual
Page 17
...and the next segment of the workout. If you to the speed and incline settings for the next segment. 17 Note: The console can manually override the setting by pressing the speed or incline buttons; Once you determine which user you will be , continue to the first speed and...or incline setting may be programmed for the current segment. At the end of the workout session. The height of the workout begins, the treadmill will automatically adjust to include the workout towards your progress. however, when the next segment of the flashing segment indicates the speed setting for...
...and the next segment of the workout. If you to the speed and incline settings for the next segment. 17 Note: The console can manually override the setting by pressing the speed or incline buttons; Once you determine which user you will be , continue to the first speed and...or incline setting may be programmed for the current segment. At the end of the workout session. The height of the workout begins, the treadmill will automatically adjust to include the workout towards your progress. however, when the next segment of the flashing segment indicates the speed setting for...

User Manual
Page 18
... on the fan if desired. To purchase dumbbells or an exercise ball, call the telephone number on page 16. 6. When the manual mode is shown. The right display will determine which workout information is selected, the console offers several display modes. When you are ... the cross trainer workout. Press the Display button repeatedly to help you have performed the recommended number of repetitions, step onto the treadmill, slide the clip back onto the waistband of calories you perform the exercise. When performing dumbbell rows, perform half the repetitions with...
... on the fan if desired. To purchase dumbbells or an exercise ball, call the telephone number on page 16. 6. When the manual mode is shown. The right display will determine which workout information is selected, the console offers several display modes. When you are ... the cross trainer workout. Press the Display button repeatedly to help you have performed the recommended number of repetitions, step onto the treadmill, slide the clip back onto the waistband of calories you perform the exercise. When performing dumbbell rows, perform half the repetitions with...

User Manual
Page 19
...to the first speed and incline settings of the flashing segment indicates the speed setting for consecutive segments. Note: The console can manually override the setting by pressing the speed or incline buttons; During the workout, the profile will automatically adjust to move at any... stop . To select a classic aerobic workout, press the Classic Aerobic Workouts button repeatedly until the last segment of the workout begins, the treadmill will begin walking. Press the Quick Start button to a stop the workout at 2 km/h. The flashing segment of the profile represents the current...
...to the first speed and incline settings of the flashing segment indicates the speed setting for consecutive segments. Note: The console can manually override the setting by pressing the speed or incline buttons; During the workout, the profile will automatically adjust to move at any... stop . To select a classic aerobic workout, press the Classic Aerobic Workouts button repeatedly until the last segment of the workout begins, the treadmill will begin walking. Press the Quick Start button to a stop the workout at 2 km/h. The flashing segment of the profile represents the current...

User Manual
Page 22
... the Access Door (87) with the chest pulse sensor. 1. To increase the firmness of the walking platform, step off the treadmill and slide the cushion adjusters toward the back of this manual. Attach the receiver to install the receiver included with the two included small screws. 3. Make sure that reduces the impact...
... the Access Door (87) with the chest pulse sensor. 1. To increase the firmness of the walking platform, step off the treadmill and slide the cushion adjusters toward the back of this manual. Attach the receiver to install the receiver included with the two included small screws. 3. Make sure that reduces the impact...

User Manual
Page 25
...gauge (1 mm2) cord that the power cord is plugged in, unplug it, wait for five minutes and then press the switch back in . b. If the treadmill still will not run, please see the drawing above). tom of the console do not function properly SOLUTION: a. c. There may be two #8 x 2" ... can be used if the treadmill is displayed in , make sure that applies, and follow the steps listed. If further assistance is turned on SOLUTION: a. Reinsert the key into the console. If the displays are , remove them. With the help of this manual. PROBLEM: The console displays remain...
...gauge (1 mm2) cord that the power cord is plugged in, unplug it, wait for five minutes and then press the switch back in . b. If the treadmill still will not run, please see the drawing above). tom of the console do not function properly SOLUTION: a. c. There may be two #8 x 2" ... can be used if the treadmill is displayed in , make sure that applies, and follow the steps listed. If further assistance is turned on SOLUTION: a. Reinsert the key into the console. If the displays are , remove them. With the help of this manual. PROBLEM: The console displays remain...

User Manual
Page 26
... 1/8 in . Be careful to 7 cm) off . 12 61 Locate the Reed Switch (71) and the Magnet (50) on the left side of this manual. 26 If the walking belt still slows when walked on SOLUTION: a. If necessary, loosen the #8 x 3/4" Switch Screw (15), move 15 50 the Reed.... Remove the key and UNPLUG THE POWER CORD. Repeat until the Magnet is no longer than 5 ft. (1.5 m). the Reed Switch is overtightened, treadmill performance may decrease and the walking belt may become damaged. While the incline is properly tightened. When the walking belt is needed, use only a ...
... 1/8 in . Be careful to 7 cm) off . 12 61 Locate the Reed Switch (71) and the Magnet (50) on the left side of this manual. 26 If the walking belt still slows when walked on SOLUTION: a. If necessary, loosen the #8 x 3/4" Switch Screw (15), move 15 50 the Reed.... Remove the key and UNPLUG THE POWER CORD. Repeat until the Magnet is no longer than 5 ft. (1.5 m). the Reed Switch is overtightened, treadmill performance may decrease and the walking belt may become damaged. While the incline is properly tightened. When the walking belt is needed, use only a ...

User Manual
Page 30
... Plate Key/Clip 30 Description Key No. Qty. PATL40907.0 R1207A To locate the parts listed below, see the EXPLODED DRAWING near the end of this manual. Key No.
... Plate Key/Clip 30 Description Key No. Qty. PATL40907.0 R1207A To locate the parts listed below, see the EXPLODED DRAWING near the end of this manual. Key No.

User Manual
Page 31
....5 Flat Washer #8 Lock Nut #8 x 3/4" Bolt 4" Ground Wire w/Decal Console Fan 16" Blue Wire, M/F 4" Black Wire, 2F 4" Black Wire, M/F 4" Red Wire, M/F 16" White Wire, 2F User's Manual *These parts are subject to change without notice. 31 Specifications are not illustrated. Qty. 116 4 117 1 118 1 119 1 120 1 * - * - * - * - * - * - Qty. 101 1 102 1 103 1 104 1 105...
....5 Flat Washer #8 Lock Nut #8 x 3/4" Bolt 4" Ground Wire w/Decal Console Fan 16" Blue Wire, M/F 4" Black Wire, 2F 4" Black Wire, M/F 4" Red Wire, M/F 16" White Wire, 2F User's Manual *These parts are subject to change without notice. 31 Specifications are not illustrated. Qty. 116 4 117 1 118 1 119 1 120 1 * - * - * - * - * - * - Qty. 101 1 102 1 103 1 104 1 105...

User Manual
Page 36
... store display models. No other warranty beyond that specifically set forth herein. The warranty extended hereunder is in workmanship and material, under this manual) • the key number and description of the replacement part(s) (see the PART LIST and the EXPLODED DRAWING near the end of... © 2007 ICON IP, Inc. This warranty extends only to state. Some states do not allow the exclusion or limitation of this manual) LIMITED WARRANTY The ICON Authorized Dealer (Dealer) warrants this product to provide the following information when contacting us assist you . The frame ...
... store display models. No other warranty beyond that specifically set forth herein. The warranty extended hereunder is in workmanship and material, under this manual) • the key number and description of the replacement part(s) (see the PART LIST and the EXPLODED DRAWING near the end of... © 2007 ICON IP, Inc. This warranty extends only to state. Some states do not allow the exclusion or limitation of this manual) LIMITED WARRANTY The ICON Authorized Dealer (Dealer) warrants this product to provide the following information when contacting us assist you . The frame ...


