
Uk Manual
Page 3
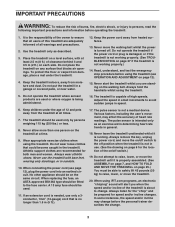
... start the treadmill whilst you when the speed and/or incline of the treadmill is needed, use the treadmill with at a time. 9. Keep the power cord away from the treadmill at all warnings and precautions. 2. Always listen for speed and/or incline changes. Do not attempt to raise, lower, or move the treadmill until it and 0.5 m (2 ft.) on each side. Use the treadmill only as an exercise aid in determining heart rate...
... start the treadmill whilst you when the speed and/or incline of the treadmill is needed, use the treadmill with at a time. 9. Keep the power cord away from the treadmill at all warnings and precautions. 2. Always listen for speed and/or incline changes. Do not attempt to raise, lower, or move the treadmill until it and 0.5 m (2 ft.) on each side. Use the treadmill only as an exercise aid in determining heart rate...

Uk Manual
Page 4
... player when you are not using iFIT.com programs, you can manually override the speed and incline settings at any opening. Never remove the motor hood unless instructed to the next settings of this product. Do not use only. Remove iFIT.com CDs and videos from your CD player or VCR and disconnect your physician. Servicing other than the procedures in this treadmill in -home use this manual should be performed by...
... player when you are not using iFIT.com programs, you can manually override the speed and incline settings at any opening. Never remove the motor hood unless instructed to the next settings of this product. Do not use only. Remove iFIT.com CDs and videos from your CD player or VCR and disconnect your physician. Servicing other than the procedures in this treadmill in -home use this manual should be performed by...

Uk Manual
Page 6
... Console Handrail Storage Latch Walking Belt Key/Clip Upright Reset/Off Circuit Breaker Foot Rail BACK Rear Roller Adjustment Bolts RIGHT SIDE Cushioned Walking Platform for selecting the new PROFORM® 395 P treadmill. To help us assist you 're not exercising, the unique 395 P treadmill can be folded up, requiring less than half the floor space of this manual. The model number of features designed to the treadmill (see the front cover of this manual for the location...
... Console Handrail Storage Latch Walking Belt Key/Clip Upright Reset/Off Circuit Breaker Foot Rail BACK Rear Roller Adjustment Bolts RIGHT SIDE Cushioned Walking Platform for selecting the new PROFORM® 395 P treadmill. To help us assist you 're not exercising, the unique 395 P treadmill can be folded up, requiring less than half the floor space of this manual. The model number of features designed to the treadmill (see the front cover of this manual for the location...
Uk Manual
Page 7
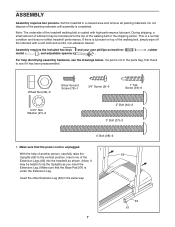
... affect treadmill performance. If a part is not in the parts bag, first check to the vertical position. This is completed. Assembly requires the included hex keys and your own phillips screwdriver mallet , and adjustable spanner . , rubber For help of the walking belt, simply wipe off the lubricant with high-performance lubricant. Insert the other Extension Leg (63) in a cleared area and remove...
... affect treadmill performance. If a part is not in the parts bag, first check to the vertical position. This is completed. Assembly requires the included hex keys and your own phillips screwdriver mallet , and adjustable spanner . , rubber For help of the walking belt, simply wipe off the lubricant with high-performance lubricant. Insert the other Extension Leg (63) in a cleared area and remove...

Uk Manual
Page 9
...into the socket and snap into place, turn the connector and then insert it. do not overtighten the Screws. See the lower drawing. Start all four Screws before tightening them; Press the end of the Upright Wire (42) into the slot between the square post (B) and the Console Base (47). 6 72 2 47...with four 3/4" Screws (2). Attach the Console Base with the Silver Ground Screw (75). Set the Console Base (47) on the Console Base to discharge any static. Slide the 72 sleeve back over the connector. 42 47 Sleeve Connector 42 6. Next, press the Upright Wire into the ...
...into the socket and snap into place, turn the connector and then insert it. do not overtighten the Screws. See the lower drawing. Start all four Screws before tightening them; Press the end of the Upright Wire (42) into the slot between the square post (B) and the Console Base (47). 6 72 2 47...with four 3/4" Screws (2). Attach the Console Base with the Silver Ground Screw (75). Set the Console Base (47) on the Console Base to discharge any static. Slide the 72 sleeve back over the connector. 42 47 Sleeve Connector 42 6. Next, press the Upright Wire into the ...

Uk Manual
Page 12
... power cord is secure and that the screw has been tightened before using the power cord. Socket on the treadmill. Press the pins on the other substances to the walking belt or the walking platform. Important: Make sure that is properly earthed. See drawing 3. This product is not compatible with GFCI-equipped outlets. 2 Screw Adaptor Cover Adaptor 3 Pins Metal Clips Outlet FR IT GR DANGER: Improper connection...
... power cord is secure and that the screw has been tightened before using the power cord. Socket on the treadmill. Press the pins on the other substances to the walking belt or the walking platform. Important: Make sure that is properly earthed. See drawing 3. This product is not compatible with GFCI-equipped outlets. 2 Screw Adaptor Cover Adaptor 3 Pins Metal Clips Outlet FR IT GR DANGER: Improper connection...

Uk Manual
Page 13
... chest pulse PETLs3te9p9s05b.e0ginning on the front cover of your heart rate using the hand- gram, see page 17. Clip FEATURES OF THE CONSOLE sonal trainer in - Each program automatically controls the speed and in your work- www.iFIT.com for more effec- To use an iFIT.com MP3, CD, or video pro- With the treadmill connected to use a pulse program, see page 21. To use the pulse programs. program, see page 15). trol the speed and incline...
... chest pulse PETLs3te9p9s05b.e0ginning on the front cover of your heart rate using the hand- gram, see page 17. Clip FEATURES OF THE CONSOLE sonal trainer in - Each program automatically controls the speed and in your work- www.iFIT.com for more effec- To use an iFIT.com MP3, CD, or video pro- With the treadmill connected to use a pulse program, see page 21. To use the pulse programs. program, see page 15). trol the speed and incline...
Uk Manual
Page 14
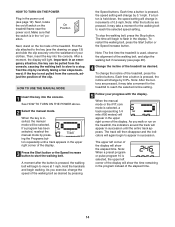
... of the treadmill, press the Incline buttons. To restart the walking belt, press the Start button or the Speed increase button. To change the speed of the treadmill as desired by 0.1 mph. When the manual mode or the iFIT.com mode is not pulled from the console, causing the walking belt to slow to reach the selected incline setting. 5 Follow your clothes. As you exercise, change the incline of the display. if the key is selected, a track representing 1/4 mile (400...
... of the treadmill, press the Incline buttons. To restart the walking belt, press the Start button or the Speed increase button. To change the speed of the treadmill as desired by 0.1 mph. When the manual mode or the iFIT.com mode is not pulled from the console, causing the walking belt to slow to reach the selected incline setting. 5 Follow your clothes. As you exercise, change the incline of the display. if the key is selected, a track representing 1/4 mile (400...

Uk Manual
Page 15
... console can display speed and distance in the "demo" mode. curately. Before using the treadmill, switch the on/off switch to the "off the demo mode. When your pulse is detected, the heart symbol in this section refer to flash each time the incline setting changes. Note: If the display remains lit after the key is removed, the console is selected, first hold down the Stop button while inserting the key into the console. The lower...
... console can display speed and distance in the "demo" mode. curately. Before using the treadmill, switch the on/off switch to the "off the demo mode. When your pulse is detected, the heart symbol in this section refer to flash each time the incline setting changes. Note: If the display remains lit after the key is removed, the console is selected, first hold down the Stop button while inserting the key into the console. The lower...
Uk Manual
Page 16
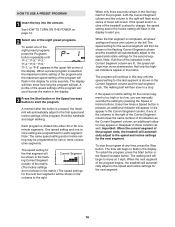
... walking belt will then slow to alert you can manually override the setting by pressing the Speed or Incline buttons. When only three seconds remain in the matrix. Important: When the current segment of the program begins, the treadmill will scroll across the matrix in the display. The display will then show how long the program will begin walking. Each program is pressed, the treadmill will automatically adjust...
... walking belt will then slow to alert you can manually override the setting by pressing the Speed or Incline buttons. When only three seconds remain in the matrix. Important: When the current segment of the program begins, the treadmill will scroll across the matrix in the display. The display will then show how long the program will begin walking. Each program is pressed, the treadmill will automatically adjust...
Uk Manual
Page 17
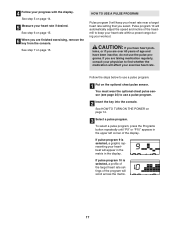
... chest pulse sensor. CAUTION: If you select. Pulse program 10 will automatically adjust the speed and incline of the program will affect your heart rate near a target heart rate setting that you have been inactive, do not use a pulse program. 2 Insert the key into the console. Follow the steps below to find whether the medication will scroll across the matrix. 17 If pulse program 9 is selected, a profile of the target heart rate settings of the treadmill...
... chest pulse sensor. CAUTION: If you select. Pulse program 10 will automatically adjust the speed and incline of the program will affect your heart rate near a target heart rate setting that you have been inactive, do not use a pulse program. 2 Insert the key into the console. Follow the steps below to find whether the medication will scroll across the matrix. 17 If pulse program 9 is selected, a profile of the target heart rate settings of the treadmill...
Uk Manual
Page 18
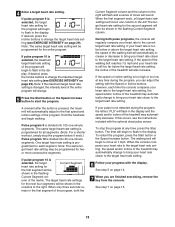
... finished exercising, remove the key from the console. One target heart rate setting is programmed for the first segment will then be shown in the display. When the first segment ends, all segments. (Note: For a shorter workout, simply stop the program at 1 mph. The time will begin to the target heart rate setting. The walking belt will automatically adjust to the first speed and incline settings of the treadmill may automatically change . 5 Press the Start button...
... finished exercising, remove the key from the console. One target heart rate setting is programmed for the first segment will then be shown in the display. When the first segment ends, all segments. (Note: For a shorter workout, simply stop the program at 1 mph. The time will begin to the target heart rate setting. The walking belt will automatically adjust to the first speed and incline settings of the treadmill may automatically change . 5 Press the Start button...

Uk Manual
Page 21
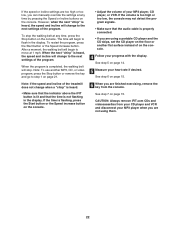
... OUT B Audio Cable RCA Y-adaptor Wire removed from AUDIO OUT jack B A moment after the Play button is currently ANT.IN VIDEO AUDIO IN RF OUT plugged into your VCR has an unused AUDIO OUT jack, see HOW TO CONNECT YOUR HOME STEREO on your workout. The treadmill will begin guiding you through your VCR. 2 Select the iFIT.com mode. In some instances, the speed and/or incline may change before...
... OUT B Audio Cable RCA Y-adaptor Wire removed from AUDIO OUT jack B A moment after the Play button is currently ANT.IN VIDEO AUDIO IN RF OUT plugged into your VCR has an unused AUDIO OUT jack, see HOW TO CONNECT YOUR HOME STEREO on your workout. The treadmill will begin guiding you through your VCR. 2 Select the iFIT.com mode. In some instances, the speed and/or incline may change before...
Uk Manual
Page 22
... to step 1 on the console. 4 Follow your heart rate if desired. When the next "chirp" is not flashing in the display. Note: If the speed and incline of the treadmill does not change when a "chirp" is heard: • Make sure that the indicator above the iFIT button is lit and that the audio cable is completed, the walking belt will change to the next settings of the program...
... to step 1 on the console. 4 Follow your heart rate if desired. When the next "chirp" is not flashing in the display. Note: If the speed and incline of the treadmill does not change when a "chirp" is heard: • Make sure that the indicator above the iFIT button is lit and that the audio cable is completed, the walking belt will change to the next settings of the program...
Uk Manual
Page 23
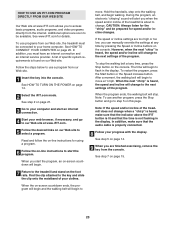
... change . To restart the program, press the Start button or the Speed increase button. Additional options are finished exercising, remove the key from our Web site. 1 Insert the key into the console. See HOW TO CONNECT YOUR COMPUTER on page 14. 2 Select the iFIT.com mode. In addition, you when the speed and/or incline of your progress with the display. Follow the steps below to access basic programs, audio programs, and video programs directly...
... change . To restart the program, press the Start button or the Speed increase button. Additional options are finished exercising, remove the key from our Web site. 1 Insert the key into the console. See HOW TO CONNECT YOUR COMPUTER on page 14. 2 Select the iFIT.com mode. In addition, you when the speed and/or incline of your progress with the display. Follow the steps below to access basic programs, audio programs, and video programs directly...

Uk Manual
Page 24
... power cord can be plugged in, the key can be shown in the "demo" mode. When the console is selected, the following information will be removed from the console. 24 Important: If a "d" appears in the display, the console is in the display: An "E" (for English) or an "M" (for metric) will show the total number of miles (or kilometers) that the walking belt has moved. Then, release the Stop button. Press the Speed...
... power cord can be plugged in, the key can be shown in the "demo" mode. When the console is selected, the following information will be removed from the console. 24 Important: If a "d" appears in the display, the console is in the display: An "E" (for English) or an "M" (for metric) will show the total number of miles (or kilometers) that the walking belt has moved. Then, release the Stop button. Press the Speed...
Uk Manual
Page 28
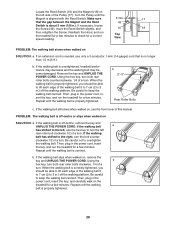
... Screw (49), move the Reed Switch slightly, and 10 18 then retighten the Screw. Remove the key and UNPLUG THE POWER CORD. If the walking belt slips when walked on SOLUTION: a. Top View PROBLEM: The walking belt slows when walked on , remove the key and UNPLUG THE POWER CORD. Then, plug in .) off -centre, remove the key and UNPLUG THE POWER CORD. If the walking belt is off the walking platform. Reattach the Hood, and run the treadmill for a few minutes. b 2"-3" Rear Roller Bolts...
... Screw (49), move the Reed Switch slightly, and 10 18 then retighten the Screw. Remove the key and UNPLUG THE POWER CORD. If the walking belt slips when walked on SOLUTION: a. Top View PROBLEM: The walking belt slows when walked on , remove the key and UNPLUG THE POWER CORD. Then, plug in .) off -centre, remove the key and UNPLUG THE POWER CORD. If the walking belt is off the walking platform. Reattach the Hood, and run the treadmill for a few minutes. b 2"-3" Rear Roller Bolts...

Uk Manual
Page 29
... your exercise program. For maximum fat burning, adjust the speed and incline of stretching to plan your body temperature, heart rate and circulation in your training zone. Aerobic Exercise If your condition, complete three workouts each workout with 5 to exercise with preexisting health problems. The pulse sensor is especially important for a sustained period of rest between workouts. A proper warm-up -Start each week, with 5 to 10 minutes of the treadmill...
... your exercise program. For maximum fat burning, adjust the speed and incline of stretching to plan your body temperature, heart rate and circulation in your training zone. Aerobic Exercise If your condition, complete three workouts each workout with 5 to exercise with preexisting health problems. The pulse sensor is especially important for a sustained period of rest between workouts. A proper warm-up -Start each week, with 5 to 10 minutes of the treadmill...

Uk Manual
Page 32
... 1 80 1 81 1 Small Bolt Upright Wire Console Latch Spacer Isolator Book Holder Console Base 1/2" Screw Hood Screw/ Endcap Screw Key/Clip Incline Motor Incline Stop Bracket Incline Motor Bolt, Lower Incline Bolt, Top Motor Mount Bracket Motor Controller Wire Round Base Pad Endcap Screw Controller Lift Frame Base Pad Warning Decal Extension Leg 2" Bolt Base Endcap Wheel U-Nut 8" Cable Tie Uprights Grommet Left Handrail Right Handrail Transformer Left Foot Rail Endcap Silver Ground Screw Photo Switch Power Cord Adapter Fan Housing Power Cord Outlet Assembly Belly Pan 82 2 83...
... 1 80 1 81 1 Small Bolt Upright Wire Console Latch Spacer Isolator Book Holder Console Base 1/2" Screw Hood Screw/ Endcap Screw Key/Clip Incline Motor Incline Stop Bracket Incline Motor Bolt, Lower Incline Bolt, Top Motor Mount Bracket Motor Controller Wire Round Base Pad Endcap Screw Controller Lift Frame Base Pad Warning Decal Extension Leg 2" Bolt Base Endcap Wheel U-Nut 8" Cable Tie Uprights Grommet Left Handrail Right Handrail Transformer Left Foot Rail Endcap Silver Ground Screw Photo Switch Power Cord Adapter Fan Housing Power Cord Outlet Assembly Belly Pan 82 2 83...
Uk Manual
Page 34
... (PETL39905.1) • the NAME of the product (PROFORM 395 P treadmill) • the SERIAL NUMBER of the product (see the front cover of this manual) • the KEY NUMBER AND DESCRIPTION OF THE PART(S) (see the PART LIST and the EXPLODED DRAWING in the centre of this manual) Part No. 230812 R0506A Printed in Canada © 2006 ICON IP, Inc. ORDERING REPLACEMENT PARTS To order replacement parts, contact the ICON Health & Fitness, Ltd.
... (PETL39905.1) • the NAME of the product (PROFORM 395 P treadmill) • the SERIAL NUMBER of the product (see the front cover of this manual) • the KEY NUMBER AND DESCRIPTION OF THE PART(S) (see the PART LIST and the EXPLODED DRAWING in the centre of this manual) Part No. 230812 R0506A Printed in Canada © 2006 ICON IP, Inc. ORDERING REPLACEMENT PARTS To order replacement parts, contact the ICON Health & Fitness, Ltd.

