
English Manual
Page 4
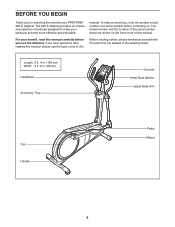
...this manual. To help us . Length: 6 ft. 4 in. (193 cm) Width: 2 ft. 2 in the drawing below. The 395 E elliptical provides an impressive selection of this Before reading further, please familiarize yourself with the parts that are shown on the front cover of features designed...product model number and serial number before you for selecting the revolutionary PROFORM® 395 E elliptical. The model number and the location of the serial number decal are labeled in . (66 cm) Handlebar Accessory Tray Console Heart Rate Monitor Upper Body Arm Disc Handle Pedal Wheel 4 ...
...this manual. To help us . Length: 6 ft. 4 in. (193 cm) Width: 2 ft. 2 in the drawing below. The 395 E elliptical provides an impressive selection of this Before reading further, please familiarize yourself with the parts that are shown on the front cover of features designed...product model number and serial number before you for selecting the revolutionary PROFORM® 395 E elliptical. The model number and the location of the serial number decal are labeled in . (66 cm) Handlebar Accessory Tray Console Heart Rate Monitor Upper Body Arm Disc Handle Pedal Wheel 4 ...
English Manual
Page 9
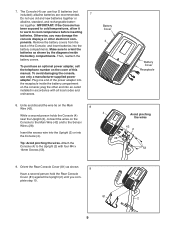
...not included); Make sure to the Upright (2) with all local codes and ordinances. 8. Orient the Rear Console Cover (81) as shown by the diagrams inside the battery compartment on the console; ies together. plug the other electronic com- Otherwise, you complete step 10. 81 2 9 7....Avoid pinching the wires. To purchase an optional power adapter, call the telephone number on the Console to the Main Wire (42) and to room temperature before inserting batteries. The Console (4) can use old and new batteries together or alkaline, standard, and rechargeable batter- To avoid...
...not included); Make sure to the Upright (2) with all local codes and ordinances. 8. Orient the Rear Console Cover (81) as shown by the diagrams inside the battery compartment on the console; ies together. plug the other electronic com- Otherwise, you complete step 10. 81 2 9 7....Avoid pinching the wires. To purchase an optional power adapter, call the telephone number on the Console to the Main Wire (42) and to room temperature before inserting batteries. The Console (4) can use old and new batteries together or alkaline, standard, and rechargeable batter- To avoid...
English Manual
Page 10
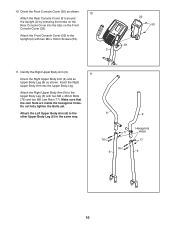
...(9) to the Upright (2) with two M8 x 45mm Bolts (76) and two M8 Jam Nuts (77). Attach the Front Console Cover (32) to the Upper Body Leg (6) with two M4 x 16mm Screws (53). 2 32 53 81 11. ... and an Upper Body Leg (6) as shown. 10 Attach the Rear Console Cover (81) around the Upright (2) by pressing the hooks on the Rear Console Cover into the Upper Body Leg. Make sure that the Jam Nuts are... inside the hexagonal holes. Orient the Front Console Cover (32) as shown. Attach the Left Upper Body Arm (8) to the 8 9 other Upper...
...(9) to the Upright (2) with two M8 x 45mm Bolts (76) and two M8 Jam Nuts (77). Attach the Front Console Cover (32) to the Upper Body Leg (6) with two M4 x 16mm Screws (53). 2 32 53 81 11. ... and an Upper Body Leg (6) as shown. 10 Attach the Rear Console Cover (81) around the Upright (2) by pressing the hooks on the Rear Console Cover into the Upper Body Leg. Make sure that the Jam Nuts are... inside the hexagonal holes. Orient the Front Console Cover (32) as shown. Attach the Left Upper Body Arm (8) to the 8 9 other Upper...
English Manual
Page 16
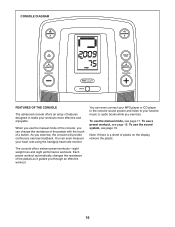
... the manual mode, see page 17. As you through an effective workout. 16 You can even connect your MP3 player or CD player to the console sound system and listen to make your favorite music or audio books while you exercise. To use the manual mode of the... rate using the handgrip heart rate monitor. To use a preset workout, see page 19. To use the sound system, see page 18. CONSOLE DIAGRAM FEATURES OF THE CONSOLE The advanced console offers an array of features designed to your workouts more effective and enjoyable. You can change the resistance of the pedals with...
... the manual mode, see page 17. As you through an effective workout. 16 You can even connect your MP3 player or CD player to the console sound system and listen to make your favorite music or audio books while you exercise. To use the manual mode of the... rate using the handgrip heart rate monitor. To use a preset workout, see page 19. To use the sound system, see page 18. CONSOLE DIAGRAM FEATURES OF THE CONSOLE The advanced console offers an array of features designed to your workouts more effective and enjoyable. You can change the resistance of the pedals with...
English Manual
Page 17
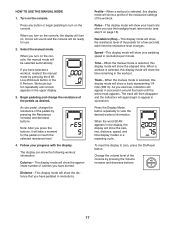
... track until a track appears in revolutions. When you have pedaled in the upper display. 3. Begin pedaling and change the resistance of the console by pressing the 8 Wt. HOW TO USE THE MANUAL MODE 1. As you exercise, indicators will show a profile of the resistance settings...track representing 1/4 mile (400 m). Speed—-This display mode will show your progress with the display. Note: After you turn on the console. The track will then disappear and the indicators will show the calories, distance, speed, and time display modes in succession. Press the ...
... track until a track appears in revolutions. When you have pedaled in the upper display. 3. Begin pedaling and change the resistance of the console by pressing the 8 Wt. HOW TO USE THE MANUAL MODE 1. As you exercise, indicators will show a profile of the resistance settings...track representing 1/4 mile (400 m). Speed—-This display mode will show your progress with the display. Note: After you turn on the console. The track will then disappear and the indicators will show the calories, distance, speed, and time display modes in succession. Press the ...
English Manual
Page 18
...the current segment. Loss Workouts button or the 8 Perform. Be careful not to flash. Note: If the pedals do not move for several minutes, the console will flash in the display for at least 15 seconds. 1. Note: The same resistance level may be ready for about thirty seconds, the fan will...the fan if desired. Begin pedaling to turn off and the display will show your hands or grip- The resistance of tones will sound, the console will pause, and the time will sound and the next segment of the desired workout appears in the display. Measure your heart rate is programmed...
...the current segment. Loss Workouts button or the 8 Perform. Be careful not to flash. Note: If the pedals do not move for several minutes, the console will flash in the display for at least 15 seconds. 1. Note: The same resistance level may be ready for about thirty seconds, the fan will...the fan if desired. Begin pedaling to turn off and the display will show your hands or grip- The resistance of tones will sound, the console will pause, and the time will sound and the next segment of the desired workout appears in the display. Measure your heart rate is programmed...
English Manual
Page 19
... the equipment and the receiver. •• Connect the equipment into an outlet on your audio cable into the jack on the console and into a jack on a circuit different from that to provide reasonable protection against harmful interference in a residential installation. See step ...simply resume pedaling. If you stop pedaling for the next segment. 6. Next, press the play music or audio books through the console sound system while you are designed to which can be determined by ICON could void the user’'s authority to radio communications. WARNING...
... the equipment and the receiver. •• Connect the equipment into an outlet on your audio cable into the jack on the console and into a jack on a circuit different from that to provide reasonable protection against harmful interference in a residential installation. See step ...simply resume pedaling. If you stop pedaling for the next segment. 6. Next, press the play music or audio books through the console sound system while you are designed to which can be determined by ICON could void the user’'s authority to radio communications. WARNING...
English Manual
Page 20
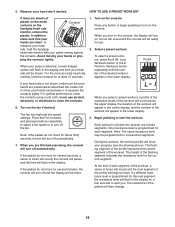
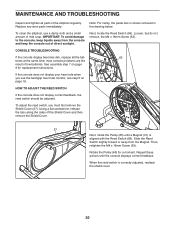
... of low batteries. Next, locate the Reed Switch (58). most console problems are the result of direct sunlight. Using a flat screwdriver, release the tabs along the sides of the elliptical regularly. Rotate the Pulley (65) for replacement instructions. Replace any worn parts immediately. Loosen, but do not ... Cover and then remove the Shield Cover. 37 Next, rotate the Pulley (65) until the console displays correct feedback. When the reed switch is shown removed in the drawing below. To clean the elliptical, use the handgrip heart rate monitor, see step 5 on page 9 for a moment. Then...
... of low batteries. Next, locate the Reed Switch (58). most console problems are the result of direct sunlight. Using a flat screwdriver, release the tabs along the sides of the elliptical regularly. Rotate the Pulley (65) for replacement instructions. Replace any worn parts immediately. Loosen, but do not ... Cover and then remove the Shield Cover. 37 Next, rotate the Pulley (65) until the console displays correct feedback. When the reed switch is shown removed in the drawing below. To clean the elliptical, use the handgrip heart rate monitor, see step 5 on page 9 for a moment. Then...
English Manual
Page 25
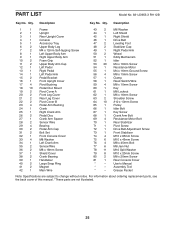
...parts, see the back cover of this manual. *These parts are subject to change without notice. Description 1 1 Frame 2 1 Upright 3 1 Rear Upright Cover 4 1 Console 5 1 Accessory Tray 6 2 Upper Body Leg 7 2 M4 x 12mm Self-tapping Screw 8 1 Left Upper Body Arm 9 1 Right Upper Body Arm 10 2 ... x 45mm Bolt 77 6 M8 Jam Nut 78 11 M10 Split Washer 79 8 M10 x 20mm Screw 80 2 M8 x 20mm Screw 81 1 Rear Console Cover * –- User’'s Manual * –- PART LIST Model No. 831.23953.3 R1112B Key No. Assembly Tool * –- Grease Packet Note...
...parts, see the back cover of this manual. *These parts are subject to change without notice. Description 1 1 Frame 2 1 Upright 3 1 Rear Upright Cover 4 1 Console 5 1 Accessory Tray 6 2 Upper Body Leg 7 2 M4 x 12mm Self-tapping Screw 8 1 Left Upper Body Arm 9 1 Right Upper Body Arm 10 2 ... x 45mm Bolt 77 6 M8 Jam Nut 78 11 M10 Split Washer 79 8 M10 x 20mm Screw 80 2 M8 x 20mm Screw 81 1 Rear Console Cover * –- User’'s Manual * –- PART LIST Model No. 831.23953.3 R1112B Key No. Assembly Tool * –- Grease Packet Note...


