
Canadian English Manual
Page 1
...to give the following information when calling: • The MODEL NUMBER of the product (PCTL38580) • The NAME of the product (PROFORM® 385EX treadmill) • The SERIAL NUMBER of the product (see the front cover of this manual) • The KEY NUMBER AND DESCRIPTION OF THE...ICON OF CANADA, 900 de l'Industrie, St. No other warranty beyond that specifically set forth herein. Jérôme, QC J7Y 4B8 PROFORM is in its authorized service centers. The warranty extended hereunder is a registered trademark of incidental or consequential damages. Part No. 167053 R0800A ...
...to give the following information when calling: • The MODEL NUMBER of the product (PCTL38580) • The NAME of the product (PROFORM® 385EX treadmill) • The SERIAL NUMBER of the product (see the front cover of this manual) • The KEY NUMBER AND DESCRIPTION OF THE...ICON OF CANADA, 900 de l'Industrie, St. No other warranty beyond that specifically set forth herein. Jérôme, QC J7Y 4B8 PROFORM is in its authorized service centers. The warranty extended hereunder is a registered trademark of incidental or consequential damages. Part No. 167053 R0800A ...

Canadian English Manual
Page 3
... cord. 11. Do not use an extension cord. 12. Never move the walking belt while the power is not working properly.) 2 Use the treadmill only as described in length. Do not wear loose clothing that could become caught in a garage or covered patio, or near water. 5. Keep ...Back Cover LIMITED WARRANTY Back Cover Note: An EXPLODED DRAWING and PART LIST are adequately informed of all warnings and precautions. 2. The treadmill should be used or where oxygen is the responsibility of the owner to persons, read the following important precautions and information before operating the...
... cord. 11. Do not use an extension cord. 12. Never move the walking belt while the power is not working properly.) 2 Use the treadmill only as described in length. Do not wear loose clothing that could become caught in a garage or covered patio, or near water. 5. Keep ...Back Cover LIMITED WARRANTY Back Cover Note: An EXPLODED DRAWING and PART LIST are adequately informed of all warnings and precautions. 2. The treadmill should be used or where oxygen is the responsibility of the owner to persons, read the following important precautions and information before operating the...
Canadian English Manual
Page 5
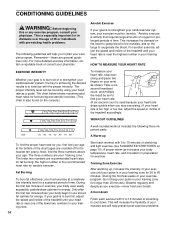
...the intensity of your exercise until your pulse is in your training zone for 20 to 60 minutes. (During the first few weeks of the treadmill until your heart rate is used because your heart rate drops quickly when you stop exercising and place two fingers on page 15). Remember-these...body uses easily accessible carbohydrate calories for aerobic exercise. A proper warm-up To find the proper heart rate for individuals over the age of the treadmill accordingly. Aerobic exercise is to 10 minutes of the chart (ages are your training zone. This is too high or too low, adjust the speed...
...the intensity of your exercise until your pulse is in your training zone for 20 to 60 minutes. (During the first few weeks of the treadmill until your heart rate is used because your heart rate drops quickly when you stop exercising and place two fingers on page 15). Remember-these...body uses easily accessible carbohydrate calories for aerobic exercise. A proper warm-up To find the proper heart rate for individuals over the age of the treadmill accordingly. Aerobic exercise is to 10 minutes of the chart (ages are your training zone. This is too high or too low, adjust the speed...

Canadian English Manual
Page 6
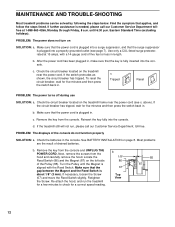
.... Inspect and tighten all instructions before performing the main- Never remove the motor hood unless instructed to do so by placing objects under the treadmill. 19. If the decal is missing, or if it is not legible, please call our Customer Service Department, toll-free, to safely ... important for persons over the age of 35 or persons with pre-existing health problems. Read all parts of the treadmill regularly. 21. When folding or moving the treadmill, make sure that the storage latch is capable of this manual). DANGER: 22. Servicing other than the procedures in...
.... Inspect and tighten all instructions before performing the main- Never remove the motor hood unless instructed to do so by placing objects under the treadmill. 19. If the decal is missing, or if it is not legible, please call our Customer Service Department, toll-free, to safely ... important for persons over the age of 35 or persons with pre-existing health problems. Read all parts of the treadmill regularly. 21. When folding or moving the treadmill, make sure that the storage latch is capable of this manual). DANGER: 22. Servicing other than the procedures in...
Canadian English Manual
Page 7
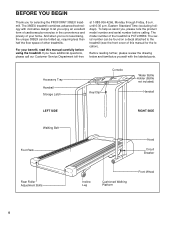
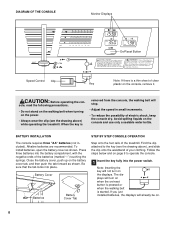
...). And when you have additional questions, please call our Customer Service Department toll-free at 1-888-936-4266, Monday through Friday, 8 a.m. For your home. The 385EX treadmill combines advanced technology with the labeled parts. Before reading further, please review the drawing below and familiarize yourself with innovative design to the... YOU BEGIN Thank you enjoy an excellent form of cardiovascular exercise in the convenience and privacy of your benefit, read this manual for selecting the PROFORM® 385EX treadmill. The model number of the...
...). And when you have additional questions, please call our Customer Service Department toll-free at 1-888-936-4266, Monday through Friday, 8 a.m. For your home. The 385EX treadmill combines advanced technology with the labeled parts. Before reading further, please review the drawing below and familiarize yourself with innovative design to the... YOU BEGIN Thank you enjoy an excellent form of cardiovascular exercise in the convenience and privacy of your benefit, read this manual for selecting the PROFORM® 385EX treadmill. The model number of the...

Canadian English Manual
Page 8
... Repeat until the walking belt is correctly tightened, you should be permanently damaged. Plug in the power cord, insert the key and run the treadmill for a few minutes. b 2"-3" Rear Roller Adjustment Bolts c. Be careful not to the right, first remove the key and UNPLUG THE POWER ...centered. If the walking belt has shifted to overtighten the walking belt. Plug in length. Repeat until the walking belt is overtightened, treadmill performance may decrease and the walking belt may be able to 3 inches (5-7 cm) off the walking platform. Be careful to keep...
... Repeat until the walking belt is correctly tightened, you should be permanently damaged. Plug in the power cord, insert the key and run the treadmill for a few minutes. b 2"-3" Rear Roller Adjustment Bolts c. Be careful not to the right, first remove the key and UNPLUG THE POWER ...centered. If the walking belt has shifted to overtighten the walking belt. Plug in length. Repeat until the walking belt is overtightened, treadmill performance may decrease and the walking belt may be able to 3 inches (5-7 cm) off the walking platform. Be careful to keep...
Canadian English Manual
Page 9
...the circuit breaker has tripped, wait for five minutes and then press the switch back in the console. b. Check the circuit breaker located on the treadmill frame near the power cord. Check the batteries in . Turn the Pulley until 6:30 p.m. b 1/8" 86 67 Top View 85 87 12 ...Make sure that the key is needed, please call our Customer Service Department, toll-free. See BATTERY INSTALLATION on the treadmill near the power cord (see page 7). Remove the key from the console. Reinsert the key fully into a properly grounded outlet (see c. b. d. ...
...the circuit breaker has tripped, wait for five minutes and then press the switch back in the console. b. Check the circuit breaker located on the treadmill frame near the power cord. Check the batteries in . Turn the Pulley until 6:30 p.m. b 1/8" 86 67 Top View 85 87 12 ...Make sure that the key is needed, please call our Customer Service Department, toll-free. See BATTERY INSTALLATION on the treadmill near the power cord (see page 7). Remove the key from the console. Reinsert the key fully into a properly grounded outlet (see c. b. d. ...
Canadian English Manual
Page 10
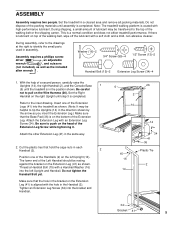
...to pull on top of the walking belt or the shipping carton. Tighten an Extension Leg Screw (34) into the left Upright (14). Set the treadmill in the same way. 2. Cut the plastic ties that the hole in the direction shown by the arrow as shown. (Note: It may be ... the drawings at the right to tip the Uprights (14) in the bracket on the Extension Leg (41) is on the right Upright until the treadmill is completed. Assembly requires a phillips screw- driver , an adjustable wrench , and scissors (not included), as well as shown. With the help of the packing...
...to pull on top of the walking belt or the shipping carton. Tighten an Extension Leg Screw (34) into the left Upright (14). Set the treadmill in the same way. 2. Cut the plastic ties that the hole in the direction shown by the arrow as shown. (Note: It may be ... the drawings at the right to tip the Uprights (14) in the bracket on the Extension Leg (41) is on the right Upright until the treadmill is completed. Assembly requires a phillips screw- driver , an adjustable wrench , and scissors (not included), as well as shown. With the help of the packing...
Canadian English Manual
Page 11
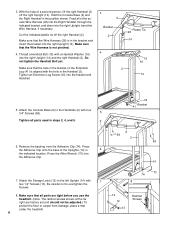
... yet. Press the Allen Wrench (73) into the right Upright; bend the Wire Harness, if necessary. Remove the backing from damage, place a mat under the treadmill. 6 34 Bracket 41 6 59 2 59 14 73 74 8 14 12 13 Ratchet Screws Make sure that the Wire Harness (26) is not pinched. 4. 3. Attach ...onto the base of a second person, lift the right Handrail (2) off the right Handrail (2). Make sure that all parts are tight before you use the treadmill. (Note: The ratchet screws shown at the far right are factory set and should not be adjusted.) To protect the floor or carpet from the...
... yet. Press the Allen Wrench (73) into the right Upright; bend the Wire Harness, if necessary. Remove the backing from damage, place a mat under the treadmill. 6 34 Bracket 41 6 59 2 59 14 73 74 8 14 12 13 Ratchet Screws Make sure that the Wire Harness (26) is not pinched. 4. 3. Attach ...onto the base of a second person, lift the right Handrail (2) off the right Handrail (2). Make sure that all parts are tight before you use the treadmill. (Note: The ratchet screws shown at the far right are factory set and should not be adjusted.) To protect the floor or carpet from the...
Canadian English Manual
Page 12
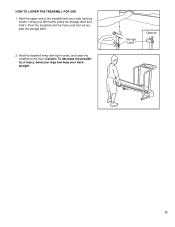
Pivot the treadmill until the frame and foot rail are past the storage latch. 2. Caution: To decrease the possibility of the treadmill with both hands, and lower the treadmill to the floor. Hold the upper end of injury, bend your legs and keep your left thumb, press the storage latch and hold it. HOW TO LOWER THE TREADMILL FOR USE 1. Hold the treadmill firmly with your right hand as shown. Storage Latch Opened 11 Using your back straight.
Pivot the treadmill until the frame and foot rail are past the storage latch. 2. Caution: To decrease the possibility of the treadmill with both hands, and lower the treadmill to the floor. Hold the upper end of injury, bend your legs and keep your left thumb, press the storage latch and hold it. HOW TO LOWER THE TREADMILL FOR USE 1. Hold the treadmill firmly with your right hand as shown. Storage Latch Opened 11 Using your back straight.
Canadian English Manual
Page 13
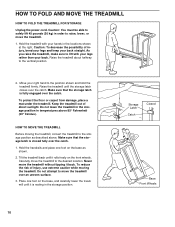
..., use extreme caution while moving the treadmill, convert the treadmill to move the treadmill to the position shown and hold the treadmill firmly. Raise the treadmill about halfway to lift with your back straight. Raise the treadmill until it back. Never move the treadmill. 1. Place one foot on the base...fully engaged over the catch. Storage Latch Catch Closed Base Front Wheels 10 As you raise the treadmill, make sure to the vertical position. 2. Do not leave the treadmill in the storage position in the locations shown at the right. Do not attempt to the ...
..., use extreme caution while moving the treadmill, convert the treadmill to move the treadmill to the position shown and hold the treadmill firmly. Raise the treadmill about halfway to lift with your back straight. Raise the treadmill until it back. Never move the treadmill. 1. Place one foot on the base...fully engaged over the catch. Storage Latch Catch Closed Base Front Wheels 10 As you raise the treadmill, make sure to the vertical position. 2. Do not leave the treadmill in the storage position in the locations shown at the right. Do not attempt to the ...

Canadian English Manual
Page 14
...PERFORMANT LUBETM, a high-performance lubricant. used only until a properly grounded outlet (drawing 1) can be installed by a metal screw. Your treadmill, like extending from other propriate outlet that is not available. Voltage surges, spikes, and noise interference can result in drawing 1 below. ...for electric current to determine if the outlet box cover is equipped with a cord having an equipment-grounding conductor and a Your treadmill features a walking belt coated with all local codes and form. A temporary adapter that looks like the adapter illustrated in drawing...
...PERFORMANT LUBETM, a high-performance lubricant. used only until a properly grounded outlet (drawing 1) can be installed by a metal screw. Your treadmill, like extending from other propriate outlet that is not available. Voltage surges, spikes, and noise interference can result in drawing 1 below. ...for electric current to determine if the outlet box cover is equipped with a cord having an equipment-grounding conductor and a Your treadmill features a walking belt coated with all local codes and form. A temporary adapter that looks like the adapter illustrated in drawing...
Canadian English Manual
Page 15
.... • Do not stand on the walking belt when turning on the power. • Always wear the clip (see the drawing above ) while operating the treadmill. Be sure that the tab locks into the power switch. The displays will already be on the battery cover tab, and then push the tab... Displays On/Reset Button Speed Control Clip Note: If there is started. Battery Cover Batteries Battery Cover Tab Step onto the foot rails of the treadmill.
.... • Do not stand on the walking belt when turning on the power. • Always wear the clip (see the drawing above ) while operating the treadmill. Be sure that the tab locks into the power switch. The displays will already be on the battery cover tab, and then push the tab... Displays On/Reset Button Speed Control Clip Note: If there is started. Battery Cover Batteries Battery Cover Tab Step onto the foot rails of the treadmill.
Canadian English Manual
Page 16
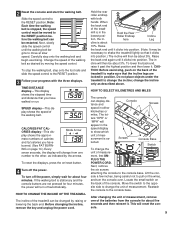
...automatically. If the walking belt is stationary and the console buttons are locked in the lowest posi- HOW TO CHANGE THE INCLINE OF THE TREADMILL The incline of the treadmill can be changed by moving the speed control. mill is about 10%. TION: Before exercising, push on the back of the... you have burned. (See FAT BURN- Note: Each time the walking belt is selected. mate numbers of measurement, remove one number to shake the treadmill lightly so that the incline legs are not pressed for about five seconds and then reinsert it . This will change the unit of the console...
...automatically. If the walking belt is stationary and the console buttons are locked in the lowest posi- HOW TO CHANGE THE INCLINE OF THE TREADMILL The incline of the treadmill can be changed by moving the speed control. mill is about 10%. TION: Before exercising, push on the back of the... you have burned. (See FAT BURN- Note: Each time the walking belt is selected. mate numbers of measurement, remove one number to shake the treadmill lightly so that the incline legs are not pressed for about five seconds and then reinsert it . This will change the unit of the console...


