

English Manual
Page 1
...? PFTL38572 Serial No. MST ?f8 . ea A:J.i .1p94:Ar1...)01t:,..,.„,,, *imp 4; 11100 are committed to you have questions, or if there are missing or damaged parts, we are : is manual ure.:fe eteti •i* USER'S MANUAL The trained technicians on our Customer Hot Line will guarantee complete satisfaction through direct assistance...
...? PFTL38572 Serial No. MST ?f8 . ea A:J.i .1p94:Ar1...)01t:,..,.„,,, *imp 4; 11100 are committed to you have questions, or if there are missing or damaged parts, we are : is manual ure.:fe eteti •i* USER'S MANUAL The trained technicians on our Customer Hot Line will guarantee complete satisfaction through direct assistance...
English Manual
Page 2
...ASSEMBLY OPERATION AND ADJUSTMENT HOW TO FOLD AND MOVE THE TREADMILL MAINTENANCE AND TROUBLE-SHOOTING CONDITIONING GUIDELINES ORDERING REPLACEMENT PARTS LIMITED WARRANTY 2 4 5 7 10 12 14 Back Cover Back Cover Note: An EXPLODED DRAWING and a PART LIST are attached to ensure..:::'::: 9 Wear appropriate exercise ...clothing when etl'alyUseta,of this manual. Please save them for se the treadmill only as described both men and women. Do not wear loose cloth-...
...ASSEMBLY OPERATION AND ADJUSTMENT HOW TO FOLD AND MOVE THE TREADMILL MAINTENANCE AND TROUBLE-SHOOTING CONDITIONING GUIDELINES ORDERING REPLACEMENT PARTS LIMITED WARRANTY 2 4 5 7 10 12 14 Back Cover Back Cover Note: An EXPLODED DRAWING and a PART LIST are attached to ensure..:::'::: 9 Wear appropriate exercise ...clothing when etl'alyUseta,of this manual. Please save them for se the treadmill only as described both men and women. Do not wear loose cloth-...

English Manual
Page 3
...persons over the age of 35 or persons with pre-existing health problems ead all parts of the treadmill overheating, do so by an authorized service representative. Always remove the key when the treadmill is intended for in this manual should be able to safely lift 45 pounds ..., or institutional setting. Never remove the motor hood:unless instructed to order a free replacement decal (see ORDERING REPLACEMENT PARTS on pages 5 and 6, and HOW TO. Never leave the treadmill unattended while it is fully closed. 20. I • Never allow children to avoid sudden jumps in small increments...
...persons over the age of 35 or persons with pre-existing health problems ead all parts of the treadmill overheating, do so by an authorized service representative. Always remove the key when the treadmill is intended for in this manual should be able to safely lift 45 pounds ..., or institutional setting. Never remove the motor hood:unless instructed to order a free replacement decal (see ORDERING REPLACEMENT PARTS on pages 5 and 6, and HOW TO. Never leave the treadmill unattended while it is fully closed. 20. I • Never allow children to avoid sudden jumps in small increments...
English Manual
Page 4
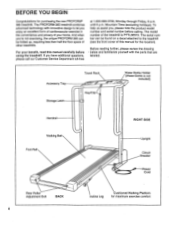
... form of cardiovascular exercise in the convenience and privacy of this manual carefully before calling. The PROFORM 385 treadmill combines advanced technology with the parts that are labeled. until 6 p.m. Mountain Time (excluding holidays). The model number of other treadmills. The serial number can be found on a decal attached to let you , please note the product...
... form of cardiovascular exercise in the convenience and privacy of this manual carefully before calling. The PROFORM 385 treadmill combines advanced technology with the parts that are labeled. until 6 p.m. Mountain Time (excluding holidays). The model number of other treadmills. The serial number can be found on a decal attached to let you , please note the product...
English Manual
Page 5
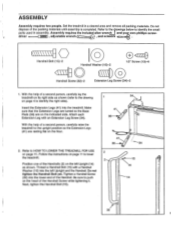
Refer to the 1rawings below to identify the small parts used in a cleared area and remove all packing materials. Thread a Handrail Bolt (15) with an Extension Leg Screw (34). ASSEMBLY Assembly requires two people. Attach ... materials until assembly is completed. Next, tighten the Handrail Bolt (15). 41 36 41 36 2 2 ... 34\,..J 16 14 32 Refer to HOW TO LOWER THE TREADMILL FOR USE on page 11 to the upright position so the Extension Legs (41) are on the left Upright and the Handrail. Make sure that...
Refer to the 1rawings below to identify the small parts used in a cleared area and remove all packing materials. Thread a Handrail Bolt (15) with an Extension Leg Screw (34). ASSEMBLY Assembly requires two people. Attach ... materials until assembly is completed. Next, tighten the Handrail Bolt (15). 41 36 41 36 2 2 ... 34\,..J 16 14 32 Refer to HOW TO LOWER THE TREADMILL FOR USE on page 11 to the upright position so the Extension Legs (41) are on the left Upright and the Handrail. Make sure that...
English Manual
Page 6
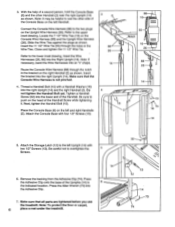
...: If necessary, bend the Wire Harnesses into the Right Upright (14). Insert the bracket into the Adhesive Clip. 7. Make sure that all parts are tightened before you use the treadmill. Thread a Handrail Bolt (15) with four 1/2" Screws (13). 3 6 88 10 55 Notch r. . 88 26 2 10 26 H . 88 14 2 26 4 l te...(15). Press the Allen Wrench (73) into the right Upright (14). Note: To protect the floor or carpet, 6 place a mat under the treadmill. Refer to the upper inset drawing. Be sure to rest the other Handrail (2) near the right Upright (14) as shown. Place the Console Base ...
...: If necessary, bend the Wire Harnesses into the Right Upright (14). Insert the bracket into the Adhesive Clip. 7. Make sure that all parts are tightened before you use the treadmill. Thread a Handrail Bolt (15) with four 1/2" Screws (13). 3 6 88 10 55 Notch r. . 88 26 2 10 26 H . 88 14 2 26 4 l te...(15). Press the Allen Wrench (73) into the right Upright (14). Note: To protect the floor or carpet, 6 place a mat under the treadmill. Refer to the upper inset drawing. Be sure to rest the other Handrail (2) near the right Upright (14) as shown. Place the Console Base ...
English Manual
Page 14
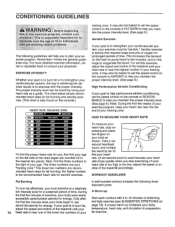
...after the first few minutes of exercise, your body uses easily accessible carbohydrate calories for in your body begin to the right of the treadmill accordingly. Remember-these are your physician. the higher number is especially important for energy. The three numbers are general guidelines only. WORKOUT ... is near the highest number in dividuals over the age of 35 or individuals with pre-existing health problems. The following three important parts: To burn fat effectively, you to help you must be helpful to set the speed control on the lungs to exercise with 5...
...after the first few minutes of exercise, your body uses easily accessible carbohydrate calories for in your body begin to the right of the treadmill accordingly. Remember-these are your physician. the higher number is especially important for energy. The three numbers are general guidelines only. WORKOUT ... is near the highest number in dividuals over the age of 35 or individuals with pre-existing health problems. The following three important parts: To burn fat effectively, you to help you must be helpful to set the speed control on the lungs to exercise with 5...
English Manual
Page 15
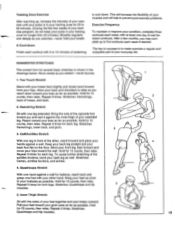
..., then relax. The key to success is to cool down Finish each week, with 5 to 10 minutes of stretching to make exercise a regular and enjoyable part of rest between workouts. Reach toward your hips toward your everyday life. This will increase the flexibility of your muscles and will help to prevent...
..., then relax. The key to success is to cool down Finish each week, with 5 to 10 minutes of stretching to make exercise a regular and enjoyable part of rest between workouts. Reach toward your hips toward your everyday life. This will increase the flexibility of your muscles and will help to prevent...
English Manual
Page 16
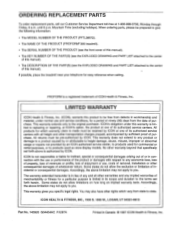
... MODEL NUMBER OF THE PRODUCT (PFTL38572). • The NAME OF THE PRODUCT (PROFORM°' 385 treadmill). • The SERIAL NUMBER OF THE PRODUCT (see the front cover of this manual). • The KEY NUMBER OF THE PART(S) (see the EXPLODED DRAWING and PART LIST attached to the center of this manual). • The DESCRIPTION OF...
... MODEL NUMBER OF THE PRODUCT (PFTL38572). • The NAME OF THE PRODUCT (PROFORM°' 385 treadmill). • The SERIAL NUMBER OF THE PRODUCT (see the front cover of this manual). • The KEY NUMBER OF THE PART(S) (see the EXPLODED DRAWING and PART LIST attached to the center of this manual). • The DESCRIPTION OF...

English Manual
Page 17
N Note: Specifications are subject to change without notice. REMOVE THIS EXPLODED DRAWING AND PART LIST FROM THE MANUAL Save this EXPLODED DRAWING and PART LIST for future reference. For information about ordering replacement parts, see the back cover of the User's Manual.
N Note: Specifications are subject to change without notice. REMOVE THIS EXPLODED DRAWING AND PART LIST FROM THE MANUAL Save this EXPLODED DRAWING and PART LIST for future reference. For information about ordering replacement parts, see the back cover of the User's Manual.
English Manual
Page 18
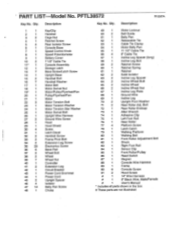
...1 Allen Wrench 74 1 Adhesive Clip 75 1 Left Foot Rail 76 1 Rear Roller 77 4 Platform Screw 78 1 Latch Catch 79 1 Walking Platform 80 1 Walking. ' PART LIST Model No. Belt 81 1 Front Roller Adjustment Bolt 82 1 Shock 83 1 Right Foot Rail 84 1 Sensor Clip 85 1 Front Roller/Pulley 86 1 Reed Switch...Magnet 88 1 Console Wire Harness 89 1 Frame 90 6 Console Screw 91 2 Hood Screw 1 14" Wire Harness 1 9" Black Wire, Male/Female 1 User's Manual * Includes all parts shown in the box # These parts are not illustrated PFTL38572 R1297A Key No. Qty. Qty.
...1 Allen Wrench 74 1 Adhesive Clip 75 1 Left Foot Rail 76 1 Rear Roller 77 4 Platform Screw 78 1 Latch Catch 79 1 Walking Platform 80 1 Walking. ' PART LIST Model No. Belt 81 1 Front Roller Adjustment Bolt 82 1 Shock 83 1 Right Foot Rail 84 1 Sensor Clip 85 1 Front Roller/Pulley 86 1 Reed Switch...Magnet 88 1 Console Wire Harness 89 1 Frame 90 6 Console Screw 91 2 Hood Screw 1 14" Wire Harness 1 9" Black Wire, Male/Female 1 User's Manual * Includes all parts shown in the box # These parts are not illustrated PFTL38572 R1297A Key No. Qty. Qty.


