
English Manual
Page 1
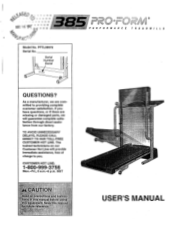
...parts, we are : is manual ure.:fe eteti •i* USER'S MANUAL As a manufacturer, we will provide immediate assistance, free of charge to providing complete customer satisfaction. If you . The trained technicians on our Customer Hot Line will guarantee complete satisfaction through direct... assistance from our factory. CUSTOMER HOT LINE: 1-800-999-3756 Mon.-Fri., 6 a.m.-6 p.m. TO AVOID UNNECESSARY DELAYS, PLEASE CALL DIRECT TO OUR TOLL-FREE CUSTOMER HOT LINE. Serial Number Decal TREADMI LLS QUESTIONS? MST ?f8 . PFTL38572 Serial No. 0...
...parts, we are : is manual ure.:fe eteti •i* USER'S MANUAL As a manufacturer, we will provide immediate assistance, free of charge to providing complete customer satisfaction. If you . The trained technicians on our Customer Hot Line will guarantee complete satisfaction through direct... assistance from our factory. CUSTOMER HOT LINE: 1-800-999-3756 Mon.-Fri., 6 a.m.-6 p.m. TO AVOID UNNECESSARY DELAYS, PLEASE CALL DIRECT TO OUR TOLL-FREE CUSTOMER HOT LINE. Serial Number Decal TREADMI LLS QUESTIONS? MST ?f8 . PFTL38572 Serial No. 0...
English Manual
Page 2
... OF CONTENTS IMPORTANT PRECAUTIONS BEFORE YOU BEGIN ASSEMBLY OPERATION AND ADJUSTMENT HOW TO FOLD AND MOVE THE TREADMILL MAINTENANCE AND TROUBLE-SHOOTING CONDITIONING GUIDELINES ORDERING REPLACEMENT PARTS LIMITED WARRANTY 2 4 5 7 10 12 14 Back Cover Back Cover Note: An EXPLODED DRAWING and a PART LIST are attached to ensure..:::'::: 9 Wear appropriate exercise clothing when etl'alyUseta,of this manual. Never use an extension cord ep:Children Under the age of this Ireedi...
... OF CONTENTS IMPORTANT PRECAUTIONS BEFORE YOU BEGIN ASSEMBLY OPERATION AND ADJUSTMENT HOW TO FOLD AND MOVE THE TREADMILL MAINTENANCE AND TROUBLE-SHOOTING CONDITIONING GUIDELINES ORDERING REPLACEMENT PARTS LIMITED WARRANTY 2 4 5 7 10 12 14 Back Cover Back Cover Note: An EXPLODED DRAWING and a PART LIST are attached to ensure..:::'::: 9 Wear appropriate exercise clothing when etl'alyUseta,of this manual. Never use an extension cord ep:Children Under the age of this Ireedi...

English Manual
Page 3
... performing the maintenance and adjustment procedures described in small increments to order a free replacement decal (see ORDERING REPLACEMENT PARTS on the back cover of this manual. Always unplug the power cord before treadmill is intended for persons over the age of 35 or persons with pre-existing health problems ead all parts of high speeds. Never remove the motor hood:unless instructed to do not operate the treadmill continuously for...
... performing the maintenance and adjustment procedures described in small increments to order a free replacement decal (see ORDERING REPLACEMENT PARTS on the back cover of this manual. Always unplug the power cord before treadmill is intended for persons over the age of 35 or persons with pre-existing health problems ead all parts of high speeds. Never remove the motor hood:unless instructed to do not operate the treadmill continuously for...
English Manual
Page 4
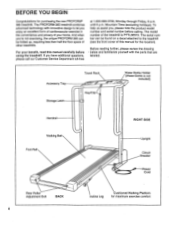
... Breaker Power Cord Rear Roller Adjustment Bolt BACK 4 Incline Leg Cushioned Walking Platform for the location). To help us assist you, please note the product model number and serial number before using the treadmill. The model number of your benefit, read this manual for maximum exercise comfort Before reading further, please review the drawing • below and familiarize yourself with innovative design to the treadmill (see the front cover of other treadmills. Accessory Tray Storage Latch...
... Breaker Power Cord Rear Roller Adjustment Bolt BACK 4 Incline Leg Cushioned Walking Platform for the location). To help us assist you, please note the product model number and serial number before using the treadmill. The model number of your benefit, read this manual for maximum exercise comfort Before reading further, please review the drawing • below and familiarize yourself with innovative design to the treadmill (see the front cover of other treadmills. Accessory Tray Storage Latch...
English Manual
Page 5
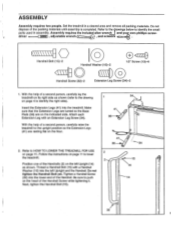
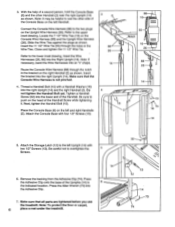
...tighten the Handrail Bolt yet. Insert the Extension Legs (41) into the lower end of a second person, carefully lay the treadmill on its right side as shown. Tighten a Handrail Screw (32) into the treadmill. Set the treadmill in assembly. Refer to the 1rawings below to lower the treadmill...raise the treadmill to HOW TO LOWER THE TREADMILL FOR USE on the head of the packing materials until assembly is completed. Do not dispose of the Handrail Screw while tightening it. Follow the instructions on the left Upright and the Handrail. Next, tighten the Handrail Bolt (15)....
...tighten the Handrail Bolt yet. Insert the Extension Legs (41) into the lower end of a second person, carefully lay the treadmill on its right side as shown. Tighten a Handrail Screw (32) into the treadmill. Set the treadmill in assembly. Refer to the 1rawings below to lower the treadmill...raise the treadmill to HOW TO LOWER THE TREADMILL FOR USE on the head of the packing materials until assembly is completed. Do not dispose of the Handrail Screw while tightening it. Follow the instructions on the left Upright and the Handrail. Next, tighten the Handrail Bolt (15)....
English Manual
Page 6
... (2) near the right Upright (14) as shown. Connect the Console Wire Harness (88) to the left and right Handrails (2). Insert the bracket into the lower end of the Console Base on the left Upright (14) with two 1/2" Screws (13). Attach the Storage Latch (12) to the two plugs on the Console Wire Harness (88) and the Upright Wire Harness (26). Close and tighten the 11 1/2" Wire Tie. Note...
... (2) near the right Upright (14) as shown. Connect the Console Wire Harness (88) to the left and right Handrails (2). Insert the bracket into the lower end of the Console Base on the left Upright (14) with two 1/2" Screws (13). Attach the Storage Latch (12) to the two plugs on the Console Wire Harness (88) and the Upright Wire Harness (26). Close and tighten the 11 1/2" Wire Tie. Note...
English Manual
Page 7
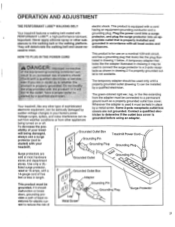
... be installed by a metal screw. not fit the outlet, have a proper outlet inailed by sudden voltage changes in accordance with your treadmill being turned on a nominal 120-volt circuit, HOW TO PLUG IN THE POWER CORD and has a grounding plug that looks like extending from other appliances Whenever the adapter is equipped with a cord having an equipment-grounding conductor and a Your treadmill features a walking belt...
... be installed by a metal screw. not fit the outlet, have a proper outlet inailed by sudden voltage changes in accordance with your treadmill being turned on a nominal 120-volt circuit, HOW TO PLUG IN THE POWER CORD and has a grounding plug that looks like extending from other appliances Whenever the adapter is equipped with a cord having an equipment-grounding conductor and a Your treadmill features a walking belt...
English Manual
Page 8
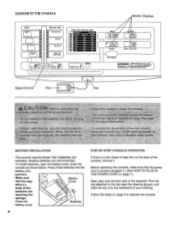
... from the console, the walking belt wil just the speed in . (See HOW TO PLUG IN THE POWER CORD on the face of the console, remove it. partment. Battery Cover ative (-) ends of your clothing. Find the clip attached to operate the console. BATTERY INSTALLATION The console requires three "AA" batteries (not included). Press three batteries into the battery com- Warm-up MED Cool-down IM su 3 -au RESET HEART RATE TRAINING ZONE OLE...
... from the console, the walking belt wil just the speed in . (See HOW TO PLUG IN THE POWER CORD on the face of the console, remove it. partment. Battery Cover ative (-) ends of your clothing. Find the clip attached to operate the console. BATTERY INSTALLATION The console requires three "AA" batteries (not included). Press three batteries into the battery com- Warm-up MED Cool-down IM su 3 -au RESET HEART RATE TRAINING ZONE OLE...
English Manual
Page 9
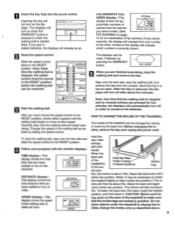
... the treadmill can be changed by raising or lowering the back end. stalled batteries, the displays will automatically turn off in position. FAT BURNING on when the ON/RESET button is pressed or when the walking belt is about 3%. TIME display-This display shows the total TIME time that the incline legs are finished exercising, stop the walking belt, step onto the foot rails and slide the speed control to change the incline only...
... the treadmill can be changed by raising or lowering the back end. stalled batteries, the displays will automatically turn off in position. FAT BURNING on when the ON/RESET button is pressed or when the walking belt is about 3%. TIME display-This display shows the total TIME time that the incline legs are finished exercising, stop the walking belt, step onto the foot rails and slide the speed control to change the incline only...
English Manual
Page 10
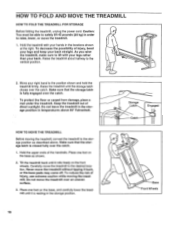
... not move the treadmill. 1. HOW TO FOLD AND MOVE THE TREADMILL HOW TO FOLD THE TREADMILL FOR STORAGE Before folding the treadmill, unplug the power cord. As you raise the treadmill, make sure to the position shown and hold the treadmill firmly. Raise the treadmill about halfway to the desired location. Hold the treadmill with your legs rather than your hands in temperatures above . Make sure that the storage latch...
... not move the treadmill. 1. HOW TO FOLD AND MOVE THE TREADMILL HOW TO FOLD THE TREADMILL FOR STORAGE Before folding the treadmill, unplug the power cord. As you raise the treadmill, make sure to the position shown and hold the treadmill firmly. Raise the treadmill about halfway to the desired location. Hold the treadmill with your legs rather than your hands in temperatures above . Make sure that the storage latch...
English Manual
Page 11
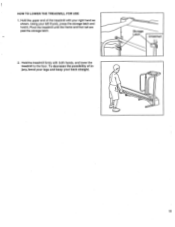
Hold the upper end of injury, bend your legs and keep your back straight. 11 Hold the treadmill firmly with your left thumb, press the storage latch and hold it. Using your right hand as shown. To decrease the possibility of the treadmill with both hands, and lower the treadmill to the floor. Pivot the treadmill until the frame and foot rail are past the storage latch. Storage Latch • Unlatched 2. HOW TO LOWER THE TREADMILL FOR USE 1.
Hold the upper end of injury, bend your legs and keep your back straight. 11 Hold the treadmill firmly with your left thumb, press the storage latch and hold it. Using your right hand as shown. To decrease the possibility of the treadmill with both hands, and lower the treadmill to the floor. Pivot the treadmill until the frame and foot rail are past the storage latch. Storage Latch • Unlatched 2. HOW TO LOWER THE TREADMILL FOR USE 1.
English Manual
Page 12
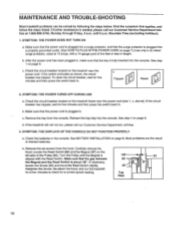
... the circuit breaker located on page 8. Make sure that the key is plugged into a properly grounded outlet. (See HOW TO PLUG IN THE POWER CORD on the left side of drained batteries. Make sure that applies, and follow the steps listed. Retighten the Screw. See BATTERY INSTALLATION on the treadmill frame near the power cord. Remove the six screws from the console. MAINTENANCE AND TROUBLE-SHOOTING Most treadmill problems can be solved...
... the circuit breaker located on page 8. Make sure that the key is plugged into a properly grounded outlet. (See HOW TO PLUG IN THE POWER CORD on the left side of drained batteries. Make sure that applies, and follow the steps listed. Retighten the Screw. See BATTERY INSTALLATION on the treadmill frame near the power cord. Remove the six screws from the console. MAINTENANCE AND TROUBLE-SHOOTING Most treadmill problems can be solved...
English Manual
Page 13
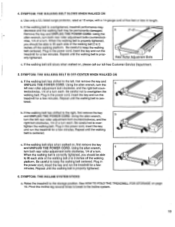
... the right, first remove the key and UNPLUG THE POWER CORD. See HOW TO FOLD THE TREADMILL FOR STORAGE on page 10. Use only a UL-listed surge protector, rated at 15 amps, with a 14-gauge cord of a turn both rear roller adjustment bolts clockwise, 1/4 of the walking belt 2 to lift each . Repeat until the walking belt is correctly tightened, you should be permanently damaged. b 2"-3" Rear Roller Adjustment Bolts c. Repeat until the walking belt is properly tightened, you should...
... the right, first remove the key and UNPLUG THE POWER CORD. See HOW TO FOLD THE TREADMILL FOR STORAGE on page 10. Use only a UL-listed surge protector, rated at 15 amps, with a 14-gauge cord of a turn both rear roller adjustment bolts clockwise, 1/4 of the walking belt 2 to lift each . Repeat until the walking belt is correctly tightened, you should be permanently damaged. b 2"-3" Rear Roller Adjustment Bolts c. Repeat until the walking belt is properly tightened, you should...
English Manual
Page 14
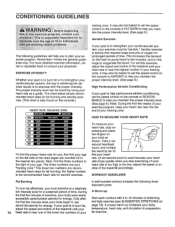
... too low, adjust the speed or incline of the chart (ages are recommended heart rates for aerobic exercise. EXERCISE INTENSITY Whether your goal is to burn fat or to strengthen your heart rate is to the nearest ten years). The lower two numbers are rounded off to exercise with pre-existing health problems. The following three important parts: To burn fat effectively, you stop exercising and place two...
... too low, adjust the speed or incline of the chart (ages are recommended heart rates for aerobic exercise. EXERCISE INTENSITY Whether your goal is to burn fat or to strengthen your heart rate is to the nearest ten years). The lower two numbers are rounded off to exercise with pre-existing health problems. The following three important parts: To burn fat effectively, you stop exercising and place two...
English Manual
Page 15
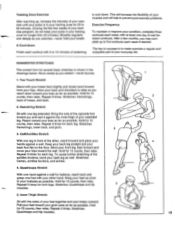
... exercise a regular and enjoyable part of the achilles tendons, bend your hips. Repeat 3 times. SUGGESTED STRETCHES The correct form for several basic stretches is to success is shown in front of rest between workouts. Hamstring Stretch Sit with one leg in the drawings below. Stretches: Hamstrings, lower back, and groin. 3 3. Bend your front leg, lean forward and move...
... exercise a regular and enjoyable part of the achilles tendons, bend your hips. Repeat 3 times. SUGGESTED STRETCHES The correct form for several basic stretches is to success is shown in front of rest between workouts. Hamstring Stretch Sit with one leg in the drawings below. Stretches: Hamstrings, lower back, and groin. 3 3. Bend your front leg, lean forward and move...
English Manual
Page 16
... of removal, installation or other rights which warranty claim is not responsible or liable for easy reference when calling. PROFORM is limited in workmanship and material, under this product to the center of this manual). LIMITED WARRANTY ICON Health & Fitness, Inc. (ICON), warrants this warranty is authorized by an ICON authorized service center, to products used as store display models. ORDERING REPLACEMENT PARTS To order replacement parts, call our Customer Service Department toll-free...
... of removal, installation or other rights which warranty claim is not responsible or liable for easy reference when calling. PROFORM is limited in workmanship and material, under this product to the center of this manual). LIMITED WARRANTY ICON Health & Fitness, Inc. (ICON), warrants this warranty is authorized by an ICON authorized service center, to products used as store display models. ORDERING REPLACEMENT PARTS To order replacement parts, call our Customer Service Department toll-free...

English Manual
Page 17
REMOVE THIS EXPLODED DRAWING AND PART LIST FROM THE MANUAL Save this EXPLODED DRAWING and PART LIST for future reference. For information about ordering replacement parts, see the back cover of the User's Manual. N Note: Specifications are subject to change without notice.
REMOVE THIS EXPLODED DRAWING AND PART LIST FROM THE MANUAL Save this EXPLODED DRAWING and PART LIST for future reference. For information about ordering replacement parts, see the back cover of the User's Manual. N Note: Specifications are subject to change without notice.
English Manual
Page 18
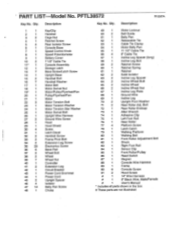
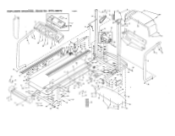
... Rear Isolator Screw Console Base Speed Control Knob Speed Potentiometer Battery Cover 7 1/2" Cable Tie Console Assembly Storage Latch Base Screw/Latch Screw Upright Base Handrail Bolt Handrail Washer Motor Belt Motor Swivel Nut Motor/Pulley/Flywheel/Fan Pulley/Flywheel/Fan Motor Motor Tension Bolt Motor Tension Washer Motor Tension Star Washer Motor Swivel Bolt Upright Wire Harness Ground Wire Screw Hood Hood Shield Screw Latch Decal Handrail Screw Frame Pivot Bolt Extension Leg Screw Electronics Screw Base Pad Wheel Bolt Wheel Wheel Nut Controller Extension Leg Circuit Breaker Power Cord...
... Rear Isolator Screw Console Base Speed Control Knob Speed Potentiometer Battery Cover 7 1/2" Cable Tie Console Assembly Storage Latch Base Screw/Latch Screw Upright Base Handrail Bolt Handrail Washer Motor Belt Motor Swivel Nut Motor/Pulley/Flywheel/Fan Pulley/Flywheel/Fan Motor Motor Tension Bolt Motor Tension Washer Motor Tension Star Washer Motor Swivel Bolt Upright Wire Harness Ground Wire Screw Hood Hood Shield Screw Latch Decal Handrail Screw Frame Pivot Bolt Extension Leg Screw Electronics Screw Base Pad Wheel Bolt Wheel Wheel Nut Controller Extension Leg Circuit Breaker Power Cord...
English Manual
Page 19
... 16 :r" 68 66 65 41 I . 25 7 45 3:7:7886 16 36 30 82 35 83 II 1491 I 35 36 35 70 35 36 35 EXPLODED DRAWING-Model No.
... 16 :r" 68 66 65 41 I . 25 7 45 3:7:7886 16 36 30 82 35 83 II 1491 I 35 36 35 70 35 36 35 EXPLODED DRAWING-Model No.

