
Uk Manual
Page 1
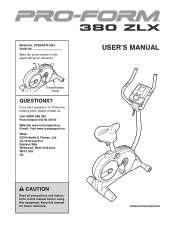
PFEVEX74108.1 Serial No. Model No. USERʼS MANUAL www.iconeurope.com Keep this equipment. Serial Number Decal QUESTIONS? If you have questions, or if there are missing parts, please contact us: Call: 08457 089 009 From Ireland: 053 92 36102 Website: www.iconsupport.eu E-mail: Visit www.iconsupport.eu Write: ICON Health & Fitness, Ltd. c/o HI Group PLC Express Way Whitwood, West Yorkshire WF10 5QJ UK CAUTION Read all precautions and instructions in the space above for future reference. Write the serial number in this manual before using this manual for reference.
PFEVEX74108.1 Serial No. Model No. USERʼS MANUAL www.iconeurope.com Keep this equipment. Serial Number Decal QUESTIONS? If you have questions, or if there are missing parts, please contact us: Call: 08457 089 009 From Ireland: 053 92 36102 Website: www.iconsupport.eu E-mail: Visit www.iconsupport.eu Write: ICON Health & Fitness, Ltd. c/o HI Group PLC Express Way Whitwood, West Yorkshire WF10 5QJ UK CAUTION Read all precautions and instructions in the space above for future reference. Write the serial number in this manual before using this manual for reference.

Uk Manual
Page 2
... number on the front cover of this manual and request a free replacement decal. If a decal is a registered trademark of the warning decal(s). Apply the decal in the location shown. TABLE OF CONTENTS WARNING DECAL PLACEMENT 2 IMPORTANT PRECAUTIONS 3 BEFORE YOU BEGIN 4 ASSEMBLY 5 HOW TO OPERATE THE EXERCISE CYCLE 12 MAINTENANCE AND TROUBLESHOOTING 20 EXERCISE GUIDELINES 21 PART LIST 22 EXPLODED DRAWING 23 ORDERING REPLACEMENT PARTS Back Cover...
... number on the front cover of this manual and request a free replacement decal. If a decal is a registered trademark of the warning decal(s). Apply the decal in the location shown. TABLE OF CONTENTS WARNING DECAL PLACEMENT 2 IMPORTANT PRECAUTIONS 3 BEFORE YOU BEGIN 4 ASSEMBLY 5 HOW TO OPERATE THE EXERCISE CYCLE 12 MAINTENANCE AND TROUBLESHOOTING 20 EXERCISE GUIDELINES 21 PART LIST 22 EXPLODED DRAWING 23 ORDERING REPLACEMENT PARTS Back Cover...
Uk Manual
Page 3
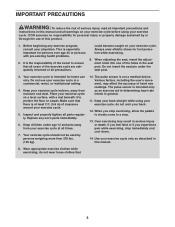
... children under the seat post. 3. Keep your back straight while using your back. 12. Before beginning any worn parts immediately. 6. Keep your physician. Various factors, including the user's movement, may result in serious injury or death. When you experience pain while exercising, stop . 13. ICON assumes no responsibility for home use of heart rate readings. Replace any exercise program, consult your exercise cycle indoors, away...
... children under the seat post. 3. Keep your back straight while using your back. 12. Before beginning any worn parts immediately. 6. Keep your physician. Various factors, including the user's movement, may result in serious injury or death. When you experience pain while exercising, stop . 13. ICON assumes no responsibility for home use of heart rate readings. Replace any exercise program, consult your exercise cycle indoors, away...
Uk Manual
Page 4
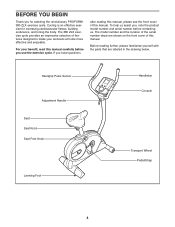
... us . Handgrip Pulse Sensor Adjustment Handle Seat Seat Knob Seat Post Knob Leveling Foot Handlebar Console Transport Wheel Pedal/Strap 4 The 380 ZLX exercise cycle provides an impressive selection of this manual. For your workouts at home more effective and enjoyable. Before reading further, please familiarize yourself with the parts that are shown on the front cover of features designed to make your benefit, read this manual carefully before you...
... us . Handgrip Pulse Sensor Adjustment Handle Seat Seat Knob Seat Post Knob Leveling Foot Handlebar Console Transport Wheel Pedal/Strap 4 The 380 ZLX exercise cycle provides an impressive selection of this manual. For your workouts at home more effective and enjoyable. Before reading further, please familiarize yourself with the parts that are shown on the front cover of features designed to make your benefit, read this manual carefully before you...
Uk Manual
Page 5
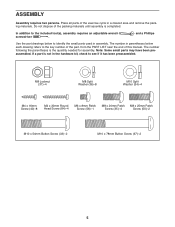
... the key number of the part, from the PART LIST near the end of the packing materials until assembly is the quantity needed for assembly. The number following the parentheses is completed. The number in a cleared area and remove the packing materials. M8 Locknut (37)-4 M8 Split Washer (36)-8 M10 Split Washer (34)-4 M4 x 16mm Screw (40)-8 M4 x 30mm Round Head Screw (84...
... the key number of the part, from the PART LIST near the end of the packing materials until assembly is the quantity needed for assembly. The number following the parentheses is completed. The number in a cleared area and remove the packing materials. M8 Locknut (37)-4 M8 Split Washer (36)-8 M10 Split Washer (34)-4 M4 x 16mm Screw (40)-8 M4 x 30mm Round Head Screw (84...

Uk Manual
Page 7
... Frame (1). Gently pull the upper end of the Frame (1), attach the Front Stabilizer (2) to the Lower Wire Harness (31). Tip: Avoid pinching the wire harnesses. While another person holds the Upright (3) near the Frame (1), connect the Upper Wire Harness (32) to the Frame 3 with four M8 x 20mm Patch Screws (35) and four M8 Split Washers (36). 4 Avoid pinching...
... Frame (1). Gently pull the upper end of the Frame (1), attach the Front Stabilizer (2) to the Lower Wire Harness (31). Tip: Avoid pinching the wire harnesses. While another person holds the Upright (3) near the Frame (1), connect the Upper Wire Harness (32) to the Frame 3 with four M8 x 20mm Patch Screws (35) and four M8 Split Washers (36). 4 Avoid pinching...
Uk Manual
Page 9
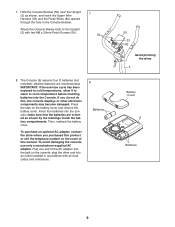
... Patch Screws (50). 7 50 8. IMPORTANT: If the exercise cycle has been exposed to cold temperatures, allow it to warm to the Upright (3) with all local codes and ordinances. 8 Batteries 55 32 82 Avoid pinching the wires 3 Battery Cover 6 Batteries 9 The Console (6) requires four D batteries (not included); To purchase an optional AC adapter, contact the store where you do not do this manual. Attach the Console...
... Patch Screws (50). 7 50 8. IMPORTANT: If the exercise cycle has been exposed to cold temperatures, allow it to warm to the Upright (3) with all local codes and ordinances. 8 Batteries 55 32 82 Avoid pinching the wires 3 Battery Cover 6 Batteries 9 The Console (6) requires four D batteries (not included); To purchase an optional AC adapter, contact the store where you do not do this manual. Attach the Console...

Uk Manual
Page 10
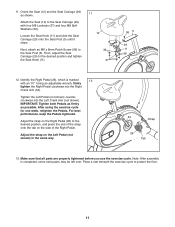
Then, connect the console pulse wires to the Console Bracket (55) with four M4 x 16mm Screws (40). 9 6 Console Pulse 82 Wires Console Wire 32 55 40 3 10. Attach the Console (6) to the Pulse Wires (82). Move the Seat Post upward and downward slightly to the Upper Wire Harness (32). Tip: Avoid pinching the wires. Then, tighten the Seat Post Knob (30). 5 Holes 1 30 10 Insert the excess wires downward into one of the holes...
Then, connect the console pulse wires to the Console Bracket (55) with four M4 x 16mm Screws (40). 9 6 Console Pulse 82 Wires Console Wire 32 55 40 3 10. Attach the Console (6) to the Pulse Wires (82). Move the Seat Post upward and downward slightly to the Upper Wire Harness (32). Tip: Avoid pinching the wires. Then, tighten the Seat Post Knob (30). 5 Holes 1 30 10 Insert the excess wires downward into one of the holes...
Uk Manual
Page 11
Loosen the Seat Knob (11) and slide the Seat Carriage (29) onto the Seat Post (5) until it stops. Using an adjustable wrench, firmly tighten the Right Pedal clockwise into the Left Crank Arm (not shown). Adjust the strap on the Right Pedal (26) to the desired position, and press the end of the Right Pedal. 11. After using the exercise cycle for one week, retighten the Pedals. IMPORTANT: Tighten both Pedals as...
Loosen the Seat Knob (11) and slide the Seat Carriage (29) onto the Seat Post (5) until it stops. Using an adjustable wrench, firmly tighten the Right Pedal clockwise into the Left Crank Arm (not shown). Adjust the strap on the Right Pedal (26) to the desired position, and press the end of the Right Pedal. 11. After using the exercise cycle for one week, retighten the Pedals. IMPORTANT: Tighten both Pedals as...

Uk Manual
Page 13
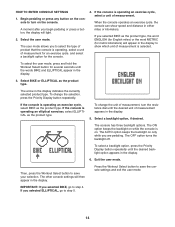
... select BIKE or ELLIPTICAL; Each workout automatically changes the resistance of the pedals and prompts you to increase or decrease your heart rate using the handgrip pulse sensor. To use a heart rate workout, see page 15. if you can also use the console for the first time, you to increase or decrease your pedaling pace as it guides you exercise, the console will not display correct feedback. (See HOW TO ENTER CONSOLE SETTINGS on...
... select BIKE or ELLIPTICAL; Each workout automatically changes the resistance of the pedals and prompts you to increase or decrease your heart rate using the handgrip pulse sensor. To use a heart rate workout, see page 15. if you can also use the console for the first time, you to increase or decrease your pedaling pace as it guides you exercise, the console will not display correct feedback. (See HOW TO ENTER CONSOLE SETTINGS on...
Uk Manual
Page 14
... the console to step 5. 14 The arrow in the display. 6. Then, press the Workout Select button to show speed and distance in the display. 3. To change the unit of measurement. If the console is operating an exercise cycle, select a unit of measurement, turn on . Select a backlight option, if desired. The AUTO option keeps the backlight on only while you selected BIKE, go to turn the resistance...
... the console to step 5. 14 The arrow in the display. 6. Then, press the Workout Select button to show speed and distance in the display. 3. To change the unit of measurement. If the console is operating an exercise cycle, select a unit of measurement, turn on . Select a backlight option, if desired. The AUTO option keeps the backlight on only while you selected BIKE, go to turn the resistance...

Uk Manual
Page 15
... the approximate number of the display will be selected. Begin pedaling or press any button on the console to decrease the resistance, turn on the console. Follow your pedaling pace will show your heart rate when you have pedaled. Note: When a calorie goal workout is operating an exercise cycle, the distance will be shown in revolutions per hour. HOW TO USE THE MANUAL MODE 1. Begin pedaling and change the resistance of calories...
... the approximate number of the display will be selected. Begin pedaling or press any button on the console to decrease the resistance, turn on the console. Follow your pedaling pace will show your heart rate when you have pedaled. Note: When a calorie goal workout is operating an exercise cycle, the distance will be shown in revolutions per hour. HOW TO USE THE MANUAL MODE 1. Begin pedaling and change the resistance of calories...
Uk Manual
Page 16
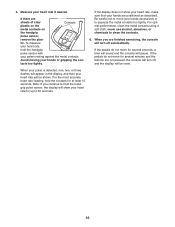
... sound and the console will be reset. When you continue to clean the contacts. 6. Measure your hands or gripping the con- If the pedals do not move for several minutes and the buttons are sheets of clear Contacts plastic on the metal contacts on the handgrip pulse sensor, remove the plas- If the pedals do not move your heart rate for at...
... sound and the console will be reset. When you continue to clean the contacts. 6. Measure your hands or gripping the con- If the pedals do not move for several minutes and the buttons are sheets of clear Contacts plastic on the metal contacts on the handgrip pulse sensor, remove the plas- If the pedals do not move your heart rate for at...
Uk Manual
Page 17
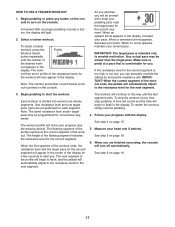
... desired work - To stop pedaling. See step 4 on the console. One resistance level and one -minute segments. The workout profile will continue in the display, increase your pace. When a downward arrow appears, decrease your progress (see the drawing above). The height of the workout. HOW TO USE A TRAINER WORKOUT 1. A moment after you . When you can manually override the setting by turning the resistance dial. The workout will...
... desired work - To stop pedaling. See step 4 on the console. One resistance level and one -minute segments. The workout profile will continue in the display, increase your pace. When a downward arrow appears, decrease your progress (see the drawing above). The height of the workout. HOW TO USE A TRAINER WORKOUT 1. A moment after you . When you can manually override the setting by turning the resistance dial. The workout will...
Uk Manual
Page 18
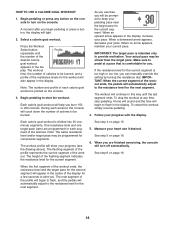
... the workout ends, the pedals will light. 2. The workout will turn on the console. 3. One resistance level and one target pace (rpm) are finished exercising, the console will continue in the display, increase your pace. The workout profile will also appear in the display. See step 4 on page 16. When you can manually override the setting by turning the resistance dial. HOW TO USE A CALORIE GOAL WORKOUT 1. Select...
... the workout ends, the pedals will light. 2. The workout will turn on the console. 3. One resistance level and one target pace (rpm) are finished exercising, the console will continue in the display, increase your pace. The workout profile will also appear in the display. See step 4 on page 16. When you can manually override the setting by turning the resistance dial. HOW TO USE A CALORIE GOAL WORKOUT 1. Select...
Uk Manual
Page 19
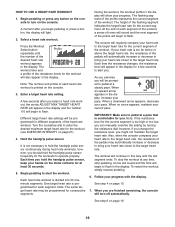
... the target heart rate, the resistance of the desired heart rate workout appears in the display. however, if you change the resistance level, you hold the handgrip pulse sensor, keep your hands on the console. 3. To stop pedaling. Press the Workout Select button Profile repeatedly until the last segment ends. Enter a target heart rate setting. A few seconds to flash. Begin pedaling to enter the desired maximum target heart rate for each heart rate workout is divided...
... the target heart rate, the resistance of the desired heart rate workout appears in the display. however, if you change the resistance level, you hold the handgrip pulse sensor, keep your hands on the console. 3. To stop pedaling. Press the Workout Select button Profile repeatedly until the last segment ends. Enter a target heart rate setting. A few seconds to flash. Begin pedaling to enter the desired maximum target heart rate for each heart rate workout is divided...
Uk Manual
Page 20
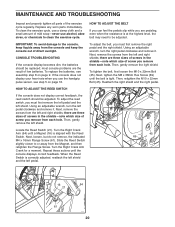
... be replaced; most console problems are three sizes of screws in the shields-note which size of low batteries. If the console does not display your heart rate when you must first remove the left pedal and the left pedal. 45 69 16 54 21 61 20 Locate the Reed Switch (21). Turn the Right Crank Arm (54) until a Magnet (16) is tight. IMPORTANT: To avoid damage to clean the exercise...
... be replaced; most console problems are three sizes of screws in the shields-note which size of low batteries. If the console does not display your heart rate when you must first remove the left pedal and the left pedal. 45 69 16 54 21 61 20 Locate the Reed Switch (21). Turn the Right Crank Arm (54) until a Magnet (16) is tight. IMPORTANT: To avoid damage to clean the exercise...

Uk Manual
Page 21
... flexibility of the chart (ages are essential for energy. WORKOUT GUIDELINES Warming Up-Start with your heart rate near the lowest number in general. After a few minutes of exercise does your age at least one day of your exercise until your heart rate is intended only as a guide to find your body begin to plan your physician. You can use stored fat calories...
... flexibility of the chart (ages are essential for energy. WORKOUT GUIDELINES Warming Up-Start with your heart rate near the lowest number in general. After a few minutes of exercise does your age at least one day of your exercise until your heart rate is intended only as a guide to find your body begin to plan your physician. You can use stored fat calories...

Uk Manual
Page 22
... Upright Left Cap Seat Post Console Flywheel Resistance Motor M4 x 12mm Screw Resistance Arm Seat Knob Seat Pulley/Crank Rear Stabilizer Transport Wheel Magnet Left Shield Right Shield Resistance Motor Bracket Seat Post Bushing Reed Switch/Wire Clamp Belt Left Pedal/Strap Flywheel Bearing Right Pedal/Strap Crank Bearing Idler Seat Carriage Seat Post Knob Lower Wire Harness Upper Wire Harness M10 x 54mm Button Screw M10 Split Washer M8 x 20mm Patch Screw M8 Split Washer M8 Locknut M8 x 25mm Shoulder Patch Screw M4 x 64mm Screw M4 x 16mm Screw...
... Upright Left Cap Seat Post Console Flywheel Resistance Motor M4 x 12mm Screw Resistance Arm Seat Knob Seat Pulley/Crank Rear Stabilizer Transport Wheel Magnet Left Shield Right Shield Resistance Motor Bracket Seat Post Bushing Reed Switch/Wire Clamp Belt Left Pedal/Strap Flywheel Bearing Right Pedal/Strap Crank Bearing Idler Seat Carriage Seat Post Knob Lower Wire Harness Upper Wire Harness M10 x 54mm Button Screw M10 Split Washer M8 x 20mm Patch Screw M8 Split Washer M8 Locknut M8 x 25mm Shoulder Patch Screw M4 x 64mm Screw M4 x 16mm Screw...

Uk Manual
Page 24
ORDERING REPLACEMENT PARTS To order replacement parts, please see the PART LIST and the EXPLODED DRAWING near the end of this manual) Part No. 286211 R1009A Printed in China © 2009 ICON IP, Inc. To help us assist you, be prepared to provide the following information when contacting us: • the model number and serial number of the product (see the front cover of this manual) • the name of the product (see the front cover of this manual) • the key number and description of the replacement part(s) (see the front cover of this manual.
ORDERING REPLACEMENT PARTS To order replacement parts, please see the PART LIST and the EXPLODED DRAWING near the end of this manual) Part No. 286211 R1009A Printed in China © 2009 ICON IP, Inc. To help us assist you, be prepared to provide the following information when contacting us: • the model number and serial number of the product (see the front cover of this manual) • the name of the product (see the front cover of this manual) • the key number and description of the replacement part(s) (see the front cover of this manual.


