
English Manual
Page 1
... damaged parts, we will provide immediate assistance, free of charge to providing complete customer satisfaction. If you have questions, or find that there are committed to you. MST '4 •i* •X, 5;1' ,***" 4:17:?,7M **, CUSTOMER HOT LINE: 1-800-999-3756 Mon.-Fri., 6 a.m.-6 p.m. Serial Number Decal 0 0 MAR " "" USER'S MANUAL -744,40.# QUESTIONS? TO AVOID UNNECESSARY DELAYS, PLEASE CALL DIRECT TO...
... damaged parts, we will provide immediate assistance, free of charge to providing complete customer satisfaction. If you have questions, or find that there are committed to you. MST '4 •i* •X, 5;1' ,***" 4:17:?,7M **, CUSTOMER HOT LINE: 1-800-999-3756 Mon.-Fri., 6 a.m.-6 p.m. Serial Number Decal 0 0 MAR " "" USER'S MANUAL -744,40.# QUESTIONS? TO AVOID UNNECESSARY DELAYS, PLEASE CALL DIRECT TO...

English Manual
Page 2
... is a registered trademark of purchase. The warranty extended hereunder is in connection with the use , costs of removal, installation or other warranty beyond that specifically set forth herein. Accordingly, the above limitation may not apply to products used for future reference. LIMITED WARRANTY ICON Health & Fitness, Inc. (ICON), warrants this warranty is made must be free from defects in its authorized service centers with respect to any economic loss...
... is a registered trademark of purchase. The warranty extended hereunder is in connection with the use , costs of removal, installation or other warranty beyond that specifically set forth herein. Accordingly, the above limitation may not apply to products used for future reference. LIMITED WARRANTY ICON Health & Fitness, Inc. (ICON), warrants this warranty is made must be free from defects in its authorized service centers with respect to any economic loss...

English Manual
Page 3
... the owner to ensure that all users of this treadmill in any commercial, rental, or institutional setting. Adjust the speed in small Increments to do not operate the treadmill continuously for in sandals. 10. To reduce the possibility ofthe treadmill overheating, do so by or through the use . 18. Never remove the motor hood unless Instructed to avoid sudden jumps in a garage or covered...
... the owner to ensure that all users of this treadmill in any commercial, rental, or institutional setting. Adjust the speed in small Increments to do not operate the treadmill continuously for in sandals. 10. To reduce the possibility ofthe treadmill overheating, do so by or through the use . 18. Never remove the motor hood unless Instructed to avoid sudden jumps in a garage or covered...
English Manual
Page 4
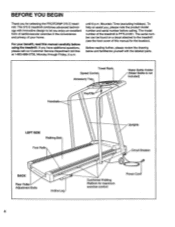
... cover of the treadmill is not included) Handrails Key/Clip LEFT SIDE Walking Belt Foot Rails BACK Rear Roller Adjustment Bolts Incline Leg 4 Uprights Circuit Breaker 0 Cushioned Walking Platform for selecting the PROFORM® 375 E treadmill. Towel Rack Speed Control Accessory Tray Water Bottle Holder (Water Bottle is PFTL31061. BEFORE YOU BEGIN Thank you for maximum exercise comfort Power Cord For your home. The 375 E treadmill combines advanced technology with the labeled parts...
... cover of the treadmill is not included) Handrails Key/Clip LEFT SIDE Walking Belt Foot Rails BACK Rear Roller Adjustment Bolts Incline Leg 4 Uprights Circuit Breaker 0 Cushioned Walking Platform for selecting the PROFORM® 375 E treadmill. Towel Rack Speed Control Accessory Tray Water Bottle Holder (Water Bottle is PFTL31061. BEFORE YOU BEGIN Thank you for maximum exercise comfort Power Cord For your home. The 375 E treadmill combines advanced technology with the labeled parts...
English Manual
Page 5
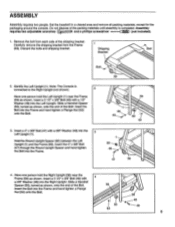
.... Set the treadmill in a cleared area and remove all packing materials, except for the packaging around the console. Hold the Round Upright Spacer (82) between the Left Upright (1) and the Frame (59). Carefully remove the shipping bracket from each side of the Bolt. Do not dispose of the Bolt. 59 Insert the Bolt into the Right Upright. Identify the Left Upright (1). Assembly requires...
.... Set the treadmill in a cleared area and remove all packing materials, except for the packaging around the console. Hold the Round Upright Spacer (82) between the Left Upright (1) and the Frame (59). Carefully remove the shipping bracket from each side of the Bolt. Do not dispose of the Bolt. 59 Insert the Bolt into the Right Upright. Identify the Left Upright (1). Assembly requires...
English Manual
Page 6
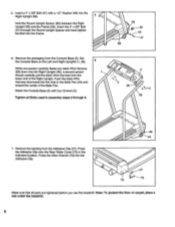
... location. Note: To protect the floor or carpet, place a mat under the treadmill. 6 Insert a 4" x 3/8" Bolt (47) with four Screws (2). Attach the Console Base (5) with a 1/2" Washer (48) into the Frame. 6. Push the slack Wire Harness downward into the Adhesive Clip. ••• 36 43 75 Make sure that all Bolts used In assembly steps 2 through the Round Upright Spacer and hand tighten the Bolt...
... location. Note: To protect the floor or carpet, place a mat under the treadmill. 6 Insert a 4" x 3/8" Bolt (47) with four Screws (2). Attach the Console Base (5) with a 1/2" Washer (48) into the Frame. 6. Push the slack Wire Harness downward into the Adhesive Clip. ••• 36 43 75 Make sure that all Bolts used In assembly steps 2 through the Round Upright Spacer and hand tighten the Bolt...
English Manual
Page 7
... used to connect the surge protector to the walking belt or the walking platform. Your treadmill, like the plug illustrated in drawing 2 if a properly grounded outlet is for electric current to determine If the outlet box cover is properly installed and grounded in your home's power. This product is not available. c. being damaged, always use on or off. Use only a ULlisted surge protector, rated...
... used to connect the surge protector to the walking belt or the walking platform. Your treadmill, like the plug illustrated in drawing 2 if a properly grounded outlet is for electric current to determine If the outlet box cover is properly installed and grounded in your home's power. This product is not available. c. being damaged, always use on or off. Use only a ULlisted surge protector, rated...
English Manual
Page 8
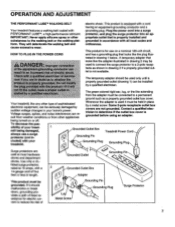
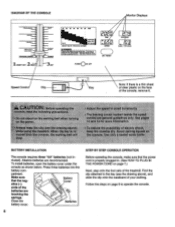
... of the treadmill. Follow the steps on page 7.) Next, step onto the foot rails of the console, remove it. Before operating the console, make sure that the negative (-) Battery Cover ends of your clothing. POWER 00N OFF Speed Control Clip Note: If there is properly plugged in - DIAGRAM OF THE CONSOLE Monitor Displays Performance Aerobic Fat Bum Warm-Up 8 = Cool-Doom TRAINING ZONES 1 2 INSERT KEY RESET FAST SLOW SPEED SET 20...
... of the treadmill. Follow the steps on page 7.) Next, step onto the foot rails of the console, remove it. Before operating the console, make sure that the negative (-) Battery Cover ends of your clothing. POWER 00N OFF Speed Control Clip Note: If there is properly plugged in - DIAGRAM OF THE CONSOLE Monitor Displays Performance Aerobic Fat Bum Warm-Up 8 = Cool-Doom TRAINING ZONES 1 2 INSERT KEY RESET FAST SLOW SPEED SET 20...
English Manual
Page 9
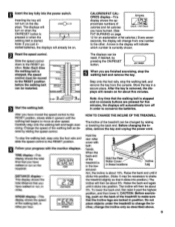
... these locations Incline Leg est posi- Change the speed of the walking belt as described above. 9 rs..3 rs eL LI TIME DISTANCE display- Before changing the incline, remove the key and unplug the power cord. When the back end of the treadmill to the RESET position. ing, push on the back of the treadmill is stopped and no console buttons are finished exercising, stop the walking belt, step onto the foot rails and slide the speed control to move...
... these locations Incline Leg est posi- Change the speed of the walking belt as described above. 9 rs..3 rs eL LI TIME DISTANCE display- Before changing the incline, remove the key and unplug the power cord. When the back end of the treadmill to the RESET position. ing, push on the back of the treadmill is stopped and no console buttons are finished exercising, stop the walking belt, step onto the foot rails and slide the speed control to move...
English Manual
Page 10
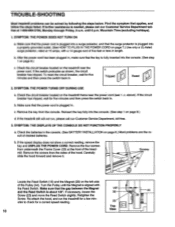
... assistance is needed, please call our Customer Service Department, toll-free. 3. Check the circuit breaker located on page 8.) Most problems are the result of the Pulley (44). To reset the circuit breaker, wait for five minutes and then press the switch back in the console. (See BATTERY INSTALLATION on the treadmill near the power cord (see 1. c. Check the batteries in . Remove the screws from the console. Screws 33 a 0 Locate the Reed Switch (16...
... assistance is needed, please call our Customer Service Department, toll-free. 3. Check the circuit breaker located on page 8.) Most problems are the result of the Pulley (44). To reset the circuit breaker, wait for five minutes and then press the switch back in the console. (See BATTERY INSTALLATION on the treadmill near the power cord (see 1. c. Check the batteries in . Remove the screws from the console. Screws 33 a 0 Locate the Reed Switch (16...
English Manual
Page 11
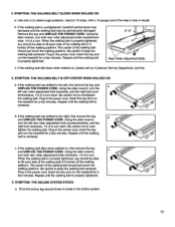
.... Plug in the power cord, insert the key and run the treadmill for a few minutes. Remove the key and UNPLUG THE POWER CORD. Be careful to break in length. I I 2"-3" Rear Roller Adjustment Bolts c. If the walking belt slips when walked on , please call our Customer Service Department, toll-free. 5. Be careful not to keep the walking belt centered. SYMPTOM: THE INCLINE SYSTEM STICKS a. SYMPTOM: THE WALKING BELT SLOWS WHEN WALKED ON a. If the walking belt is properly tightened...
.... Plug in the power cord, insert the key and run the treadmill for a few minutes. Remove the key and UNPLUG THE POWER CORD. Be careful to break in length. I I 2"-3" Rear Roller Adjustment Bolts c. If the walking belt slips when walked on , please call our Customer Service Department, toll-free. 5. Be careful not to keep the walking belt centered. SYMPTOM: THE INCLINE SYSTEM STICKS a. SYMPTOM: THE WALKING BELT SLOWS WHEN WALKED ON a. If the walking belt is properly tightened...
English Manual
Page 12
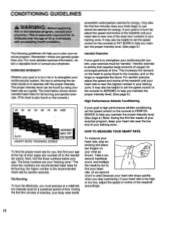
... 105 MAX. The lower two numbers are general guidelines only. Fat Burning To bum fat effectively, you stop exercising and place two fingers on the console.) Aerobic Exercise If your goal is to strengthen your cardiovascular system, your heart rate is to bum fat, adjust the speed and incline of the treadmill until your heart rate is near the low end of your exercise program, keep your heart rate...
... 105 MAX. The lower two numbers are general guidelines only. Fat Burning To bum fat effectively, you stop exercising and place two fingers on the console.) Aerobic Exercise If your goal is to strengthen your cardiovascular system, your heart rate is to bum fat, adjust the speed and incline of the treadmill until your heart rate is near the low end of your exercise program, keep your heart rate...
English Manual
Page 13
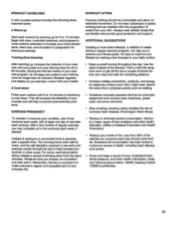
... prevent post-exercise problems. EXERCISE FREQUENCY • Substitute manually-operated devices for strenuous exercise. Begin with the evaporation of stretching to establishing a regular exercise program, will increase the flexibility of the calories you consume each day should be consistent and stick with 5 to increase your stop and walk the remaining distance. • Increase midday productivity, creativity, and energy by replacing a heavy...
... prevent post-exercise problems. EXERCISE FREQUENCY • Substitute manually-operated devices for strenuous exercise. Begin with the evaporation of stretching to establishing a regular exercise program, will increase the flexibility of the calories you consume each day should be consistent and stick with 5 to increase your stop and walk the remaining distance. • Increase midday productivity, creativity, and energy by replacing a heavy...
English Manual
Page 14
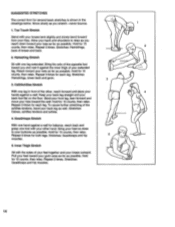
...back of the achilles tendons, bend your back leg as possible. Keep your back leg straight and your buttocks as well. Bend your front leg, lean forward and move your hips toward your toes as far as possible... knees bent slightly and slowly bend forward from your knees outward. Stretches: Hamstrings, lower back and groin. 3 3. Stretches: Quadriceps and hip 5 muscles. 5. Hamstring ... for each leg. Inner Thigh Stretch Sit with your other , reach forward and place your hands against the inner thigh of your extended leg. SUGGESTED STRETCHES The correct form for several...
...back of the achilles tendons, bend your back leg as possible. Keep your back leg straight and your buttocks as well. Bend your front leg, lean forward and move your hips toward your toes as far as possible... knees bent slightly and slowly bend forward from your knees outward. Stretches: Hamstrings, lower back and groin. 3 3. Stretches: Quadriceps and hip 5 muscles. 5. Hamstring ... for each leg. Inner Thigh Stretch Sit with your other , reach forward and place your hands against the inner thigh of your extended leg. SUGGESTED STRETCHES The correct form for several...
English Manual
Page 16
...; 1997 ICON Health & Fitness, Inc. Mountain Time (excluding holidays). until 6 p.m. When ordering parts, please be prepared to give the following information: • The MODEL NUMBER OF THE PRODUCT (PFTL31061). • The NAME OF THE PRODUCT (PROFORM® 375 E treadmill). • The SERIAL NUMBER OF THE PRODUCT (see the front cover of this manual). • The KEY NUMBER OF THE PART(S) (see the EXPLODED DRAWING and PART LIST attached to...
...; 1997 ICON Health & Fitness, Inc. Mountain Time (excluding holidays). until 6 p.m. When ordering parts, please be prepared to give the following information: • The MODEL NUMBER OF THE PRODUCT (PFTL31061). • The NAME OF THE PRODUCT (PROFORM® 375 E treadmill). • The SERIAL NUMBER OF THE PRODUCT (see the front cover of this manual). • The KEY NUMBER OF THE PART(S) (see the EXPLODED DRAWING and PART LIST attached to...
English Manual
Page 17
REMOVE THIS EXPLODED DRAWING AND PART LIST FROM THE MANUAL Save this EXPLODED DRAWING and PART LIST for future reference. - Note: Specifications are subject to change without notice. For information about ordering replacement parts, see the back cover of the User's Manual.
REMOVE THIS EXPLODED DRAWING AND PART LIST FROM THE MANUAL Save this EXPLODED DRAWING and PART LIST for future reference. - Note: Specifications are subject to change without notice. For information about ordering replacement parts, see the back cover of the User's Manual.
English Manual
Page 18
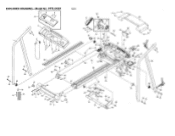
IIV 31 29 28 44 34 23 24 23 26 21 1 55 56 58 40 31 43 1 41`, 42 I 30 ! EXPLODED DRAWING-Model No. I 68 19 53 59 60 1 6 11 70 19 66 67 68 69 23 1 62 50 PFTL31061 R0397A O 00 00 47 49 50 6--78 27 .'.tj 79 77 1[ 76 74 4 58 28 52 28 23 5 80 57 57 75 51 74 73 34 4"1- 23 71 66 21 12 20 13 14 15 16 18 25 17* 82 I 231 I 26 !
IIV 31 29 28 44 34 23 24 23 26 21 1 55 56 58 40 31 43 1 41`, 42 I 30 ! EXPLODED DRAWING-Model No. I 68 19 53 59 60 1 6 11 70 19 66 67 68 69 23 1 62 50 PFTL31061 R0397A O 00 00 47 49 50 6--78 27 .'.tj 79 77 1[ 76 74 4 58 28 52 28 23 5 80 57 57 75 51 74 73 34 4"1- 23 71 66 21 12 20 13 14 15 16 18 25 17* 82 I 231 I 26 !

English Manual
Page 19
... Left Upright/Handrail Screw Key/Clip Console Screw/Cover Screw Console Base Console Speed Potentiometer Speed Control Battery Cover Front Wheel Incline Leg Plate Motor Belt Motor Tension Bolt Motor Tension Washer Star Washer Reed Switch/Extension Wire Motor/Pulley/FlywheeVFan Pulley/Flywheel/Fan Incline Leg Cover Motor Small Screw Motor Hood Mounting Screw Controller Motor Pivot Bolt Anchor Screw Adhesive Clip Platform Screw Magnet Cage Nut Hood Anchor Cover Screw Frame Cover Cover Clip Choke Wire Harness Front Roller Adjustment Bolt Right Upright/Handrail Adjustment Washer Power Cord Strain...
... Left Upright/Handrail Screw Key/Clip Console Screw/Cover Screw Console Base Console Speed Potentiometer Speed Control Battery Cover Front Wheel Incline Leg Plate Motor Belt Motor Tension Bolt Motor Tension Washer Star Washer Reed Switch/Extension Wire Motor/Pulley/FlywheeVFan Pulley/Flywheel/Fan Incline Leg Cover Motor Small Screw Motor Hood Mounting Screw Controller Motor Pivot Bolt Anchor Screw Adhesive Clip Platform Screw Magnet Cage Nut Hood Anchor Cover Screw Frame Cover Cover Clip Choke Wire Harness Front Roller Adjustment Bolt Right Upright/Handrail Adjustment Washer Power Cord Strain...

