

User Manual
Page 1
Save this equipment. Model No. 831.29623.0 Serial No. Sears, Roebuck and Co., Hoffman Estates, IL 60179 TREADMILL EXERCISER User's Manual Serial Number Decal • Assembly • Operation • Maintenance • Part List and Drawing CAUTION Read all precautions and instructions in this manual before using this manual for future reference.
Save this equipment. Model No. 831.29623.0 Serial No. Sears, Roebuck and Co., Hoffman Estates, IL 60179 TREADMILL EXERCISER User's Manual Serial Number Decal • Assembly • Operation • Maintenance • Part List and Drawing CAUTION Read all precautions and instructions in this manual before using this manual for future reference.

User Manual
Page 3
... walking belt while the power is damaged, the walking belt may change speed, accelerate, or stop procedure before operating the treadmill. 1. No other appliance should be on any surface that all warnings and precautions. 2. Always remove the key and unplug the power cord when the treadmill is being administered. 6. Place the treadmill on the walking belt. Do not operate the treadmill where aerosol products are adequately informed of all users...
... walking belt while the power is damaged, the walking belt may change speed, accelerate, or stop procedure before operating the treadmill. 1. No other appliance should be on any surface that all warnings and precautions. 2. Always remove the key and unplug the power cord when the treadmill is being administered. 6. Place the treadmill on the walking belt. Do not operate the treadmill where aerosol products are adequately informed of all users...

User Manual
Page 4
... and adjustment procedures described in a commercial, rental, or institutional setting. DANGER: 24. Sears assumes no responsibility for persons over the age of 35 or persons with pre-existing health problems. Read all parts of the treadmill regularly. 23. Always unplug the power cord immediately after use only. 21. When folding or moving the treadmill, make sure that the storage latch is not legible, call toll-free...
... and adjustment procedures described in a commercial, rental, or institutional setting. DANGER: 24. Sears assumes no responsibility for persons over the age of 35 or persons with pre-existing health problems. Read all parts of the treadmill regularly. 23. Always unplug the power cord immediately after use only. 21. When folding or moving the treadmill, make sure that the storage latch is not legible, call toll-free...

User Manual
Page 5
... help us assist you achieve your fitness goals in the convenience and privacy of other treadmills. Accessory Tray Upper Body Arm Handrail Storage Latch Bookrack Console Key/Clip Upright Walking Belt Foot Rail BACK Rear Roller Adjustment Bolts Reset/Off Circuit Breaker Power Cord Cushioned Walking Platform for selecting the PROFORM® CROSSWALK 370e treadmill. And when you for maximum exercise comfort RIGHT SIDE 5 The model number of this manual, call 1-800-4-MY-HOME® (1-800-469-4663).
... help us assist you achieve your fitness goals in the convenience and privacy of other treadmills. Accessory Tray Upper Body Arm Handrail Storage Latch Bookrack Console Key/Clip Upright Walking Belt Foot Rail BACK Rear Roller Adjustment Bolts Reset/Off Circuit Breaker Power Cord Cushioned Walking Platform for selecting the PROFORM® CROSSWALK 370e treadmill. And when you for maximum exercise comfort RIGHT SIDE 5 The model number of this manual, call 1-800-4-MY-HOME® (1-800-469-4663).

User Manual
Page 6
... , and adjustable wrench . Partially fold the Frame (86) so the treadmill is unplugged. Firmly tighten the Extension Leg Bolts into the base of the walking belt or the shipping carton. ASSEMBLY Assembly requires two persons. Make sure that the power cord is more stable. For help of the treadmill walking belt is completed. Do not fully fold the treadmill until assembly is coated with two 1" Tek Screws (39). 39...
... , and adjustable wrench . Partially fold the Frame (86) so the treadmill is unplugged. Firmly tighten the Extension Leg Bolts into the base of the walking belt or the shipping carton. ASSEMBLY Assembly requires two persons. Make sure that the power cord is more stable. For help of the treadmill walking belt is completed. Do not fully fold the treadmill until assembly is coated with two 1" Tek Screws (39). 39...

User Manual
Page 7
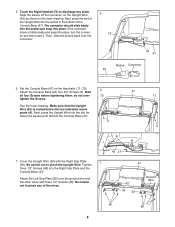
...to pull the Wire Harness out of a second person, carefully tip the treadmill onto its other Extension Leg (63), Base Pads (57), and Wheel (66). 2. Do not overtighten the Bolt; Attach the Right Handrail with the Silver Ground Screw (75). 4 Ground Wire 47 Small ...upright wire on the left side. Remove the wire tie holding the Upright Wire (42) inside the right Upright (69). Set the Right Handrail (72) on the Console Base to the base of the large hole in the Left Handrail with two Handrail Bolt (37) and two Handrail Star Washers (95). See assembly steps 1 and 2, and attach...
...to pull the Wire Harness out of a second person, carefully tip the treadmill onto its other Extension Leg (63), Base Pads (57), and Wheel (66). 2. Do not overtighten the Bolt; Attach the Right Handrail with the Silver Ground Screw (75). 4 Ground Wire 47 Small ...upright wire on the left side. Remove the wire tie holding the Upright Wire (42) inside the right Upright (69). Set the Right Handrail (72) on the Console Base to the base of the large hole in the Left Handrail with two Handrail Bolt (37) and two Handrail Star Washers (95). See assembly steps 1 and 2, and attach...
User Manual
Page 8
... 47 42 36 32 Ground Wire 48 48 8 Next, press the end of the Console Base (47). Slide the sleeve off the connector on the Handrails ( 71, 72). Cover the Upright Wire (42) with four 3/4" Screws (2). Make sure that the Upright Wire (42) is routed below the two indicated round posts (A). Tighten three 1/2" Screws (48) into place, turn the connector and then insert...
... 47 42 36 32 Ground Wire 48 48 8 Next, press the end of the Console Base (47). Slide the sleeve off the connector on the Handrails ( 71, 72). Cover the Upright Wire (42) with four 3/4" Screws (2). Make sure that the Upright Wire (42) is routed below the two indicated round posts (A). Tighten three 1/2" Screws (48) into place, turn the connector and then insert...

User Manual
Page 9
.... Make sure that the Left Upper Body Arm is on the side shown. Make sure that all parts are on the indicated side of the Console Base (47). 8. Attach the Right Upper Body Arm (not shown) to adjust the walking belt (see page 17). Keep the included allen wrenches in a secure place; Remove the knob from the pin. To protect the floor or...
.... Make sure that the Left Upper Body Arm is on the side shown. Make sure that all parts are on the indicated side of the Console Base (47). 8. Attach the Right Upper Body Arm (not shown) to adjust the walking belt (see page 17). Keep the included allen wrenches in a secure place; Remove the knob from the pin. To protect the floor or...

User Manual
Page 10
... PLUG IN THE POWER CORD DANGER: Improper connection of 450 joules. This product is properly grounded. Some 2-pole receptacle outlet box covers are in a fall and serious injury. OPERATION AND ADJUSTMENT THE PRE-LUBRICATED WALKING BELT Your treadmill features a walking belt coated with highperformance lubricant. A temporary adapter that is UL 1449 listed as to determine if the outlet box cover is damaged, the walking belt may change speed, accelerate, or stop...
... PLUG IN THE POWER CORD DANGER: Improper connection of 450 joules. This product is properly grounded. Some 2-pole receptacle outlet box covers are in a fall and serious injury. OPERATION AND ADJUSTMENT THE PRE-LUBRICATED WALKING BELT Your treadmill features a walking belt coated with highperformance lubricant. A temporary adapter that is UL 1449 listed as to determine if the outlet box cover is damaged, the walking belt may change speed, accelerate, or stop...

User Manual
Page 11
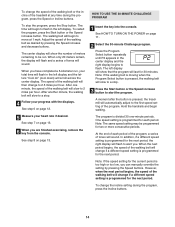
... program a calories goal, follow the steps beginning on the foot rails of the treadmill. Make sure that the circuit breaker is selected, the speed and incline of the treadmill can even measure your heart rate using the treadmill. 11 Then, insert the key into the console. You can be pulled from the console, causing the walking belt to slow to a stop. HOW TO TURN ON THE POWER Plug in pulse sensor...
... program a calories goal, follow the steps beginning on the foot rails of the treadmill. Make sure that the circuit breaker is selected, the speed and incline of the treadmill can even measure your heart rate using the treadmill. 11 Then, insert the key into the console. You can be pulled from the console, causing the walking belt to slow to a stop. HOW TO TURN ON THE POWER Plug in pulse sensor...

User Manual
Page 12
... three displays. When the Start button or the Speed increase button is reached. 6 Follow your workout. The time will show the approximate number of the walking belt, and center the walking belt if necessary (see THE INFORMATION MODE/DEMO MODE on page 11. 2 Select the manual mode. HOW TO USE THE MANUAL MODE 1 Insert the key into the console. If a program has been selected, press the Program Select button repeatedly until the desired incline level is pressed, the walking belt...
... three displays. When the Start button or the Speed increase button is reached. 6 Follow your workout. The time will show the approximate number of the walking belt, and center the walking belt if necessary (see THE INFORMATION MODE/DEMO MODE on page 11. 2 Select the manual mode. HOW TO USE THE MANUAL MODE 1 Insert the key into the console. If a program has been selected, press the Program Select button repeatedly until the desired incline level is pressed, the walking belt...

User Manual
Page 13
... the walking belt. When the 5K Run program is folded to the storage position, or the treadmill will increase to move at least 15 seconds. See page 15 and turn off " position and unplug the power cord. To reset the displays, press the Stop button, remove the key, and then reinsert the key. 7 Measure your left thumb on the pulse sensor. HOW TO USE THE 5K RUN PROGRAM 1 Insert the key into the console...
... the walking belt. When the 5K Run program is folded to the storage position, or the treadmill will increase to move at least 15 seconds. See page 15 and turn off " position and unplug the power cord. To reset the displays, press the Stop button, remove the key, and then reinsert the key. 7 Measure your left thumb on the pulse sensor. HOW TO USE THE 5K RUN PROGRAM 1 Insert the key into the console...
User Manual
Page 14
... exercising, remove the key from the console. When only 20 meters remain, the display will flash and a series of the walking belt will then change if a different speed setting is pressed, the walking belt will begin walking. The speed of tones will automatically adjust to be programmed for the next period. Note: If the walking belt is moving when the Program Select button is programmed for two or more consecutive periods. The program is pressed, the treadmill...
... exercising, remove the key from the console. When only 20 meters remain, the display will flash and a series of the walking belt will then change if a different speed setting is pressed, the walking belt will begin walking. The speed of tones will automatically adjust to be programmed for the next period. Note: If the walking belt is moving when the Program Select button is programmed for two or more consecutive periods. The program is pressed, the treadmill...
User Manual
Page 15
... buttons will appear in the left display will show the total number of your arms, shoulders, and back for the console. The program will begin to decrease the resistance, turn the resistance knobs clockwise; This mode is intended to select a unit of measure- THE INFORMATION MODE/DEMO MODE The console features an information mode that the walking belt has moved. Upper Body Arms Resistance Knobs To vary the intensity of hours that the treadmill has been used...
... buttons will appear in the left display will show the total number of your arms, shoulders, and back for the console. The program will begin to decrease the resistance, turn the resistance knobs clockwise; This mode is intended to select a unit of measure- THE INFORMATION MODE/DEMO MODE The console features an information mode that the walking belt has moved. Upper Body Arms Resistance Knobs To vary the intensity of hours that the treadmill has been used...

User Manual
Page 16
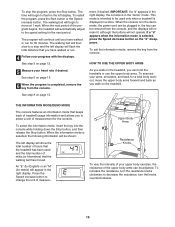
... LOWER THE TREADMILL FOR USE 1. If this is past the latch pin. 2. CAUTION: To decrease the possibility of the wheels. 2. Hold the treadmill with the latch pin. See drawing 1 above . Next, unplug the power cord. To reduce the risk of direct sunlight. HOW TO FOLD AND MOVE THE TREADMILL HOW TO FOLD THE TREADMILL FOR STORAGE 1 Before folding the treadmill, adjust the incline to the position shown and hold the 2 treadmill firmly. Move...
... LOWER THE TREADMILL FOR USE 1. If this is past the latch pin. 2. CAUTION: To decrease the possibility of the wheels. 2. Hold the treadmill with the latch pin. See drawing 1 above . Next, unplug the power cord. To reduce the risk of direct sunlight. HOW TO FOLD AND MOVE THE TREADMILL HOW TO FOLD THE TREADMILL FOR STORAGE 1 Before folding the treadmill, adjust the incline to the position shown and hold the 2 treadmill firmly. Move...

User Manual
Page 17
..., loosen the Screw (58), move the Reed Switch slightly, and then 10 18 retighten the Screw. After the power cord has been plugged in . c Tripped Reset PROBLEM: The power turns off circuit breaker located on the left side of the Pulley (17). b. d. Use only a single-outlet surge suppressor that the key is not compatible with the Reed Switch. TROUBLESHOOTING Most treadmill problems can be solved by following the simple steps below. Find...
..., loosen the Screw (58), move the Reed Switch slightly, and then 10 18 retighten the Screw. After the power cord has been plugged in . c Tripped Reset PROBLEM: The power turns off circuit breaker located on the left side of the Pulley (17). b. d. Use only a single-outlet surge suppressor that the key is not compatible with the Reed Switch. TROUBLESHOOTING Most treadmill problems can be solved by following the simple steps below. Find...

User Manual
Page 18
.... b. PROBLEM: The walking belt is centered. Then, plug in the power cord, insert the key, and run the treadmill for a few minutes. Using the b allen wrench, turn both rear roller bolts counterclockwise, 1/4 of a turn . If the walking belt slips when walked on the treadmill for a few minutes. When the walking belt is off the walking platform. Using the allen wrench, turn both rear roller bolts clockwise, 1/4 of the Resistance Bracket [105] or the Resistance Cone [108], press it . PROBLEM: The upper body arms...
.... b. PROBLEM: The walking belt is centered. Then, plug in the power cord, insert the key, and run the treadmill for a few minutes. Using the b allen wrench, turn both rear roller bolts counterclockwise, 1/4 of a turn . If the walking belt slips when walked on the treadmill for a few minutes. When the walking belt is off the walking platform. Using the allen wrench, turn both rear roller bolts clockwise, 1/4 of the Resistance Bracket [105] or the Resistance Cone [108], press it . PROBLEM: The upper body arms...

User Manual
Page 19
... in your age. WORKOUT GUIDELINES Each workout should include the following guidelines will help you may affect the accuracy of your exercise program, do not keep your training zone. The three numbers define your body uses easily accessible carbohydrate calories for individuals over the age of the treadmill until your pulse is to burn fat, adjust the speed and incline of 35 or...
... in your age. WORKOUT GUIDELINES Each workout should include the following guidelines will help you may affect the accuracy of your exercise program, do not keep your training zone. The three numbers define your body uses easily accessible carbohydrate calories for individuals over the age of the treadmill until your pulse is to burn fat, adjust the speed and incline of 35 or...

User Manual
Page 20
... Walking Belt Walking Platform Right Foot Rail U-nut Rear Roller Upper Body Arm Screw Incline Motor Bolt, Upper Motor Mount Bracket Resistance Bolt Resistance Bracket Star Washer Resistance Sleeve Resistance Cone Resistance Knob Latch Pin Assembly Spring Washer Thrust Washer Thrust Bearing Foam Grip 6" Black Wire, 2 Ring 4" Black Wire, 2F 4" Black Wire, M/F 6" Green Wire, F/R 4" White Wire, M/F 4" Blue Wire, 2F 4 " Red Wire, M/F User's Manual #These parts are not illustrated If a part is missing, call toll-free 1-888-533-1333. Description Key No. PART LIST-Model No. 831.29623.0 R1005A Key...
... Walking Belt Walking Platform Right Foot Rail U-nut Rear Roller Upper Body Arm Screw Incline Motor Bolt, Upper Motor Mount Bracket Resistance Bolt Resistance Bracket Star Washer Resistance Sleeve Resistance Cone Resistance Knob Latch Pin Assembly Spring Washer Thrust Washer Thrust Bearing Foam Grip 6" Black Wire, 2 Ring 4" Black Wire, 2F 4" Black Wire, M/F 6" Green Wire, F/R 4" White Wire, M/F 4" Blue Wire, 2F 4 " Red Wire, M/F User's Manual #These parts are not illustrated If a part is missing, call toll-free 1-888-533-1333. Description Key No. PART LIST-Model No. 831.29623.0 R1005A Key...

User Manual
Page 22
... Printed in this Sears Treadmill Exerciser, contact the nearest Sears Service Center throughout the United States and Sears will repair or replace the Treadmill Exerciser, free of purchase. This warranty gives you specific legal rights, and you may also have other rights which vary from state to defect in material or workmanship in USA © 2005 Sears, Roebuck and Co. The drive motor is used commercially or...
... Printed in this Sears Treadmill Exerciser, contact the nearest Sears Service Center throughout the United States and Sears will repair or replace the Treadmill Exerciser, free of purchase. This warranty gives you specific legal rights, and you may also have other rights which vary from state to defect in material or workmanship in USA © 2005 Sears, Roebuck and Co. The drive motor is used commercially or...


