

User Manual
Page 1
... Department Unit 4 Revie Road Industrial Estate Revie Road Beeston Leeds, LS118JG UK email: [email protected] CAUTION Read all precautions and instructions in this manual before using this manual for future reference. Class H Fitness Product Model No. Serial Number Decal QUESTIONS? If you have questions, or if there are committed to providing...
... Department Unit 4 Revie Road Industrial Estate Revie Road Beeston Leeds, LS118JG UK email: [email protected] CAUTION Read all precautions and instructions in this manual before using this manual for future reference. Class H Fitness Product Model No. Serial Number Decal QUESTIONS? If you have questions, or if there are committed to providing...

User Manual
Page 2
TABLE OF CONTENTS IMPORTANT PRECAUTIONS 3 BEFORE YOU BEGIN 5 ASSEMBLY 6 OPERATION AND ADJUSTMENT 9 HOW TO FOLD AND MOVE THE TREADMILL 13 TROUBLESHOOTING 15 CONDITIONING GUIDELINES 17 ORDERING REPLACEMENT PARTS Back Cover Note: An EXPLODED DRAWING and a PART LIST are attached in the centre of ICON Health & Fitness, Inc. 2 PROFORM is a registered trademark of this manual.
TABLE OF CONTENTS IMPORTANT PRECAUTIONS 3 BEFORE YOU BEGIN 5 ASSEMBLY 6 OPERATION AND ADJUSTMENT 9 HOW TO FOLD AND MOVE THE TREADMILL 13 TROUBLESHOOTING 15 CONDITIONING GUIDELINES 17 ORDERING REPLACEMENT PARTS Back Cover Note: An EXPLODED DRAWING and a PART LIST are attached in the centre of ICON Health & Fitness, Inc. 2 PROFORM is a registered trademark of this manual.

User Manual
Page 4
...Service Department to do so by an authorised service representative. nance and adjustment procedures described in this manual should be performed by or through the use the treadmill in the location shown. 4 Inspect and properly tighten all instructions before performing the mainte- Do not...pre-existing health problems. Read all parts of this manual). SAVE THESE INSTRUCTIONS The decals shown have been placed on the treadmill. DANGER: 23. Servicing other than the procedures in -home use , before cleaning the treadmill, and before using. Always unplug the power cord ...
...Service Department to do so by an authorised service representative. nance and adjustment procedures described in this manual should be performed by or through the use the treadmill in the location shown. 4 Inspect and properly tighten all instructions before performing the mainte- Do not...pre-existing health problems. Read all parts of this manual). SAVE THESE INSTRUCTIONS The decals shown have been placed on the treadmill. DANGER: 23. Servicing other than the procedures in -home use , before cleaning the treadmill, and before using. Always unplug the power cord ...

User Manual
Page 5
...Adjustment Bolts On/Off Switch Circuit Breaker RIGHT SIDE Cushioned Walking Platform for selecting the new PROFORM® 360 P treadmill. Before reading further, please familiarise yourself with innovative design to help us assist you 're not exercising, the ... model number and serial number before using the treadmill. BEFORE YOU BEGIN Congratulations for maximum exercise comfort 5 The 360 P treadmill combines advanced technology with the parts that are labelled in the convenience and privacy of this manual, please call our Customer Service Department at 08457...
...Adjustment Bolts On/Off Switch Circuit Breaker RIGHT SIDE Cushioned Walking Platform for selecting the new PROFORM® 360 P treadmill. Before reading further, please familiarise yourself with innovative design to help us assist you 're not exercising, the ... model number and serial number before using the treadmill. BEFORE YOU BEGIN Congratulations for maximum exercise comfort 5 The 360 P treadmill combines advanced technology with the parts that are labelled in the convenience and privacy of this manual, please call our Customer Service Department at 08457...
User Manual
Page 6
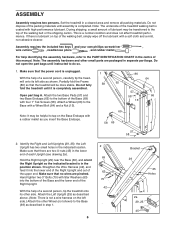
... may be helpful to the bottom of the packing materials until instructed to do so. 1. Make sure that the treadmill will be transferred to the Base (69) as described above. (Note: There is not a wire harness on top...so the indicated bracket is completed. Straighten the Wire Harness (42), and feed it is unplugged. Set the treadmill in the lower end of the walking belt, simply wipe off the lubricant with a rubber mallet as shown.... the lower end of the Right Upright and out of this manual. Make sure that no wires are packaged in the centre of the upper end.
... may be helpful to the bottom of the packing materials until instructed to do so. 1. Make sure that the treadmill will be transferred to the Base (69) as described above. (Note: There is not a wire harness on top...so the indicated bracket is completed. Straighten the Wire Harness (42), and feed it is unplugged. Set the treadmill in the lower end of the walking belt, simply wipe off the lubricant with a rubber mallet as shown.... the lower end of the Right Upright and out of this manual. Make sure that no wires are packaged in the centre of the upper end.

User Manual
Page 20
...: • The MODEL NUMBER of the product (PETL30130) • The NAME of the product (PROFORM® 360 P treadmill) • The SERIAL NUMBER of the product (see the front cover of this manual) • The KEY NUMBER and DESCRIPTION of this manual) Part No. 199796 R0304B Printed in the centre of the desired part(s) (see the...
...: • The MODEL NUMBER of the product (PETL30130) • The NAME of the product (PROFORM® 360 P treadmill) • The SERIAL NUMBER of the product (see the front cover of this manual) • The KEY NUMBER and DESCRIPTION of this manual) Part No. 199796 R0304B Printed in the centre of the desired part(s) (see the...

User Manual
Page 22
... 8" Blue Wire, 2F 4" Blue Wire, 2F 4" Black Wire, 2F 4" Black Wire, M/F 4" White Wire, M/F 8" White Wire, 2F 8" Green Wire, 2 Ring 8" Green Wire, F/Ring 6 " Red Wire, M/F User's Manual *Includes all parts shown in the box #These parts are not illustrated Description 48 1 49 2 50 1 51 1 52 1 53 2 54 2 55 2 56 1 57 2 58 12...
... 8" Blue Wire, 2F 4" Blue Wire, 2F 4" Black Wire, 2F 4" Black Wire, M/F 4" White Wire, M/F 8" White Wire, 2F 8" Green Wire, 2 Ring 8" Green Wire, F/Ring 6 " Red Wire, M/F User's Manual *Includes all parts shown in the box #These parts are not illustrated Description 48 1 49 2 50 1 51 1 52 1 53 2 54 2 55 2 56 1 57 2 58 12...


