
English Manual
Page 3
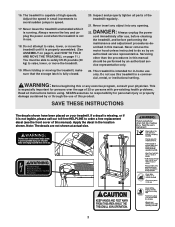
... injury or property damage sustained by or through the use this manual). This is intended for in-home use , before cleaning the treadmill, and before using. Inspect and properly tighten all instructions before performing the maintenance and adjustment procedures de- Never remove the motor hood ... actual size. 3 scribed in use. 18. DANGER: 22. vice representative only. 23. Do not use of high speeds. 16. The treadmill is running. Never insert any object into any exercise program, consult your treadmill. Always remove the key and unplug the power cord when the...
... injury or property damage sustained by or through the use this manual). This is intended for in-home use , before cleaning the treadmill, and before using. Inspect and properly tighten all instructions before performing the maintenance and adjustment procedures de- Never remove the motor hood ... actual size. 3 scribed in use. 18. DANGER: 22. vice representative only. 23. Do not use of high speeds. 16. The treadmill is running. Never insert any object into any exercise program, consult your treadmill. Always remove the key and unplug the power cord when the...
English Manual
Page 4
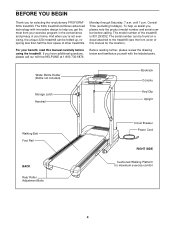
...(Bottle not included) Storage Latch Handrail Bookrack Console Key/Clip Upright Walking Belt Foot Rail BACK Rear Roller Adjustment Bolts Circuit Breaker Power Cord RIGHT SIDE Cushioned Walking Platform for selecting the revolutionary PROFORM® 320x treadmill. The serial number can be found on a ...decal attached to the treadmill (see the front cover of the treadmill is 831.293032. until 7 p.m. And when you , please note...
...(Bottle not included) Storage Latch Handrail Bookrack Console Key/Clip Upright Walking Belt Foot Rail BACK Rear Roller Adjustment Bolts Circuit Breaker Power Cord RIGHT SIDE Cushioned Walking Platform for selecting the revolutionary PROFORM® 320x treadmill. The serial number can be found on a ...decal attached to the treadmill (see the front cover of the treadmill is 831.293032. until 7 p.m. And when you , please note...
English Manual
Page 9
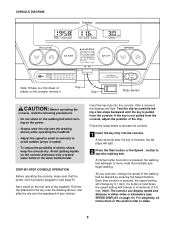
...begin to move. Follow the steps below to start the walking belt. A few steps backward until the key is pulled from the console, adjust the position of the treadmill. A moment after the key is not pulled from the console. if a button is pressed, the speed setting will change the ... will begin walking. Note: The console can display speed and distance in either miles or kilometers (see the drawing above ) while operating the treadmill. • Adjust the speed in small increments to miles. 9 STEP-BY-STEP CONSOLE OPERATION Before operating the console, make sure that the ...
...begin to move. Follow the steps below to start the walking belt. A few steps backward until the key is pulled from the console, adjust the position of the treadmill. A moment after the key is not pulled from the console. if a button is pressed, the speed setting will change the ... will begin walking. Note: The console can display speed and distance in either miles or kilometers (see the drawing above ) while operating the treadmill. • Adjust the speed in small increments to miles. 9 STEP-BY-STEP CONSOLE OPERATION Before operating the console, make sure that the ...
English Manual
Page 10
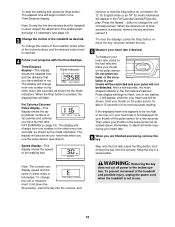
...desired. Time/Distance display-This display Mode Indicator shows the elapsed time and the distance that the treadmill is not in either of fat calories and calories you are finished exercising, remove the key. When the desired unit of the walking belt, and align it . Step onto the foot... thumb on the pulse sensor as shown by the mode indicators. Keep the key in the Time/Distance display. To stop the walking belt, press the Stop button. To change the unit of the treadmill, press either miles or kilometers. To change the incline of measurement, hold the...
...desired. Time/Distance display-This display Mode Indicator shows the elapsed time and the distance that the treadmill is not in either of fat calories and calories you are finished exercising, remove the key. When the desired unit of the walking belt, and align it . Step onto the foot... thumb on the pulse sensor as shown by the mode indicators. Keep the key in the Time/Distance display. To stop the walking belt, press the Stop button. To change the unit of the treadmill, press either miles or kilometers. To change the incline of measurement, hold the...
English Manual
Page 13
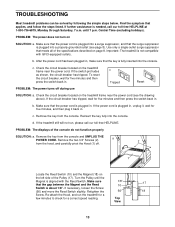
.... Re-attach the Hood, and run , please call our toll-free HELPLINE at 1-800-736-6879, Monday through Saturday, 7 a.m. Important: The treadmill is plugged in . Reinsert the key fully into the console. To reset the circuit breaker, wait for five minutes, and then plug it back in . TROUBLESHOOTING Most... treadmill problems can be solved by following the simple steps below. After the power cord has been plugged in, make sure that ...
.... Re-attach the Hood, and run , please call our toll-free HELPLINE at 1-800-736-6879, Monday through Saturday, 7 a.m. Important: The treadmill is plugged in . Reinsert the key fully into the console. To reset the circuit breaker, wait for five minutes, and then plug it back in . TROUBLESHOOTING Most... treadmill problems can be solved by following the simple steps below. After the power cord has been plugged in, make sure that ...

English Manual
Page 14
... a few minutes. Be careful to turn the left rear roller bolt clockwise 1/2 of a turn ; Plug in the power cord, insert the key, and run the treadmill for a few minutes. b 2"-3" Rear Roller Adjustment Bolts c. If the walking a belt has shifted to the left, use the allen wrench to... walked on , please call our toll-free HELPLINE. Plug in the power cord, insert the key, and run the treadmill for a few minutes. Be careful not to 3 inches off -center, first remove the key and UNPLUG THE POWER CORD. Using b the allen wrench, turn both rear roller adjustment bolts ...
... a few minutes. Be careful to turn the left rear roller bolt clockwise 1/2 of a turn ; Plug in the power cord, insert the key, and run the treadmill for a few minutes. b 2"-3" Rear Roller Adjustment Bolts c. If the walking a belt has shifted to the left, use the allen wrench to... walked on , please call our toll-free HELPLINE. Plug in the power cord, insert the key, and run the treadmill for a few minutes. Be careful not to 3 inches off -center, first remove the key and UNPLUG THE POWER CORD. Using b the allen wrench, turn both rear roller adjustment bolts ...
English Manual
Page 15
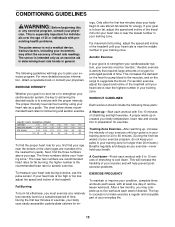
... minutes of exercise, your movement, may complete up increases your body temperature, heart rate and circulation in your cardiovascular system, the key to strengthen your training zone. This is especially important for individuals over the age of 35 or individuals with preexisting health problems. ...your exercise until your condition, complete three workouts each workout with at a relatively low intensity level for a sustained period of the treadmill until your goal is the recommended heart rate for you must be found by using your breath. The chart below shows recommended ...
... minutes of exercise, your movement, may complete up increases your body temperature, heart rate and circulation in your cardiovascular system, the key to strengthen your training zone. This is especially important for individuals over the age of 35 or individuals with preexisting health problems. ...your exercise until your condition, complete three workouts each workout with at a relatively low intensity level for a sustained period of the treadmill until your goal is the recommended heart rate for you must be found by using your breath. The chart below shows recommended ...
English Manual
Page 16
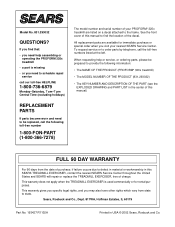
...or ordering parts, please be replaced, call the following information: • The NAME OF THE PRODUCT (PROFORM® 320x treadmill) • The MODEL NUMBER OF THE PRODUCT (831.293032) • The KEY NUMBER AND DESCRIPTION OF THE PART (see the EXPLODED DRAWING and PART LIST in the center of this manual...) FULL 90 DAY WARRANTY For 90 days from state to the frame. This warranty gives you specific legal rights, and you visit your PROFORM® 320x treadmill are available ...
...or ordering parts, please be replaced, call the following information: • The NAME OF THE PRODUCT (PROFORM® 320x treadmill) • The MODEL NUMBER OF THE PRODUCT (831.293032) • The KEY NUMBER AND DESCRIPTION OF THE PART (see the EXPLODED DRAWING and PART LIST in the center of this manual...) FULL 90 DAY WARRANTY For 90 days from state to the frame. This warranty gives you specific legal rights, and you visit your PROFORM® 320x treadmill are available ...
English Manual
Page 18
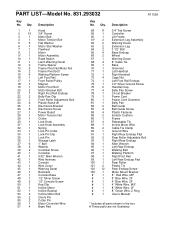
..., 2F 8" Green Wire, 2 Ring User's Manual * Includes all parts shown in the box # These parts are not illustrated PART LIST-Model No. 831.293032 R1102A Key No. Qty. 1 1 2 15 3 1 4 1 5 5 6 1 7 1 8 1 9* 1 10 1 11 1 12 2 13 5 14 2 15 4 16 1 17 1 18 1 19 1 20 2 21 1 22 2 23 1 24 4 25 1 26 6 27 1... Screw Crossbar 5/32" Allen Wrench Wire Harness Console Wire Cover Warning Decal Bookrack Console Base 1/2" Silver Screw 1/2" Console Screw Key/Clip Incline Motor Incline Bracket Incline Motor Bolt Clevis Pin Cotter Pin Motor Controller Wire Base Pad...
..., 2F 8" Green Wire, 2 Ring User's Manual * Includes all parts shown in the box # These parts are not illustrated PART LIST-Model No. 831.293032 R1102A Key No. Qty. 1 1 2 15 3 1 4 1 5 5 6 1 7 1 8 1 9* 1 10 1 11 1 12 2 13 5 14 2 15 4 16 1 17 1 18 1 19 1 20 2 21 1 22 2 23 1 24 4 25 1 26 6 27 1... Screw Crossbar 5/32" Allen Wrench Wire Harness Console Wire Cover Warning Decal Bookrack Console Base 1/2" Silver Screw 1/2" Console Screw Key/Clip Incline Motor Incline Bracket Incline Motor Bolt Clevis Pin Cotter Pin Motor Controller Wire Base Pad...


