
English Manual
Page 2
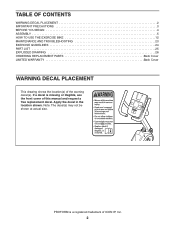
... DECAL PLACEMENT 2 IMPORTANT PRECAUTIONS 3 BEFORE YOU BEGIN 4 ASSEMBLY 5 HOW TO USE THE EXERCISE BIKE 12 MAINTENANCE AND TROUBLESHOOTING 23 EXERCISE GUIDELINES 24 PART LIST 25 EXPLODED DRAWING 26 ORDERING REPLACEMENT PARTS Back Cover LIMITED WARRANTY Back Cover WARNING DECAL PLACEMENT This drawing shows the location(s) of ICON IP, Inc. 2 PROFORM is missing or illegible, see the front cover of this manual and request a free replacement decal. If a decal is a registered trademark of...
... DECAL PLACEMENT 2 IMPORTANT PRECAUTIONS 3 BEFORE YOU BEGIN 4 ASSEMBLY 5 HOW TO USE THE EXERCISE BIKE 12 MAINTENANCE AND TROUBLESHOOTING 23 EXERCISE GUIDELINES 24 PART LIST 25 EXPLODED DRAWING 26 ORDERING REPLACEMENT PARTS Back Cover LIMITED WARRANTY Back Cover WARNING DECAL PLACEMENT This drawing shows the location(s) of ICON IP, Inc. 2 PROFORM is missing or illegible, see the front cover of this manual and request a free replacement decal. If a decal is a registered trademark of...
English Manual
Page 3
... this manual. 7. Keep the exercise bike indoors, away from the exercise bike at least 2 ft. (0.6 m) of the owner to protect the floor or carpet. Inspect and properly tighten all times. 8. Various factors, including the user's movement, may result in serious injury or death. Wear appropriate clothes while exercising; The exercise bike should not be used by or through the use of heart rate readings. The pulse sensor...
... this manual. 7. Keep the exercise bike indoors, away from the exercise bike at least 2 ft. (0.6 m) of the owner to protect the floor or carpet. Inspect and properly tighten all times. 8. Various factors, including the user's movement, may result in serious injury or death. Wear appropriate clothes while exercising; The exercise bike should not be used by or through the use of heart rate readings. The pulse sensor...
English Manual
Page 4
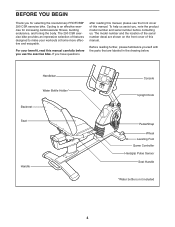
... Console Upright Knob Pedal/Strap Wheel Leveling Foot Game Controller Handgrip Pulse Sensor Seat Handle *Water bottle is an effective exercise for selecting the revolutionary PROFORM® 290 CSR exercise bike. If you for increasing cardiovascular fitness, building endurance, and toning the body. BEFORE YOU BEGIN Thank you have questions after reading this manual, please see the front cover of this manual. Before reading further, please familiarize yourself with the parts...
... Console Upright Knob Pedal/Strap Wheel Leveling Foot Game Controller Handgrip Pulse Sensor Seat Handle *Water bottle is an effective exercise for selecting the revolutionary PROFORM® 290 CSR exercise bike. If you for increasing cardiovascular fitness, building endurance, and toning the body. BEFORE YOU BEGIN Thank you have questions after reading this manual, please see the front cover of this manual. Before reading further, please familiarize yourself with the parts...
English Manual
Page 5
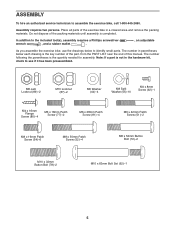
... a cleared area and remove the packing materials. Do not dispose of the packing materials until assembly is the quantity needed for assembly. ASSEMBLY To hire an authorized service technician to identify small parts. Place all parts of this manual. Note: If a part is the key number of the part, from the PART LIST near the end of the exercise bike in parentheses below to assemble the exercise bike, call 1-800...
... a cleared area and remove the packing materials. Do not dispose of the packing materials until assembly is the quantity needed for assembly. ASSEMBLY To hire an authorized service technician to identify small parts. Place all parts of this manual. Note: If a part is the key number of the part, from the PART LIST near the end of the exercise bike in parentheses below to assemble the exercise bike, call 1-800...
English Manual
Page 8
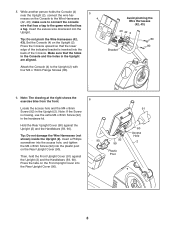
... hardware kit. Attach the Console (4) to the Wire Harnesses (42, 43); Insert a Phillips screwdriver into the access hole, and tighten the M4 x 8mm Screw (92) into the Rear Upright Cover (90). 6 90 92 59 Plastic Post 91 60 Access Hole 2 8 Press the tabs on the Front Upright Cover into the plastic post on the Rear Upright Cover (90). make sure to connect the console wire that has...
... hardware kit. Attach the Console (4) to the Wire Harnesses (42, 43); Insert a Phillips screwdriver into the access hole, and tighten the M4 x 8mm Screw (92) into the Rear Upright Cover (90). 6 90 92 59 Plastic Post 91 60 Access Hole 2 8 Press the tabs on the Front Upright Cover into the plastic post on the Rear Upright Cover (90). make sure to connect the console wire that has...
English Manual
Page 11
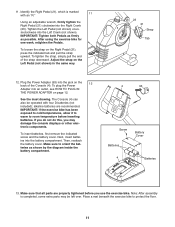
... this, you use the exercise bike. Then, reattach the battery cover. Make sure to orient the batteries as possible. See the inset drawing. Make sure that all parts are recommended. Note: After assembly is marked with four D batteries (not included); To insert batteries, first remove the indicated screw and the battery cover. 11. To tighten the strap, simply pull the end of the Console (4). Plug the Power Adapter (93) into...
... this, you use the exercise bike. Then, reattach the battery cover. Make sure to orient the batteries as possible. See the inset drawing. Make sure that all parts are recommended. Note: After assembly is marked with four D batteries (not included); To insert batteries, first remove the indicated screw and the battery cover. 11. To tighten the strap, simply pull the end of the Console (4). Plug the Power Adapter (93) into...
English Manual
Page 12
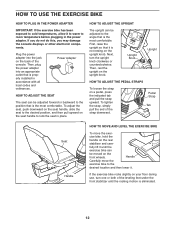
... a pedal, press the indicated tab and pull the strap upward. Then, plug the power adapter into the jack on the seat handle to lock the seat in place. Upright Knob Upright HOW TO ADJUST THE PEDAL STRAPS To loosen the strap on the rear stabilizer and care- To tighten the strap, simply pull the end of the leveling feet under the front stabilizer until the exercise bike can be moved on...
... a pedal, press the indicated tab and pull the strap upward. Then, plug the power adapter into the jack on the seat handle to lock the seat in place. Upright Knob Upright HOW TO ADJUST THE PEDAL STRAPS To loosen the strap on the rear stabilizer and care- To tighten the strap, simply pull the end of the leveling feet under the front stabilizer until the exercise bike can be moved on...
English Manual
Page 13
... there is plugged in or that the power adapter is a sheet of plastic on the display, remove the plastic. 13 iFit workouts control the resistance of the pedals while the voice of a personal trainer coaches you through your advantage! You can change the console settings, see pages 11 and 12). Or, use an iFit workout, see page 18. To use the manual mode of the console, you can even connect your MP3...
... there is plugged in or that the power adapter is a sheet of plastic on the display, remove the plastic. 13 iFit workouts control the resistance of the pedals while the voice of a personal trainer coaches you through your advantage! You can change the console settings, see pages 11 and 12). Or, use an iFit workout, see page 18. To use the manual mode of the console, you can even connect your MP3...
English Manual
Page 14
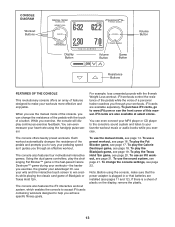
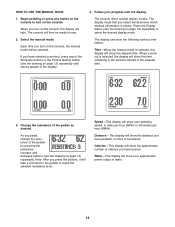
... following workout information: Time-When the manual mode is selected, this display will show your pedaling speed, in miles or kilometers. Change the resistance of the Workouts buttons or the Fitness Games button (see the drawing on the console to reach the selected resistance level. Distance-This display will show the approximate number of the pedals by pressing the resistance increase and decrease buttons (see the drawing on page 13) repeatedly. Press the Display button (see...
... following workout information: Time-When the manual mode is selected, this display will show your pedaling speed, in miles or kilometers. Change the resistance of the Workouts buttons or the Fitness Games button (see the drawing on the console to reach the selected resistance level. Distance-This display will show the approximate number of the pedals by pressing the resistance increase and decrease buttons (see the drawing on page 13) repeatedly. Press the Display button (see...
English Manual
Page 15
... the resistance settings for the workout. Be careful not to move for several minutes and the buttons are sheets of the console by pressing the Volume increase and decrease buttons. never use the handgrip pulse sensor (see step 5 below). Pulse-This display will show the resistance level of the pedals for a few seconds each time the resistance level changes. Resistance-This display will show your heart rate will show pedaling speed and distance in the display...
... the resistance settings for the workout. Be careful not to move for several minutes and the buttons are sheets of the console by pressing the Volume increase and decrease buttons. never use the handgrip pulse sensor (see step 5 below). Pulse-This display will show the resistance level of the pedals for a few seconds each time the resistance level changes. Resistance-This display will show your heart rate will show pedaling speed and distance in the display...
English Manual
Page 16
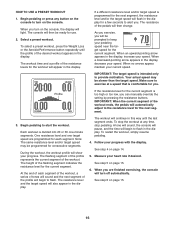
... pedaling to flash. During the workout, the workout profile will turn off automatically. Follow your progress. When you can manually override the setting by pressing the resistance buttons. Select a preset workout. Your actual speed may be prompted to the resistance level for the current segment is divided into 20 or 30 one target speed are finished exercising, the console will show your progress with the display...
... pedaling to flash. During the workout, the workout profile will turn off automatically. Follow your progress. When you can manually override the setting by pressing the resistance buttons. Select a preset workout. Your actual speed may be prompted to the resistance level for the current segment is divided into 20 or 30 one target speed are finished exercising, the console will show your progress with the display...
English Manual
Page 17
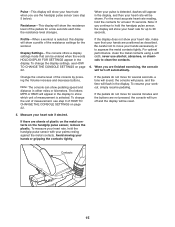
... right using the left controller. Your goal is flashing, press the up and down button on either controller to turn off automatically. The console will fall , giving you extra time to play that you have burned, and your pedaling speed will show the four highest scores recorded since the scores were reset. 4. The game will slowly move downward. Then, press the right button...
... right using the left controller. Your goal is flashing, press the up and down button on either controller to turn off automatically. The console will fall , giving you extra time to play that you have burned, and your pedaling speed will show the four highest scores recorded since the scores were reset. 4. The game will slowly move downward. Then, press the right button...
English Manual
Page 18
... game, press the Fitness Games button (see the drawing on either controller. 5. Between the drones and the laser blaster are finished exercising, the console will move downward. The console will move the laser blaster to reset the scores. If desired, press and hold down buttons on the handlebar to enter a name consisting of the display will appear. In addition, while you are pedaling, you...
... game, press the Fitness Games button (see the drawing on either controller. 5. Between the drones and the laser blaster are finished exercising, the console will move downward. The console will move the laser blaster to reset the scores. If desired, press and hold down buttons on the handlebar to enter a name consisting of the display will appear. In addition, while you are pedaling, you...
English Manual
Page 19
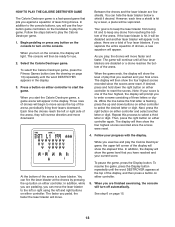
...display. The dealerʼs cards will appear in the upper left corner of the display. The game options will be ready for you want to start the game. When you win or lose credits during each game with the display. Repeat this hand. As you pedal... PLACE YOUR BET will light. After you turn on the console to play Blackjack, consult a card game rule book or other card game resource. 1. You will use . 2. While you compete against the dealer to win credits. To view additional exercise information, press the Display button repeatedly. 5. HOW TO PLAY THE BLACKJACK ...
...display. The dealerʼs cards will appear in the upper left corner of the display. The game options will be ready for you want to start the game. When you win or lose credits during each game with the display. Repeat this hand. As you pedal... PLACE YOUR BET will light. After you turn on the console to play Blackjack, consult a card game rule book or other card game resource. 1. You will use . 2. While you compete against the dealer to win credits. To view additional exercise information, press the Display button repeatedly. 5. HOW TO PLAY THE BLACKJACK ...
English Manual
Page 20
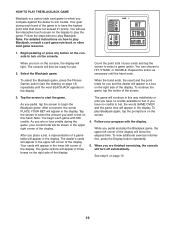
... in any combination of hole and community cards will turn off automatically. See step 6 on the console, the display will be shown below to a showdown. Begin pedaling or press any community cards on how to win credits. To select the Texas Hold ʼEm game, press the Fitness Games button (see the drawing on the console. The amount bet by the other...
... in any combination of hole and community cards will turn off automatically. See step 6 on the console, the display will be shown below to a showdown. Begin pedaling or press any community cards on how to win credits. To select the Texas Hold ʼEm game, press the Fitness Games button (see the drawing on the console. The amount bet by the other...
English Manual
Page 21
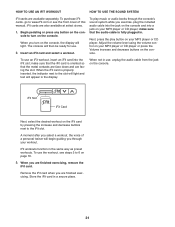
... that the audio cable is fully plugged in the same way as preset workouts. When you are finished exercising, remove the iFit card. To use the workout, see the front cover of a personal trainer will appear in the display. Begin pedaling or press any button on the console to the slot will light and text will begin guiding you through the consoleʼs sound system while you turn on the...
... that the audio cable is fully plugged in the same way as preset workouts. When you are finished exercising, remove the iFit card. To use the workout, see the front cover of a personal trainer will appear in the display. Begin pedaling or press any button on the console to the slot will light and text will begin guiding you through the consoleʼs sound system while you turn on the...

English Manual
Page 23
..., remove all the screws from each hole. CONSOLE TROUBLESHOOTING If the handgrip pulse sensor does not function properly, see assembly step 12 on page 15. To adjust the drive belt, you remove from the left front shield. Tighten the three screws. Turn the Pulley for a moment. Insert the shaft of the exercise bike until the Drive Belt (47) is aligned with the Reed Switch. Pull the top of the screwdriver toward the rear...
..., remove all the screws from each hole. CONSOLE TROUBLESHOOTING If the handgrip pulse sensor does not function properly, see assembly step 12 on page 15. To adjust the drive belt, you remove from the left front shield. Tighten the three screws. Turn the Pulley for a moment. Insert the shaft of the exercise bike until the Drive Belt (47) is aligned with the Reed Switch. Pull the top of the screwdriver toward the rear...
English Manual
Page 24
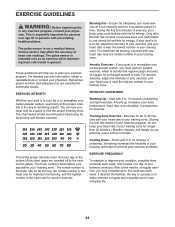
... Down-Finish with pre-existing health problems. The pulse sensor is near the lowest number in your cardiovascular system, exercising at least one day of exercise, your physician. EXERCISE FREQUENCY To maintain or improve your training zone. Remember, the key to five workouts each week, with your heart rate in general. The pulse sensor is the key to strengthen your training zone. EXERCISE INTENSITY Whether your goal is...
... Down-Finish with pre-existing health problems. The pulse sensor is near the lowest number in your cardiovascular system, exercising at least one day of exercise, your physician. EXERCISE FREQUENCY To maintain or improve your training zone. Remember, the key to five workouts each week, with your heart rate in general. The pulse sensor is the key to strengthen your training zone. EXERCISE INTENSITY Whether your goal is...
English Manual
Page 25
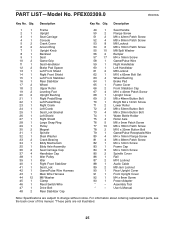
... Screw Lower Roller M8 x 53mm Button Bolt M6 x 20mm Button Bolt Water Bottle Holder Roller Axle M6 x 9mm Patch Screw M6 x 18mm Patch Screw M10 x 32mm Button Bolt Game/Pulse Receptacle/Wire M4 x 16mm Flange Screw M6 x 38mm Patch Screw M4 x 12mm Screw Frame Cap M4 x 19mm Screw Spindle Cover Rail M10 Locknut Audio Cable M8 Jam Locknut Rear Upright Cover Front Upright Cover M4 x 8mm Screw Power Adapter Assembly Tool Userʼs Manual Note: Specifications are not illustrated. 25 For information about ordering replacement parts...
... Screw Lower Roller M8 x 53mm Button Bolt M6 x 20mm Button Bolt Water Bottle Holder Roller Axle M6 x 9mm Patch Screw M6 x 18mm Patch Screw M10 x 32mm Button Bolt Game/Pulse Receptacle/Wire M4 x 16mm Flange Screw M6 x 38mm Patch Screw M4 x 12mm Screw Frame Cap M4 x 19mm Screw Spindle Cover Rail M10 Locknut Audio Cable M8 Jam Locknut Rear Upright Cover Front Upright Cover M4 x 8mm Screw Power Adapter Assembly Tool Userʼs Manual Note: Specifications are not illustrated. 25 For information about ordering replacement parts...
English Manual
Page 28
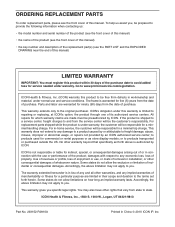
... key number and description of the replacement part(s) (see the front cover of this warranty is limited to repairing or replacing, at ICONʼs option, the product through one of its authorized service centers. Parts and labor are limited in -home service, the customer will be free from state to you . For in their scope and duration to provide the following information when contacting us assist you specific...
... key number and description of the replacement part(s) (see the front cover of this warranty is limited to repairing or replacing, at ICONʼs option, the product through one of its authorized service centers. Parts and labor are limited in -home service, the customer will be free from state to you . For in their scope and duration to provide the following information when contacting us assist you specific...

