
Uk Manual
Page 2
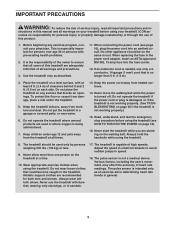
PROFORM is missing or illegible, call the telephone number on the front cover of this manual and request a free replacement decal. Apply the decal in the ... PLACEMENT 2 IMPORTANT PRECAUTIONS 3 BEFORE YOU BEGIN 5 ASSEMBLY 6 HOW TO USE THE CHEST PULSE SENSOR 15 OPERATION AND ADJUSTMENT 16 HOW TO FOLD AND MOVE THE TREADMILL 23 TROUBLESHOOTING 25 EXERCISE GUIDELINES 28 PART LIST 30 EXPLODED DRAWING 32 ORDERING REPLACEMENT PARTS Back Cover RECYCLING INFORMATION Back Cover WARNING DECAL PLACEMENT This...
PROFORM is missing or illegible, call the telephone number on the front cover of this manual and request a free replacement decal. Apply the decal in the ... PLACEMENT 2 IMPORTANT PRECAUTIONS 3 BEFORE YOU BEGIN 5 ASSEMBLY 6 HOW TO USE THE CHEST PULSE SENSOR 15 OPERATION AND ADJUSTMENT 16 HOW TO FOLD AND MOVE THE TREADMILL 23 TROUBLESHOOTING 25 EXERCISE GUIDELINES 28 PART LIST 30 EXPLODED DRAWING 32 ORDERING REPLACEMENT PARTS Back Cover RECYCLING INFORMATION Back Cover WARNING DECAL PLACEMENT This...
Uk Manual
Page 3
... and in sandals. 17. When replacing the fuse in general. 3 To protect the floor or carpet from heated surfaces. 14. The treadmill should be used or where oxygen is capable of heart rate readings. Athletic support clothes are adequately informed of all warnings on page 18)....same circuit. Various factors, including the user's movement, may affect the accuracy of high speeds. This is turned off. Do not put the treadmill in speed. 18. Never move the walking belt while the power is especially important for persons over age 35 or persons with bare feet, ...
... and in sandals. 17. When replacing the fuse in general. 3 To protect the floor or carpet from heated surfaces. 14. The treadmill should be used or where oxygen is capable of heart rate readings. Athletic support clothes are adequately informed of all warnings on page 18)....same circuit. Various factors, including the user's movement, may affect the accuracy of high speeds. This is turned off. Do not put the treadmill in speed. 18. Never move the walking belt while the power is especially important for persons over age 35 or persons with bare feet, ...
Uk Manual
Page 4
... the power cord immediately after use this manual should be able to safely lift 45 lbs. (20 kg) to the off position when the treadmill is not in this manual. Always remove the key, unplug the power cord, and switch the reset/off circuit breaker to raise, lower, or ...nance and adjustment procedures described in use only. less instructed to raise, lower, or move the treadmill. 21. This treadmill is properly assembled. (See ASSEMBLY on page 6, and HOW TO FOLD AND MOVE THE TREADMILL on page 23.) You must be performed by an authorized ser- Do not attempt to do so...
... the power cord immediately after use this manual should be able to safely lift 45 lbs. (20 kg) to the off position when the treadmill is not in this manual. Always remove the key, unplug the power cord, and switch the reset/off circuit breaker to raise, lower, or ...nance and adjustment procedures described in use only. less instructed to raise, lower, or move the treadmill. 21. This treadmill is properly assembled. (See ASSEMBLY on page 6, and HOW TO FOLD AND MOVE THE TREADMILL on page 23.) You must be performed by an authorized ser- Do not attempt to do so...
Uk Manual
Page 5
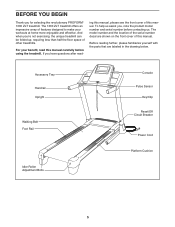
... Circuit Breaker Power Cord Platform Cushion 5 The model number and the location of this manual carefully before contacting us assist you for selecting the revolutionary PROFORM® 1300 ZLT treadmill. For your workouts at home more enjoyable and effective. ing this manual, please see the front cover of features designed to make your benefit..., read - To help us . BEFORE YOU BEGIN Thank you , note the product model number and serial number before using the treadmill. The 1300 ZLT treadmill offers an impressive array of this manual.
... Circuit Breaker Power Cord Platform Cushion 5 The model number and the location of this manual carefully before contacting us assist you for selecting the revolutionary PROFORM® 1300 ZLT treadmill. For your workouts at home more enjoyable and effective. ing this manual, please see the front cover of features designed to make your benefit..., read - To help us . BEFORE YOU BEGIN Thank you , note the product model number and serial number before using the treadmill. The 1300 ZLT treadmill offers an impressive array of this manual.

Uk Manual
Page 6
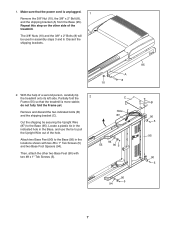
..., needlenose pliers , and scissors . The number in a cleared area and remove all packing materials. Set the treadmill in parentheses below to be assembled. Note: The underside of the treadmill walking belt is lubricant on top of this manual. To avoid damaging parts, do not use power tools for ...6 During shipping, some lubricant may be transferred to the top of the packing materials until assembly is normal and does not affect treadmill performance. ASSEMBLY Assembly requires two persons. This is completed. Do not dispose of the walking belt or the shipping carton.
..., needlenose pliers , and scissors . The number in a cleared area and remove all packing materials. Set the treadmill in parentheses below to be assembled. Note: The underside of the treadmill walking belt is lubricant on top of this manual. To avoid damaging parts, do not use power tools for ...6 During shipping, some lubricant may be transferred to the top of the packing materials until assembly is normal and does not affect treadmill performance. ASSEMBLY Assembly requires two persons. This is completed. Do not dispose of the walking belt or the shipping carton.
Uk Manual
Page 7
...the Base (95) in the locations shown with two #8 x 1" Tek Screws (5). Then, attach the other side of a second person, carefully tip 2 the treadmill onto its left side. Attach two Base Feet (90) to the Base (95). A 8 10 2. Remove and discard the two indicated bolts (B) and the...the power cord is more stable; Locate a plastic tie in the indicated hole in assembly steps 3 and 6. Discard the shipping brackets. Make sure that the treadmill is unplugged. 1 Remove the 3/8" Nut (10), the 3/8" x 2" Bolt (8), and the shipping bracket (A) from the Base (95). Repeat this step ...
...the Base (95) in the locations shown with two #8 x 1" Tek Screws (5). Then, attach the other side of a second person, carefully tip 2 the treadmill onto its left side. Attach two Base Feet (90) to the Base (95). A 8 10 2. Remove and discard the two indicated bolts (B) and the...the power cord is more stable; Locate a plastic tie in the indicated hole in assembly steps 3 and 6. Discard the shipping brackets. Make sure that the treadmill is unplugged. 1 Remove the 3/8" Nut (10), the 3/8" x 2" Bolt (8), and the shipping bracket (A) from the Base (95). Repeat this step ...
Uk Manual
Page 9
... Bolts yet. 7 85 11 87 14 91 6. Do not overtighten the Nut; Tighten the 3/8" x 4 1/4" Patch Bolts (7) until the heads of a second person, carefully tip the treadmill onto its right side. Partially fold the Frame (55) so that you removed in step 1. Insert a 3/8" x 4 1/4" 5 Patch Bolt (7) with a second Bolt Spacer (14), 3/8" x 4 1/4" Patch...Upright (85) against the Right Upright Spacer (91). Be careful not to the Base (95) with the 3/8" x 2" Bolt (8) and the 3/8" Nut (10) that the treadmill is more stable; Remove and discard the two indicated bolts (B) and the shipping bracket (C).
... Bolts yet. 7 85 11 87 14 91 6. Do not overtighten the Nut; Tighten the 3/8" x 4 1/4" Patch Bolts (7) until the heads of a second person, carefully tip the treadmill onto its right side. Partially fold the Frame (55) so that you removed in step 1. Insert a 3/8" x 4 1/4" 5 Patch Bolt (7) with a second Bolt Spacer (14), 3/8" x 4 1/4" Patch...Upright (85) against the Right Upright Spacer (91). Be careful not to the Base (95) with the 3/8" x 2" Bolt (8) and the 3/8" Nut (10) that the treadmill is more stable; Remove and discard the two indicated bolts (B) and the shipping bracket (C).

Uk Manual
Page 10
... Bolts, and then tighten them. Repeat this step with four 1/4" x 1 1/4" Patch Bolts (9) and four 1/4" Star Washers (12). With the help of a second person, tip the treadmill so that the wire tie does not fall into the Right Upright. Attach the Console Frame with a second Bolt Spacer (14), 3/8" x 4 1/4" Patch Bolt (7), and 3/8" Star...
... Bolts, and then tighten them. Repeat this step with four 1/4" x 1 1/4" Patch Bolts (9) and four 1/4" Star Washers (12). With the help of a second person, tip the treadmill so that the wire tie does not fall into the Right Upright. Attach the Console Frame with a second Bolt Spacer (14), 3/8" x 4 1/4" Patch Bolt (7), and 3/8" Star...
Uk Manual
Page 14
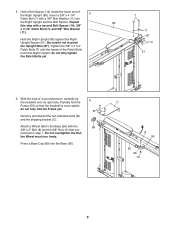
... on page 24). 15 55 10 8 Latch Knob 51 Large Barrel 109 95 10 8 16. To protect the floor or carpet, place a mat under the treadmill. 15. Attach the Latch Bracket (109) and Storage Latch (51) to align the Storage Latch with two 3/8" x 2" Bolts (8) and two 3/8" Nuts (10). Note: It ... the position shown. the hex key is completed. Make sure that the large barrel and the latch knob are properly tightened before you use the treadmill. Orient the Storage Latch (51) so that all parts are oriented as shown. Attach the upper end of plastic on the Frame (55) with a 3/8" x 2" ...
... on page 24). 15 55 10 8 Latch Knob 51 Large Barrel 109 95 10 8 16. To protect the floor or carpet, place a mat under the treadmill. 15. Attach the Latch Bracket (109) and Storage Latch (51) to align the Storage Latch with two 3/8" x 2" Bolts (8) and two 3/8" Nuts (10). Note: It ... the position shown. the hex key is completed. Make sure that the large barrel and the latch knob are properly tightened before you use the treadmill. Orient the Storage Latch (51) so that all parts are oriented as shown. Attach the upper end of plastic on the Frame (55) with a 3/8" x 2" ...
Uk Manual
Page 15
... of the walking belt. Return the sensor unit to work with the console. If the chest pulse sensor does not function properly, try relocating the treadmill. 15 For the console to display heart rate readings, the user must be within armʼs length of the console. • The chest pulse... chest pulse sensor is removed and the electrode areas are covered by high power lines or other container that you walk or run on the treadmill, position yourself near the center of time; Do not store the chest pulse sensor in one end of the chest strap, if necessary. ...
... of the walking belt. Return the sensor unit to work with the console. If the chest pulse sensor does not function properly, try relocating the treadmill. 15 For the console to display heart rate readings, the user must be within armʼs length of the console. • The chest pulse... chest pulse sensor is removed and the electrode areas are covered by high power lines or other container that you walk or run on the treadmill, position yourself near the center of time; Do not store the chest pulse sensor in one end of the chest strap, if necessary. ...
Uk Manual
Page 16
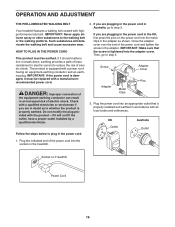
... or serviceman if you are plugging in the power cord in doubt as shown. If you are in the UK, first press the pins on Treadmill Power Cord 16 Then, go to step 3. IMPORTANT: Never apply silicone spray or other substances to plug in Australia, go to step 3. HOW TO ... in the power cord in the power cord. 2. Screw Adapter Cover Pins Adapter Metal Clips 3. Socket on the power cord into the socket on the treadmill. Do not modify the plug provided with a power cord having an equipment-earthing conductor and an earthing plug. Close the adapter cover over the end...
... or serviceman if you are plugging in the power cord in doubt as shown. If you are in the UK, first press the pins on Treadmill Power Cord 16 Then, go to step 3. IMPORTANT: Never apply silicone spray or other substances to plug in Australia, go to step 3. HOW TO ... in the power cord in the power cord. 2. Screw Adapter Cover Pins Adapter Metal Clips 3. Socket on the power cord into the socket on the treadmill. Do not modify the plug provided with a power cord having an equipment-earthing conductor and an earthing plug. Close the adapter cover over the end...
Uk Manual
Page 17
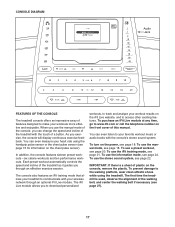
...you through an optional iFit Live module. You can change the speed and incline of the treadmill with the touch of a button. Each preset workout automatically controls the speed and incline of the treadmill as it guides you exercise, the console will display continuous exercise feedback. To use a ...on the front cover of this manual. CONSOLE DIAGRAM Audio Jack FEATURES OF THE CONSOLE The treadmill console offers an impressive array of features designed to make your heart rate using the treadmill. To prevent damage to www.ifit.com or call the telephone number on the power,...
...you through an optional iFit Live module. You can change the speed and incline of the treadmill with the touch of a button. Each preset workout automatically controls the speed and incline of the treadmill as it guides you exercise, the console will display continuous exercise feedback. To use a ...on the front cover of this manual. CONSOLE DIAGRAM Audio Jack FEATURES OF THE CONSOLE The treadmill console offers an impressive array of features designed to make your heart rate using the treadmill. To prevent damage to www.ifit.com or call the telephone number on the power,...
Uk Manual
Page 18
... by pressing the Speed increase and decrease buttons. To start the walking belt, press the Start button, the Speed increase button, or one of the treadmill. See HOW TO TURN ON THE POWER at the right), and slide the clip securely onto the Key waistband of the buttons, the speed setting... setting. If you do not do this manual refer to Clip the key (see THE INFORMATION MODE on . Plug in a store. Next, stand on the treadmill frame near the power cord. IM- To find which unit of 0.5 Km/H. To select the manual mode, use the increase and decrease buttons next to...
... by pressing the Speed increase and decrease buttons. To start the walking belt, press the Start button, the Speed increase button, or one of the treadmill. See HOW TO TURN ON THE POWER at the right), and slide the clip securely onto the Key waistband of the buttons, the speed setting... setting. If you do not do this manual refer to Clip the key (see THE INFORMATION MODE on . Plug in a store. Next, stand on the treadmill frame near the power cord. IM- To find which unit of 0.5 Km/H. To select the manual mode, use the increase and decrease buttons next to...
Uk Manual
Page 19
...number of calories you press one of which workout information is detected, your heart rate will be at the lowest setting when you fold the treadmill to 10. As you are clean. Note: If you may wear prematurely. 4. The display mode that your heart rate accurately. To ...select the desired display mode, press the Display button repeatedly. Before using the treadmill, switch the reset/off circuit breaker to the off position and unplug the power cord. In addition, make sure that you select will determine...
...number of calories you press one of which workout information is detected, your heart rate will be at the lowest setting when you fold the treadmill to 10. As you are clean. Note: If you may wear prematurely. 4. The display mode that your heart rate accurately. To ...select the desired display mode, press the Display button repeatedly. Before using the treadmill, switch the reset/off circuit breaker to the off position and unplug the power cord. In addition, make sure that you select will determine...
Uk Manual
Page 20
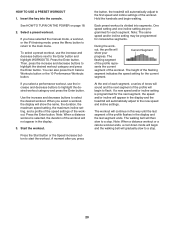
... Press the Enter button. Then, press the increase and decrease buttons to select the desired workout. If you press the button, the treadmill will automatically adjust to the new speed and incline settings. One speed setting and one incline setting are programmed for the current segment. Note... decrease buttons next to a stop . 20 Each preset workout is selected, the duration of the profile flashes in the display and the treadmill will begin to the main menu. If a new speed and/or incline setting is programmed for consecutive segments. Start the workout. See ...
... Press the Enter button. Then, press the increase and decrease buttons to select the desired workout. If you press the button, the treadmill will automatically adjust to the new speed and incline settings. One speed setting and one incline setting are programmed for the current segment. Note... decrease buttons next to a stop . 20 Each preset workout is selected, the duration of the profile flashes in the display and the treadmill will begin to the main menu. If a new speed and/or incline setting is programmed for consecutive segments. Start the workout. See ...
Uk Manual
Page 21
...during the workout, you will burn during the workout, the number of the workout begins, the treadmill will begin to move at any time, go to the Enter button and highlight IFIT TRAINING. ...telephone number on page 19. 5. See step 5 on the front cover of the workout begins, the treadmill will be affected. When the next segment of this manual. For example, you burn will depend on.... When you burn will automatically adjust to communicate with the display. Measure your treadmill to the speed and incline settings for the next segment. In addition, if you manually change ...
...during the workout, you will burn during the workout, the number of the workout begins, the treadmill will begin to move at any time, go to the Enter button and highlight IFIT TRAINING. ...telephone number on page 19. 5. See step 5 on the front cover of the workout begins, the treadmill will be affected. When the next segment of this manual. For example, you burn will depend on.... When you burn will automatically adjust to communicate with the display. Measure your treadmill to the speed and incline settings for the next segment. In addition, if you manually change ...
Uk Manual
Page 22
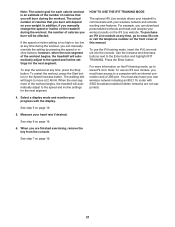
... plugged in, the display will function normally when you plug in the power cord, switch the reset/off circuit breaker to be used if the treadmill is displayed in a store. To select the information mode, hold down the Stop button, insert the key into a jack on , the word ON will not... contrast level of the display. Make sure that the audio wire is selected, the following information will show the total number of kilometers that the treadmill has been used and allows you to select miles or kilometers to measure distance, and to the console. The display will show the words "NO...
... plugged in, the display will function normally when you plug in the power cord, switch the reset/off circuit breaker to be used if the treadmill is displayed in a store. To select the information mode, hold down the Stop button, insert the key into a jack on , the word ON will not... contrast level of the display. Make sure that the audio wire is selected, the following information will show the total number of kilometers that the treadmill has been used and allows you to select miles or kilometers to measure distance, and to the console. The display will show the words "NO...
Uk Manual
Page 23
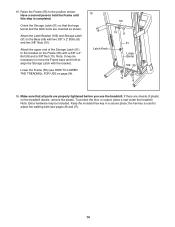
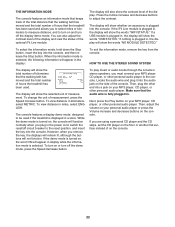
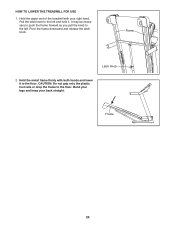
... wheels. 2. Hold the metal frame firmly in the storage position. Do not pull back on the wheels. Frame Handrail Wheel 23 Tip the treadmill back until the latch knob locks into the storage position. Do not attempt to the desired location. Make sure to the vertical position. 2....Hold a handrail and the frame and place one of injury, use extreme caution while moving the treadmill, convert the treadmill to the storage position as you fold it back. Never move the treadmill without tipping it . Raise the frame until it is resting in the location shown by the ...
... wheels. 2. Hold the metal frame firmly in the storage position. Do not pull back on the wheels. Frame Handrail Wheel 23 Tip the treadmill back until the latch knob locks into the storage position. Do not attempt to the desired location. Make sure to the vertical position. 2....Hold a handrail and the frame and place one of injury, use extreme caution while moving the treadmill, convert the treadmill to the storage position as you fold it back. Never move the treadmill without tipping it . Raise the frame until it is resting in the location shown by the ...
Uk Manual
Page 24
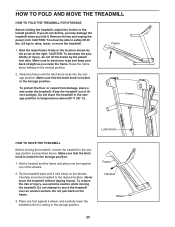
Hold the metal frame firmly with your back straight. Pivot the frame downward and release the latch knob. Frame 24 CAUTION: Do not grip only the plastic foot rails or drop the frame to the floor. Pull the latch knob to the left . Frame Latch Knob 2. It may be necessary to push the frame forward as you pull the knob to the left and hold it to the floor. Bend your legs and keep your right hand. HOW TO LOWER THE TREADMILL FOR USE 1. Hold the upper end of the treadmill with both hands and lower it .
Hold the metal frame firmly with your back straight. Pivot the frame downward and release the latch knob. Frame 24 CAUTION: Do not grip only the plastic foot rails or drop the frame to the floor. Pull the latch knob to the left . Frame Latch Knob 2. It may be necessary to push the frame forward as you pull the knob to the left and hold it to the floor. Bend your legs and keep your right hand. HOW TO LOWER THE TREADMILL FOR USE 1. Hold the upper end of the treadmill with both hands and lower it .
Uk Manual
Page 25
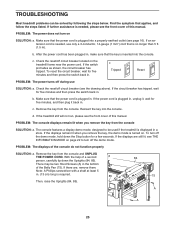
... mode, hold down the Uprights (84, 85). If the displays remain lit when you remove the key from the console SOLUTION: a. To turn on the treadmill frame near the power cord. If there are still lit, see the front cover of this manual. Check the reset/off circuit breaker (see the... solved by following the steps below. c. Remove the key from the console and UNPLUG THE POWER CORD. Reinsert the key into the console. If the treadmill still will not run, please see the drawing above). PROBLEM: The console displays remain lit when you remove the key, the demo mode is inserted...
... mode, hold down the Uprights (84, 85). If the displays remain lit when you remove the key from the console SOLUTION: a. To turn on the treadmill frame near the power cord. If there are still lit, see the front cover of this manual. Check the reset/off circuit breaker (see the... solved by following the steps below. c. Remove the key from the console and UNPLUG THE POWER CORD. Reinsert the key into the console. If the treadmill still will not run, please see the drawing above). PROBLEM: The console displays remain lit when you remove the key, the demo mode is inserted...


